Forward Pod Play with Offload Option
Master the forward pod drive with an aggressive offload option to punch through the gain line and exploit defensive gaps.

Equipment Needed
Overview
The forward pod is a staple of modern rugby attacking structures. It is designed to create go-forward ball, suck in defenders, and generate quick ruck ball. This specific play introduces a dynamic offload option. When the ball carrier commits multiple defenders and manages to keep their arms free, a well-timed offload to a trailing support runner can completely break the defensive line. Use this play when you have identified a soft shoulder in the opposition's defensive line or when you need to change the point of attack quickly.
Setup
- Equipment Needed: 1 rugby ball, 10-15 cones to mark the pitch and defensive line, hit shields (optional for defenders).
- Pitch Setup: Use a standard 100m x 70m pitch or a marked 40m x 40m grid for training. Mark the gain line clearly with cones.
- Player Positions:
- Attacking Team: 9 (Scrum-half), 2 (Hooker - Ball Carrier), 4 (Lock - Latch/Support), 6 (Flanker - Latch/Support), 8 (Number Eight - Cleanup/Support), 12 (Inside Centre - Offload Receiver), 10 (Fly-half - Second Receiver).
- Defending Team: 3-4 defenders (e.g., 6, 7, 8) positioned 1m beyond the gain line.
Step-by-Step Instructions
Phase 1: The Pod Setup and Drive
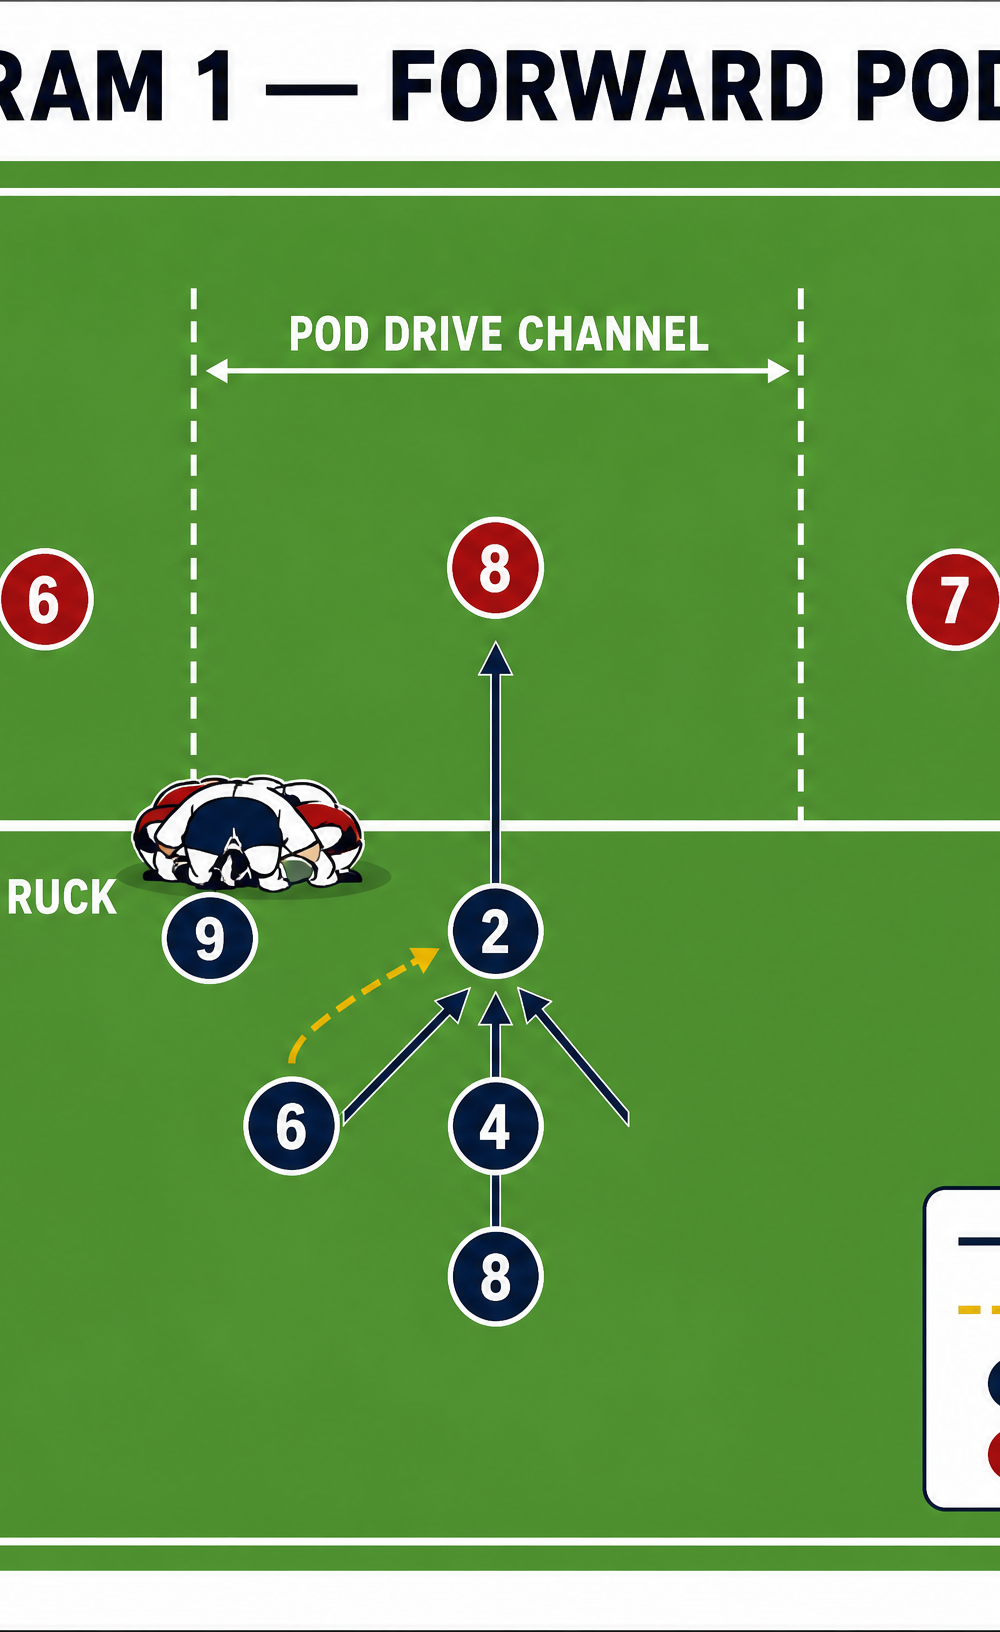
- The Setup: The 9 positions at the base of the ruck. The forward pod (2, 4, 6) sets up flat, approximately 2m to the right of the 9 and slightly behind the gain line. The 8 positions 2m behind the pod.
- The Call: The 9 makes the call to initiate the play.
- The Run: The 2 (ball carrier) runs a hard, direct line straight at the gain line, targeting the inside shoulder of a specific defender (e.g., the defending 6).
- The Pass: The 9 delivers a crisp, flat pass to the 2.
- The Latch: As the 2 receives the ball, the 4 and 6 bind tightly onto the 2's hips/shoulders to provide a strong driving wedge.
- The Contact: The pod drives into contact, aiming to cross the gain line.
Phase 2: The Offload and Support
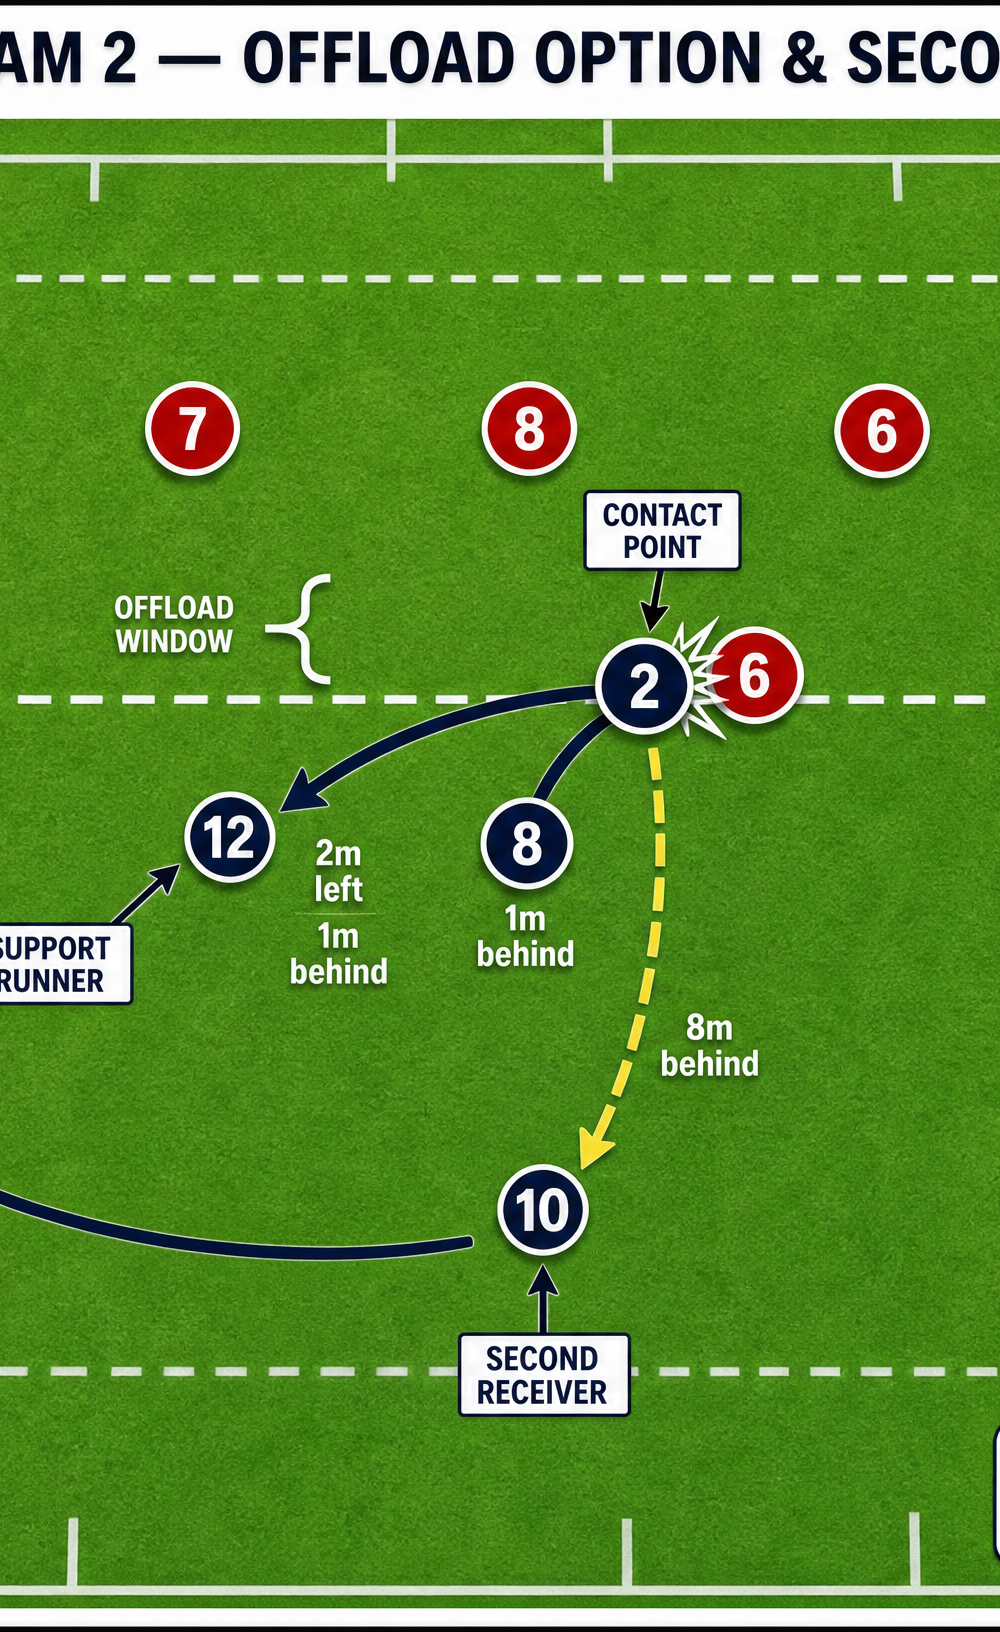
7. The Offload Window: As the 2 makes contact and draws in the defender(s), they must fight to keep their arms free and the ball available.
8. The Support Run: The 12 (Inside Centre) anticipates the contact and runs a hard, aggressive support line 2m to the left and 1m behind the 2, exploiting the gap left by the committed defender.
9. The Offload: The 2 executes a quick, accurate offload pass to the 12.
10. The Break: The 12 accelerates through the gap, breaking the defensive line.
11. Alternative Options: If the offload is not on, the 2 goes to ground, the 4 and 6 secure the ruck, and the 8 arrives as the cleanup option. Alternatively, the 2 can pass back to the 10 (Fly-half) positioned 8m behind as a second receiver.
Key Coaching Points
- Depth and Pace: The pod must set up with enough depth to hit the line at pace. A static pod is easily stopped.
- Body Height: The ball carrier (2) must enter contact with a low body height and a strong leg drive.
- Ball Presentation: The ball carrier must fight to keep the ball away from the defender's grasp to allow for the offload.
- Support Timing: The support runner (12) must time their run perfectly—too early and they overrun the pass, too late and the gap closes.
- Communication: Clear communication between the 9, the pod, and the support runners is essential.
Common Mistakes
- Running Too High: The ball carrier enters contact upright, making it easy for the defender to wrap the ball and prevent the offload.
- Static Support: The support runner waits for the offload instead of anticipating it and running onto the ball at pace.
- Forcing the Offload: The ball carrier tries to force an offload when it's not on, resulting in a knock-on or interception. Teach players to take the tackle and secure the ruck if the offload isn't clear.
- Poor Latching: The supporting forwards (4, 6) fail to bind tightly, reducing the driving power of the pod.
Variations & Progressions
- Progression 1 (Adding Pressure): Introduce live defenders with hit shields, gradually increasing the intensity of the contact.
- Progression 2 (Multiple Options): Have the 12 run a decoy line and the 13 run the actual support line for the offload.
- Variation 1 (Blindside Attack): Run the same pod structure but attack the blindside instead of the openside.
Age Adaptations
- Under 8 - Under 10: Focus on the basic pass from the 9 to a single runner. Emphasise running straight and holding onto the ball in contact. Offloads are not recommended at this age.
- Under 12 - Under 14: Introduce the pod structure (3 players). Focus on the latching and driving mechanics. Begin introducing the concept of the offload in controlled, low-contact scenarios.
- Under 16 - Open: Full implementation of the play with live contact, multiple support options, and decision-making under pressure.

