The Hammer Pod: Forward Carry with Dynamic Offload Option
Master the art of the 3-man forward pod to generate quick ball, break the gainline, and unleash your backline through targeted offloading.

Equipment Needed
1. Overview
The 'Hammer Pod' with an offload option is a foundational attacking structure designed to get your team over the gainline and generate lightning-quick ball (LQB). By organizing forwards into tight 3-man pods off the scrum-half (9), you force the defense to commit multiple tacklers to the point of contact. The primary objective is a dominant carry. However, the true weapon of this play is the pre-called offload option. When the ball carrier wins the collision, the immediate support players are positioned to receive an offload, bypassing the ruck entirely and exploiting a retreating defense.
This play is highly effective when playing off a lineout, a slow ruck, or when trying to reset your attacking shape in the middle of the field.
2. Setup
- Pitch Area: Can be run anywhere, but highly effective between the 15m lines to provide attacking options on both sides.
- Players Required: Minimum 7 (Scrum-half, Fly-half, 3-man forward pod, 2 backs/additional forwards for wide options).
- Equipment: 1 Rugby ball, 4 cones to mark the defensive line, tackle shields (optional for opposed practice).
Player Positioning
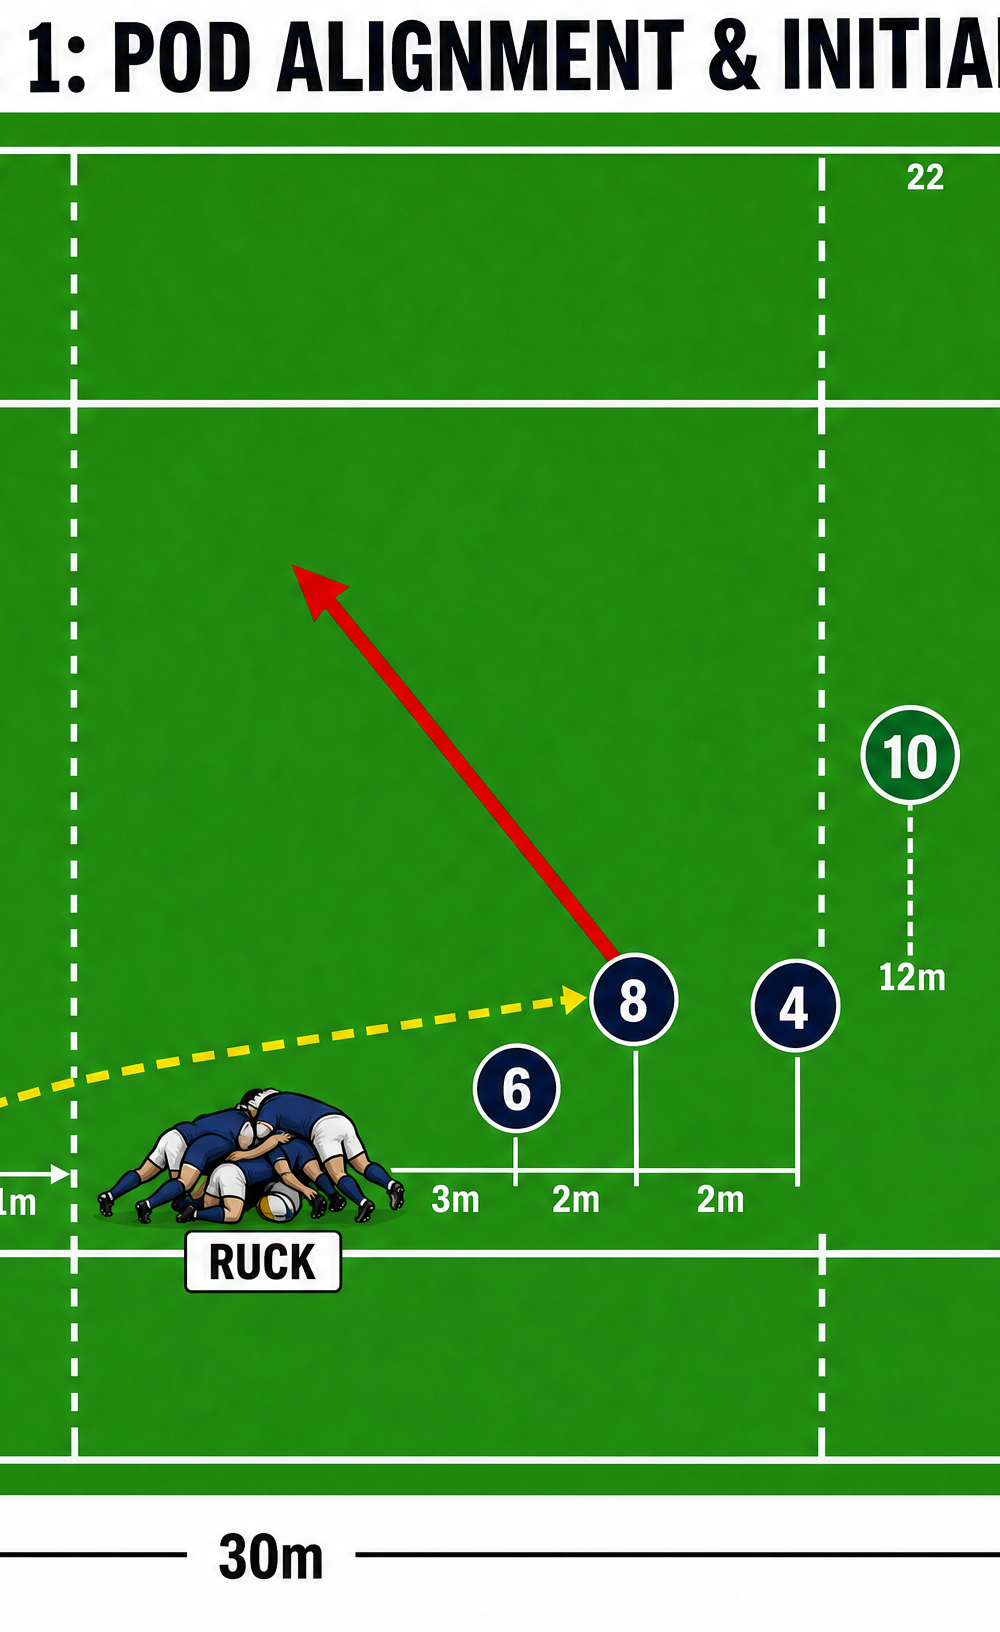
- Scrum-half (9): At the base of the ruck/set-piece.
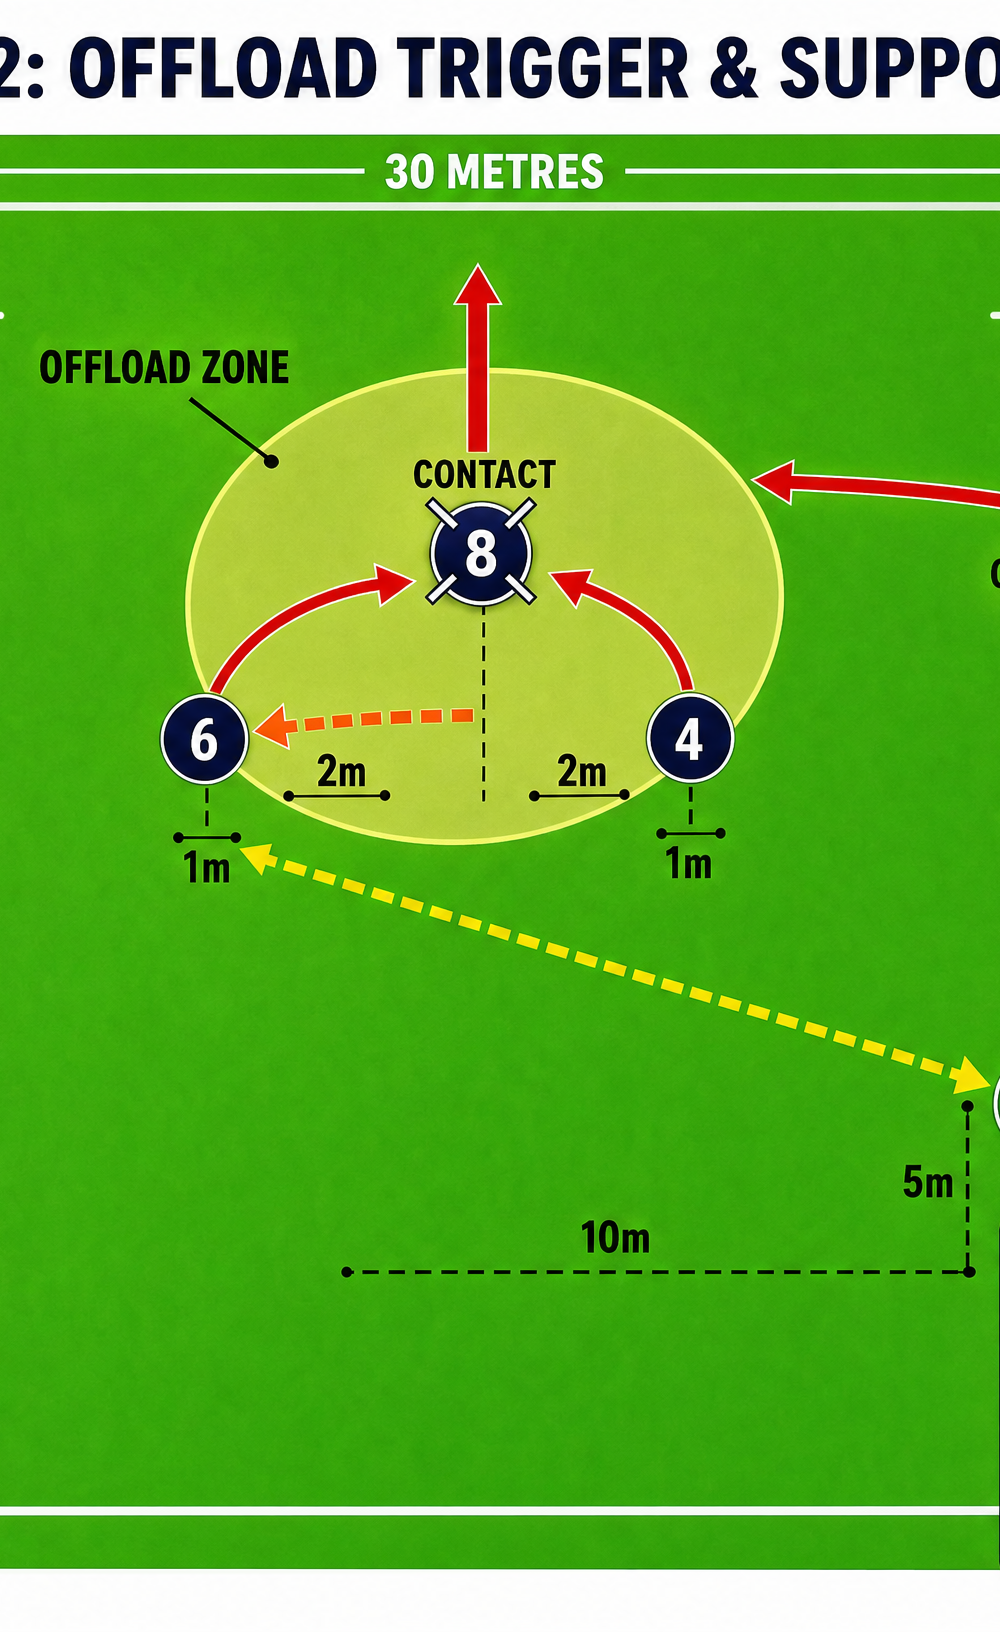
- The Pod (e.g., 6, 8, 4): Positioned 3 to 5 metres off the ruck. The central player (8) is the primary ball carrier. The inside support (6) is on the ball carrier's inside shoulder, 1 metre deep. The outside support (4) is on the outside shoulder, 1 metre deep.
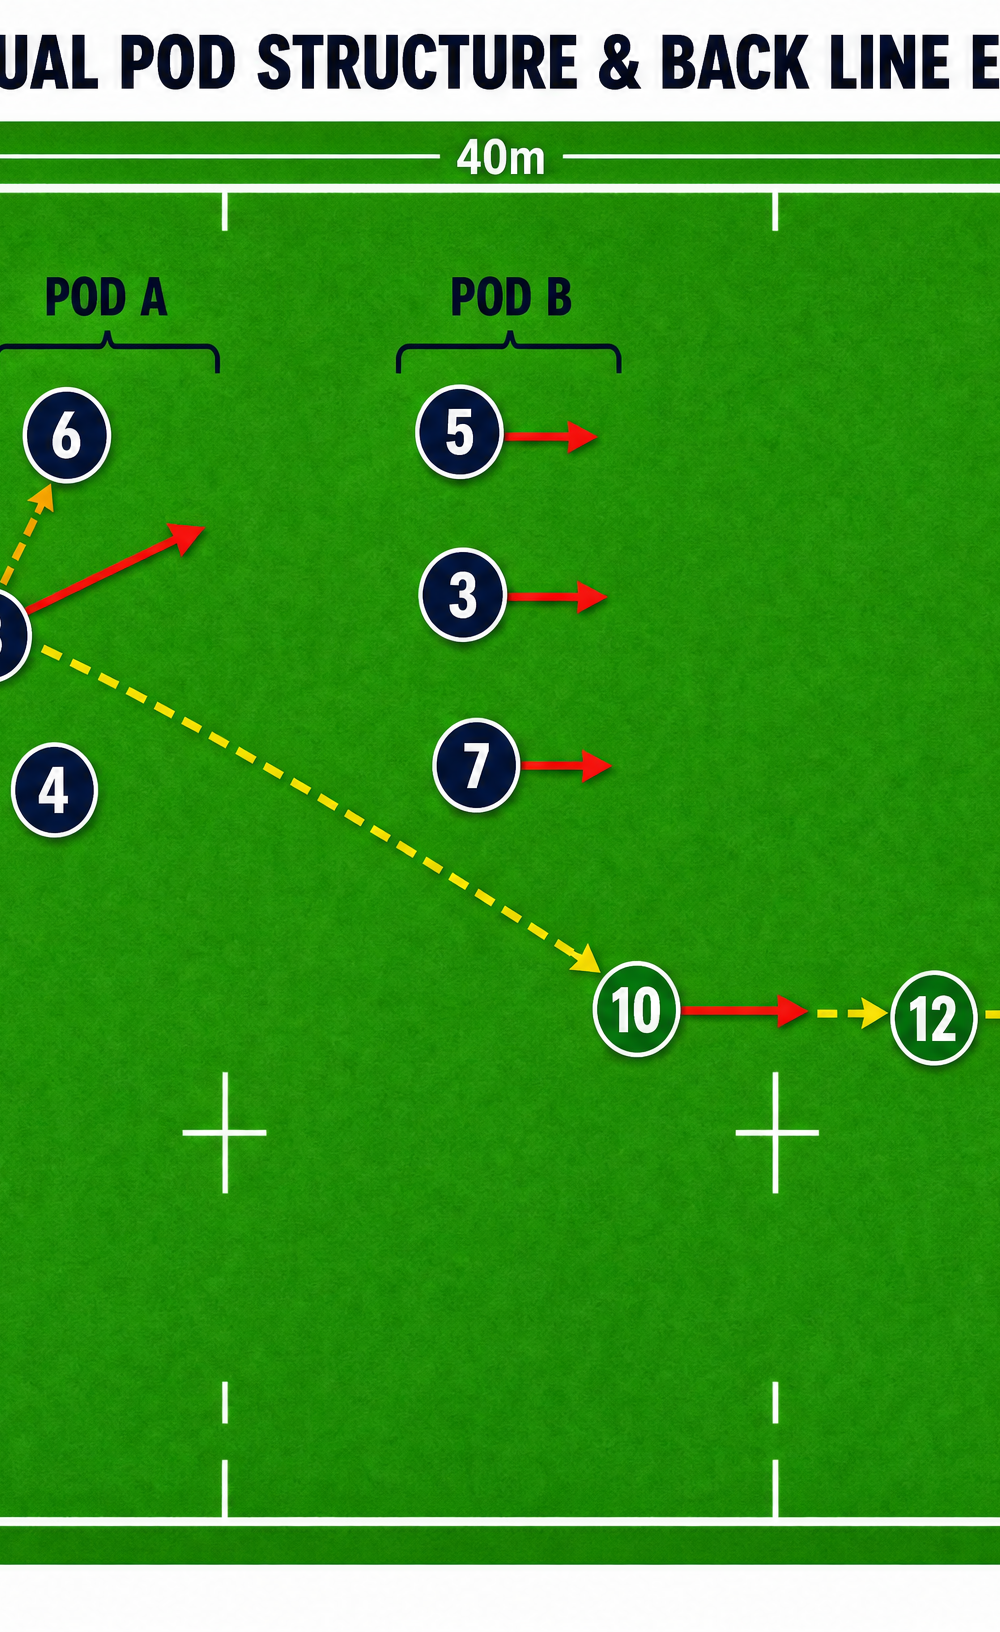
- Fly-half (10): Positioned 10-12 metres wide of the pod, slightly deeper, calling the play and ready for the next phase or a wide pass.
3. Step-by-Step Instructions

Phase 1: The Approach and Catch
- The Call: The Fly-half (10) or Scrum-half (9) calls the 'Hammer' pod structure.
- Alignment: The 3-man pod aligns flat and square to the defensive line, communicating their readiness to the 9.
- The Pass: The 9 delivers a crisp, flat pass to the central player (the 'Tip' or 'Point' man) of the pod.
- The Carry: The ball carrier attacks the gap between two defenders, accelerating onto the ball to ensure they are moving forward at the point of the catch.
Phase 2: The Collision and Trigger
- Winning the Contact: The ball carrier drops their body height just before contact, leading with the shoulder and driving the legs to break the initial tackle.
- The Trigger: As the carrier punches through the gainline and their arms are free, they look for the pre-communicated offload. This is the 'Trigger'.
- Support Lines: Simultaneously, the inside and outside support players accelerate. They must hold their depth until the pass is thrown, running hard lines directly off the carrier's hips.
Phase 3: The Offload or Recycle
- The Execution: The ball carrier delivers a short, sympathetic pop pass (the offload) to the support player who has the best line through the defense.
- The Continuation: The receiving player bursts through the defensive line. The remaining pod player and the original carrier immediately transition to become the new support/clean-out players.
- The Alternative (Recycle): If the offload is not on (carrier is chopped low or wrapped up), the carrier goes to ground on their terms, presenting the ball cleanly. The two support players instantly become the primary clear-out, securing the ruck for a lightning-fast recycle to the 10.
4. Key Coaching Points
- Square Shoulders: The pod must run square to the defensive line to fix defenders. Drifting sideways allows the defense to slide.
- Late Acceleration: Support players must not overrun the ball carrier. They should hold their depth and accelerate onto the offload.
- Body Height: The ball carrier must win the collision. High body height results in being driven backward and losing the offload opportunity.
- Sympathetic Passing: The offload is a delicate pop or a controlled push, not a fast spin pass. It must be easy to catch in heavy traffic.
- Decision Making: The carrier must earn the right to offload. If the tackle is dominant, secure the ball. Do not force a 50/50 pass.
5. Common Mistakes
- Flat Support: Support players aligning too flat (in line with the carrier) meaning they overrun the offload or are easily tackled if they receive it.
- Catching Standing Still: The ball carrier taking the ball from the 9 while stationary, losing all momentum before contact.
- Forcing the Pass: Attempting the offload when the arms are wrapped or when going backward, leading to knock-ons or interceptions.
- Ignoring the Clean-out: Support players anticipating the offload so much that they fail to secure the ruck when the carrier goes to ground.
6. Variations & Progressions
- The Tip Pass: Instead of taking contact, the central pod player catches and immediately passes (tips) to the outside support player before the defensive line closes.
- Backdoor Option: The central player receives the ball, turns their back to the defense, and passes out the back to a forward wrapping around, or directly to the Fly-half (10).
- Two-Pod Structure: Run two pods simultaneously. The 9 can hit the first pod, or the first pod can act as a decoy for a pass out the back to the second pod or the 10.
7. Age Adaptations
- Under 10s / Under 12s: Focus heavily on the ball carry and safe presentation. Introduce the offload only as a 'pop off the floor' once the tackle is complete.
- Under 14s / Under 16s: Introduce the pre-contact offload in controlled, semi-opposed environments. Emphasize the timing and depth of the support runners.
- Open / Senior: Full speed execution with complex decision-making. Incorporate tip passes, backdoor options, and reading the defensive spacing on the fly.