The Hammer Pod: Forward Drive with Inside Offload
Master this aggressive forward pod play designed to dent the defensive line and create second-phase attacking space through a well-timed inside offload.

Equipment Needed
1. Overview
The 'Hammer Pod' is a direct, aggressive attacking structure used primarily off set-pieces or slow ruck ball. It aims to condense the defensive line by committing multiple defenders to a heavy collision, before exploiting the space created with a dynamic offload to a supporting runner. This play is highly effective in the middle third of the pitch (between the 22m lines) when you need to generate forward momentum and quick front-foot ball for your backline.
By running a tight 3-man forward pod directly at the seam between two defenders, you force the defence to compress. The key to the play is the ball carrier staying on their feet post-contact, allowing the inside support runner to burst through the resulting gap.
2. Setup
Equipment Needed:
- 1 Rugby Ball
- 8 Cones (4 for the defensive line, 4 for the attacking starting points)
- Tackle shields or hit shields (optional for the defensive players during initial walk-throughs)
Pitch Setup:
Set up in the middle of a standard 100m x 70m pitch. Place the starting ruck roughly 15m in from the touchline to give the backline room to operate on the open side.
Player Positions:
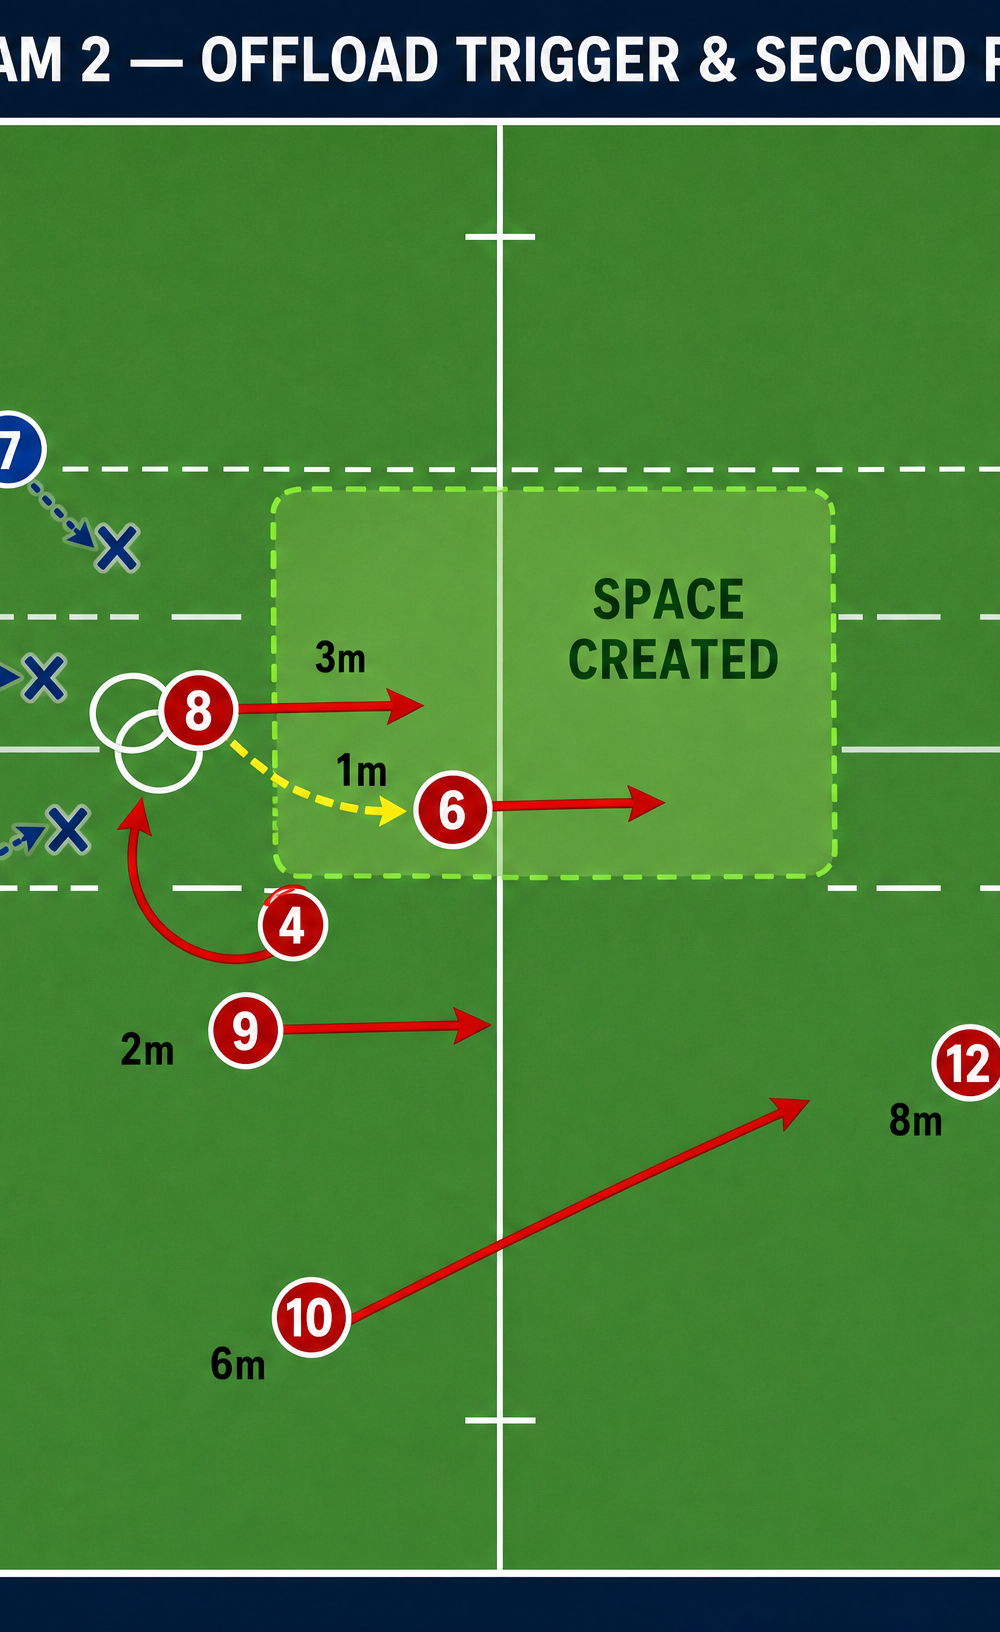
- Number 9 (Scrum-half): Positioned directly behind the ruck.
- Forward Pod (e.g., 8, 6, 4): A tight triangle formation positioned 2 metres deep and slightly offset from the ruck. The lead runner (8) is at the apex.
- Number 10 (Fly-half): Positioned 5 metres deep and 3 metres wide of the ruck.
- Backline (12, 13): Staggered flat alignment outside the 10.
3. Step-by-Step Instructions

Phase 1: The Setup and Strike
- The Number 9 clears the ball quickly from the base of the ruck with a flat, fast pass to the lead runner of the forward pod (Number 8).
- The Number 8 catches the ball moving forward at pace, targeting the inside shoulder of the second defender out from the ruck.
- The two support forwards (6 and 4) latch onto the hips of the Number 8 immediately upon contact, driving their teammate forward through the collision zone.
Phase 2: The Offload and Break
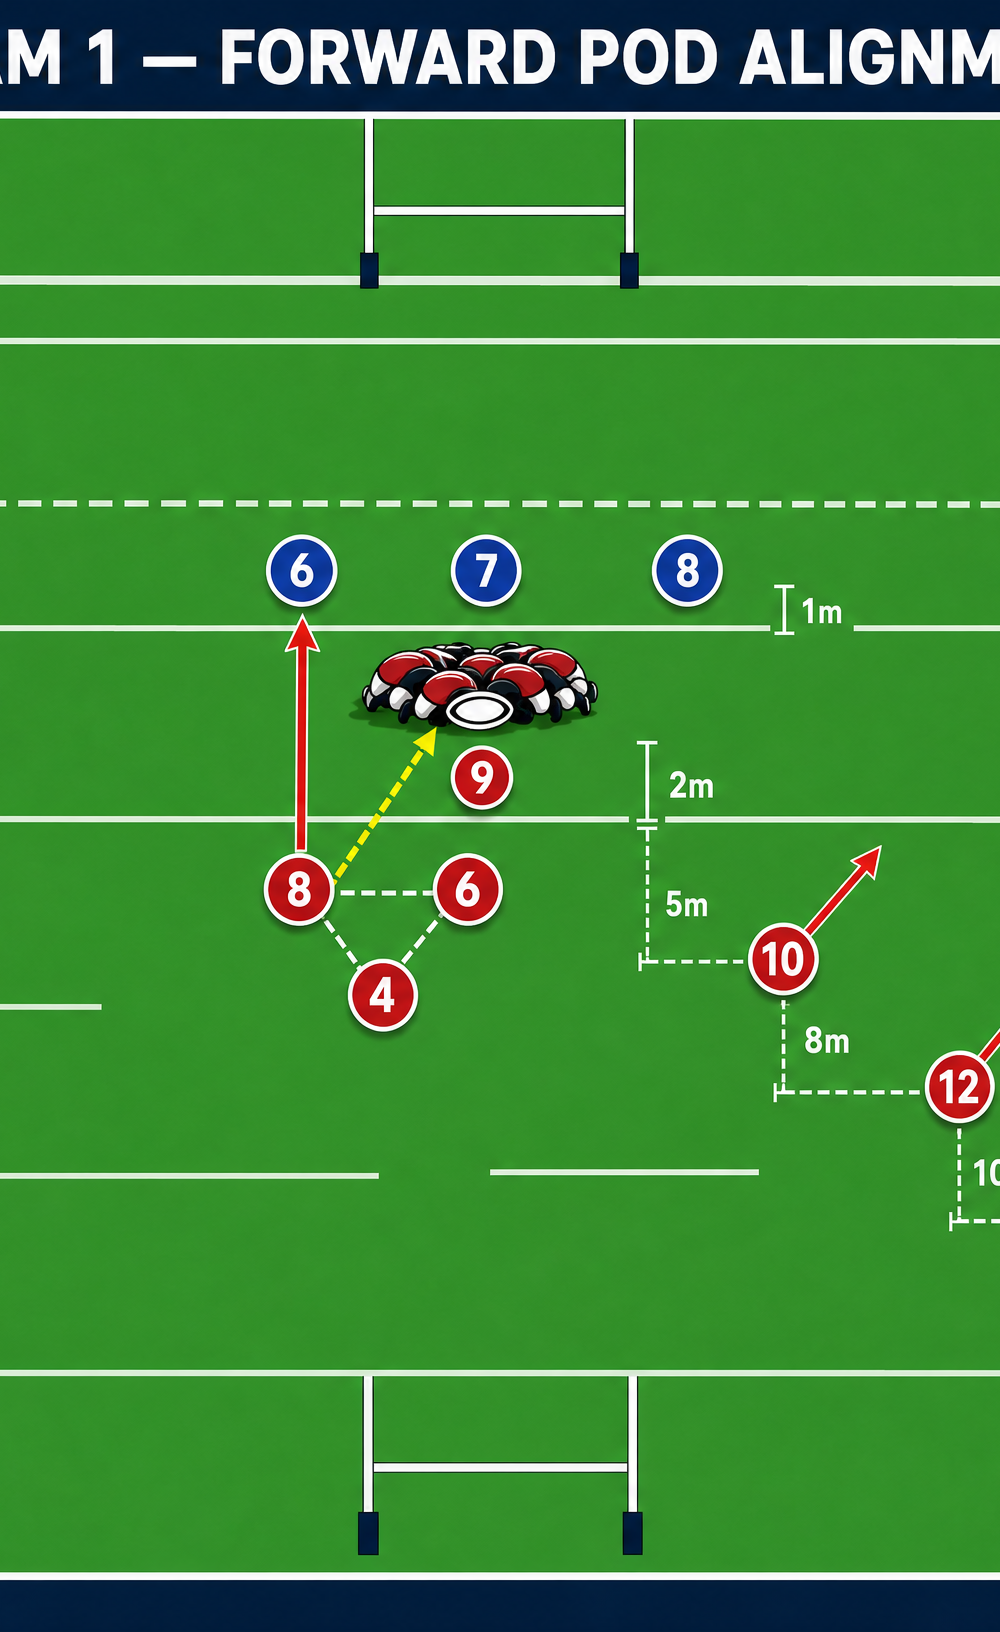
4. As the Number 8 absorbs the initial contact, they must fight to stay square and keep their arms free.
5. The Number 6 (who was supporting on the inside hip) anticipates the offload and accelerates into the space left by the compressing defenders.
6. The Number 8 delivers a short, soft pop pass (offload) to the Number 6 bursting through the gap.
Phase 3: Second Phase Execution
7. The Number 6 breaks the line. The Number 4 (the trailing forward) must now become the primary support runner, offering an option on the outside.
8. The Number 9 tracks the play flat and fast, ready to clear the ball if a tackle is made.
9. The Number 10 and the backline adjust their running lines to exploit the disorganized defence on the next phase, calling for the ball in the wider channels.
4. Key Coaching Points
- Pace onto the Ball: The lead forward must take the ball at full pace. A static catch allows the defence to dominate the collision.
- Target the Seam: Aim for the space between two defenders (the 'seam') rather than running directly at a single player. This forces both defenders to commit.
- Fight Through Contact: The ball carrier must pump their legs and stay square through the initial hit to keep the offload channel open.
- Timing of the Support Run: The inside support runner (Number 6) must time their run perfectly—too early and they overrun the pass, too late and the gap closes.
- Soft Hands: The offload must be a sympathetic 'pop' pass, not a fired bullet. It needs to hang in the air slightly for the runner to run onto.
5. Common Mistakes
- Running Too High: Forwards running upright into contact will be easily chopped down, preventing the offload.
- Latching Too Early: Support players latching onto the ball carrier before contact can slow the momentum and result in a penalty for obstruction.
- Forcing the Offload: If the tackle is dominant and the arms are wrapped, the ball carrier must secure the ball and go to ground. Forcing a bad offload leads to turnovers.
- Backline Standing Flat: If the 10 and 12 stand too flat, they won't have the depth to react to the line break or a quick recycle.
6. Variations & Progressions
- The Pull-Back: If the defence reads the pod play and blitzes hard, the Number 8 can catch and immediately pass the ball out the back to the Number 10 who is wrapping around behind the pod.
- The Tip Pass: Instead of taking contact, the Number 8 can tip the ball early to the Number 4 running a hard line on their outside shoulder, changing the point of attack.
- Add Defenders: Progress from using tackle shields to full live contact, gradually increasing the number of defenders to force decision-making under pressure.
7. Age Adaptations
- Under 8 - Under 10: Focus purely on the shape of the pod and running straight. Remove the offload element and emphasize going to ground safely and presenting the ball.
- Under 12 - Under 14: Introduce the concept of the offload, but practice it at walking pace first. Use soft touch or two-hand tag to simulate contact without the physical impact.
- Under 16 - Open: Full contact execution. Focus on the nuances of the latching technique and the speed of the recycle if the offload is not available.

