Mastering the Fundamentals: Layup Progression Drills for Young Players
Missed layups lose games — but they are fixable. Discover a proven step-by-step layup progression system, five practical drills, and expert coaching tips to help your young basketball and netball players finish at the rim with confidence.

Mastering the Fundamentals: Layup Progression Drills for Young Players
When it comes to youth basketball and netball, few skills are as critical as finishing at the rim. Games at the youth level are often decided by which team can consistently convert close-range opportunities. Yet, coaches everywhere share a common frustration: watching players make layups effortlessly in practice, only to miss them repeatedly under game pressure.
To build confident, effective finishers, coaches must move beyond having players simply jog in a straight line for uncontested layups. Developing reliable finishing skills requires a structured progression — starting with basic footwork and advancing to game-like, contested scenarios.
This guide explores the best practices for teaching layup progressions, offering practical drills you can immediately implement to help your young players master the art of finishing.
Why Young Players Miss Layups
Before diving into drills, it is important to understand why young players struggle with layups in the first place. Recognizing these common pitfalls allows coaches to tailor their feedback and instruction effectively.
Poor Footwork and Balance
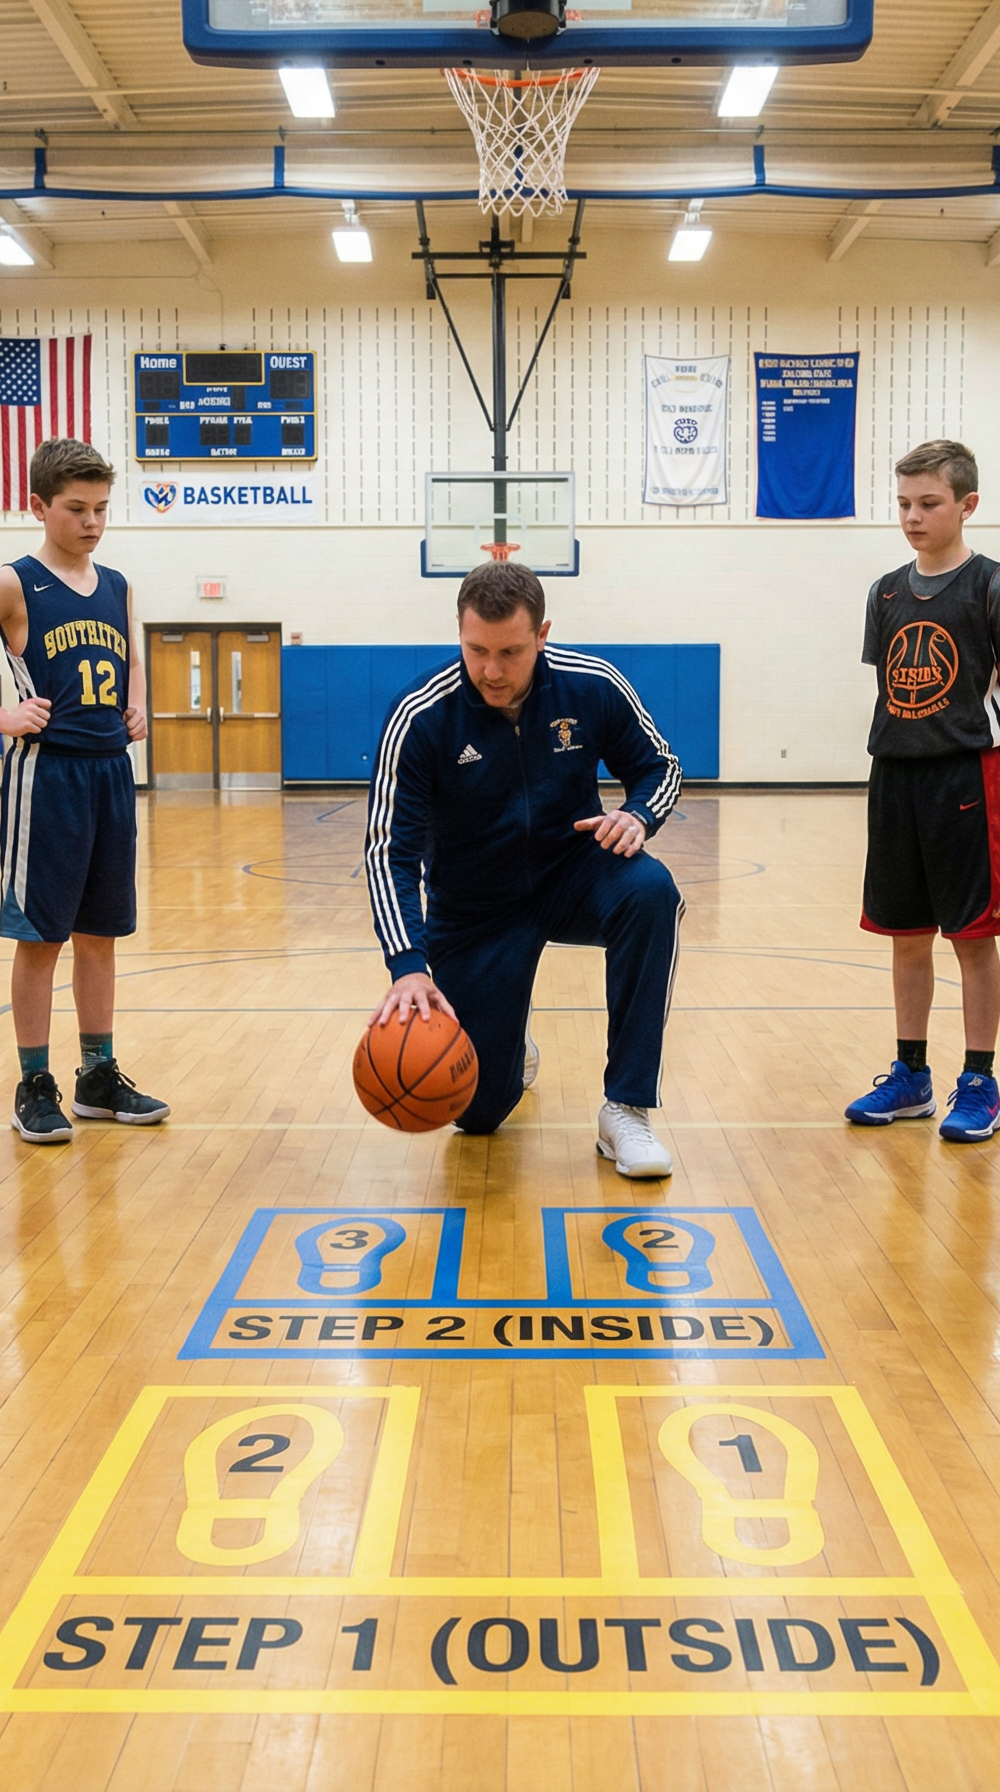
Many young players sprint toward the basket out of control, leading to awkward, off-balance shot attempts. The foundation of a good layup is the two-step rhythm: a long step with the outside foot to gather momentum, followed by a high jump off the inside foot. When this footwork is rushed or incorrect, balance is lost and the shot becomes unpredictable.
Fear of Contact
In game situations, a layup is rarely uncontested. Young players often shy away from defenders, altering their angle of attack or throwing up wild, fading shots to avoid contact. Teaching players to embrace contact, protect the ball, and draw fouls is an essential part of developing a complete finisher.
Lack of Game-Speed Practice
If practice consists entirely of 1-on-0 drills with no defensive pressure, players are unprepared for the speed and intensity of a real game. Adding defenders — even trailing ones — forces players to keep their eyes up, make quick decisions, and finish under pressure. The gap between practice performance and game performance narrows dramatically when drills simulate real conditions.
Limited Finishing Options
A standard overhand layup is not always the best choice. As players develop, they need to learn variations such as the reverse layup, floater, and euro step to navigate around help defense. Coaches who only teach the traditional layup are leaving their players without the tools to adapt when a help defender steps into the lane.
The 3-Step Layup Teaching Progression
To build strong habits, the best coaching methodology progresses from highly controlled environments to chaotic, game-like situations. Here is a proven three-step progression to teach layups effectively.
Step 1: Mastering Footwork Without the Ball
The biggest distraction for a beginner learning a layup is the basketball itself. When a player is focused on dribbling and shooting, their footwork suffers. The solution is simple: remove the ball entirely.
The Circle Drill: Have players form a large semicircle around the paint. Instruct them to jog in a circle and, every few steps, simulate a layup by planting their foot and driving their knee upward.
- When circling to the right, players should plant the left foot and drive the right knee up.
- When circling to the left, players should plant the right foot and drive the left knee up.
- Once the movement feels natural, you can add a ball that players toss lightly into the air to simulate the release.
Coaching Tip: This drill builds muscle memory without the pressure of making a shot or managing a dribble. It is ideal for players aged 6 to 10 who are encountering the layup for the first time, but it also serves as an excellent warm-up reset for older players who have developed bad habits.
Step 2: Adding the Ball (Zero-Step and One-Dribble Layups)
Once the footwork feels natural, reintroduce the basketball — but keep the movement limited.
Zero-Step Layups: Have players start on the block in a lunge stance. For a right-handed layup, the left foot is forward and the right foot is back. They step with the left foot, drive the right knee up, and shoot the ball softly off the upper corner of the square on the backboard.
Coaching Tip: Emphasize jumping high, not forward. A common mistake is players lunging toward the basket rather than launching vertically, which reduces control and makes the shot easier to block.
One-Dribble Progression: Once players master the zero-step, move them back slightly and have them take one hard dribble, gather the ball, take their two steps, and finish. Gradually move the starting point back to the three-point line as their confidence and coordination improve.
Step 3: Introducing Defensive Pressure
To bridge the gap between practice and games, you must introduce defense. This is the step most youth coaches skip, and it is the primary reason players who look great in drills fall apart in games.
1v1 Chase Down Drill: Position the offensive player at the three-point line with a defender slightly behind them or at half-court. On the whistle, the offensive player attacks the basket while the defender tries to catch up and contest the shot.
Coaching Tip: Give younger or less experienced players a larger head start to ensure they can experience success. Gradually reduce the gap as their confidence grows. This drill forces the offensive player to sprint, maintain control, and finish at game speed — all while sensing a defender closing in behind them.
5 Practical Layup Drills to Use at Your Next Practice
Once your team has grasped the fundamentals, incorporate these dynamic drills to improve their finishing in varied, game-realistic situations.
Drill 1: The Zig-Zag Finishing Drill
This drill is excellent for teaching players how to finish from different angles and with different techniques.
How it works: A player starts outside the three-point line, drives to the basket, and finishes with a specific type of layup (e.g., standard, reverse, floater). They immediately rebound their own shot, dribble out to a different spot on the perimeter, and attack again using a different finishing move. This continues for 60 to 90 seconds.
Why it works: It builds conditioning, encourages creativity, and forces players to practice finishes they might not typically attempt. It is particularly effective for players aged 10 and above who are ready to expand their finishing repertoire.
Coaching Tip: Call out the required finishing move before each drive to add a decision-making element. This simulates the split-second choices players must make in games.
Drill 2: Half-Court 2-on-1 Transition
Basketball and netball are games of quick decisions. This drill simulates fast-break scenarios where players have a numerical advantage and must decide whether to drive or pass.
How it works: Set up two offensive lines on the wings and one defensive line in the middle near the three-point line. The coach passes to one of the offensive players, triggering a live 2-on-1 scenario. The offense must quickly decide whether to drive for a layup or pass to the open teammate.
Why it works: It teaches players to read the defense. If the defender commits to the ball handler, they pass; if the defender stays back, the ball handler must confidently attack the rim and finish the layup. This drill develops both finishing ability and court vision simultaneously.
Drill 3: Around the Arc 1-on-1
This drill is fantastic for simulating half-court offensive drives against a trailing defender, which is one of the most common finishing scenarios in youth games.
How it works: An offensive player and a defensive player start in the corner. The offensive player dribbles around the three-point arc. At any point, the offensive player can turn and attack the basket. The defender must trail them and is only permitted to enter the paint once the offensive player does.
Why it works: The offensive player learns to protect the ball with their body and finish with a defender on their hip, while the defender practices contesting without fouling. This drill develops both sides of the ball simultaneously.
Drill 4: Block-to-Block Mikan Drill
Named after NBA Hall of Famer George Mikan, this classic drill builds touch, coordination, and ambidextrous finishing.
How it works: A player stands under the basket and alternates shooting layups from the left block and right block without letting the ball touch the floor. After each make, they catch the ball before it drops and immediately move to the opposite block for the next shot.
Why it works: It forces players to use both hands and builds a soft touch around the rim. It is also an excellent drill for building rhythm and confidence in young players who are hesitant to use their non-dominant hand.
Coaching Tip: Set a target number of consecutive makes (e.g., 10 in a row) to add a competitive element and encourage focus.
Drill 5: The Layup Hi-Five Drill (Ages 6–9)
For the youngest players, making the drill fun is just as important as making it instructional. This drill, popularized by Jr. NBA coaching programs, adds an engaging element to footwork practice.
How it works: Place a coach or assistant at the side of the key with their hand raised. As the player drives toward the basket and takes their two-step layup, they must high-five the raised hand with their non-shooting hand at the peak of their jump before releasing the shot.
Why it works: The high-five forces players to jump high (rather than forward), keeps the non-shooting hand engaged to protect the ball, and makes the drill memorable and enjoyable for young children. It is a simple coaching cue that produces immediate improvements in form.
Age-Appropriate Coaching Considerations
Not all players are ready for the same drills at the same time. The following table provides a general guide for matching drill complexity to player age and development stage.
| Age Group | Focus | Recommended Drills |
|---|---|---|
| 6–8 years | Basic footwork, fun engagement | Circle Drill, Hi-Five Drill |
| 9–11 years | Technique with ball, both hands | Zero-Step Layups, Mikan Drill, Zig-Zag |
| 12–14 years | Game-speed finishing, pressure | Chase Down, Around the Arc, 2-on-1 |
| 14+ years | Advanced variations, decision-making | All drills + floater, euro step, reverse |
Always prioritize technique over speed for younger age groups. A player who learns correct footwork at age 8 will be a far more effective finisher at age 14 than one who develops bad habits early.
Managing Your Youth Sports Club with Vanta Sports
Implementing effective practice plans requires organization and time. Volunteer coaches often spend hours managing schedules, tracking attendance, and communicating with parents — time that could be spent developing better practice drills and giving players more individual feedback.
This is where having the right club management ecosystem becomes a genuine game-changer. Vanta Sports is purpose-built for youth basketball and netball, offering a comprehensive suite of tools designed to make life easier for clubs, coaches, parents, and players alike.
While generic scheduling tools offer basic functionality, Vanta Sports provides a complete, integrated experience:
- Vanta Club: A robust platform for administrators to handle registrations, manage integrated Stripe payments, and ensure safeguarding and compliance requirements are met.
- Vanta Coach App: A completely free tool for volunteer coaches that allows you to plan sessions, track attendance, and communicate with your team — freeing you up to focus on what matters most: coaching.
- Vanta Guardian: Keeps parents informed and connected with real-time schedule updates and payment management.
- Vanta Player App: Gives players a dedicated space to track their goals, achievements, and team events, building engagement and accountability.
With modern, intuitive design and a focus specifically on youth sports, Vanta Sports ensures that administrative tasks never get in the way of player development.
Conclusion
Teaching layups is an ongoing process that requires patience, a structured progression, and a willingness to let players struggle through contested, game-like drills in practice. By starting with footwork, adding the ball in controlled settings, and eventually introducing live defenders, you can build a team of confident, capable finishers who perform when it matters most.
Remember the core principles: long first step, high second step, eyes up, and ball protected. Incorporate the drills outlined above into your regular practice plans, and you will soon see those frustrating missed practice layups transform into crucial game-time points.
Ready to Take Your Training to the Next Level?
Discover how Vanta Sports helps coaches run better practices. Learn more about Vanta Sports