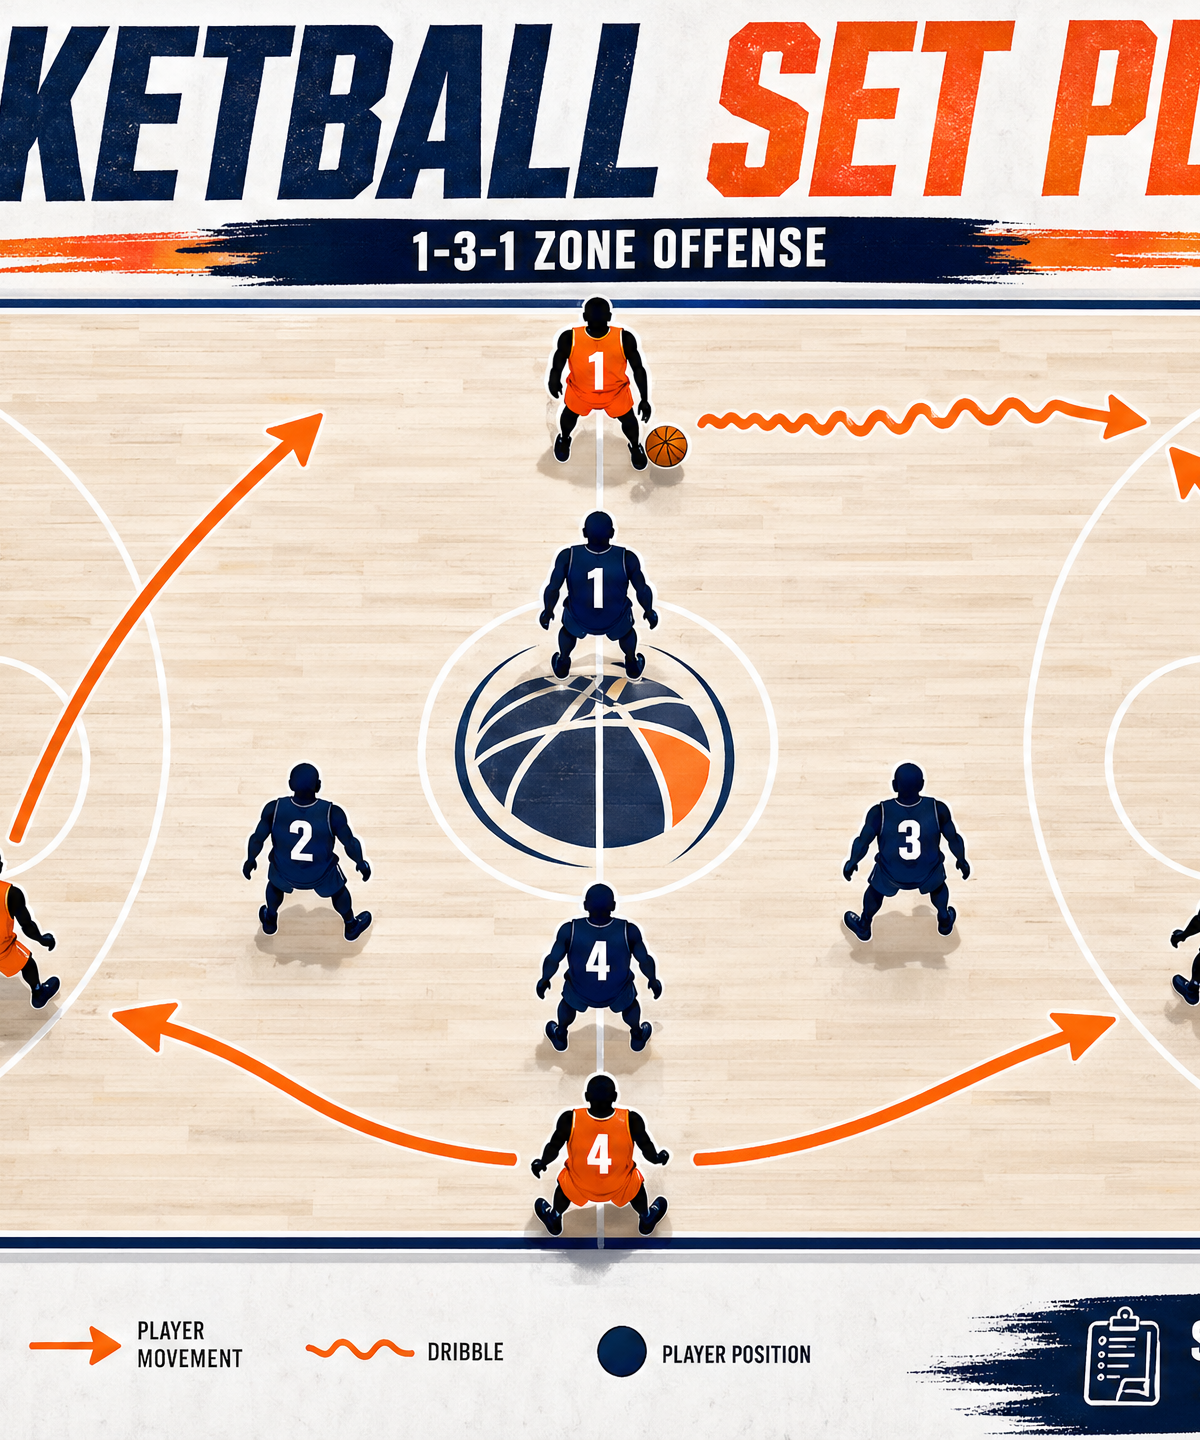
The Ultimate 1-3-1 Zone Offense: Overloading and High-Low Attacks
Master the 1-3-1 zone offense with this comprehensive guide to overloading the defense, exploiting the high post, and creating high-percentage scoring opportunities.
Equipment Needed
1. Overview
The 1-3-1 zone offense is a highly effective tactical approach designed to dismantle 2-3 and 1-2-2 zone defenses. By placing a player at the high post and spreading the floor with shooters, this set play forces the defense to make difficult choices. It excels at creating overloads on one side of the floor, opening up skip passing lanes, and facilitating devastating high-low actions between your post players.
When executed correctly, this offense will distort the defensive shape, pull rim protectors away from the basket, and generate open three-point shots or uncontested layups. Use this set when the opposing team sits back in a passive zone and you need to dictate the tempo and spacing.
2. Setup
Court Dimensions: Standard FIBA half-court (14m x 15m)
Player Positioning:
- Player 1 (Point Guard): Starts at the top of the key, near the mid-court line or slightly behind the three-point arc.
- Player 2 (Shooting Guard): Positioned on the right wing, outside the three-point line.
- Player 3 (Small Forward): Positioned on the left wing, outside the three-point line.
- Player 4 (Power Forward): Starts at the high post elbow (right or left depending on the entry pass).
- Player 5 (Center): Starts on the low post block, typically opposite the ball side initially.
3. Step-by-Step Instructions
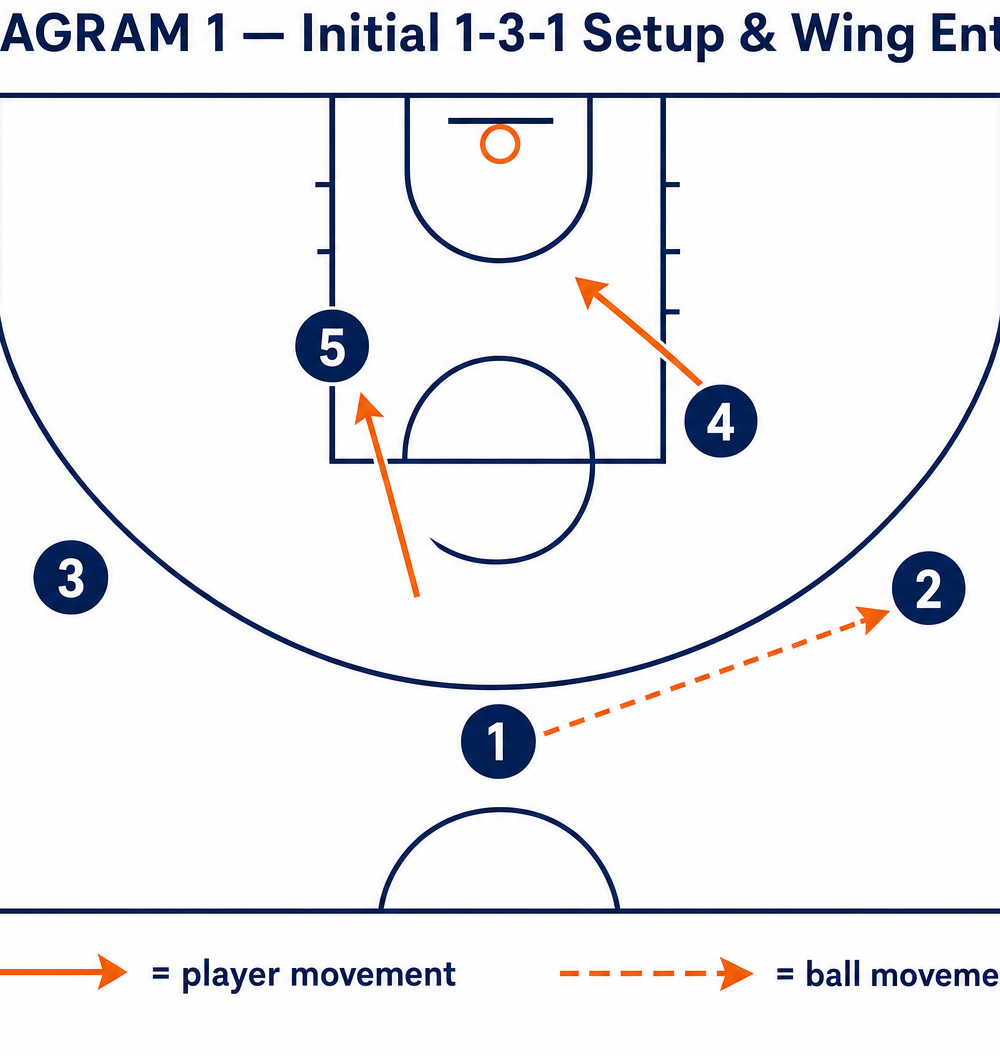
Phase 1: The Initial Setup & Wing Entry

- Initiation: Player 1 brings the ball down the court and sets up at the top of the key. Players 2 and 3 space wide to the wings. Player 4 starts near the high post, and Player 5 anchors the low block.
- The Entry Pass: Player 1 passes the ball to Player 2 on the right wing.
- Post Movement: As the ball is in the air, Player 4 dives from the high post elbow down toward the right block. Simultaneously, Player 5 flashes up from the low block to the high post. This creates an immediate overload on the right side of the floor.
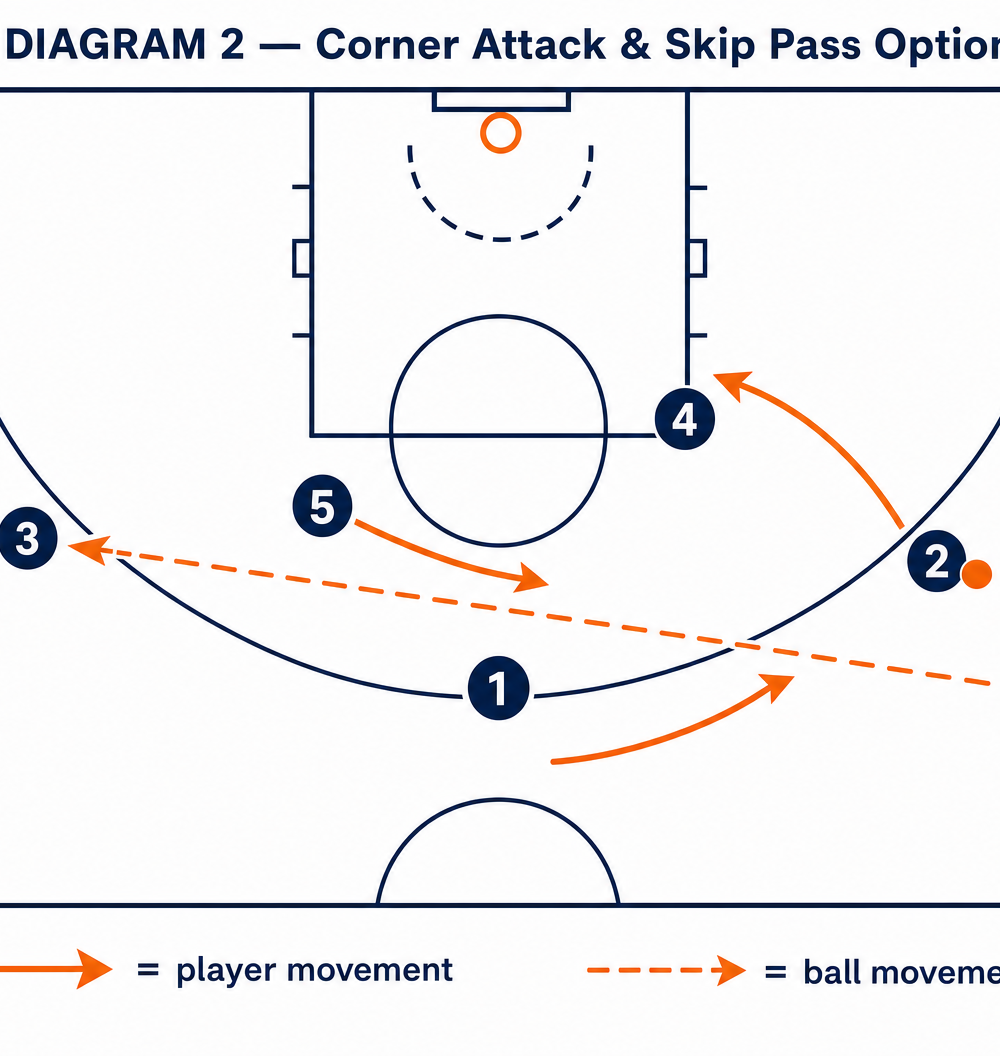
Phase 2: Corner Attack & Skip Pass Option
- Overload Pressure: With the ball on the right wing (Player 2), the defense must shift. Player 4 is now in the short corner/low block area, demanding attention.
- The Skip Pass: If the defense over-commits to the strong side, Player 2 executes a crisp skip pass across the court to Player 3 on the left wing.
- Off-Ball Movement: As the skip pass occurs, Player 5 steps out from the high post toward the ball-side (left). Player 4 cuts aggressively from the right block up toward the right elbow. Player 1 rotates toward the vacated right wing space to maintain spacing.
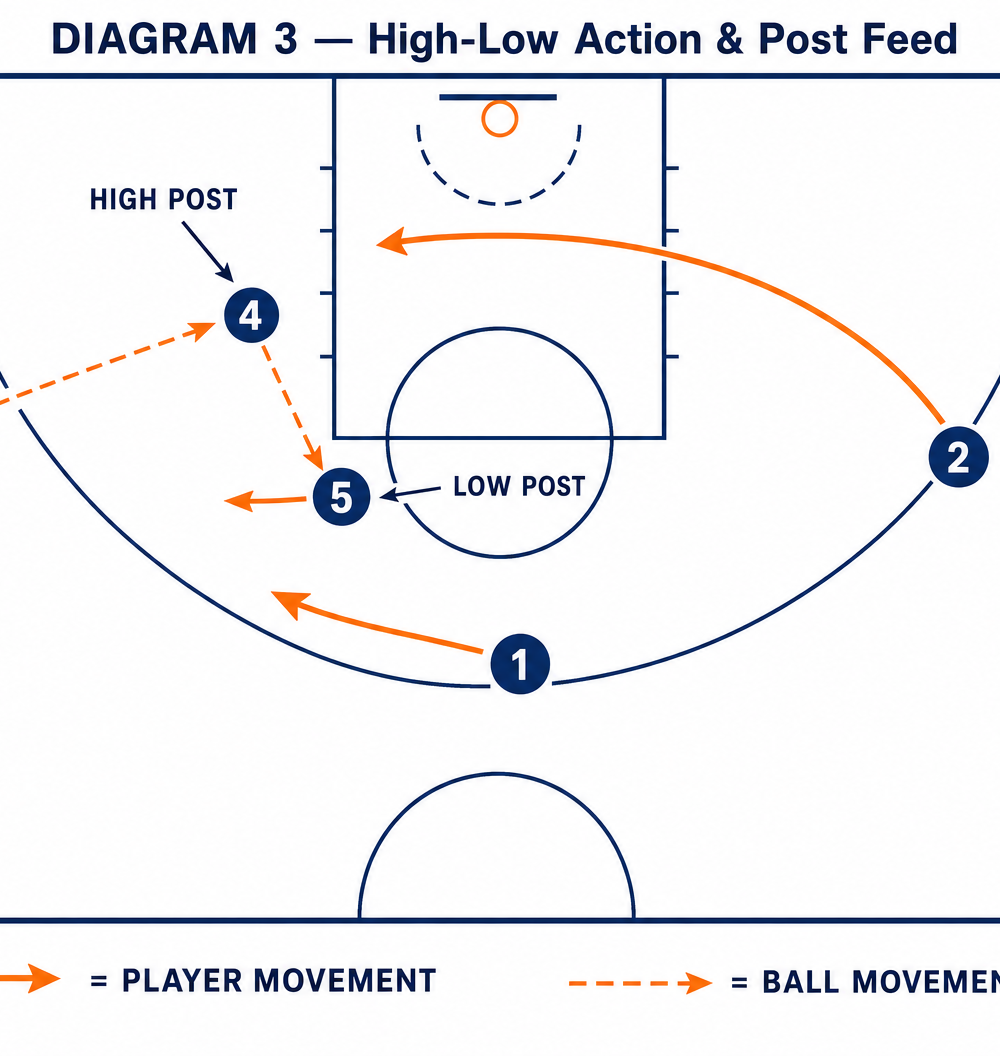
Phase 3: High-Low Action & Post Feed
- High Post Entry: Player 3 receives the skip pass and immediately looks to enter the ball to Player 4, who has now flashed to the high post (left elbow area).
- The High-Low Look: Upon catching the ball at the high post, Player 4 turns to face the basket. Player 5, now established on the left low block, seals their defender.
- The Finish: Player 4 delivers a precise interior pass down to Player 5 for a high-percentage finish at the rim. Meanwhile, Player 2 cuts along the baseline to provide a secondary passing option or offensive rebounding position.
4. Key Coaching Points
- Patience and Ball Reversal: Do not force the first option. The strength of the 1-3-1 offense lies in reversing the ball from side to side to stretch the defense before attacking the gaps.
- High Post Positioning: The player at the high post (Player 4 or 5) must catch the ball facing the basket. They are the primary playmaker in this offense and must be a threat to shoot, drive, or pass.
- Crisp Skip Passes: Skip passes must be thrown with velocity and accuracy. A slow, looping pass allows the zone defense time to recover and intercept the ball.
- Sealing the Defender: The low post player must actively fight for position and seal their defender on their back before calling for the ball in the high-low action.
- Spacing: Maintain wide spacing on the perimeter. If players drift too close together, one defender can guard two offensive players, neutralizing the overload.
5. Common Mistakes
- Stagnation: Players standing still off the ball. The 1-3-1 requires constant flashing to the high post and cutting along the baseline to keep the defense occupied.
- Ignoring the High Post: Guards settling for perimeter shots without attempting to enter the ball to the high post. The offense breaks down if the middle of the zone is not challenged.
- Poor Passing Angles: Trying to force passes through multiple defenders instead of using ball fakes and utilizing the skip pass to shift the defense.
- Clogging the Paint: Both post players ending up on the low block at the same time, which clogs the driving lanes and makes it easy for the defense to collapse.
6. Variations & Progressions
- Dribble Penetration: If the defense closes out too hard on the skip pass, the wing player (Player 3) can utilize a pump fake and drive hard to the basket, forcing the defense to collapse and opening up kick-out passes.
- Ball Screen Option: Incorporate a ball screen for the wing player from the high post player. This forces the zone defenders to communicate and often leads to confusion and open shots.
- Corner Overload: Instead of flashing to the high post, have the weak-side wing cut all the way through to the strong-side corner to create a massive overload, forcing the defense to completely abandon the weak side.
7. Age Adaptations
- Under 10s / Under 12s: Focus primarily on spacing and basic ball reversal. Simplify the post movements to just one player flashing to the high post while the other stays on the block.
- Under 14s / Under 16s: Introduce the high-low action and emphasize the importance of skip passes. Teach players how to read the defense and make decisions from the high post.
- Open / Advanced: Implement all variations, including ball screens and complex cutting actions. Expect players to read the defensive rotations instantly and exploit the weakest point of the zone.