The 15-Metre Striker: Penalty Corner Attack Play
A highly effective set play designed to exploit a disorganized defense near the try line following a penalty, using misdirection and hard running lines.

Equipment Needed
Overview
The '15-Metre Striker' is a dynamic attacking set play designed for use when awarded a penalty near the opposition's try line, specifically around the 15-metre mark. This play is engineered to exploit the inevitable disorganization and narrow alignment of a retreating defensive line. By employing a combination of direct running and subtle misdirection, the play isolates defenders and creates clear scoring opportunities in the wider channels.
This set piece is most effective when the defense is scrambling to retreat 10 metres, often leaving gaps on the fringes or out wide. It relies on crisp execution, precise timing, and committed decoy runners to manipulate the defensive shape and open up a pathway to the try line.
Setup

Equipment Needed:
- 1 Rugby Ball
- Cones (to mark the penalty spot, try line, 5m, 15m, and 22m lines for practice)
- 6 Attacking Players (typically backs and loose forwards)
- 7+ Defending Players (for opposed practice)
Pitch Setup:
Set up the drill on a standard 100m x 70m Rugby pitch. The starting point is a penalty mark situated 15 metres from the touchline and approximately 10-15 metres out from the opposition try line.
Player Positions (Attacking):
- 9 (Scrum-half): Positioned at the penalty mark, ready to tap and pass.
- 10 (Fly-half): First receiver, standing relatively flat to take the ball on the gain line.
- 12 (Inside Centre): Positioned slightly deeper, ready to run a hard line or loop.
- 13 (Outside Centre): Positioned wide as a primary decoy.
- 14 (Winger): The primary strike runner, starting wide but ready to cut back inside.
- 15 (Fullback): Sweeper/support player, positioned 10 metres deep.
Step-by-Step Instructions

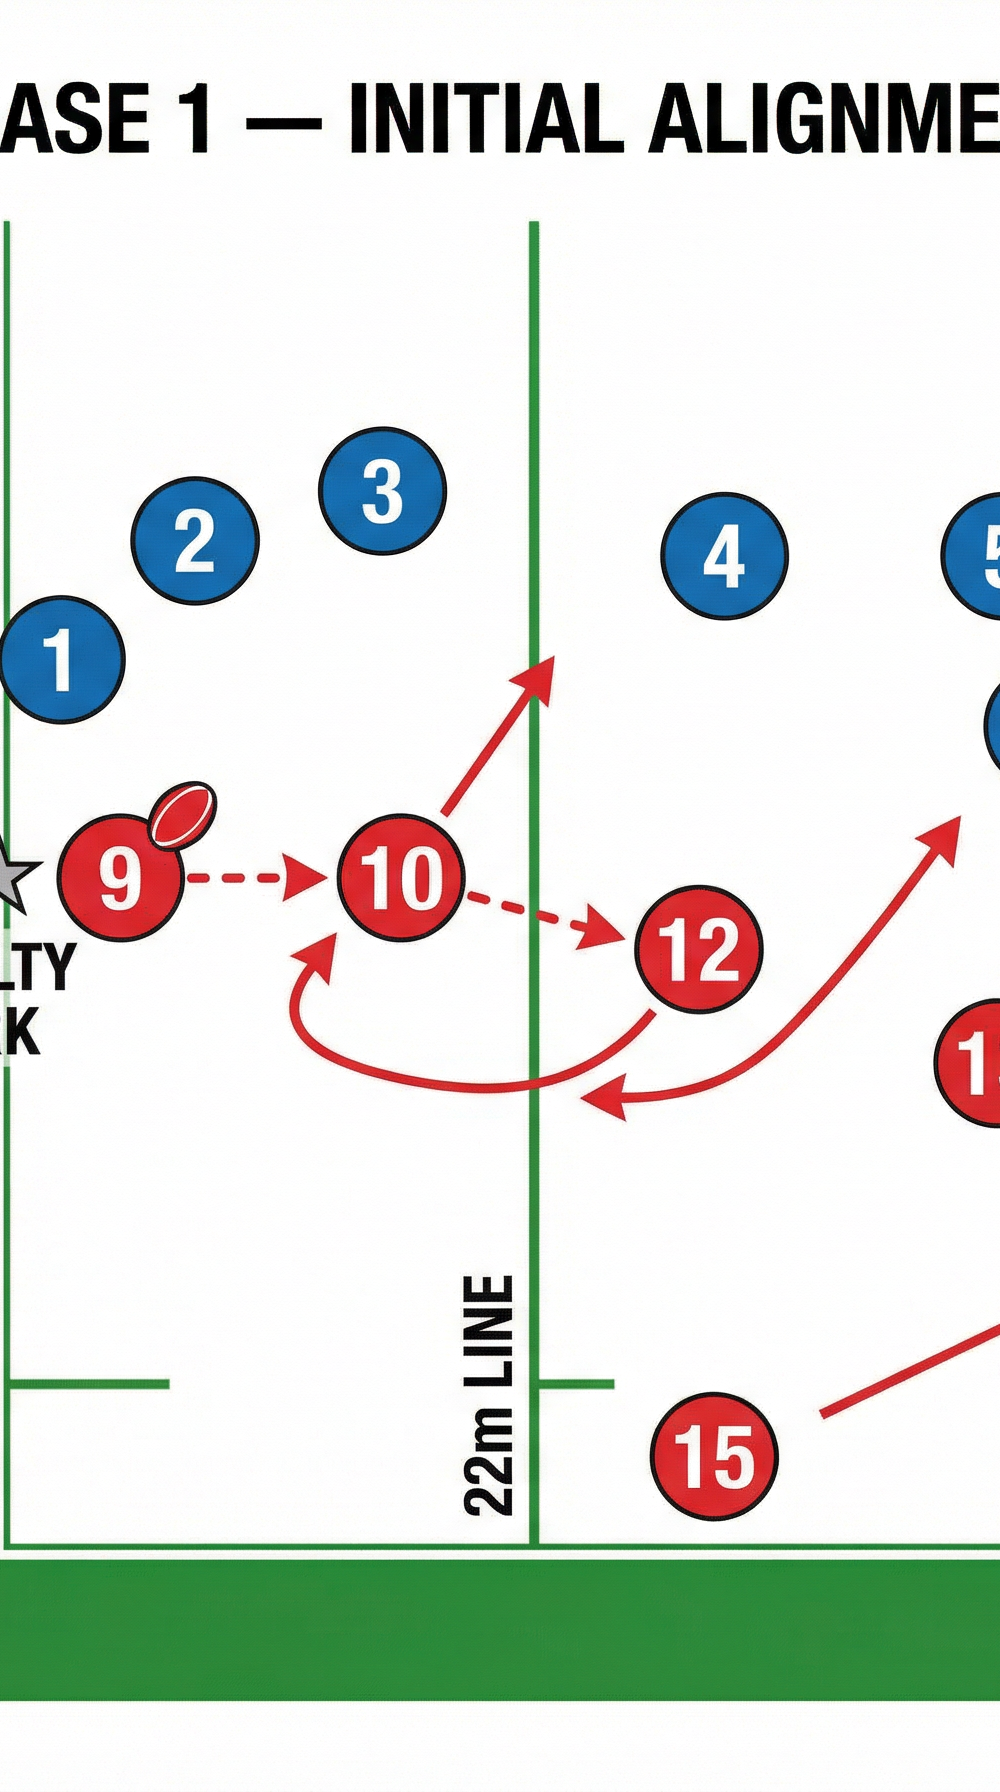
Phase 1: Initial Alignment & Execution

- The Tap: The Scrum-half (9) takes a quick tap penalty at the mark, ensuring they tap the ball correctly on the mark to avoid a reset.
- The First Pass: The 9 immediately delivers a swift, flat pass to the Fly-half (10), who is already moving forward to engage the first defender.
- The Loop: As the 10 receives the ball, the Inside Centre (12) initiates a rapid loop run around the back of the 10.
- The Decoy: Simultaneously, the Outside Centre (13) runs a hard, wide line, aiming to draw the attention of the wider defenders (specifically the opposition 13 and winger) and hold them out wide.
- The Second Pass: The 10, having committed the inside defenders, executes a precise pop pass or short ball to the looping 12.
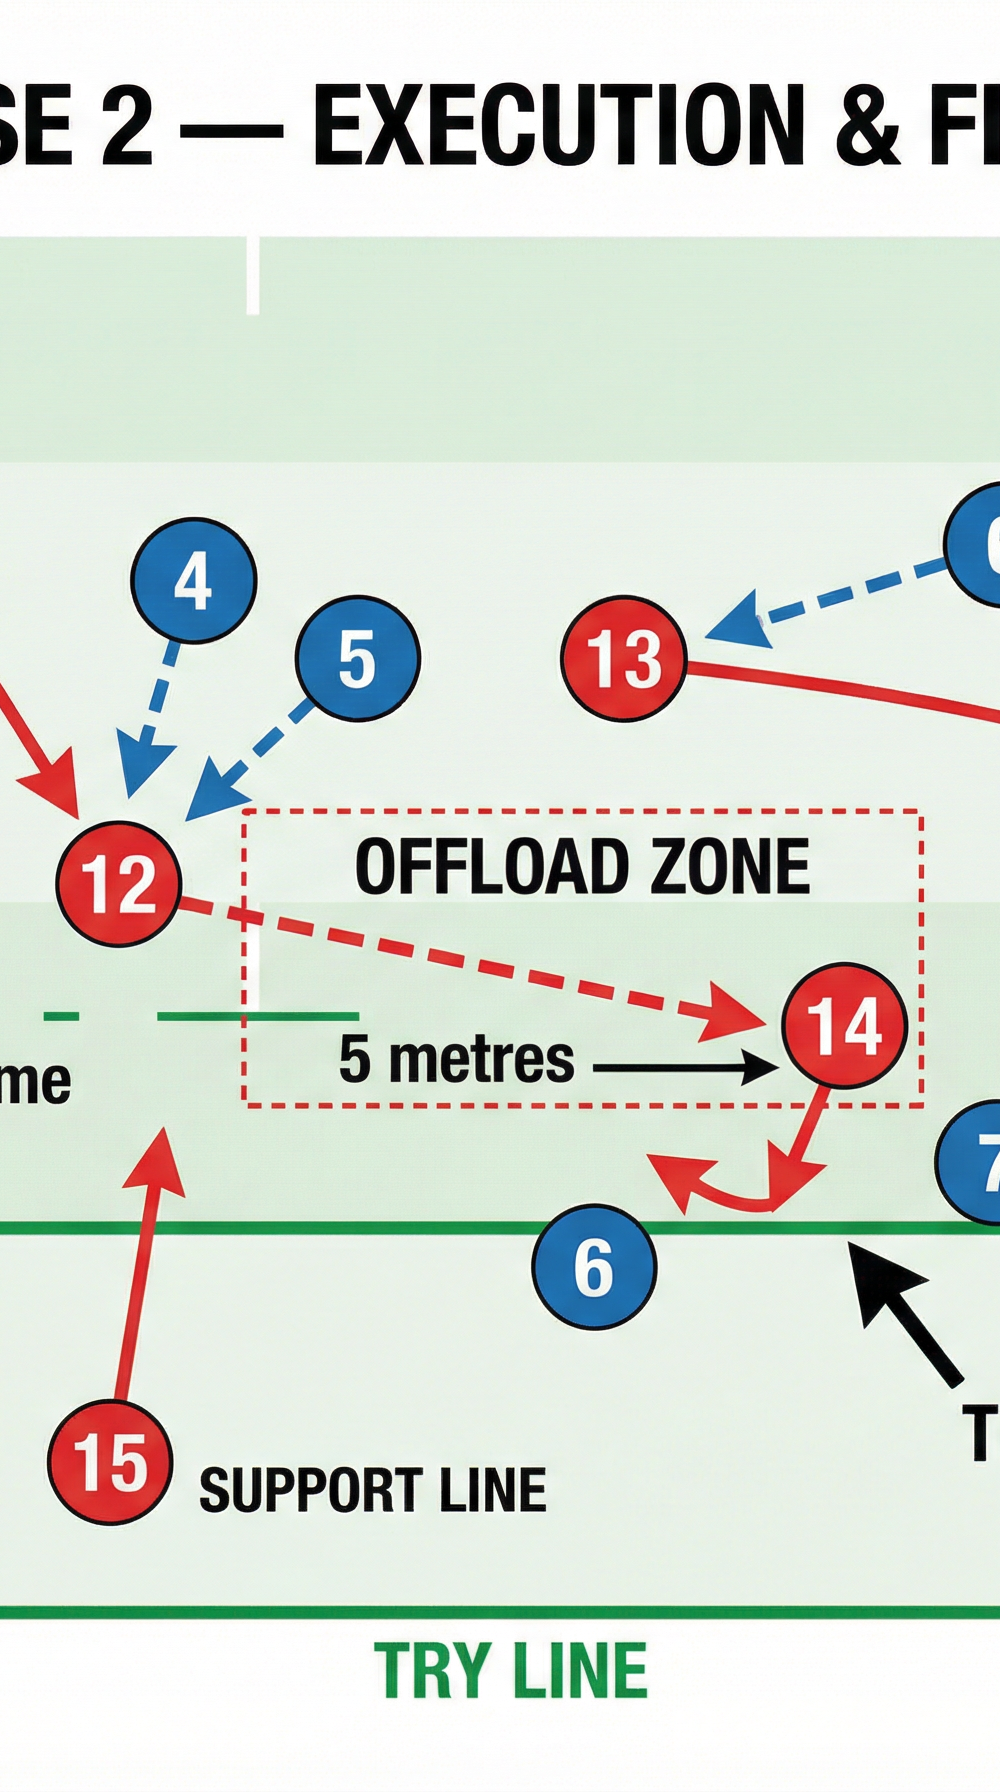
Phase 2: Execution & Finish
- The Strike Line: As the 12 receives the ball and drives forward, the Winger (14) changes direction, cutting back sharply on an inside angle towards the gap created between the defending centres.
- The Offload: The 12 engages the defensive line, absorbing the initial contact if necessary, and delivers a timely offload to the hard-running 14.
- The Finish: The 14 receives the ball at pace in the 'Offload Zone' and accelerates through the gap to score near the corner.
- Support: The Fullback (15) tracks the play from deep, ready to receive an offload if the 14 is tackled short of the line or to secure the breakdown if a ruck is formed.
Key Coaching Points
- Speed of Execution: The success of this play hinges on the speed of the initial tap and pass. The defense must not be allowed time to set.
- Commitment of Decoys: The decoy run by the 13 must be completely convincing. They must call for the ball and run a line that forces the defense to react.
- Depth and Timing: The 12 must time their loop perfectly to receive the ball at pace, while the 14 must not overrun the play, timing their cut-back to arrive exactly as the gap opens.
- Communication: Clear, concise communication is essential, especially between the 10, 12, and 14, to ensure the timing of the passes and runs is synchronized.
- The Offload: The 12 must focus on keeping the ball alive through contact, executing a legal and accurate offload to the 14.
Common Mistakes

- Telegraphing the Play: Players staring at their intended target or setting up too early, giving the defense time to read the play.
- Flat Alignment: Attackers standing too flat, reducing the time and space available to execute the loop and passes.
- Weak Decoy Runs: Decoy runners jogging or not looking for the ball, allowing the defense to drift off them and cover the primary strike runners.
- Poor Pass Quality: Inaccurate or slow passes from the 9 or 10, which disrupt the timing of the entire play.
Variations & Progressions

- Variation 1: The Dummy Loop. The 10 shapes to pass to the looping 12 but instead takes the ball into contact themselves or throws a long pass to the wide 13.
- Variation 2: The Inside Ball. Instead of passing to the looping 12, the 10 slips a short inside pass to a hard-running forward (e.g., a flanker) coming off their shoulder.
- Progression 1: Add Defensive Pressure. Start with passive defenders and gradually increase the defensive line speed and aggression to test execution under pressure.
- Progression 2: Phase Play Integration. Instead of starting from a penalty, initiate the play from a quick ruck near the 15-metre line to simulate game conditions.
Age Adaptations

- Under 10s/12s: Simplify the play. Focus on the quick tap and a single, direct pass to a hard runner. Emphasize running straight and supporting the ball carrier. Remove the complex loop and offload elements.
- Under 14s/16s: Introduce the loop and decoy runs, but focus heavily on the timing and execution of the passes. Ensure players understand their roles before adding defensive pressure.
- Open/Senior: Execute the full play at match speed with full defensive pressure. Emphasize the subtle nuances of misdirection, body language, and the quality of the offload.