The '4-Up' Release: Breaking Full-Court Pressure with Poise
Master the '4-Up' press break to confidently dismantle full-court pressure, secure the basketball, and transition smoothly into early offense.
Equipment Needed
1. Overview
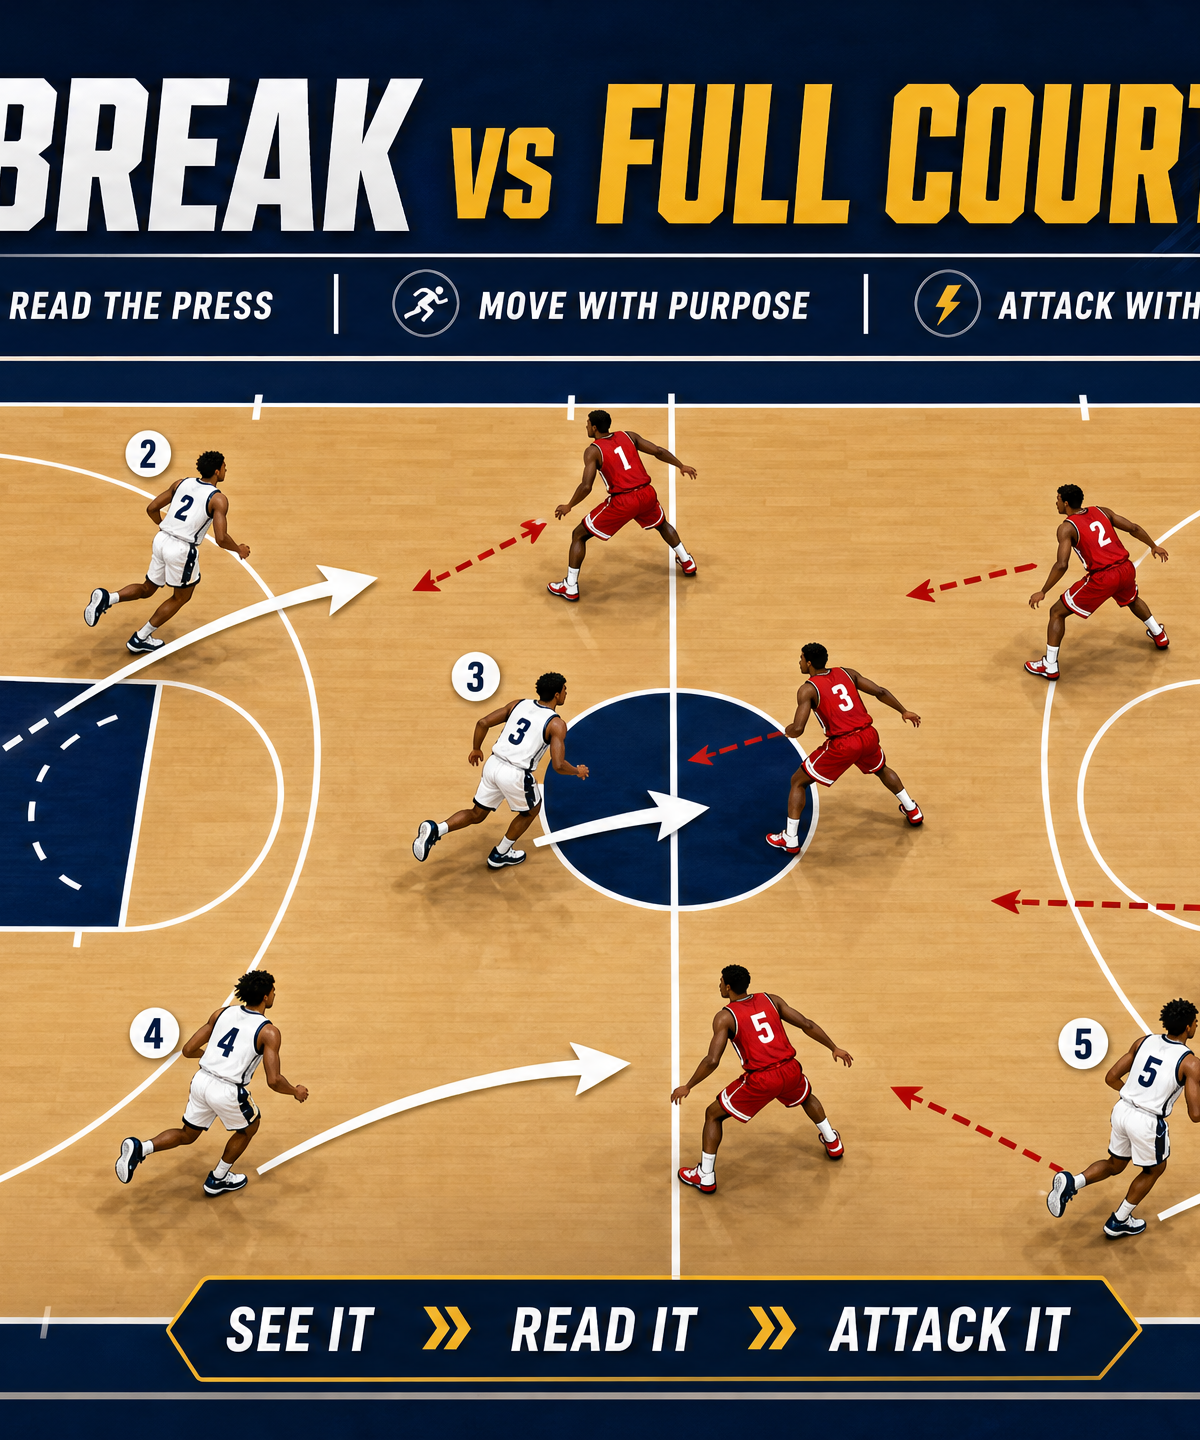
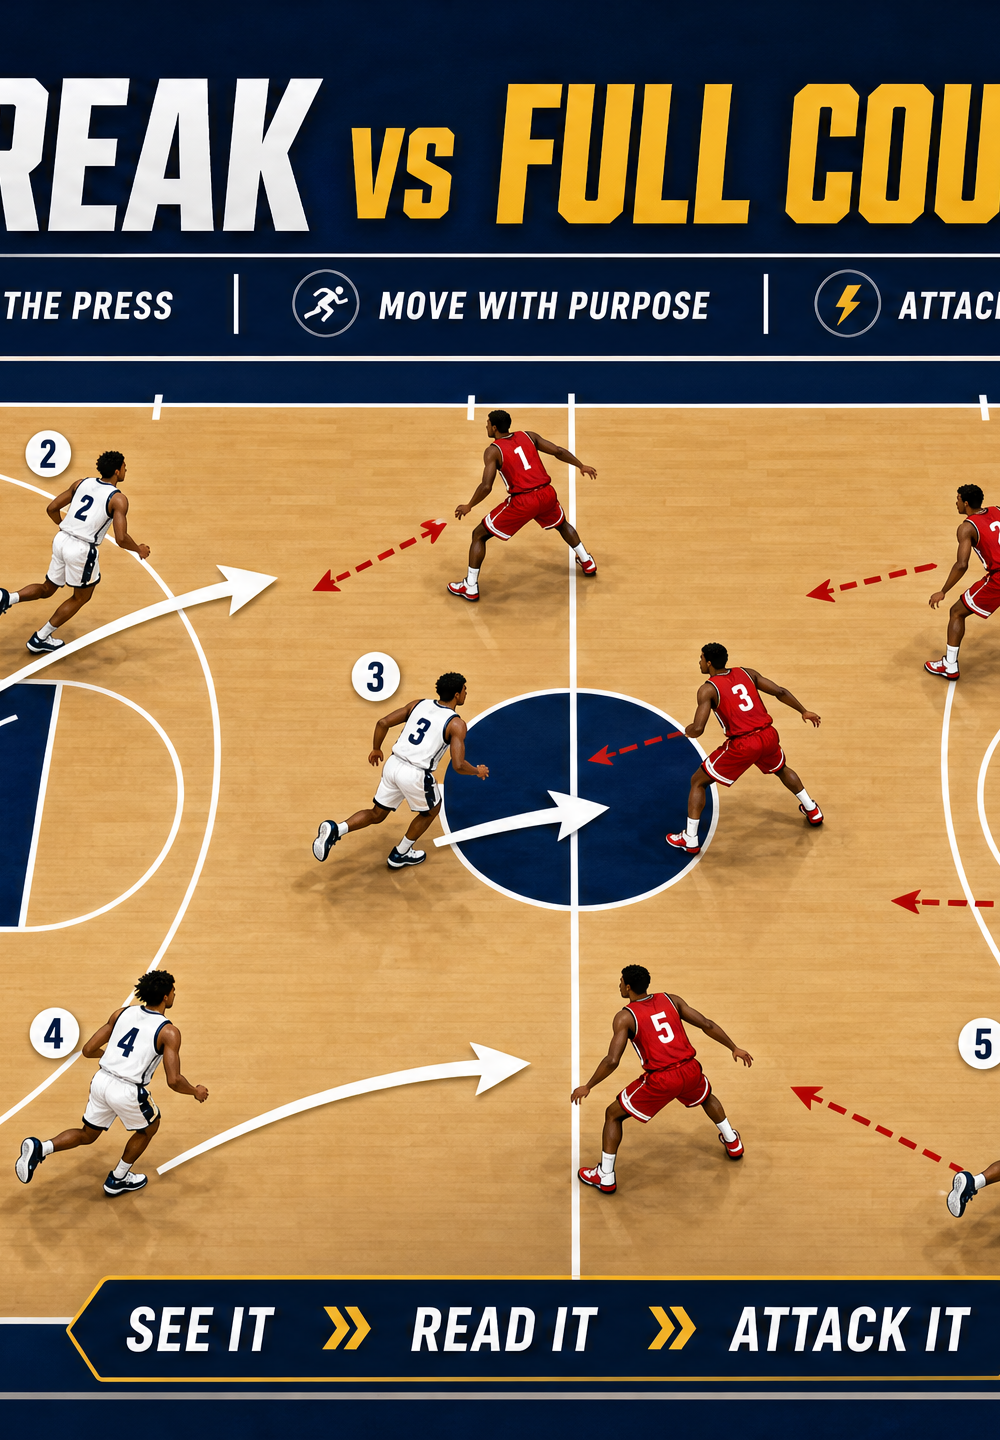
Full-court pressure can rattle even the most disciplined teams. The '4-Up' press break is designed to counter aggressive man-to-man and zone presses by creating structured spacing, multiple passing angles, and safe release valves. By positioning four players above the free-throw line extended, this alignment stretches the defense vertically, forcing them to cover more ground and opening up crucial passing lanes. Use this set play when opponents attempt to speed up your tempo, trap the inbounder, or deny the primary ball handler.
2. Setup
Court Dimensions: Standard FIBA Court (28m x 15m)
Equipment Needed: 1 Basketball, 5 Offensive Players, 5 Defensive Players (for live drills)
Player Positions (Initial Alignment):
- Player 1 (Point Guard): Inbounds the ball from the baseline.
- Player 2 (Shooting Guard): Positioned wide on the left sideline, at the free-throw line extended.
- Player 3 (Small Forward): Positioned wide on the right sideline, at the free-throw line extended.
- Player 4 (Power Forward): Positioned near the left low block (Safety Valve).
- Player 5 (Center): Positioned near the right low block (Safety Valve).
3. Step-by-Step Instructions
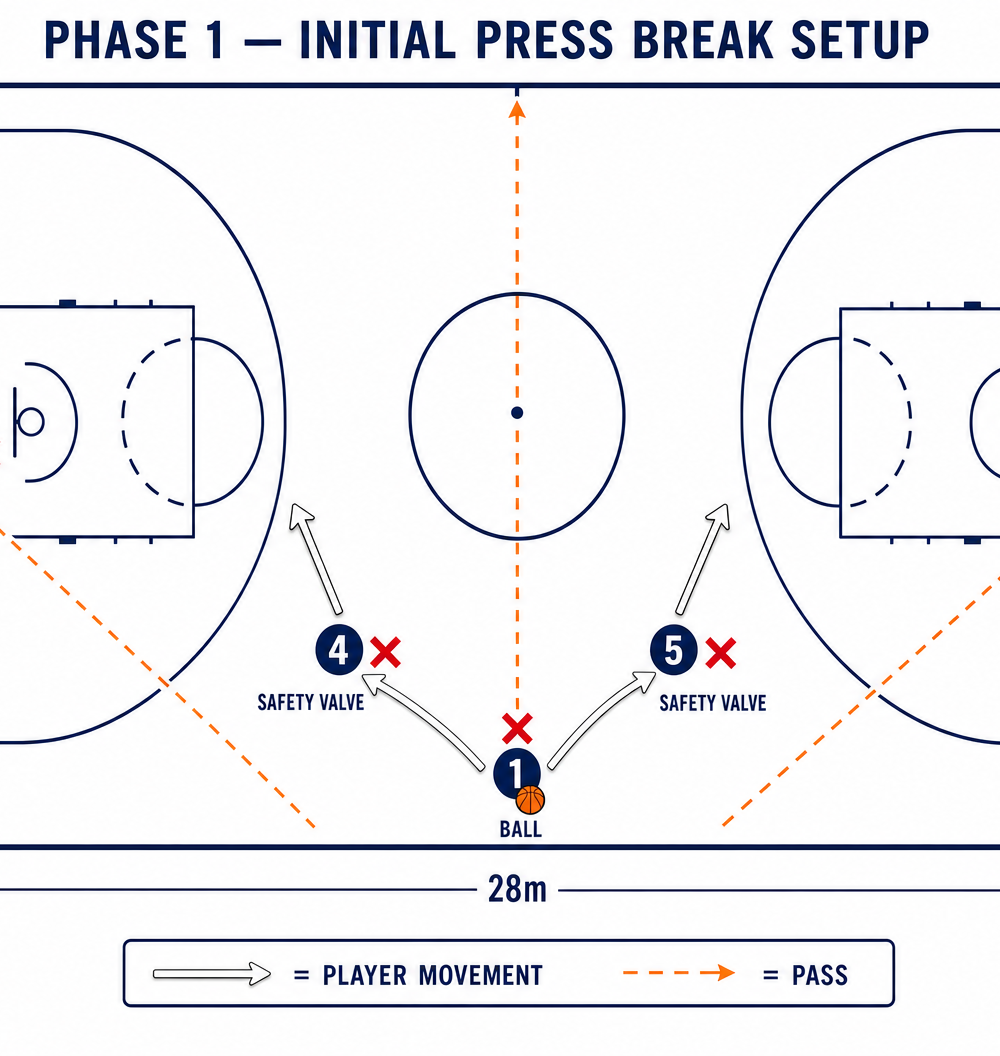
Phase 1: The Inbound and Initial Release
- The Setup: Player 1 slaps the ball to signal the start of the play. Players 2 and 3 V-cut aggressively to get open on the wings.
- The Primary Look: Player 1 looks to pass to either Player 2 or Player 3 as they pop out toward the ball. The preferred pass is to the strong side (the side the inbounder is favoring).
- The Safety Valve: If the primary wings are denied, Players 4 and 5 flash to the middle of the paint to provide a safe, short passing option.
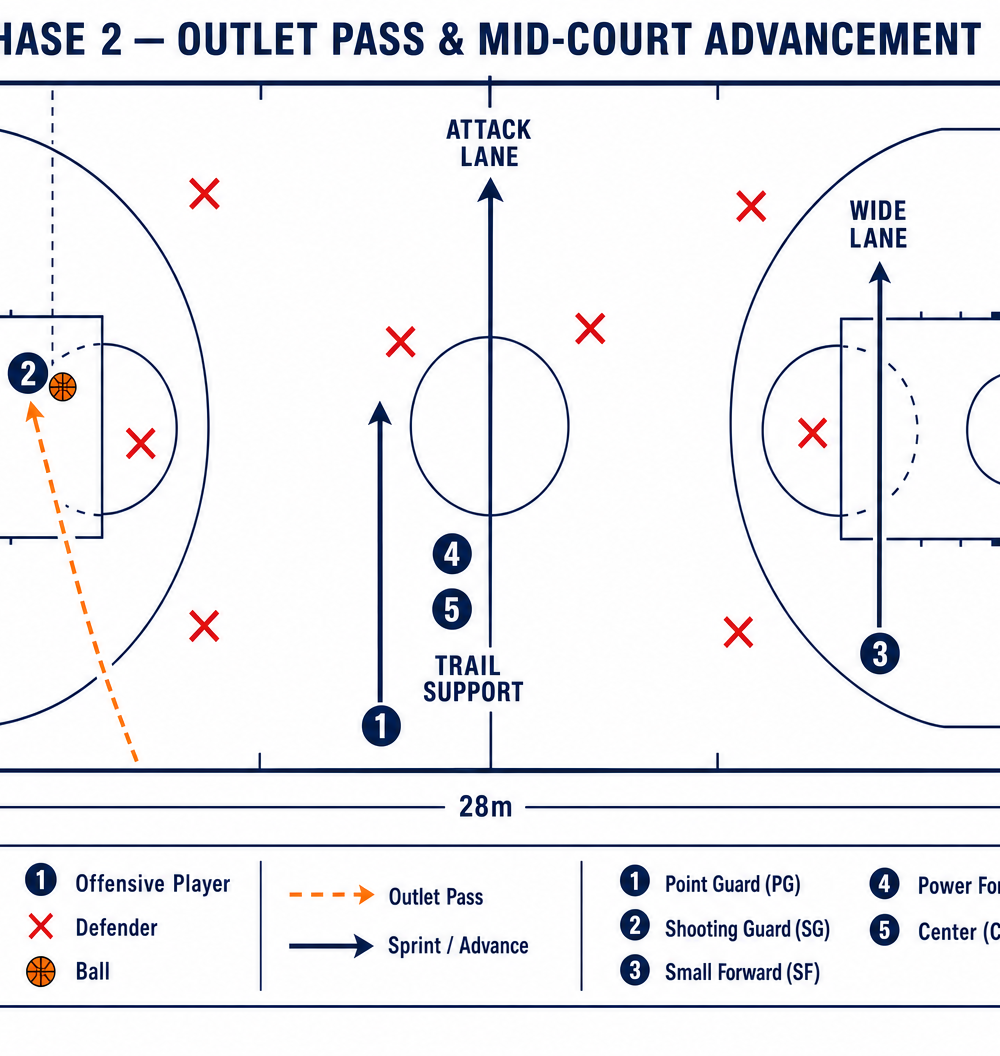
Phase 2: Advancing the Ball
4. The Outlet: Let's assume Player 2 receives the outlet pass on the left wing. Immediately upon catching the ball, Player 2 squares up to the court (faces forward) to survey the floor.
5. The Sprint: Player 1 (the inbounder) immediately sprints up the middle of the court, acting as the primary attack option.
6. The Weak Side Run: Player 3 sprints hard up the right sideline, filling the wide lane.
7. The Trail: Players 4 and 5 trail the play through the middle, staying behind the ball to provide a backward release option if Player 2 gets trapped.
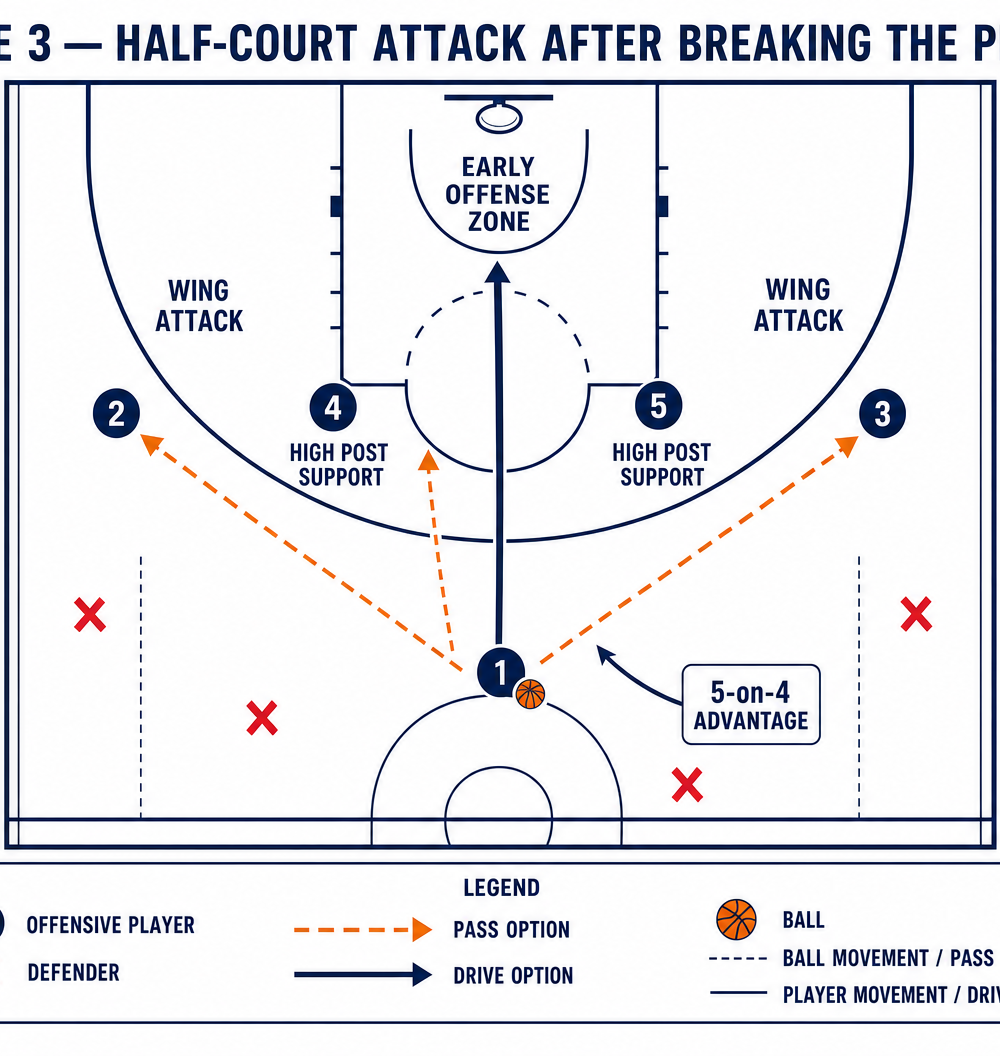
Phase 3: Crossing Half-Court and Early Offense
8. The Attack: Player 2 looks to pass ahead to the sprinting Player 1 or Player 3. If the pass is not available, Player 2 can dribble advance if there is clear space.
9. The Advantage: Once the ball crosses half-court (e.g., in the hands of Player 1 at the top of the key), the offense should look to exploit the retreating defense.
10. The Setup: Player 2 and Player 3 fill the wings. Players 4 and 5 rim run or set up at the high posts (elbows) to flow directly into your early offense or half-court sets.
4. Key Coaching Points
- Meet All Passes: Receivers must aggressively step toward the ball to prevent defenders from jumping the passing lane.
- Square Up Immediately: Upon catching the outlet pass, the receiver must face the opposite basket (triple threat position) to see the entire floor before putting the ball on the floor.
- Middle Penetration: The inbounder (Player 1) must sprint the middle of the floor. Attacking the middle splits the defense and creates passing angles to both sidelines.
- Don't Panic Dribble: Encourage players to use pass fakes and pivots rather than immediately putting the ball on the floor when pressured.
- Always Have a Trailer: Ensure the bigs (4 and 5) stay behind the line of the ball to offer a safe backward pass if the ball handler is trapped near the sideline.
5. Common Mistakes
- Running Away from the Ball: Receivers drifting up the court instead of V-cutting back toward the inbounder, leading to easy interceptions.
- Staring Down the Target: The inbounder telegraphing the pass, allowing the defense to anticipate and deflect the ball.
- Catching and Putting the Head Down: The outlet receiver immediately dribbling without surveying the floor, often dribbling directly into a trap.
- Slow Inbounder Sprint: The inbounder casually jogging up the court instead of sprinting to become an immediate offensive threat.
6. Variations & Progressions
- The 'Clear Out' Variation: If the defense is heavily denying the wings, have Players 2 and 3 sprint deep, allowing Players 4 and 5 to flash up to the free-throw line for the initial pass.
- Dribble Entry Progression: Practice scenarios where the initial pass is denied, forcing the inbounder to run the baseline (after a made basket) to find a better angle.
- 5-on-4 Advantage Drill: Start the drill with the offense already having successfully passed the ball to the middle of the court, focusing purely on attacking the retreating defense with a numbers advantage.
7. Age Adaptations
- Under 10s / Under 12s: Focus heavily on the fundamentals of pivoting, pass fakes, and stepping to meet the ball. Keep the structure simple, perhaps just focusing on getting the ball to the middle.
- Under 14s / Under 16s: Introduce the concept of reading the defense. Teach the outlet receiver how to identify traps and use the trailer effectively. Emphasize the speed of the inbounder's sprint.
- Open / Advanced: Incorporate complex reads, such as recognizing whether the defense is in a man-to-man or zone press, and adjusting the routes accordingly. Focus on flowing seamlessly from the press break into a structured early offense set.