Attacking Backs Move Off First Phase: The 'Crash & Wide' Option
A fundamental set play designed to manipulate the defense off first-phase possession, creating options for both direct penetration and wide exploitation.

Equipment Needed
1. Overview
This set play, often referred to as the 'Crash & Wide' option, is a staple for attacking backs off first-phase possession, typically from a scrum or lineout. Its primary objective is to ask immediate questions of the opposition's defensive line by offering two distinct, contrasting threats: a hard, direct runner attacking the inside channel, and a wider, sweeping movement designed to outflank the defense.
By presenting multiple threats simultaneously, the play forces defenders to make split-second decisions, often leading to hesitations or misreads that can be exploited. This move is particularly effective when the attacking team has secured clean, quick ball, allowing the playmakers the time and space to execute the necessary passes and running lines. It is a versatile play that can be used to establish forward momentum or to create scoring opportunities on the edges of the pitch.
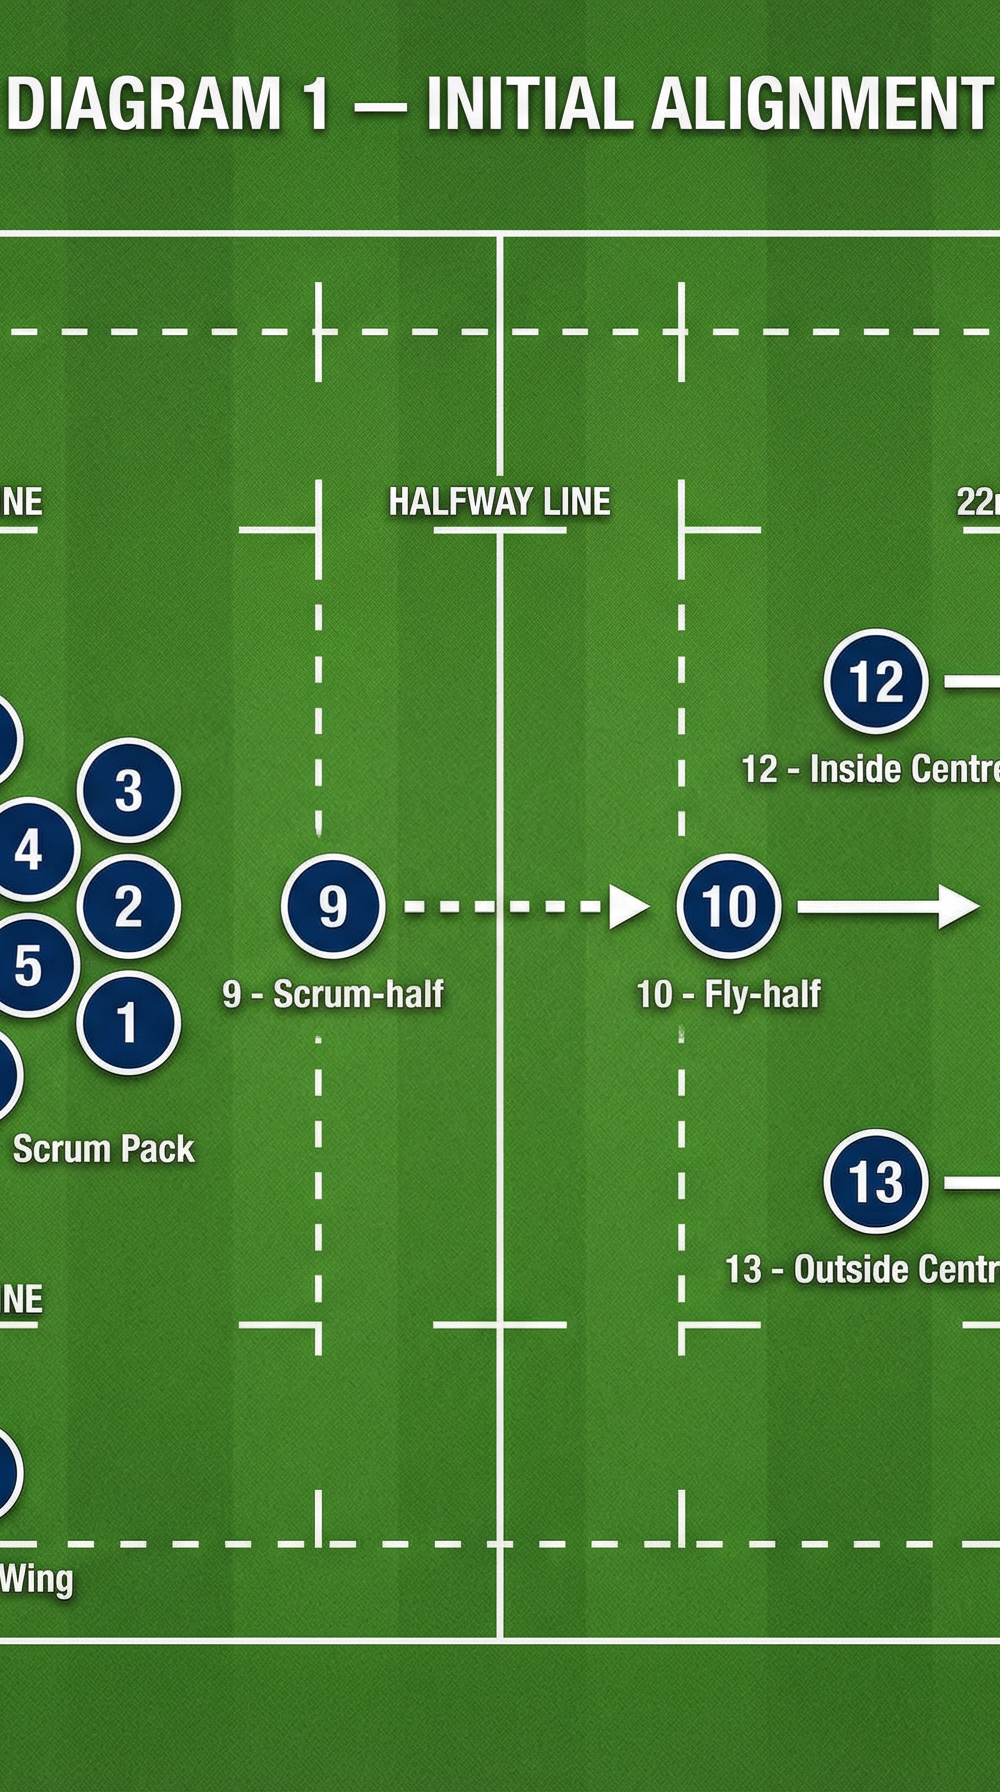
2. Setup

Proper setup is crucial for the success of this play. The alignment must be precise to ensure the timing of the runs and passes is perfect.
- Pitch Location: Best executed between the two 15m lines, providing enough space on either side for the play to develop.
- Initial Alignment: The scrum-half (9) secures the ball at the base. The fly-half (10) should be positioned approximately 8-10 meters deep and slightly wider than the scrum, depending on the defensive line speed. The inside centre (12) aligns slightly flatter and outside the 10, ready to hit a hard line. The outside centre (13) is positioned wider and slightly deeper than the 12. The fullback (15) and wings (11, 14) are positioned to exploit the space created by the primary runners.

3. Step-by-Step Instructions
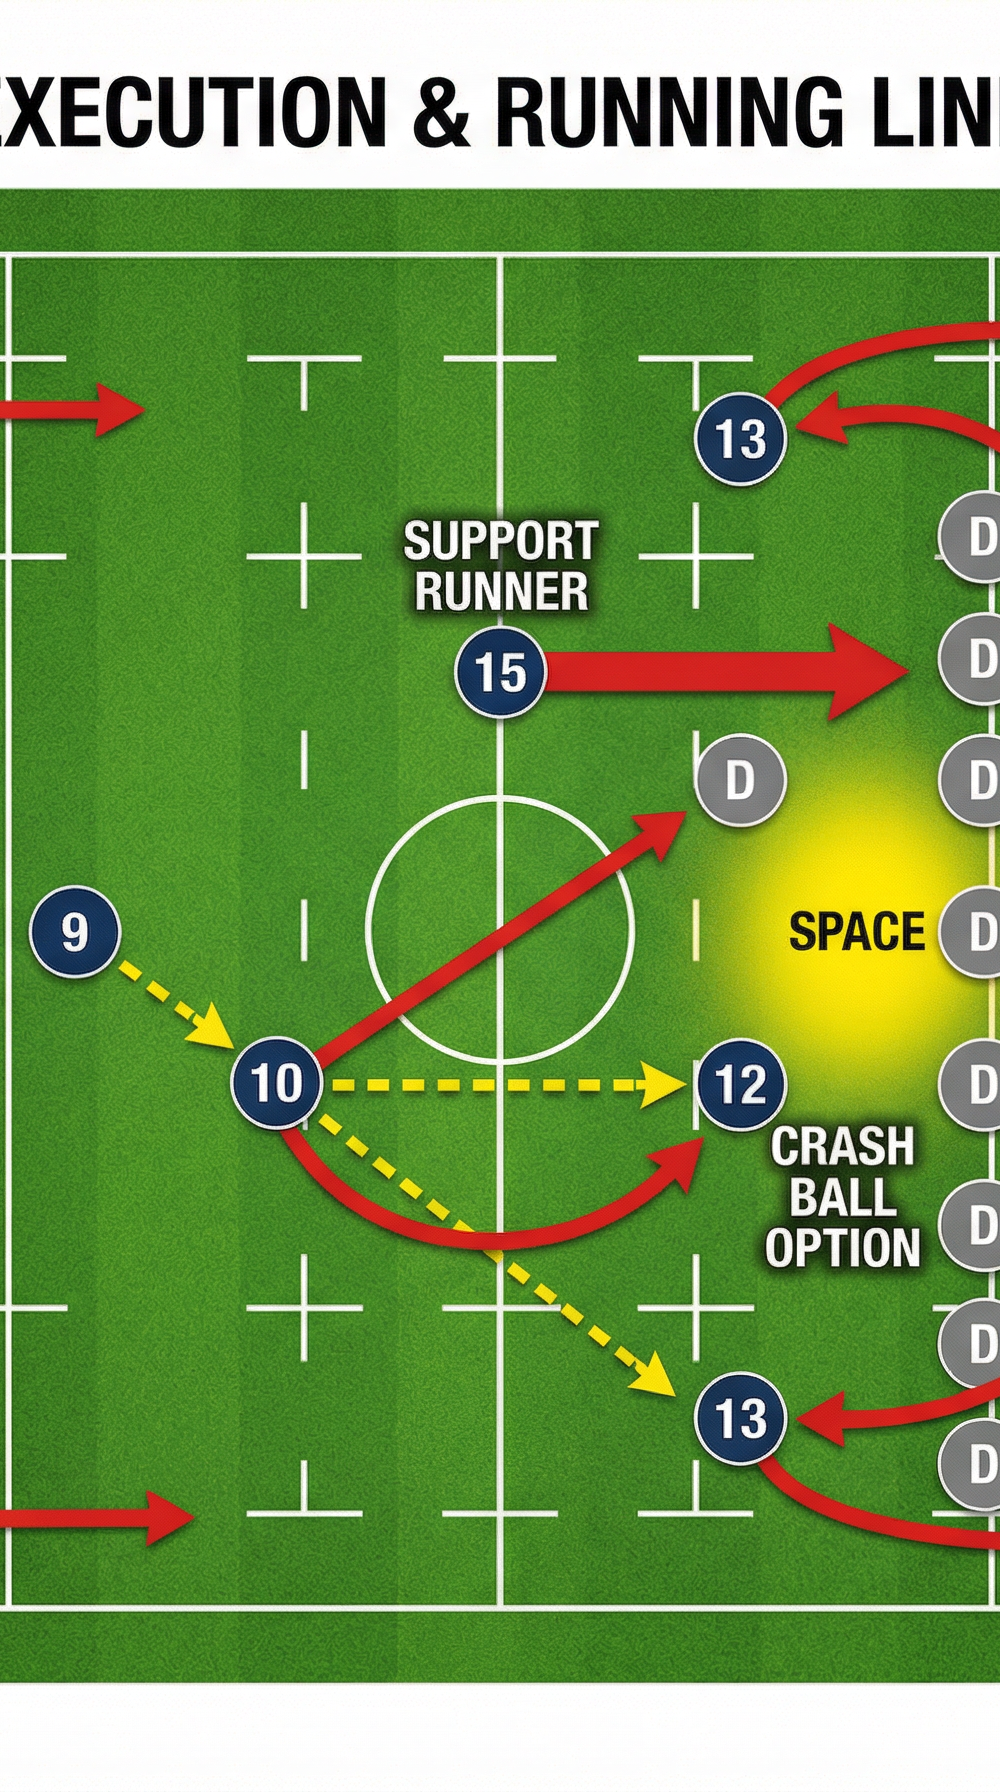
The execution of this play relies on precise timing, accurate passing, and aggressive running lines.
- The Delivery: The scrum-half (9) delivers a swift, accurate pass to the fly-half (10). The speed of this pass is critical to give the 10 time to read the defense.
- The Attack: The fly-half (10) receives the ball on the move, attacking the defensive line directly to commit the opposing fly-half or inside centre.
- The Crash Option: As the 10 attacks the line, the inside centre (12) runs a hard, direct line back 'against the grain' or into the gap between the opposing 10 and 12. This run must be aggressive and convincing to draw defenders inward.
- The Decision: The fly-half (10) reads the defense. If the defense drifts wide to cover the outside threat, the 10 plays a short, flat pass to the charging 12 (the 'Crash' option).
- The Wide Option: If the defense bites inward to cover the 12's run, the 10 throws a longer, flatter pass behind the 12 to the outside centre (13) or the fullback (15) entering the line (the 'Wide' option).
- Support and Continuity: Regardless of which option is chosen, the remaining players must provide immediate support to secure the breakdown or continue the attack if the line is broken.
4. Key Coaching Points
To ensure this play is executed effectively, coaches should focus on the following critical elements during training:
- Timing is Everything: The 12 must not overrun the 10. The run must be timed perfectly so the 12 arrives at the pass at maximum pace just as the 10 is engaging the defensive line.
- Square Shoulders: The 10 must keep their shoulders square to the defensive line until the last possible moment. Turning the shoulders too early telegraphs the pass and allows the defense to adjust.
- Convincing Decoys: Even if the 12 does not receive the ball, their run must be 100% committed. A half-hearted decoy run will not draw defenders and will compromise the wide option.
- Communication: Clear, concise communication between the 10, 12, and 13 is essential, especially regarding the defensive alignment and the chosen option.
- Depth and Pace: The wider players (13, 15, wings) must maintain adequate depth to receive the ball at pace. Catching the ball while stationary nullifies the advantage of the wide option.
5. Common Mistakes
Watch out for these frequent errors that can cause the play to break down:
- Flat Alignment: If the 10 or 12 align too flat, they reduce their reaction time and make it easier for the defense to rush up and shut down the play.
- Telegraphing the Pass: The 10 looking at the intended receiver too early, allowing the defense to anticipate the play and intercept or tackle the receiver man-and-ball.
- Poor Pass Quality: A slow, inaccurate, or looping pass from the 9 or 10 disrupts the timing of the entire move and gives the defense time to recover.
- Lack of Support: Players failing to react quickly after the pass is made, resulting in an isolated ball carrier and a potential turnover at the ensuing breakdown.
6. Variations & Progressions
Once the basic structure is mastered, introduce variations to keep the defense guessing:
- The Fullback Entry: Instead of the 13 taking the wide pass, the fullback (15) enters the line at pace from deep, creating an overload on the outside edge.
- The Switch: The 10 initiates a switch pass with the 12, who then has the option to crash or pass wide to the 13.
- The Inside Ball: The 10 shapes to pass wide but instead slips a short pass to a blindside winger or forward running an inside line off the 10's shoulder.
7. Age Adaptations
This play can be adapted for different age groups and skill levels:
- Under 10s - Under 12s: Focus purely on the basic execution of the catch, pass, and straight running lines. Simplify the options to just a direct run by the 10 or a simple pass to the 12.
- Under 14s - Under 16s: Introduce the concept of the decoy runner and the decision-making process for the 10. Emphasize the importance of timing and communication.
- Open Age / Senior: Implement the full complexity of the play, including multiple variations, complex running lines, and reading the subtle cues of the defensive alignment.