Final Seconds: The Double-Screen Buzzer Beater Set Play
Master the high-pressure end-of-game buzzer beater using a double-screen action that frees your best shooter for a game-winning three — with built-in safety valves and clear inbound triggers.
Equipment Needed
Overview
The Final Seconds Double-Screen Buzzer Beater is a structured end-of-game set play designed to generate a clean, high-percentage look for your primary shooter off a coordinated double-screen action with 5 seconds or fewer remaining on the clock. It is best deployed when your team trails by 1–3 points and requires a three-point attempt, or when trailing by 1–2 points and a mid-range pull-up off the curl is sufficient to win or tie.
This play is built on a core principle every coach must internalise: chaos favours the prepared team. When the crowd is loud, the clock is short, and the pressure is at its peak, your players must have a play they have run hundreds of times in practice — one that gives them a clear read, a primary option, and a safety valve. The Double-Screen Buzzer Beater delivers exactly that.
Use this play from a sideline out-of-bounds (SLOB) situation in the offensive half-court, triggered by a timeout call with 5–8 seconds remaining. It is equally effective from a full-court inbound with 6–8 seconds if your team has a strong long-pass option.
Setup

Equipment Required
- 1 basketball
- Full FIBA court (28m x 15m)
- 5 offensive players, 5 defensive players (or 5 offensive players for walk-through)
- Coaching whiteboard or tablet for pre-play diagram review
- Stopwatch or shot clock for timed repetitions
Court Setup
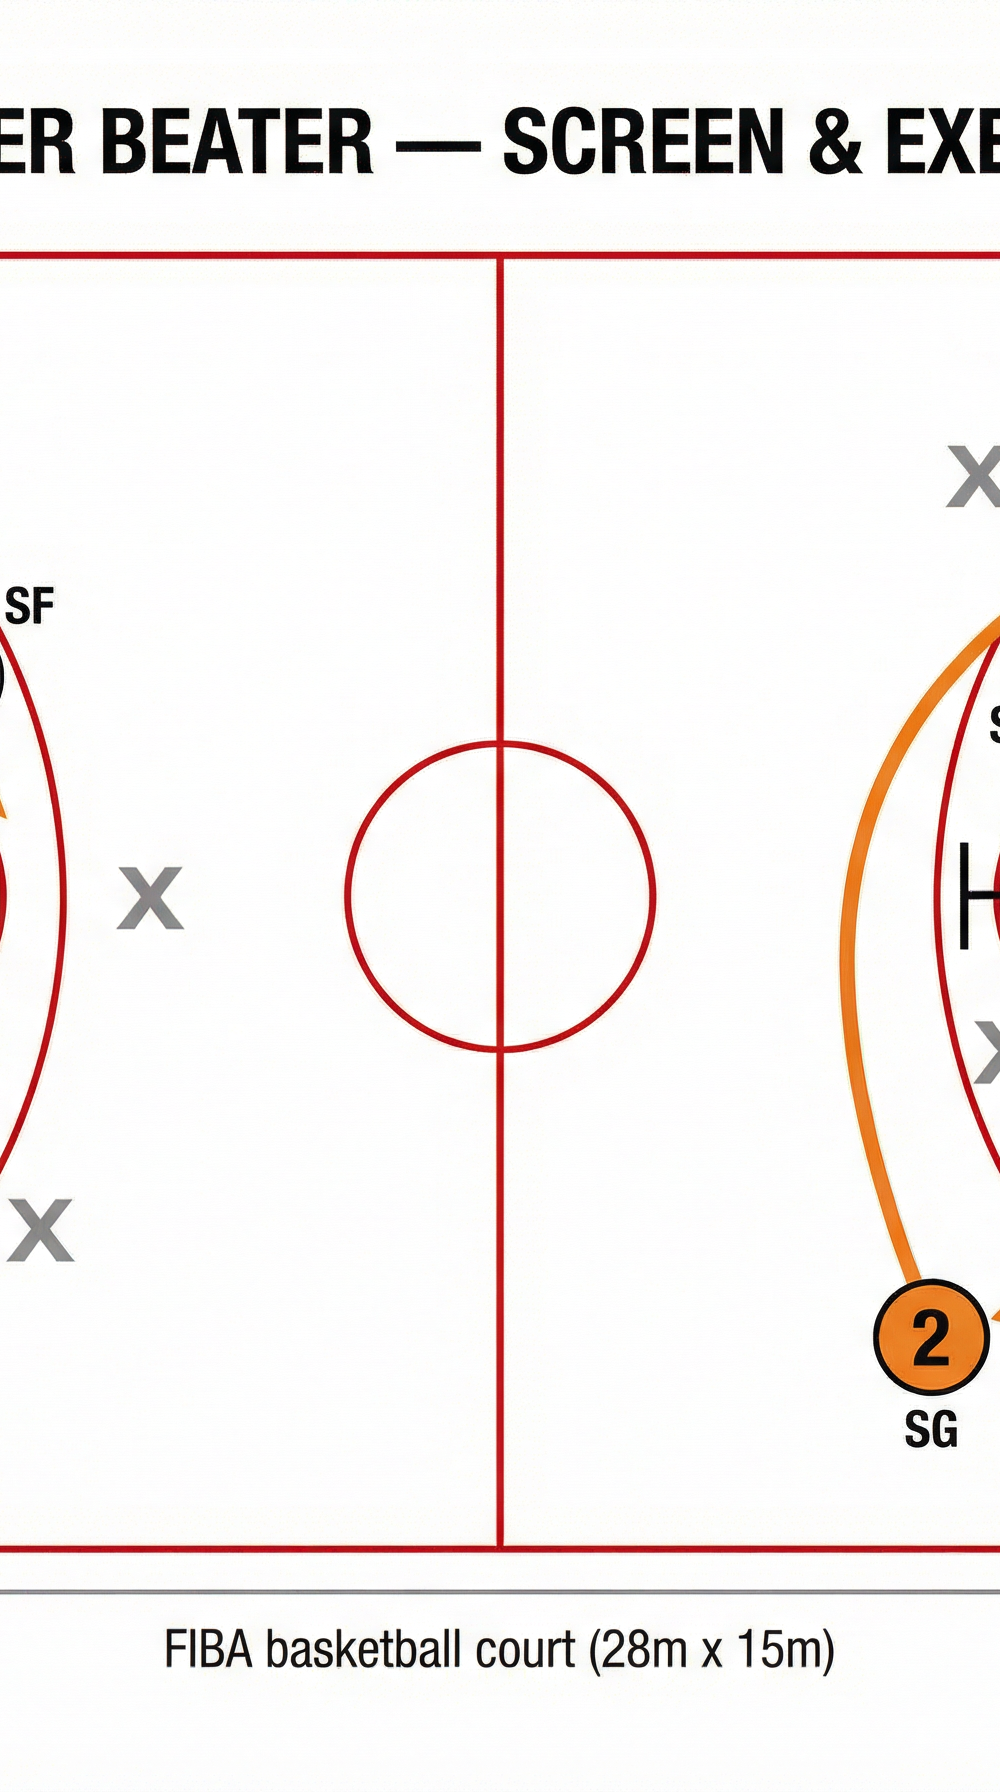
The play initiates from a sideline out-of-bounds position on the right side of the court, approximately 3–4 metres inside the offensive half, level with the free-throw line extended. This positioning gives the inbounder (1) the widest possible passing angle and maximum court vision.
Starting Player Positions
| Player | Position | Starting Location |
|---|---|---|
| 1 — Point Guard | Inbounder | Sideline, right side, ~14m from the baseline |
| 2 — Shooting Guard | Primary Shooter | Right block, inside the paint |
| 3 — Small Forward | Safety Valve | Left elbow, ~5m from the basket |
| 4 — Power Forward | Cross-Screener | Left block |
| 5 — Centre | Back-Screener | Right elbow, ~5m from the basket |
Step-by-Step Instructions

Step 1 — Timeout & Whiteboard (30 seconds before inbound)
Call your timeout with 6–8 seconds remaining. Gather all five players immediately. Draw the play clearly on the whiteboard. Assign roles by name, not just number. Confirm the signal word or hand gesture that triggers the inbound pass. Remind Player 2 of their shooting target — corner three, wing three, or pull-up mid-range — based on the score differential.
Step 2 — Set the Formation (0:00 on timeout clock)
As players take the court, Player 1 steps out of bounds on the right sideline at approximately the free-throw line extended (14m from the baseline). Players 2, 4, and 5 stack vertically inside the paint near the right block. Player 3 positions at the left elbow, approximately 5m from the basket, facing the inbounder.
Step 3 — Initiate the Action (on Player 1's signal)
Player 1 slaps the ball or calls the trigger word. Simultaneously:
- Player 5 steps from the right elbow toward the right block and sets a back-screen on Player 2's defender, angling their body to seal the defender toward the baseline.
- Player 4 cuts across the paint from the left block and sets a cross-screen on the help-side defender, creating a lane for Player 3 to flash if needed.
Step 4 — Primary Cutter Reads the Screen (1–2 seconds after signal)
Player 2 takes one hard step toward the baseline (selling a baseline cut), then sharply curls off Player 5's back-screen toward the right wing or right corner of the three-point arc — approximately 6.75m from the basket. The cut must be tight to the screener's shoulder. Player 2 should arrive at the catch point already in their shooting pocket, feet set or in a one-motion catch-and-shoot rhythm.
Step 5 — Inbound Pass (2–3 seconds after signal)
Player 1 delivers a sharp, flat chest pass to Player 2 at the wing or corner. The pass must be thrown to the shooting hand side, slightly above the waist — never a lob. If Player 2's defender fights over the screen and cuts off the primary curl, Player 1 immediately looks to Player 3, who flashes from the left elbow to the top of the key as the safety valve.
Step 6 — Shot or Drive Decision (3–4 seconds after signal)
Player 2 catches and shoots immediately. There is no dribble unless the defender closes out recklessly and a one-dribble pull-up is available. Player 3 (safety valve at the top of the key) is the reset option if the primary is denied. Players 4 and 5 crash the offensive glass immediately on the shot for a potential tip-in or put-back.

Step 7 — Offensive Rebounding Assignments
On release of the shot:
- Player 5 crashes the right block.
- Player 4 crashes the left block.
- Player 3 holds the top of the key for defensive balance.
- Player 1 steps inbounds and sprints to the right corner for a potential kick-out if the shot is not taken.
Key Coaching Points

1. The Screen Must Be Legal and Stationary. Player 5's back-screen is the engine of this play. Drill your centre to set their feet before the cutter moves, with feet shoulder-width apart and arms crossed at the chest. A moving screen in a buzzer beater situation will result in a foul call and a dead ball — a catastrophic outcome. Walk through the screen angle in every practice repetition.
2. The Cutter Must Sell the Fake. Player 2's one-step baseline sell is what creates the separation off the screen. If Player 2 simply runs to the wing without the fake, a disciplined defender will anticipate the curl and cut it off. Coach your shooter to make the fake look real — drop the shoulder, take a genuine step toward the baseline — before exploding off the screen.
3. Catch in the Shooting Pocket. Player 2 must be ready to shoot the instant the ball arrives. Hands up, feet moving into position before the catch, eyes on the rim as the ball arrives. The time between catch and release in a buzzer beater must be under 0.5 seconds. Drill catch-and-shoot repetitions from the wing and corner until this is automatic.
4. The Inbounder Must Read the Defence First. Player 1 should take a full second to scan the defence before slapping the ball. Identify where Player 2's defender is positioned. If the defender is already shading the curl, Player 1 should signal Player 3 to flash early. A rushed inbound pass into traffic is worse than a deliberate reset to the safety valve.
5. Know the Score Differential. This play must be adapted based on the scoreboard. If trailing by 3, Player 2 must shoot the three — no driving, no mid-range. If trailing by 1 or 2, a mid-range pull-up off the curl is acceptable. Brief your players on this decision tree explicitly during the timeout.
6. Offensive Rebounders Must Sprint, Not Drift. Players 4 and 5 crashing the glass are not spectators — they are active participants in the play's success. A tipped shot that goes in counts the same as a clean make. Coach your bigs to read the shot arc and attack the glass with intent from the moment the ball leaves Player 2's hands.
Common Mistakes

Mistake 1 — The Inbounder Panics and Forces the Pass. Under pressure, Player 1 will often rush the inbound pass before the screen has been set, delivering the ball into a crowded area with no separation. Correct this by drilling the play with a stopwatch and teaching Player 1 that 2 seconds of patience will always yield a better look than an immediate forced pass. Use the phrase: "Wait for the screen, then deliver."
Mistake 2 — Player 2 Drifts Instead of Cutting. A common error is Player 2 jogging to the wing rather than making a sharp, explosive cut off the screen. This gives the defender time to recover and contest. Correct by placing a cone at the screen position and requiring Player 2 to physically brush the cone on every repetition, reinforcing the tight curl.
Mistake 3 — The Screener Moves Too Early. Player 5 will often begin moving toward the screen before Player 2 is ready, resulting in a moving screen violation. Establish a clear verbal or visual cue between Player 2 and Player 5 — for example, Player 2 claps once to signal they are ready for the screen. Drill this communication until it is instinctive.
Mistake 4 — Forgetting the Safety Valve. Coaches and players become so focused on the primary option that Player 3's safety valve role is neglected. If Player 1 cannot find Player 2, the play breaks down entirely. Dedicate specific repetitions to the safety valve scenario: have a defender deny Player 2 completely and force Player 1 to find Player 3 at the top of the key.
Mistake 5 — Shooting a Two When a Three Is Required. This is a game-management error, not a technical one, but it is equally costly. If trailing by 3 and Player 2 receives the ball at the elbow (inside the arc), they must not shoot. Drill the score-differential decision tree explicitly and quiz players during walk-throughs: "We're down three — where do you need to be?"
Variations & Progressions
Variation 1 — The Flare Action (Easier)
For teams with a less reliable screener or younger players who struggle with the back-screen timing, replace the back-screen with a flare screen. Player 5 sets a screen on the wing, and Player 2 flares to the corner rather than curling to the wing. This is a simpler read for both the screener and the cutter, with a slightly longer pass distance for Player 1. Ideal for under-14 groups or teams new to set-play basketball.
Variation 2 — The Stagger Screen (Intermediate)
For more advanced teams, replace the single back-screen with a stagger double-screen: Player 4 sets the first screen at the right block, and Player 5 sets the second screen at the right elbow. Player 2 runs off both screens in sequence, creating two opportunities for separation. This is significantly harder for the defence to navigate and produces cleaner looks against well-organised man-to-man defences.
Variation 3 — The Slip Option (Advanced)
Add a slip read for Player 5. If Player 5 recognises that their defender is hedging hard to stop Player 2's curl, Player 5 slips the screen and cuts directly to the basket for a lob pass from Player 1. This turns the play into a two-option read — curl for Player 2 or lob for Player 5 — and is extremely difficult to defend. Introduce this only after the base play is fully mastered.
Age Adaptations

Under 10 & Under 12: Simplify to a single screen (Player 5 only) and remove the safety valve read. Player 1 is your most composed ball-handler, not necessarily your point guard by position. Reduce the inbound distance — use a baseline inbound rather than sideline to shorten the pass. Focus the session entirely on the catch-and-shoot mechanic rather than the full play structure. Run the play at half-speed with no defence for the first 10 repetitions.
Under 14 & Under 16: Run the full play as described, but introduce the safety valve read only after the primary action is consistent. Begin adding a token defender on Player 2 after 5 successful walk-throughs. Introduce score-differential decision-making (two vs. three required) as a verbal quiz during timeouts. At this age, the mental rehearsal of the play is as important as the physical execution.
Open / Senior: Run the full play including the slip option (Variation 3) and introduce defensive schemes — zone, box-and-one, and full-court press — that the play must adapt to. Senior players should be able to call audibles at the line of scrimmage based on defensive positioning. Conduct full 5v5 live repetitions with a shot clock set to 5 seconds, simulating true game pressure. Film and review every repetition for post-session analysis.