The 'Lightning' Buzzer Beater: A Game-Winning Set Play
Master the 'Lightning' set play to create a high-percentage, open shot in the dying seconds of a close game.

Equipment Needed
1. Overview
The "Lightning" set play is designed specifically for end-of-game situations where you need a quick, reliable shot to tie or win the game. It leverages a combination of misdirection, a solid screen-the-screener action, and precise timing to free up your best shooter. This play is highly effective against man-to-man defenses that are overly aggressive or prone to switching late in the shot clock. When executed correctly, it forces the defense to make a split-second decision, often resulting in an open look from the wing or corner.
2. Setup

Equipment Needed:
- 1 Basketball
- FIBA Regulation Court (28m x 15m)
- 5 Players
Court Setup & Player Positions:

The play begins in a 1-4 high alignment, but quickly transitions. The initial setup is as follows:
- 1 (Point Guard): Starts with the ball near the half-court line, dictating the pace and reading the defense.
- 2 (Shooting Guard - Primary Target): Positioned on the right wing, just outside the three-point arc.
- 3 (Small Forward): Positioned on the left wing, mirroring the 2 guard.
- 4 (Power Forward): Starts at the right elbow (high post).
- 5 (Center): Starts on the left low block.
3. Step-by-Step Instructions
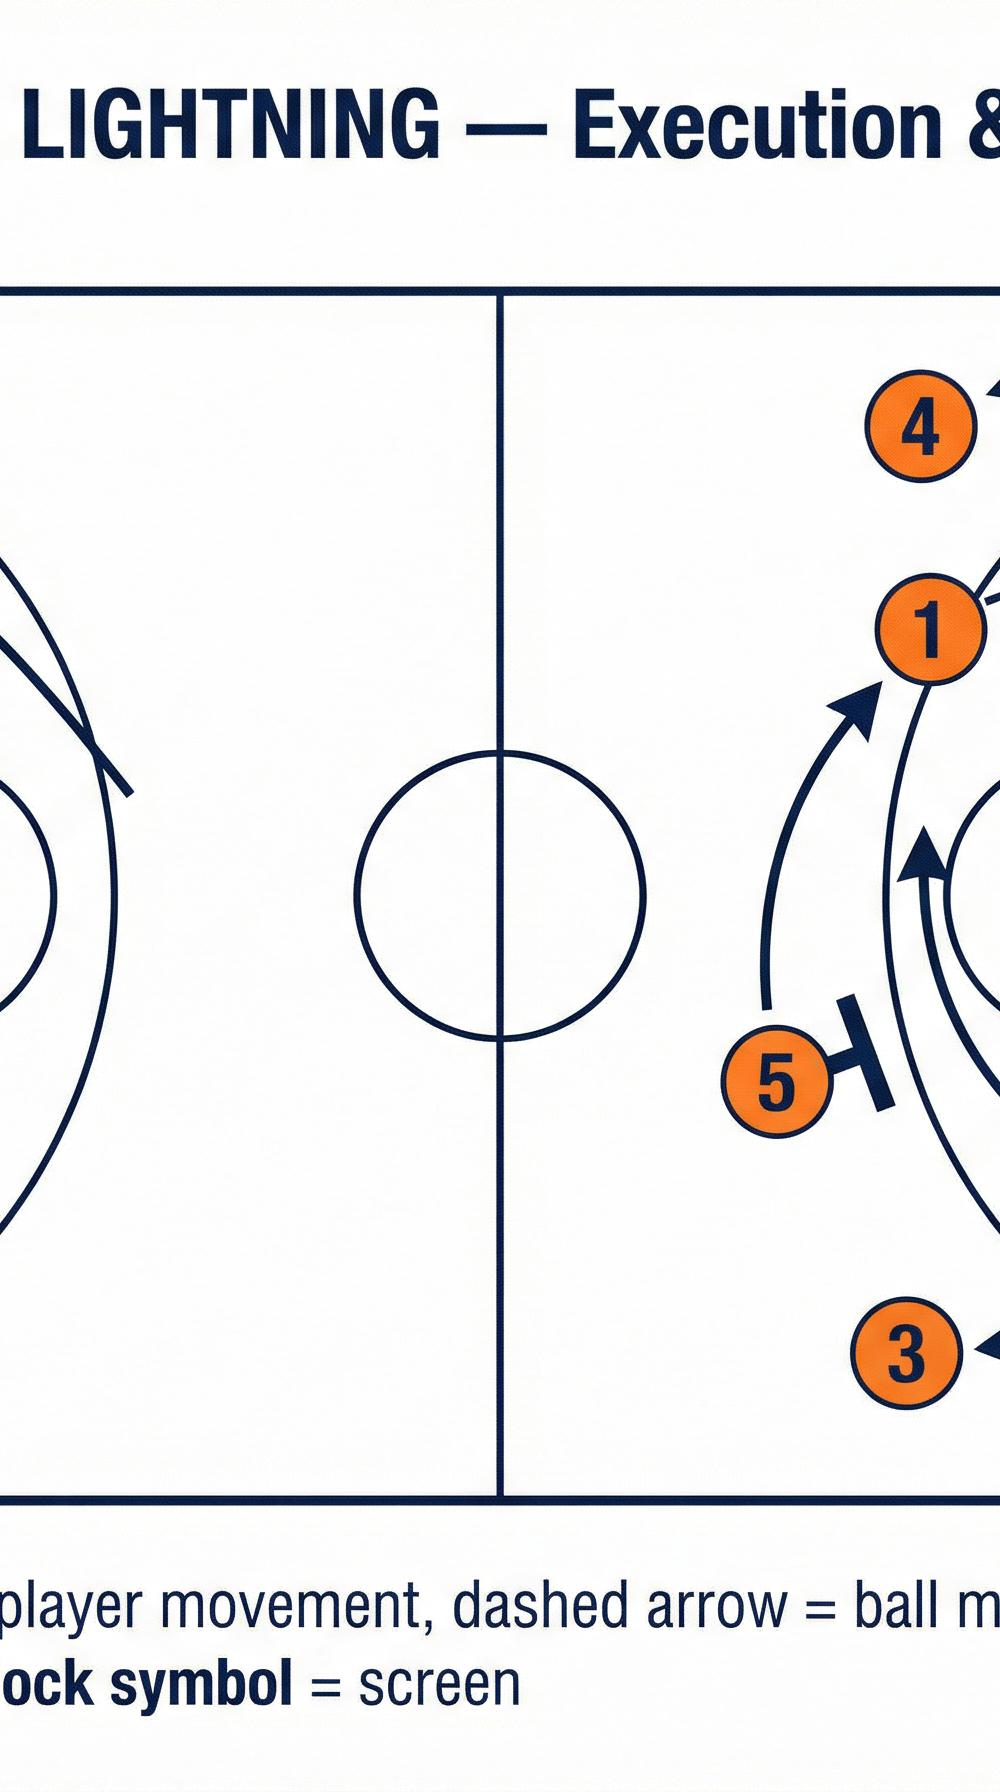
Phase 1: The Initiation
- The Dribble Entry: Player 1 initiates the play by aggressively dribbling toward the right elbow area. This action is designed to draw the attention of the defense and compress the strong side.
- The First Cut: Simultaneously, Player 3 cuts hard from the left wing down to the left corner. This clears out the weak side and forces their defender to make a choice: follow the cut or provide help defense.
Phase 2: The Action
3. The Ball Screen: As Player 1 approaches the right elbow, Player 5 sprints up from the left block to set a hard, angled ball screen for Player 1. This screen must be set with a wide base and perfect timing to be effective.
4. The Flare Screen: The critical misdirection happens here. As Player 1 uses the screen from 5, Player 4 (who was at the right elbow) steps out to set a flare screen for Player 2.
5. The Curl: Player 2 uses the screen from 4, curling tightly around it to pop out to the right corner/deep wing area.

Phase 3: The Execution
6. The Pass: Player 1, coming off the ball screen from 5, reads the defense. If the flare screen was successful, Player 1 delivers a crisp, accurate pass to Player 2 stepping into the shot.
7. The Shot: Player 2 receives the pass in rhythm, elevates, and takes the shot. Player 4 and 5 crash the offensive glass immediately in case of a miss.
4. Key Coaching Points

- Timing is Everything: The flare screen (4 on 2's defender) must occur at the exact moment Player 1 is using the ball screen from 5. If it's too early or too late, the defense will recover.
- Sell the Misdirection: Player 1 must aggressively attack the ball screen to make the defense believe they are looking to score or roll. This freezes the help defense on the weak side.
- Quality of Screens: Both the ball screen (5) and the flare screen (4) must be solid. Screeners need a wide base and must avoid moving screens. A weak screen will ruin the play.
- Pass Accuracy: Player 1 must deliver the ball perfectly into Player 2's shooting pocket. A poor pass disrupts the shooter's rhythm and allows the defense to close out.
- Read the Defense: If the defense switches the flare screen aggressively, Player 4 must be prepared to slip the screen and cut hard to the basket for a potential dump-off pass from Player 1.
5. Common Mistakes

- Rushing the Play: Players often panic in end-of-game situations. Emphasize patience and executing the cuts and screens at the correct pace.
- Telegraphing the Pass: If Player 1 stares down Player 2 the entire time, the defense will anticipate the pass and intercept it. Player 1 must keep their eyes up and look at the rim as they come off the ball screen.
- Poor Spacing: If Player 3 doesn't clear out to the corner effectively, the weak side becomes congested, making it difficult for Player 1 to operate and read the defense.
- Fading on the Shot: The shooter (Player 2) must step into the pass and go straight up. Fading away decreases the shooting percentage significantly.
6. Variations & Progressions
- The Slip Option (Progression): If the defense starts switching the flare screen (4 on 2's defender), have Player 4 fake the screen and immediately slip to the basket for a layup.
- The Pick and Pop (Variation): If Player 5 is a capable shooter, instead of rolling hard after the ball screen, they can pop out to the three-point line. If the defense collapses on Player 1 or Player 2, Player 5 will be wide open.
- Decoy 2 (Variation): Use Player 2 as a decoy. Have them curl hard off the flare screen to draw two defenders, opening up Player 4 for a quick post-up or Player 1 for a drive to the basket.
7. Age Adaptations
- Under 12s: Simplify the play. Remove the flare screen and focus entirely on a simple pick-and-roll action between 1 and 5, with the other players spacing the floor.
- Under 14s: Introduce the flare screen, but focus heavily on the mechanics of setting a legal screen and making a good pass. The timing might not be perfect, but the concept is important.
- Under 16s & Open: Run the play at full speed with all variations. Emphasize reading the defense (e.g., slipping the screen if they switch) and executing under pressure.