Blindside Strike: Number 8 Pick & Go with Flat Support
Exploit the narrow channel from a 5m scrum with this aggressive blindside attack, utilizing your Number 8 and a flat-running blindside flanker to break the gain line and set up a wide second phase.

Equipment Needed
Overview
The "Blindside Strike" is a highly effective set piece move designed to exploit the narrow channel when you have a scrum positioned close to the touchline (typically 5m-10m in). This play isolates the opposition's blindside flanker and scrum-half, creating a localized 2v1 or 3v2 overload. By attacking the blindside first, you force the defense to fold around the corner, creating space on the openside for a rapid second-phase attack. It is best used when you have a dominant Number 8 and a dynamic Number 6 who runs hard, flat lines.
Setup
- Pitch Position: Left-hand side of the pitch, 5m-8m from the touchline.
- Formation: Standard 3-4-1 scrum pack.
- Key Personnel: Number 8 (primary ball carrier), Number 6 (primary support/offload option), Number 9 (distributor/secondary support), Number 12 (looping support).

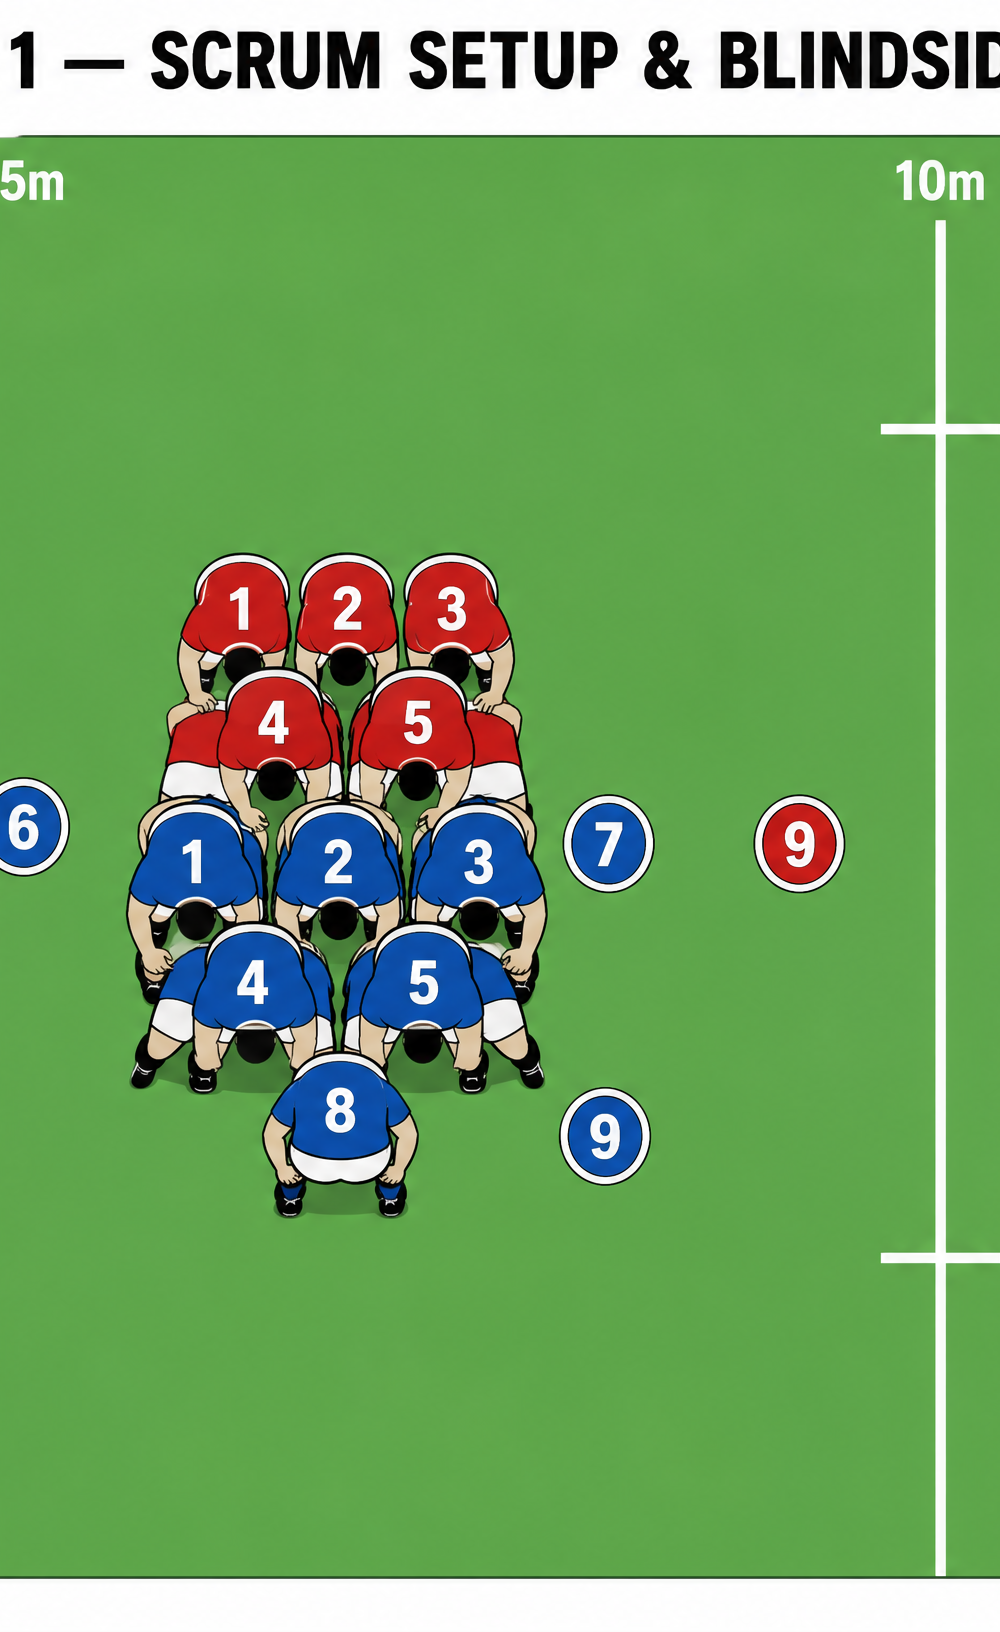
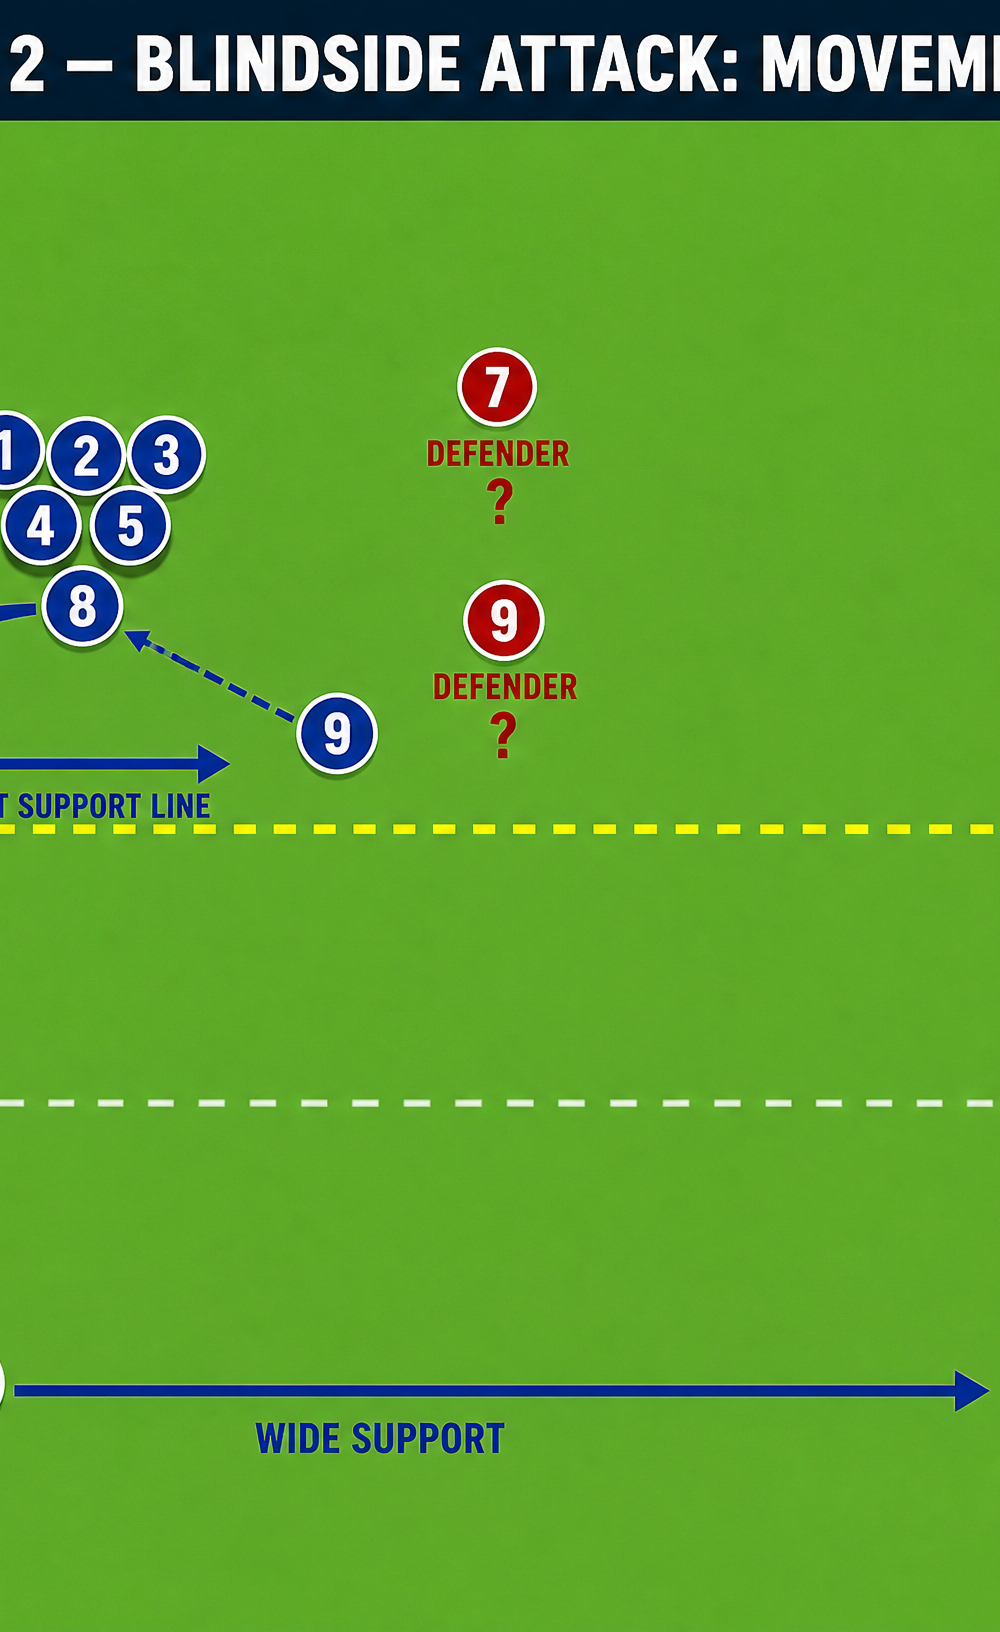
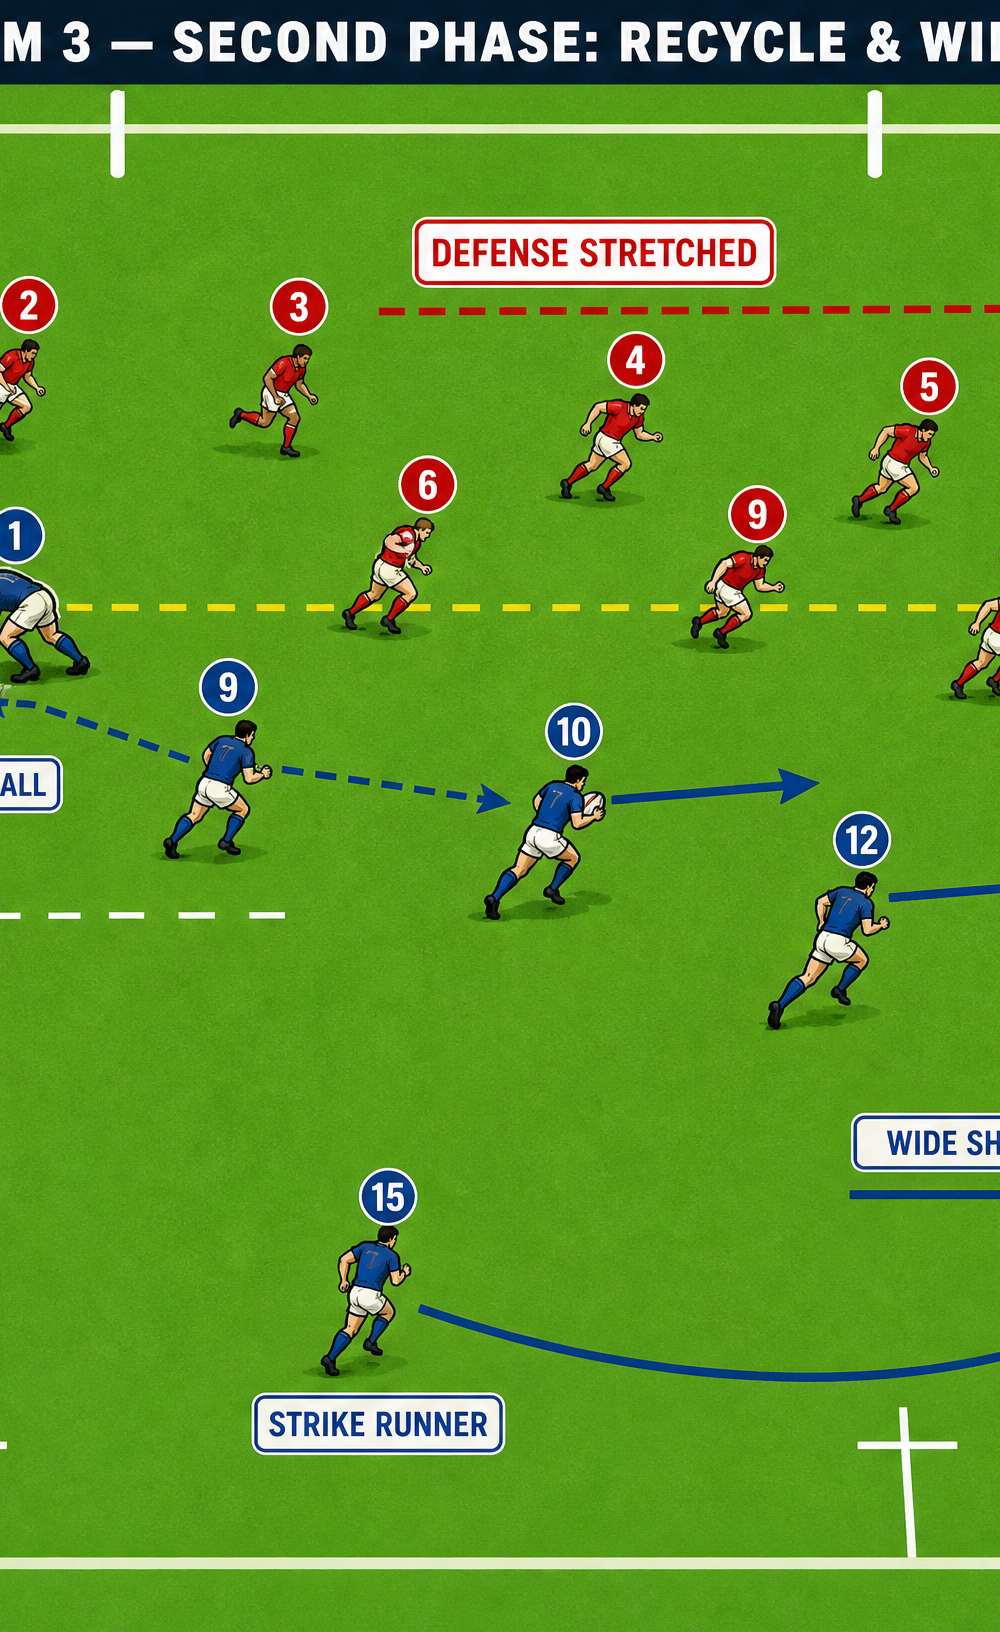
Diagram 1: Initial Setup
As shown in Diagram 1, the scrum is set 5m from the left touchline. The attacking Number 6 positions themselves slightly wider than normal, ready to run a flat line. The attacking Number 9 is positioned to clear the ball quickly or track the Number 8.
Step-by-Step Instructions
- The Win: The front row must secure stable possession. The Number 8 controls the ball at the base, keeping it shielded from the opposing scrum-half.
- The Break: As the ball reaches the back, the Number 8 picks the ball and aggressively attacks the blindside channel. The initial step must be explosive to beat the opposing Number 9 to the corner.
- The Support Line: Simultaneously, the Number 6 detaches from the scrum and runs a hard, flat line parallel to the gain line, staying on the Number 8's inside shoulder.
- The Decision (Phase 1):
- Option A (Carry): If the opposing Number 7 commits to the Number 6, the Number 8 carries hard into the space, aiming to cross the gain line and set a rapid ruck.
- Option B (Offload): If the opposing Number 7 steps out to tackle the Number 8, the Number 8 executes a short pop pass inside to the hard-running Number 6.
- The Recycle: Whoever carries the ball must fight to go forward in the tackle. The Number 9 tracks the play to provide immediate service from the ensuing ruck.
- The Second Phase: With the defense now condensed on the blindside, the Number 9 fires a long pass to the Number 10 on the openside. The backline executes a wide shift, utilizing the Number 15 as a strike runner to exploit the overlap.
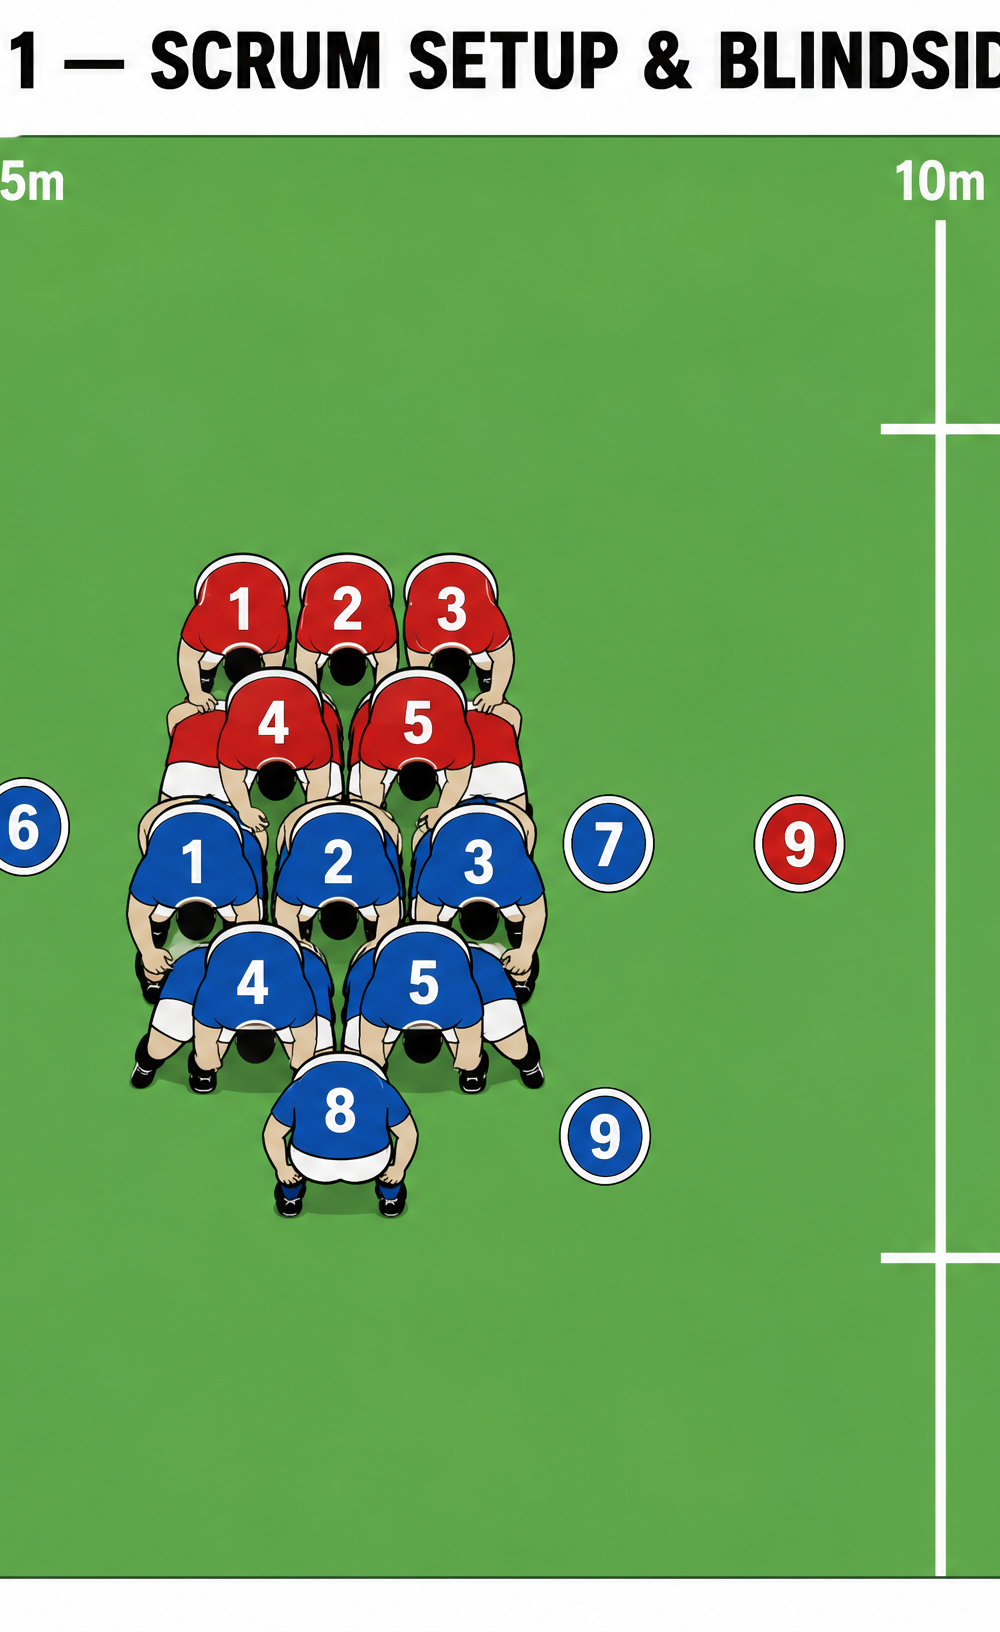
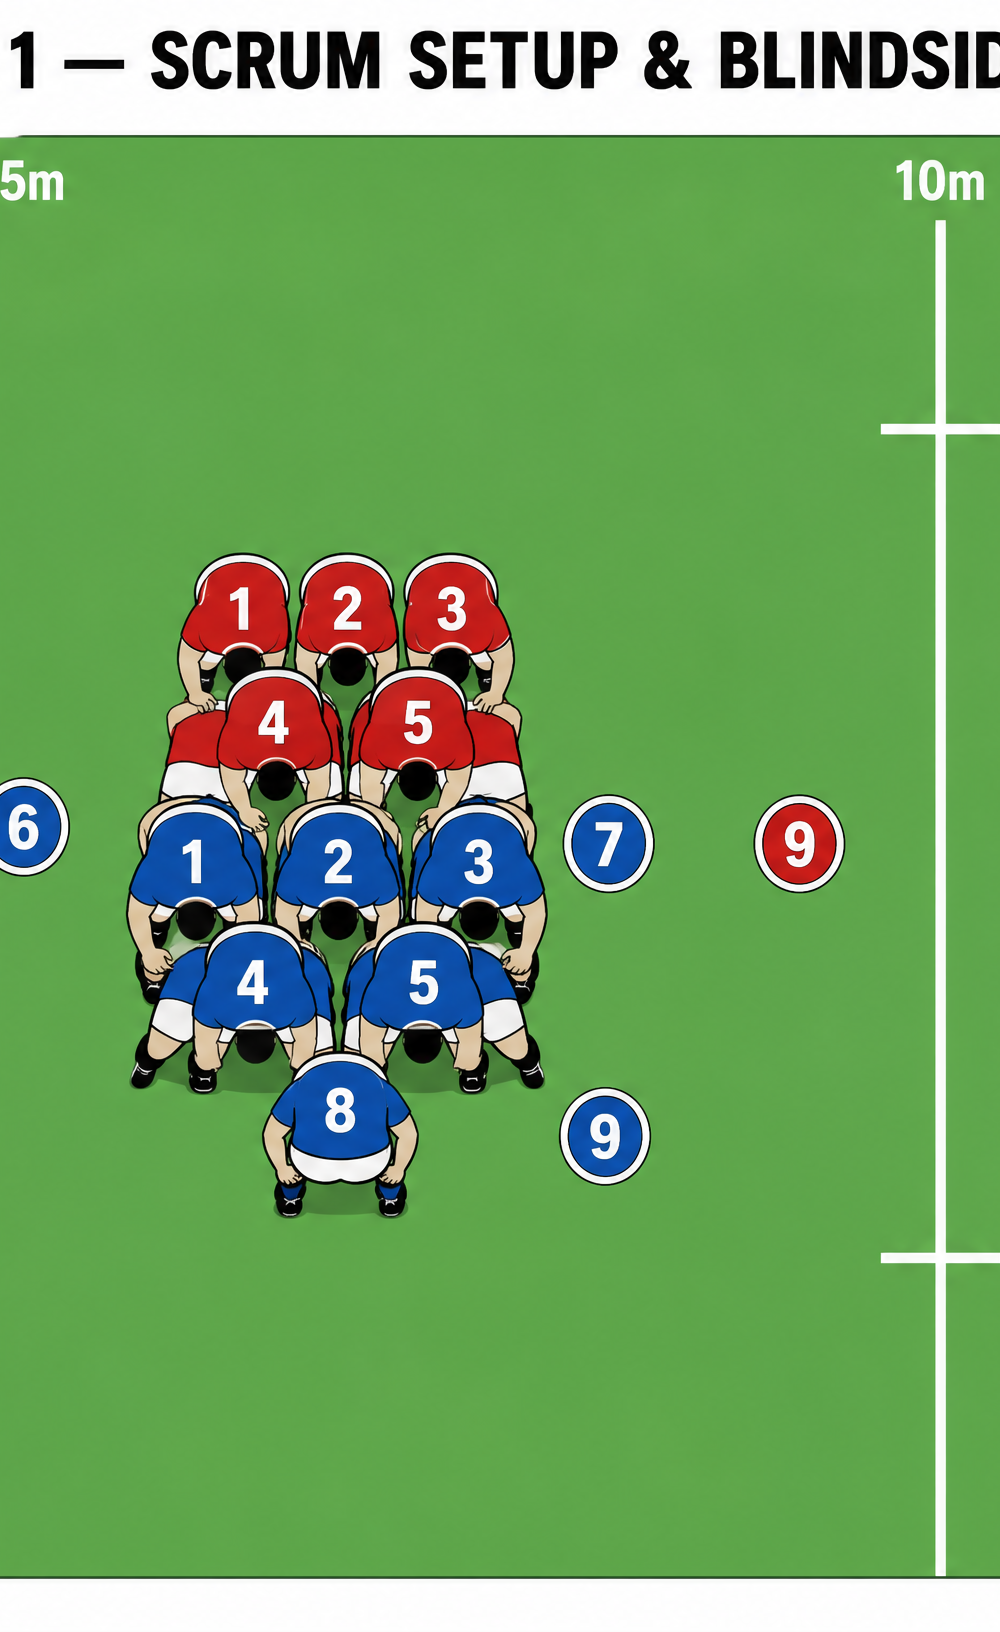
Diagram 2: Movement Pattern
Diagram 2 details the primary running lines. Notice the Number 8's arcing run to get outside the opposing Number 9, and the crucial flat support line from the Number 6. The Number 12 also loops around to offer an offload option if the Number 8 breaks the initial tackle.
Key Coaching Points
- Scrum Stability: The play fails if the scrum goes backward. The tight five must provide a solid platform.
- Number 8's First Step: The pick must be explosive. The Number 8 cannot hesitate; they must attack the seam immediately.
- Timing of the Number 6: The Number 6 must not overrun the Number 8. They need to arrive perfectly on time to receive the short pop pass at pace.
- Quick Recycle: The success of the second phase depends entirely on lightning-fast ball from the blindside ruck. The ball carrier must present cleanly.
- Scrum-half Positioning: The Number 9 must not get caught in the traffic. They need to anticipate the tackle and be in position to clear the ball instantly.
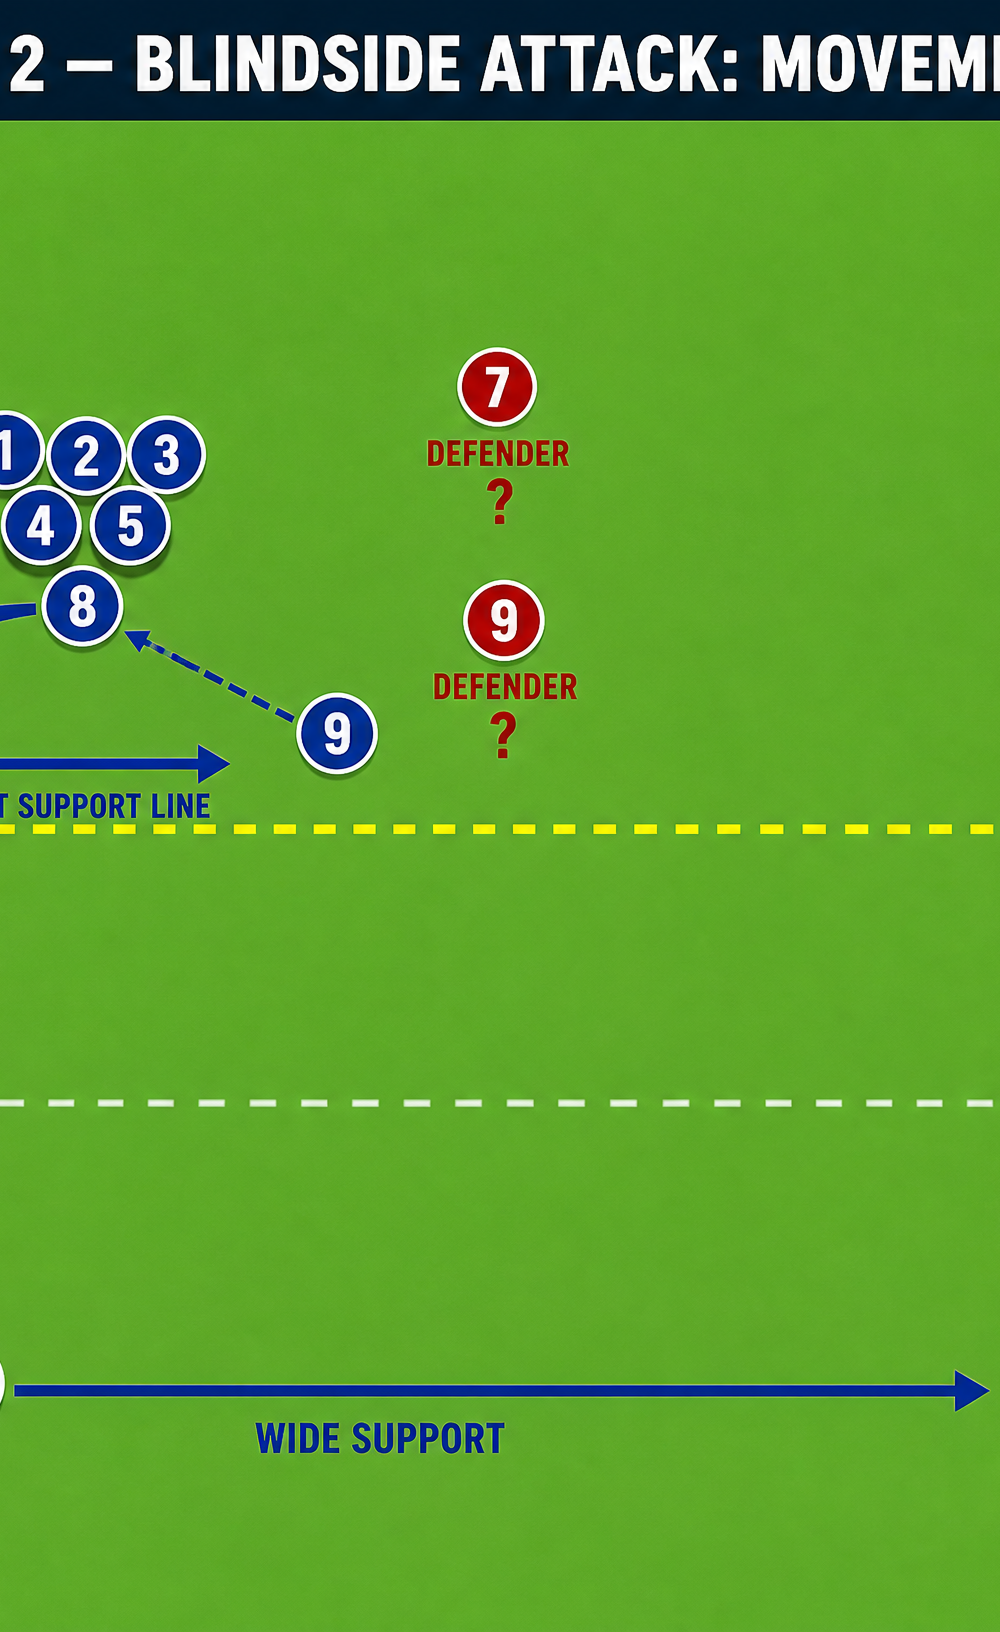
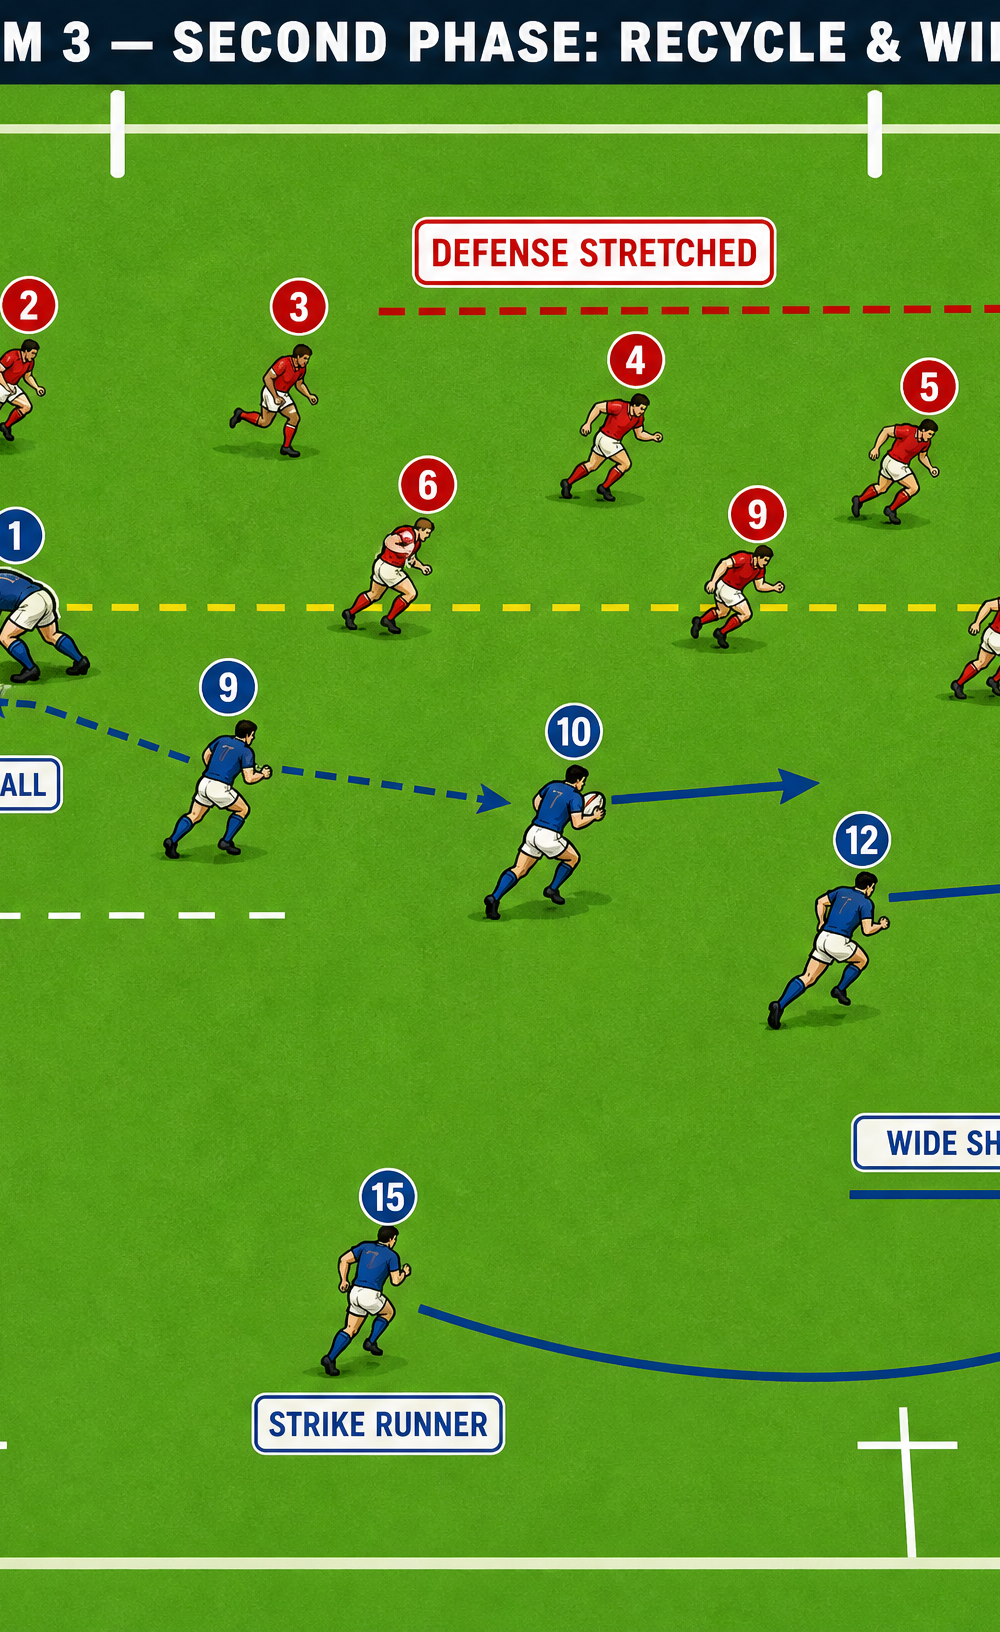
Diagram 3: Second Phase Recycle
Diagram 3 shows the immediate aftermath of the blindside carry. The defense is stretched, and the quick ball allows the Number 10 to orchestrate a wide attack against a disorganized defensive line.
Common Mistakes
- Telegraphing the Play: The Number 8 looks too early at the blindside, alerting the defense.
- Number 6 Running Too Deep: If the Number 6 is too deep, the opposing Number 7 can easily drift and cover both options.
- Poor Ball Presentation: The ball carrier gets isolated and turned over, killing the momentum.
- Slow Service from 9: The Number 9 takes too long to reach the ruck, allowing the defense to realign on the openside.
Variations & Progressions
- The 9 Snipe: If the opposing Number 7 and 9 over-commit to the Number 8, the Number 8 can pop the ball to their own Number 9 running a tight line right off the base of the scrum.
- Blindside Winger Involvement: Bring the blindside winger (Number 11) off their wing to run an inside line off the Number 10 on the second phase, exploiting the gap left by the folding forwards.
Age Adaptations
- Under 12s: Focus primarily on the Number 8 pick and go, ensuring they get over the gain line safely. Simplify the support lines.
- Under 14s: Introduce the Number 6 flat support option. Emphasize decision-making for the Number 8 (carry vs. pass).
- Under 16s+: Execute the full play, including the rapid recycle and wide second-phase attack. Focus on execution speed and precision.

