Bowling Run-Up Alignment Corridor Drill
A foundational fast bowling drill designed to build a straight, efficient run-up and ensure perfect side-on alignment at the crease.

Equipment Needed
1. Overview
For any fast or medium-pace bowler, the run-up is the engine room of the delivery. A straight, momentum-building approach ensures maximum energy transfer through the crease and towards the target. The Bowling Run-Up Alignment Corridor Drill is designed to eliminate lateral deviation during the approach and enforce a strong, side-on position at the point of delivery. By using visual constraints (the alignment corridor), bowlers are forced to run straight, land their feet correctly, and direct all their momentum towards the batsman. This drill is highly effective for correcting "round-arm" actions, splayed feet, and loss of pace due to poor alignment.
2. Setup

To run this drill effectively, you will need access to a standard 22-yard cricket pitch (turf or synthetic) and a clear run-up area.
Equipment Needed:
- 12-16 flat marker cones or standard training cones
- 1 set of wooden stumps (bowling end)
- 1 set of wooden stumps (batting end)
- 6-8 cricket balls
- Measuring tape (optional, for precise lane width)
Pitch and Field Setup:
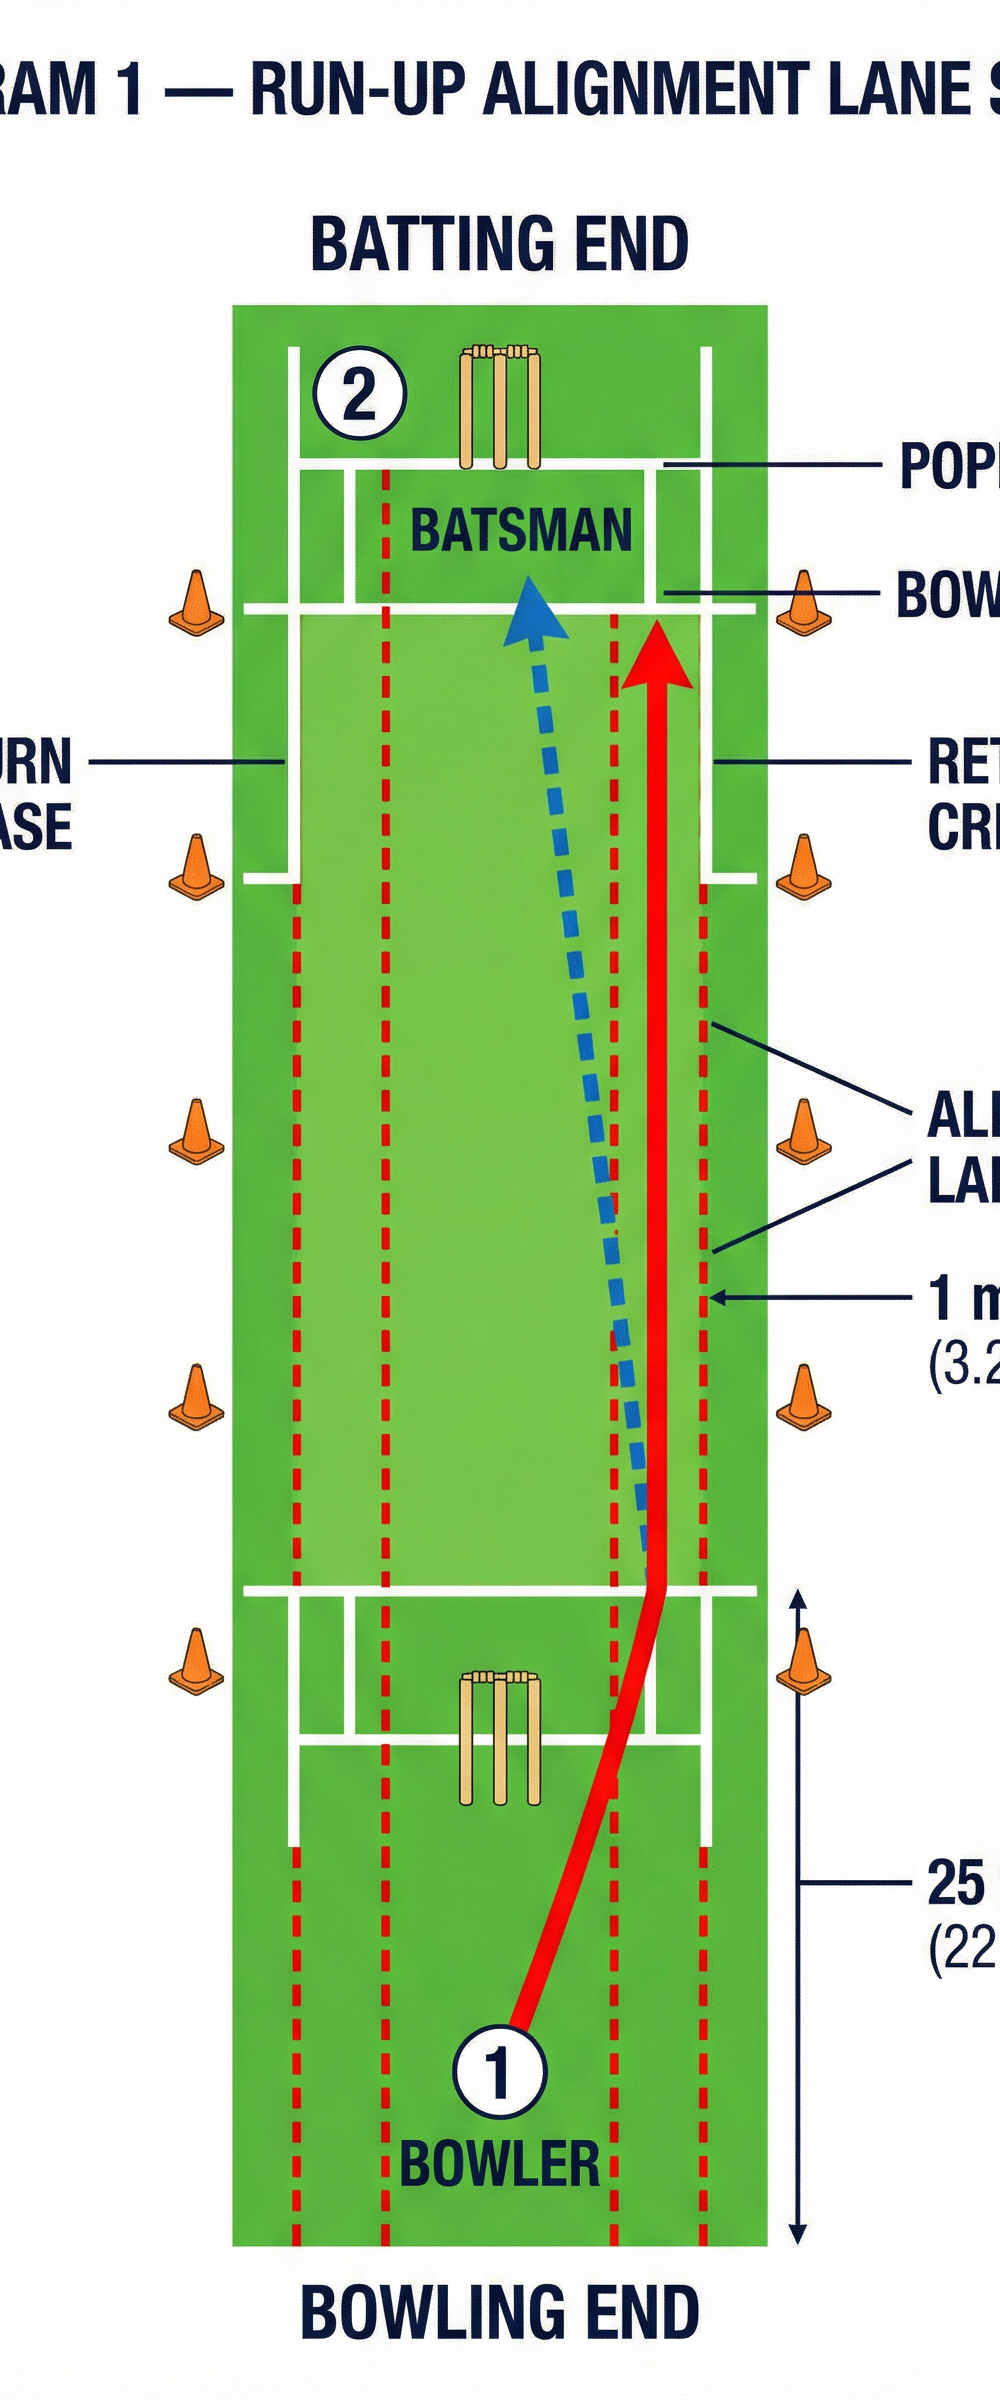
- Place the stumps at both the bowling and batting ends of the 22-yard pitch.
- Identify the bowler's natural starting mark (typically 15 to 25 yards behind the bowling crease).
- Create the Alignment Corridor: Place cones in two parallel lines starting from the bowler's mark all the way to the bowling crease. The lane should be exactly 1 metre (approx. 3.28 feet) wide. The lane should align perfectly with the target stump (usually off-stump or middle-stump) at the batting end.
Player Positions:
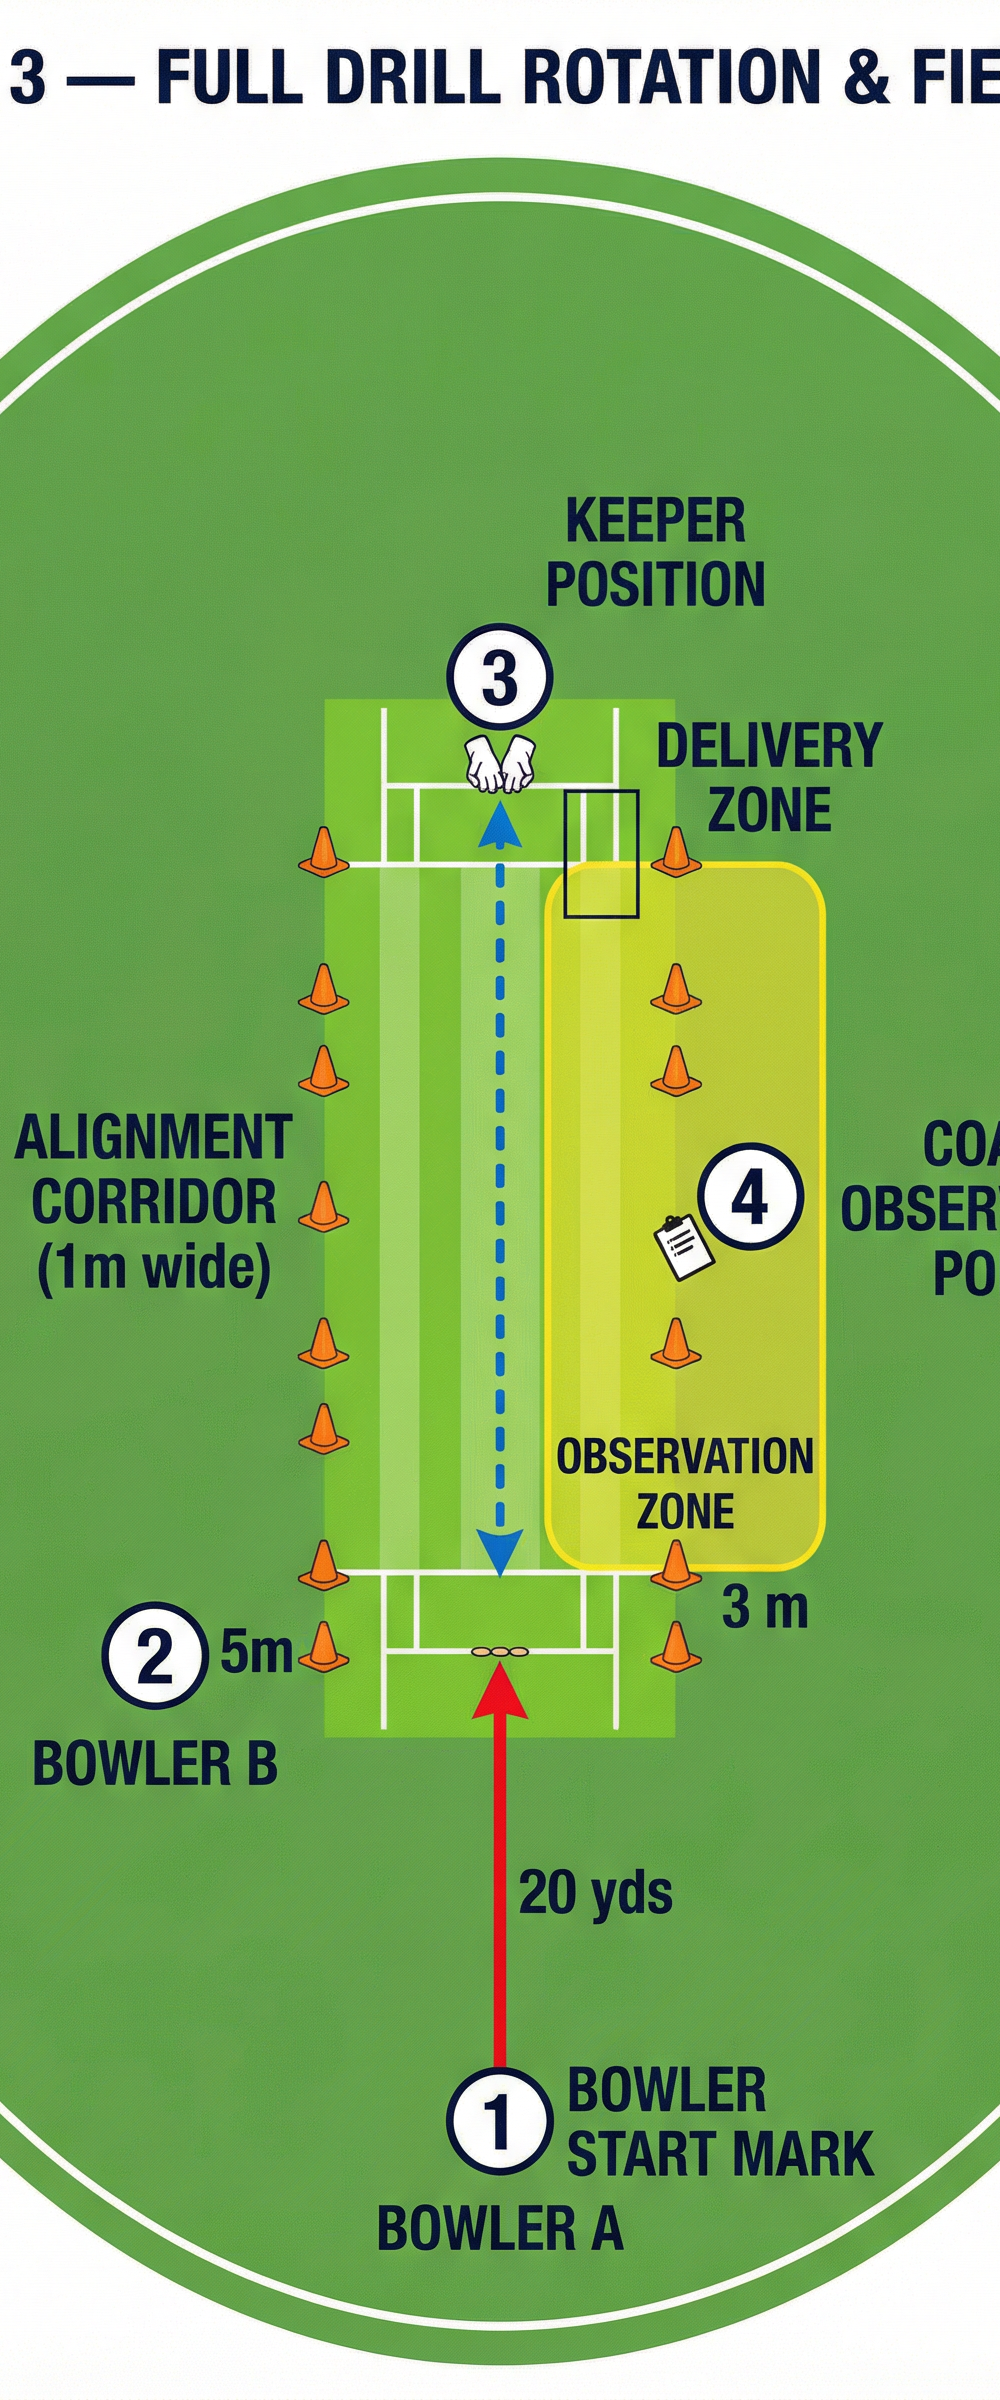
- Bowler A: Starts at the top of their run-up mark.
- Bowler B: Waits safely 5 metres to the side of the run-up lane.
- Wicket-Keeper: Positioned behind the stumps at the batting end to receive the deliveries.
- Coach: Stands 3 metres to the side of the pitch, parallel to the bowling crease, inside the designated observation zone.
3. Step-by-Step Instructions

Follow these exact steps to execute the drill during your coaching session:
- Establish the Mark: Have the bowler measure out their standard run-up starting from the bowling crease back to their mark. Place a distinct marker at their starting point.
- Build the Corridor: Lay down the cones to form the 1-metre wide alignment lane as described in the setup. Ensure the lane is perfectly straight and targets the desired line at the batting end.
- The Approach: On the coach's call, the bowler begins their run-up. They must accelerate smoothly while staying entirely within the cone corridor. If a foot lands outside the cones, the run-up is voided, and they must jog back and restart.
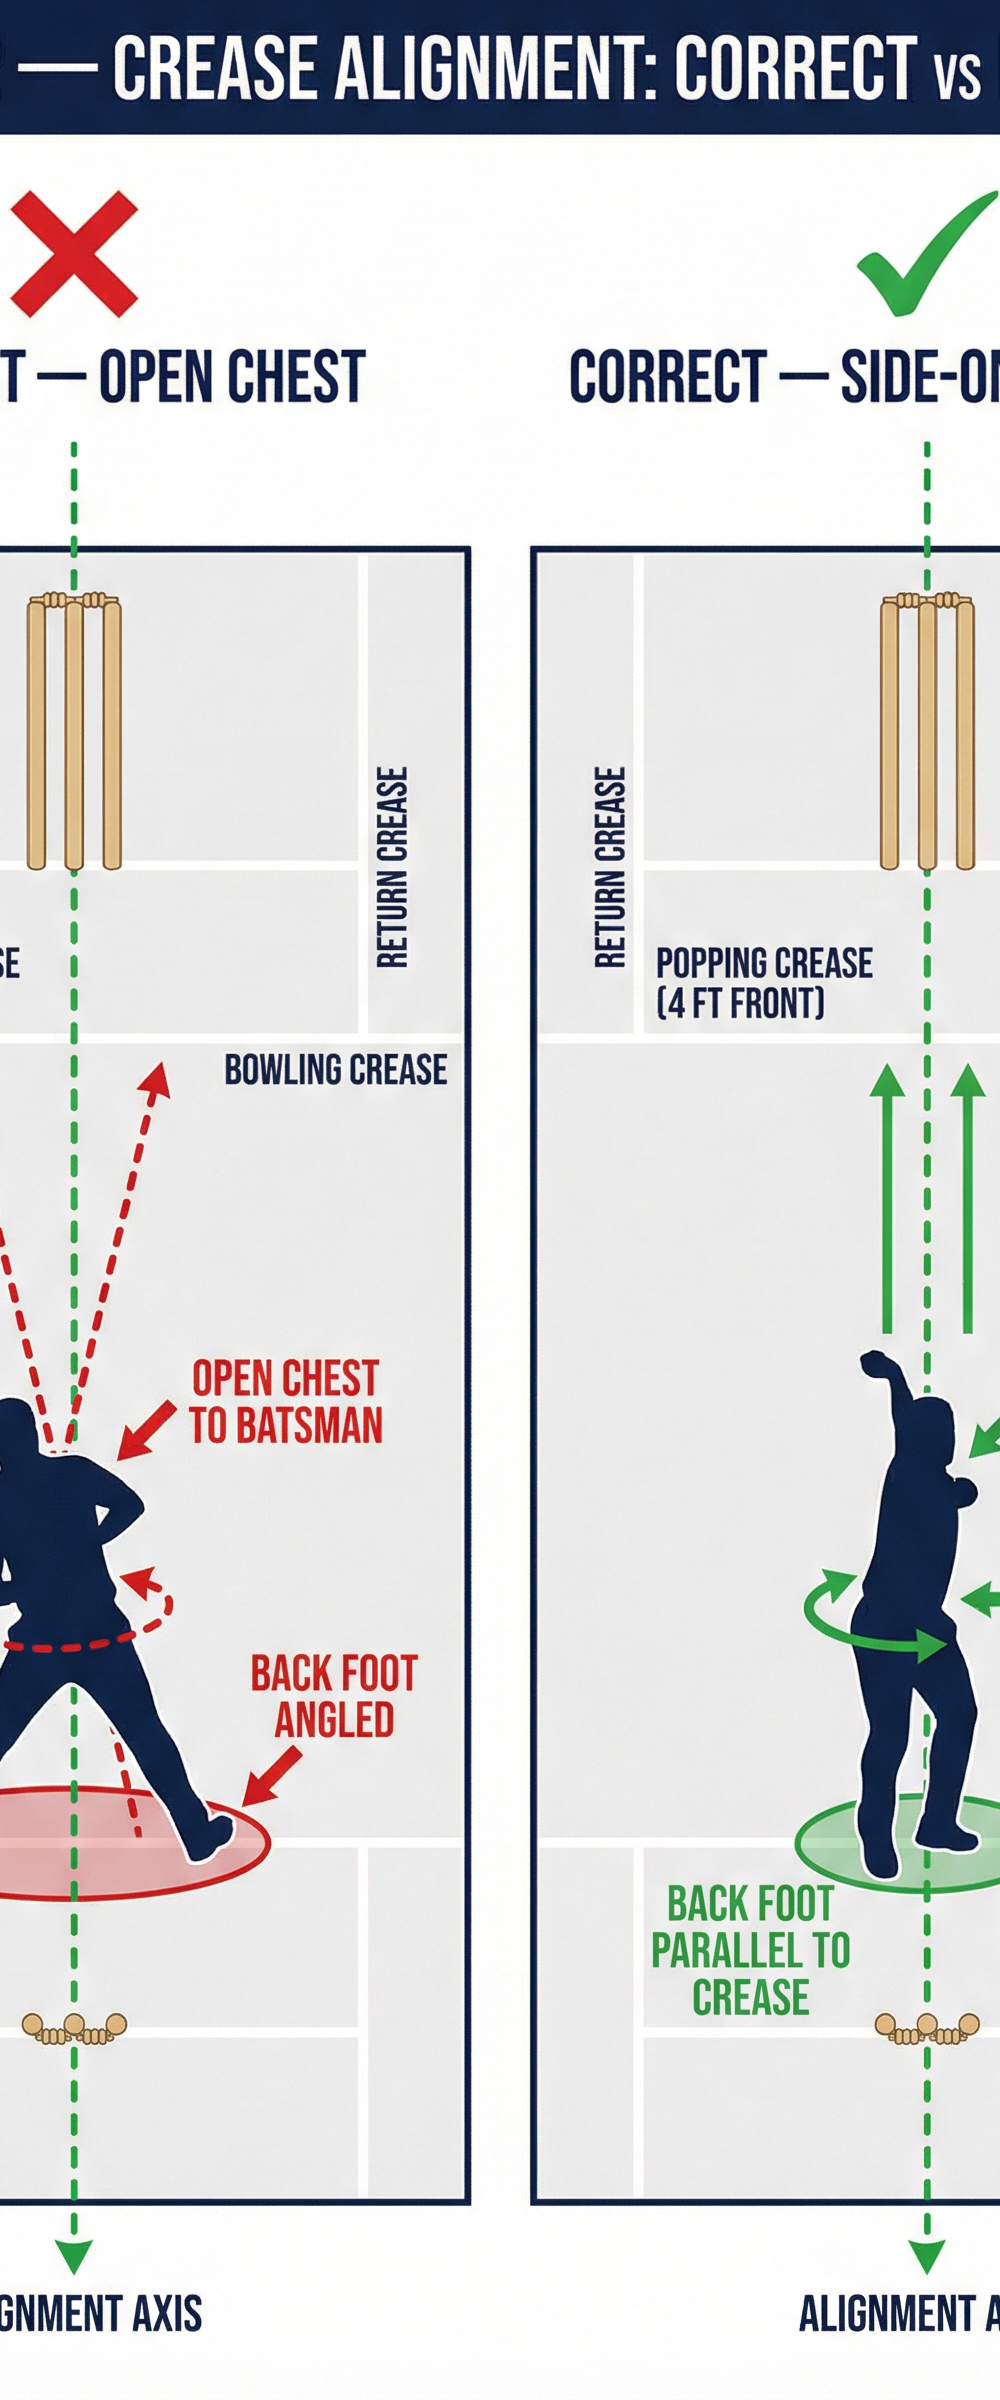
- The Delivery Stride: As the bowler enters the delivery stride, the coach must closely observe the back foot and front foot landing. The back foot should land parallel to the crease, and the front foot should land pointing straight down the pitch.
- The Release: The bowler delivers the ball to the wicket-keeper, aiming to hit the top of off-stump.
- Follow-Through: After releasing the ball, the bowler must continue their momentum straight down the pitch, avoiding the danger area, before peeling off to the side.
- Rotation: Bowler A retrieves their ball (if necessary) or joins the back of the queue. Bowler B then steps up to the mark and repeats the process.

4. Key Coaching Points
As a coach, focus your observation and feedback on these critical elements:
- Head Position: The bowler's head must remain still and level throughout the run-up. A bobbing or tilting head will throw off their balance and alignment.
- Momentum Transfer: The run-up should build gradually in speed, peaking just before the gather and delivery stride. Avoid starting too fast and slowing down at the crease.
- Side-On Alignment: At the point of back-foot contact, the bowler's hips and shoulders should be aligned side-on to the target. The non-bowling arm should be high and pointing directly down the pitch.
- Front Arm Pull-Down: Encourage a strong, aggressive pull-down of the non-bowling arm to initiate shoulder rotation and generate pace.
- Follow-Through Direction: The bowler's momentum must continue towards the target after release. Falling away to the off-side or leg-side indicates a loss of energy and poor alignment.
5. Common Mistakes

Watch out for these frequent errors and correct them immediately:
- Running Outside the Corridor: Bowlers who curve their run-up lose momentum and often struggle with their line. The cones provide immediate visual feedback if they drift.
- Open Chest at the Crease: Landing with the chest facing the batsman (front-on) rather than side-on reduces rotational power and often leads to bowling down the leg side.
- Splayed Feet: If the back foot points towards fine leg or the front foot points towards extra cover, the bowler's alignment is broken, leading to a loss of pace and accuracy.
- Decelerating at the Crease: Bowlers who stutter or slow down before delivering lose the kinetic energy built up during the run-up. Ensure a smooth, continuous acceleration.
6. Variations & Progressions

To keep the drill challenging and adaptable, introduce these variations:
- Narrow the Corridor: For advanced bowlers, reduce the width of the alignment lane from 1 metre to 0.75 metres to demand even greater precision in their approach.
- Target Bowling: Place a target cone or a specific fielding target (e.g., a catching cradle) at the batting end. The bowler must not only maintain alignment but also hit the specific target zone.
- Weighted Ball Run-Ups: Use a slightly heavier training ball (if age-appropriate) to emphasize the feeling of momentum transfer and strong arm pull-down through the crease.
7. Age Adaptations

Tailor the drill to suit the physical development and skill level of your players:
- Under 10s: Focus purely on running straight. Widen the corridor to 1.5 metres. Don't worry too much about perfect side-on alignment yet; prioritize a smooth run-up and a straight follow-through.
- Under 12s to Under 14s: Introduce the 1-metre corridor. Begin focusing heavily on the side-on position at the crease and the direction of the front foot landing.
- Under 16s and Open: Use the standard 1-metre or narrower corridor. Demand perfect alignment, maximum momentum transfer, and consistent accuracy hitting the target stump. Incorporate video analysis for precise feedback.