Batting Partnership Rotation Play: Mastering Strike Rotation and Run-Rate Management
Teach your batsmen to rotate strike intelligently, manage the run rate under pressure, and build match-winning partnerships through disciplined, purposeful running between the wickets.

Equipment Needed
Overview
The Batting Partnership Rotation Play is one of the most tactically important skills a batting pair can develop. At its core, this set play trains two batsmen to rotate strike consistently — converting ones and twos from deliveries that do not merit a boundary — in order to maintain scoring momentum, disrupt the bowler's rhythm, and keep the fielding captain under constant pressure to adjust their field.
This play is most effective in the middle overs of a limited-overs match (overs 10–35 in a 50-over game; overs 7–15 in a T20), when the fielding side has settled into a defensive ring and the batting side must accumulate runs without taking excessive risks. It is equally valuable in Test and first-class cricket when a partnership is being built after the fall of a wicket, or when a junior batsman needs to be shielded from a dominant bowler.
The objective is not simply to run hard — it is to run smart. Batsmen must read the field, communicate clearly, and pre-plan their running intentions before each delivery is bowled.
Setup
Equipment Required
| Item | Quantity | Notes |
|---|---|---|
| Cricket bat | 2 | Match-weight or training bat |
| Batting gloves & pads | 2 sets | Full protective gear |
| Helmet | 2 | Mandatory for all live-ball drills |
| Cricket balls | 6–12 | Mix of new and worn balls |
| Stumps & bails | 2 sets | Full set at each end |
| Cones | 8–10 | For fielder positioning markers |
| Whiteboard / coaching board | 1 | For pre-session tactical briefing |
Pitch and Field Setup
Use a full-length 22-yard pitch on a standard oval cricket ground. If working in a training facility or nets, use a full-length net with a minimum of 3 metres of run-off behind each crease. Place fielding cones in the following positions to simulate a standard mid-overs defensive field:
- Mid-on (approximately 20 metres from the striker, on the on-side)
- Mid-off (approximately 20 metres from the striker, on the off-side)
- Mid-wicket (approximately 25 metres, on-side)
- Cover (approximately 25 metres, off-side)
- Square Leg (approximately 20 metres, square on the on-side)
- Point (approximately 20 metres, square on the off-side)
- Fine Leg (approximately 55 metres, fine on the on-side)
- Third Man (approximately 55 metres, fine on the off-side)
For live fielding drills, place real fielders at these positions. For shadow or feed drills, cones are sufficient.
Player Positions
- B1 — Striker (Senior/Dominant Batsman): Takes guard at the batting crease at the striker's end. This batsman is responsible for reading the field and calling the run.
- B2 — Non-Striker (Junior/Secondary Batsman): Stands at the non-striker's crease, backing up 2–3 metres as the bowler enters their delivery stride. This batsman must be ready to run immediately on B1's call.
- BWL — Bowler: Delivers from the bowling crease at the non-striker's end. In training, a coach or throw-down specialist can feed deliveries.
- Fielders (F1–F8): Positioned as per the cone layout above.
Step-by-Step Instructions


Step 1 — Pre-Ball Field Assessment (Before the Bowler Runs In)
As the bowler walks back to their mark, B1 (the striker) actively scans the field. They identify the two or three gaps where a controlled shot could yield a single — typically mid-on, mid-off, or mid-wicket gaps. B1 communicates their intention to B2 with a brief verbal signal: "Looking for the one on the on-side" or simply "Yes, be ready."
Step 2 — Non-Striker Backs Up
As the bowler enters their delivery stride, B2 leaves their crease and backs up 2–3 metres toward the striker's end. This reduces the distance B2 must cover to complete the run and gives B1 a larger margin for calling. B2 must not leave the crease until the bowler's front foot passes the bowling crease.
Step 3 — Ball Delivery and Shot Selection
B1 plays a controlled, placement shot — not a power shot — into the identified gap. The priority is placement over power: a firm push into the mid-on gap, a dab to fine leg, or a nurdle to mid-wicket. The ball does not need to reach the boundary; it only needs to travel far enough that the fielder cannot prevent the single.
Step 4 — The Call
Immediately after contact, B1 calls loudly and clearly: "YES" (run), "NO" (do not run), or "WAIT" (hold and reassess). The call must be made within 1 second of the shot. B1 owns the call on balls played in front of the wicket. B2 owns the call on balls played behind the wicket (fine leg, third man, backward square leg).
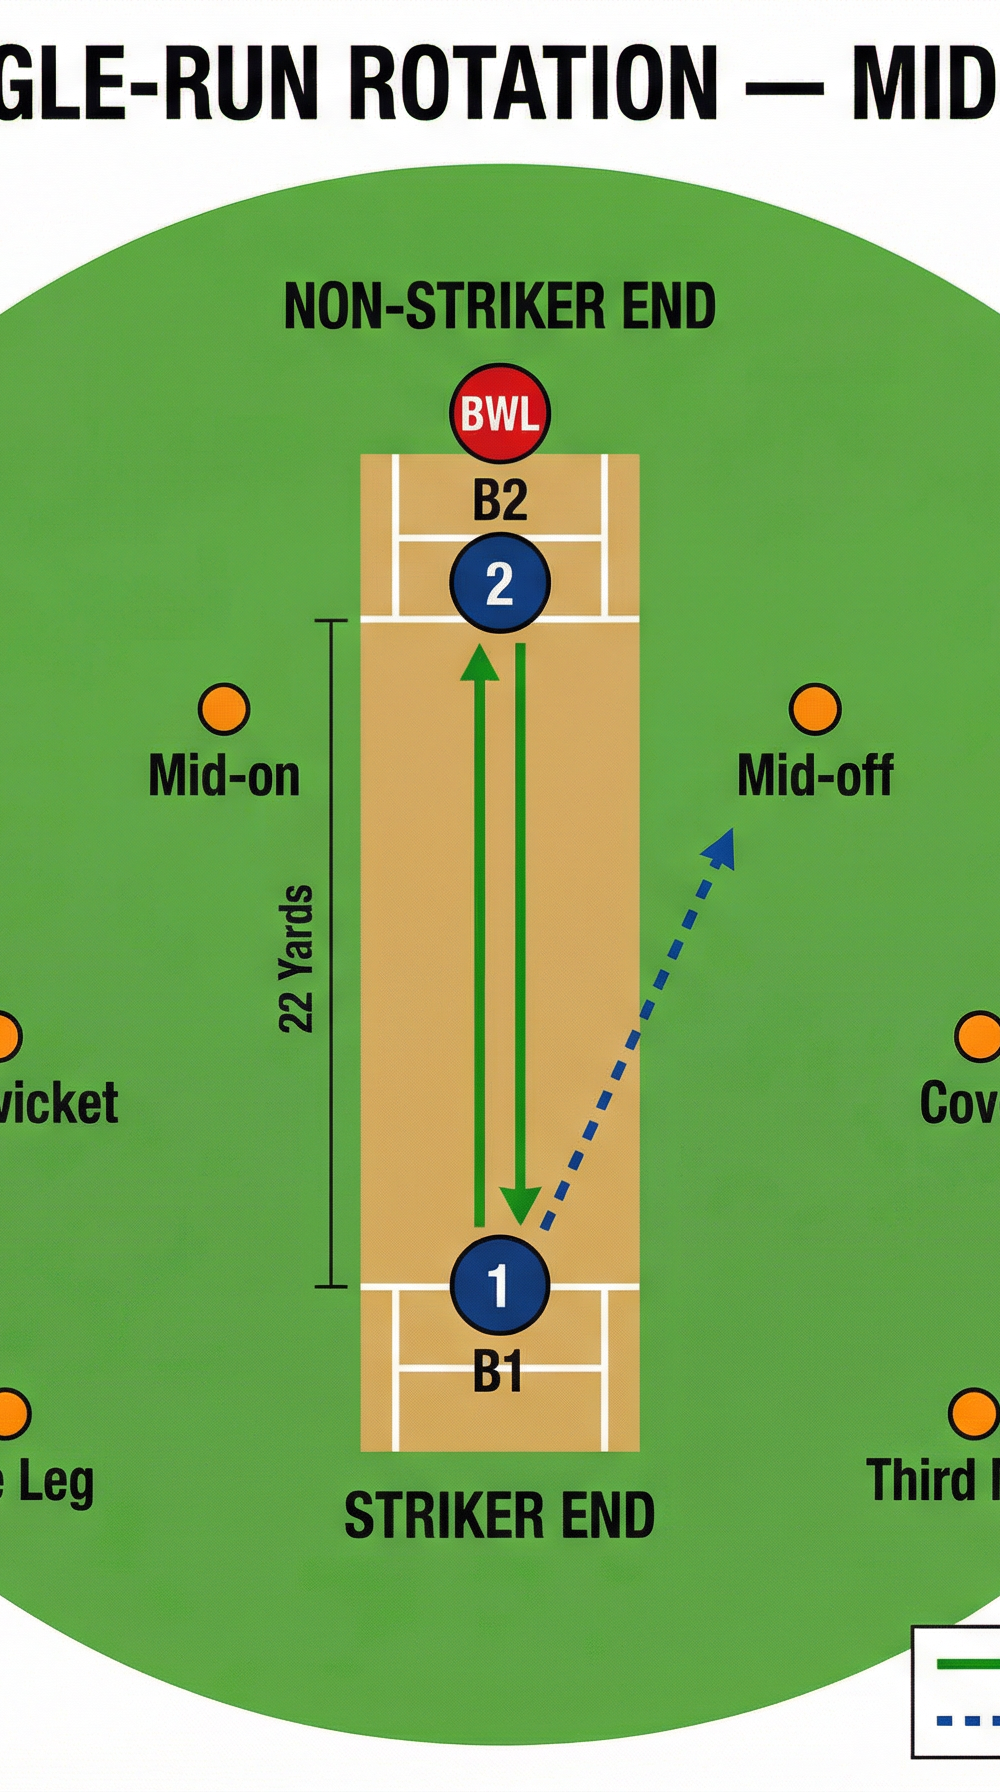
Step 5 — Running the Single
Both batsmen run hard and straight down the pitch, bats grounded behind the crease line. B1 runs toward the non-striker's end; B2 runs toward the striker's end. Both batsmen run with their bat extended forward, grounding it just inside the crease. Neither batsman should slow down until the bat is safely behind the line.
Step 6 — Turning and Backing Up for a Second Run
On reaching the crease, both batsmen immediately turn and look at the fielder. If the fielder is slow to the ball or throws wide, B1 (now at the non-striker's end) calls "YES TWO" and both batsmen complete a second run. The decision to run a second must be made before the batsman has fully turned — hesitation at the crease is the most common cause of run-outs.
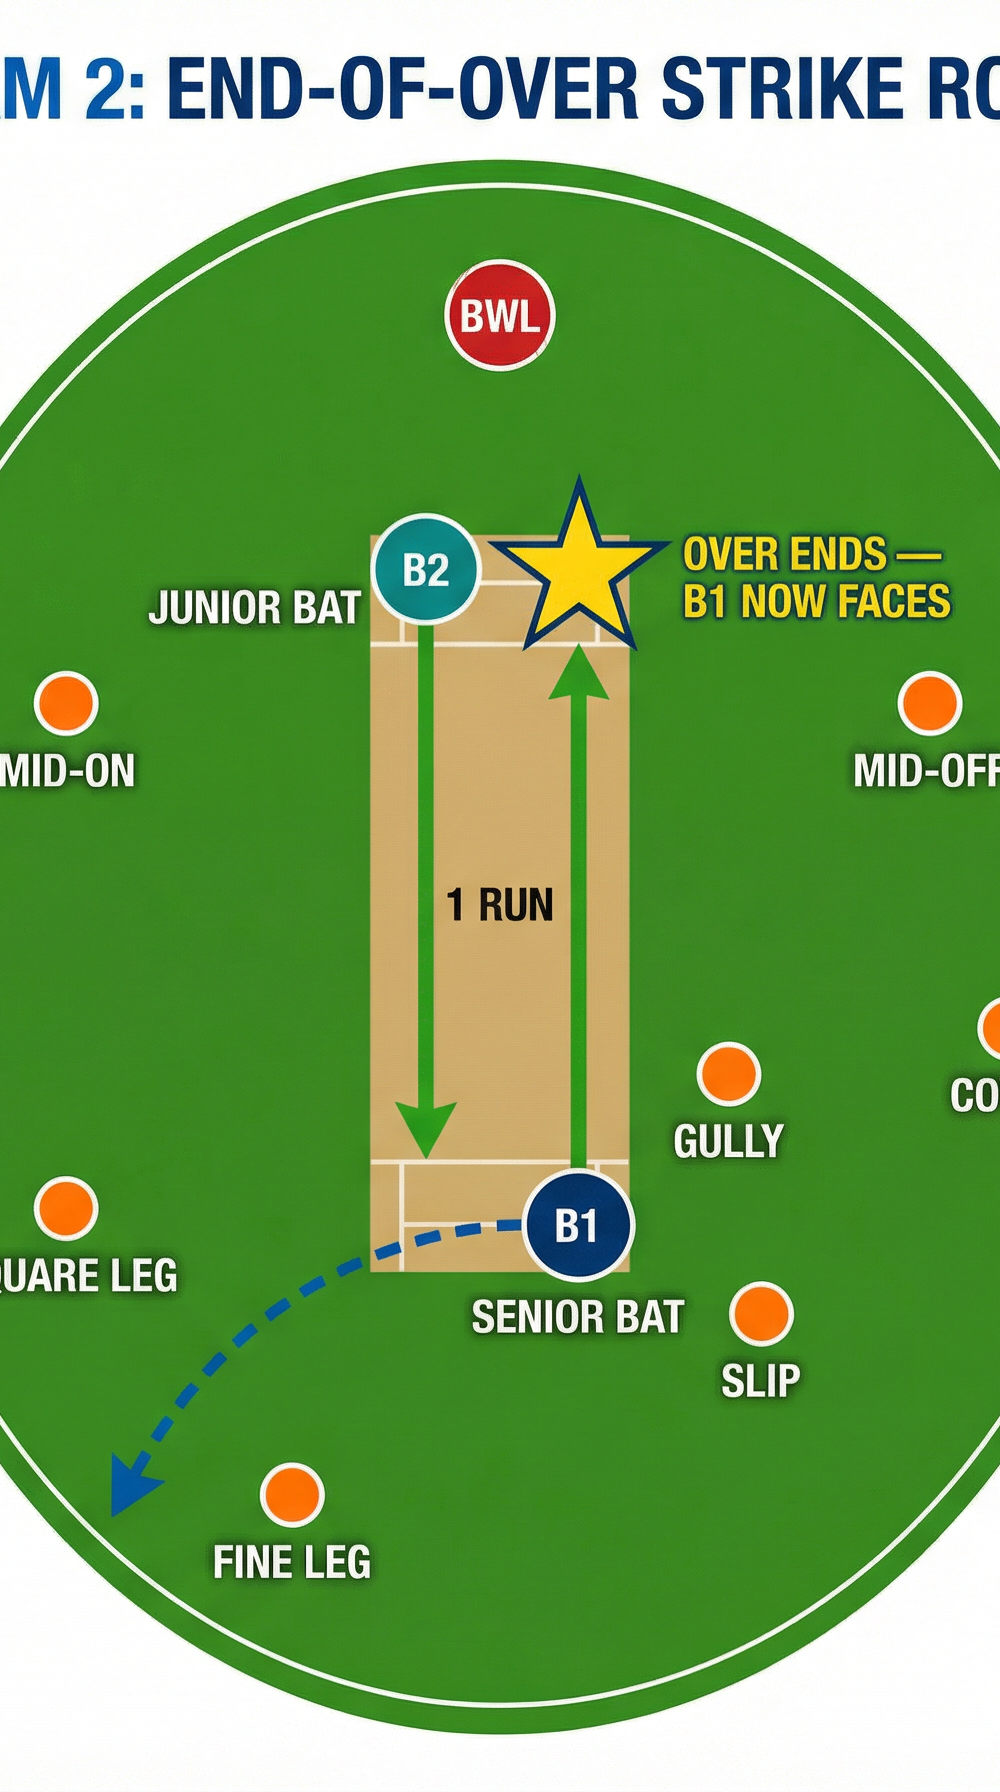
Step 7 — End-of-Over Strike Management
This is the most tactically advanced element of the rotation play. With one ball remaining in the over, B1 (the stronger batsman) must ensure they will face the first ball of the next over. If B1 is currently on strike, they must play a single off the last ball to cross to the non-striker's end, which becomes the striker's end when the over changes. If B1 is the non-striker, they must ensure B2 does not score an odd number of runs during the over. Coaches should walk batsmen through the ball-count arithmetic during training: "You're on strike, it's ball 5 of the over — you need to score an odd number of runs this ball to keep the strike next over."
Key Coaching Points

1. Call Early, Call Loud, Call Once
The single most important habit in running between the wickets is the quality of the call. Coaches should insist on a call being made within one second of the shot. A late call forces the non-striker to make a split-second decision under pressure, which is the primary cause of run-outs. Drill this relentlessly: if there is no call, there is no run.
2. Back Up Aggressively
Many junior batsmen back up only one step, which adds 2–3 metres to every single they run. Teach B2 to back up to the maximum safe distance — 2–3 metres past the crease — as the bowler's front foot lands. This transforms a tight single into a comfortable one and a comfortable single into a potential two.
3. Read the Field Before Every Ball
Rotation play is not reactive — it is pre-planned. Batsmen should enter every delivery knowing where the single is. Coaches should use a "field quiz" during training: pause the drill before each ball and ask B1 to identify the two best single options before the ball is bowled.
4. Run the First Run Hard
Batsmen who jog the first run and then decide whether to take a second are consistently run out. The correct technique is to sprint the first run and make the decision to take a second before reaching the crease. Coaches should use a stopwatch to time the run: a fit batsman should complete a single in under 3.5 seconds from bat-on-ball to bat-grounded.
5. Manage Strike at the End of the Over
Coaches must teach batsmen to count balls within an over and to be aware of their position relative to the over change. This is a skill that separates good batsmen from great ones. Use a "ball count drill" where the coach calls out the ball number ("Ball 4 — what do you need?") and the batsman must verbalise their strike management intention.
6. Communicate Between Deliveries
The partnership is a conversation. Between balls, B1 and B2 should briefly confer: "Their mid-off is up — push it past them" or "Fine leg is on the boundary — don't go there." This shared awareness makes the rotation play a genuine team tactic rather than two individuals batting independently.
Common Mistakes

Mistake 1 — Calling "Wait" and Then Running
A "Wait" call means stop and reassess, not "maybe run." Batsmen who call "Wait" and then commit to a run create confusion and are a run-out waiting to happen. Coaches should enforce a strict rule: a "Wait" call means both batsmen return to their original crease. If a run is then available, a fresh "Yes" call must be made.
Mistake 2 — Not Grounding the Bat
Junior batsmen frequently run past the crease without grounding the bat, or they ground the bat outside the crease line. Coaches should use slow-motion video review or have a fielder positioned at each end during drills to call "out" whenever the bat is not grounded correctly. The bat must be grounded behind the popping crease line, not on it.
Mistake 3 — Hesitating at the Crease Before the Second Run
The most common cause of run-outs on second runs is a batsman who completes the first run, stops, looks, and then decides to go. By the time they have decided, the fielder has thrown. Coaches should drill the "turn and burn" technique: on reaching the crease, the batsman turns immediately and sprints, trusting their partner's call.
Mistake 4 — Ignoring the Ball-Count
Batsmen who are unaware of which ball of the over they are facing cannot manage strike effectively. This is particularly common in junior cricket. Coaches should make ball-counting a non-negotiable habit: "Every batsman knows the ball count at all times." Use verbal reminders during training until it becomes automatic.
Mistake 5 — Playing for the Single When a Boundary Is On
Rotation play should never suppress attacking intent. If a fielder is out of position and a boundary is clearly available, the batsman should take it. Coaches must teach batsmen to distinguish between "rotation mode" (field is set, take the single) and "attack mode" (field is exposed, go for the boundary). Over-caution is as costly as recklessness.
Variations and Progressions

Variation 1 — Pressure Rotation Drill (Harder)
Add a live wicketkeeper and two close-in fielders (slip and gully) to the standard setup. Instruct the fielding side that any run-out results in a 5-run penalty to the batting team. This simulates match pressure and forces batsmen to sharpen their decision-making. Increase difficulty further by having the coach call out a target score (e.g., "You need 12 runs off the last 2 overs — rotation only, no boundaries").
Variation 2 — Blind Call Drill (Communication Focus)
B2 (the non-striker) wears a training vest that partially restricts their peripheral vision. B1 must provide more explicit verbal guidance: "Yes — it's to mid-on, you have time" rather than simply "Yes." This drill develops the communication skills that are essential when running in fading light or on a noisy ground.
Progression — Full Match Simulation with Scoring Targets
Once the basic rotation play is mastered, run a full 10-over match simulation with two batting pairs competing against each other. Each pair must achieve a minimum of 60% of their runs from singles and twos (no boundaries). Award bonus points for successful second runs and deduct points for run-outs. This progression embeds the rotation play into a realistic match context and develops the tactical awareness that training drills alone cannot replicate.
Age Adaptations

| Age Group | Key Adaptations |
|---|---|
| Under 10 | Use a shorter pitch (15 yards), soft ball, and focus only on Steps 1–5. Simplify the call to "Run" or "No." Do not introduce end-of-over strike management at this age. Emphasise fun and basic communication. |
| Under 12 | Introduce the full 22-yard pitch and hard ball. Teach the "Yes / No / Wait" call system. Begin introducing the concept of backing up. Use fielding cones rather than live fielders to reduce injury risk. |
| Under 14 | Introduce live fielders and the pressure rotation drill. Begin teaching ball-count awareness and basic end-of-over strike management. Introduce the concept of shielding a weaker batsman. |
| Under 16 | Full implementation of all steps including end-of-over strike management. Introduce the blind call drill and full match simulation. Discuss field-reading tactics and how to identify which fielder is the weakest link for a quick single. |
| Open / Senior | Add video analysis of the session. Discuss match-specific scenarios (e.g., chasing 180 in a T20, building a Test partnership). Introduce the concept of "farming the strike" against a dominant spinner or fast bowler. |