Mastering the Short Ball: Comprehensive Pull and Hook Shot Drill
Equip your batters with the technique and confidence to effectively play or evade short-pitched bowling through progressive, scenario-based training.

Equipment Needed
Overview
Facing short-pitched bowling is one of the most intimidating challenges for any batter. This drill is designed to build both the technical foundation and the mental resilience required to handle the short ball effectively. By breaking down the response into clear shot selections—the pull, the hook, and evasive action—coaches can help players develop a decisive and safe approach. This session is particularly useful during pre-season preparation or when preparing to face express pace bowling on bouncy tracks.
Setup

To run this drill safely and effectively, you will need a standard 22-yard cricket pitch or an equivalent artificial surface. Ensure the area is clear of hazards and that all batters are wearing full protective equipment, including a properly fitted helmet with a grille, chest guard, arm guard, batting pads, and gloves.
Equipment Required
- Standard cricket balls (or synthetic balls for younger/less experienced players)
- Full batting protective gear (Helmets are non-negotiable)
- Stumps (at both ends)
- Measuring tape or cones to mark fielding positions and pitch zones
Field and Pitch Setup
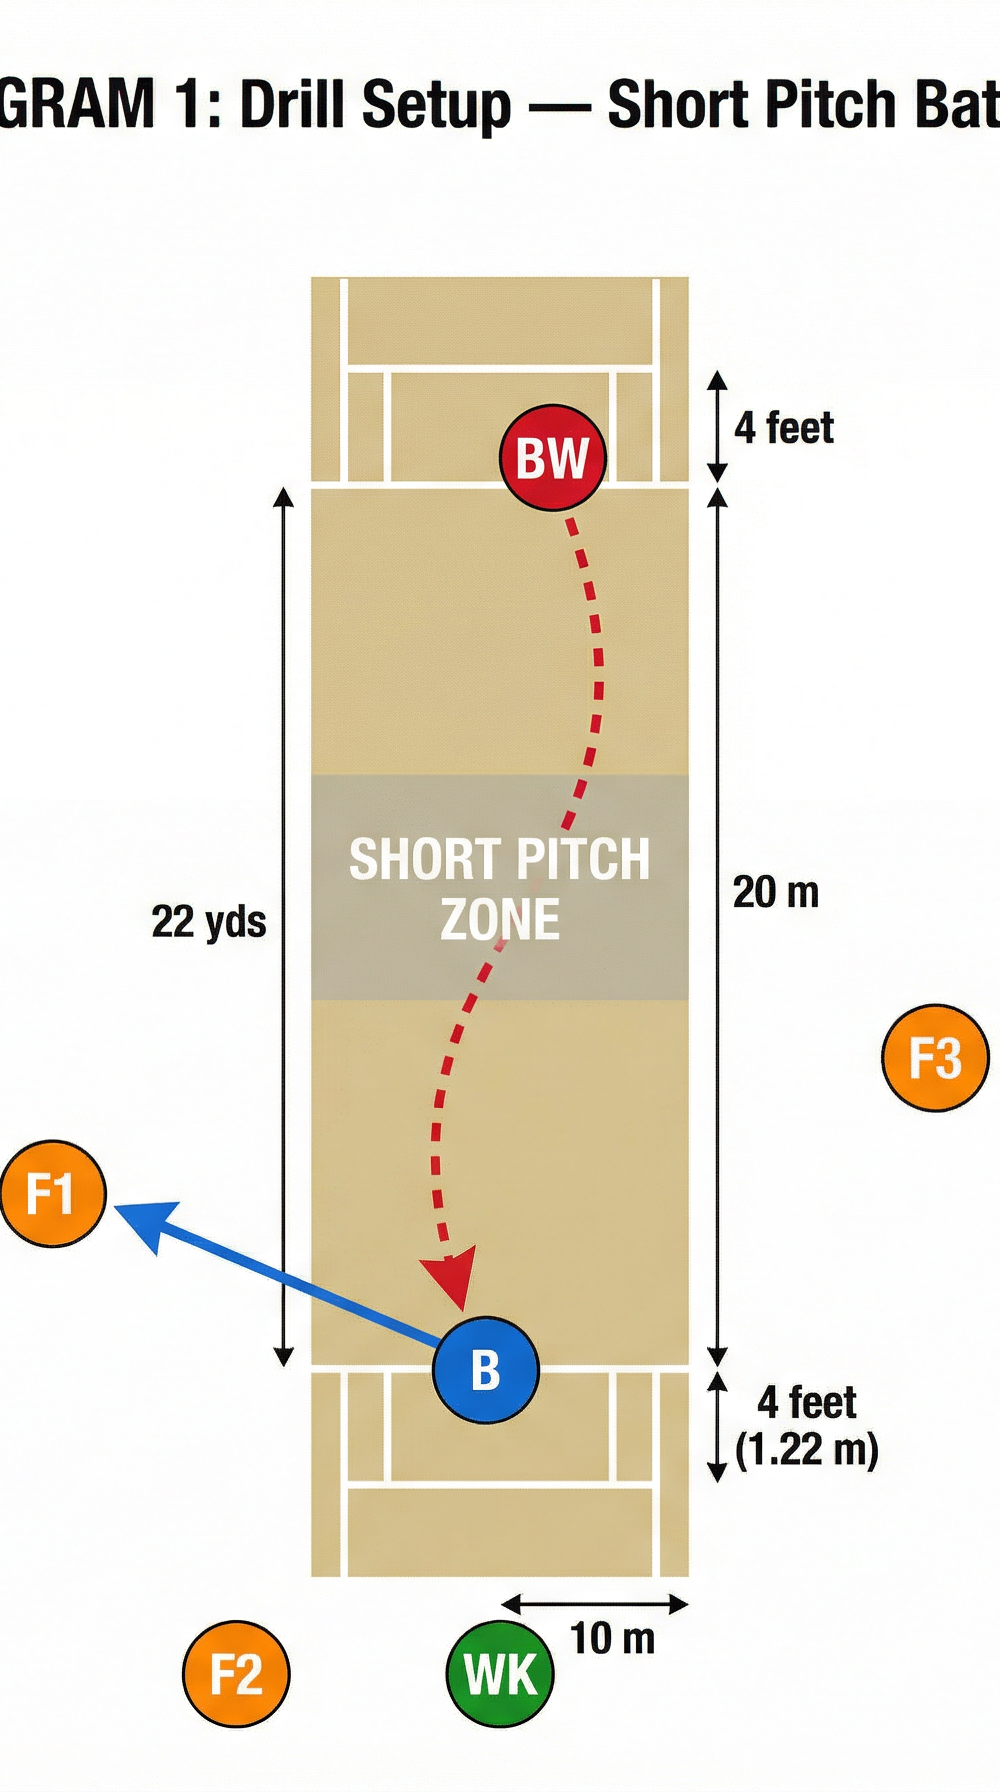
Mark out a "Short Pitch Zone" on the pitch. This is typically a rectangular area located approximately halfway down the pitch, where a short delivery would naturally land to bounce up toward the batter's chest or head height. Place cones or flat markers to clearly delineate this zone for the bowler or throwdown specialist.

Position your fielders strategically to catch the outcomes of the shots. You will need:
- Wicket-keeper (WK): Positioned roughly 10-12 metres behind the stumps, depending on the pace of the deliveries.
- Square Leg (F1): Positioned 15 metres from the pitch, square of the wicket on the leg side.
- Fine Leg (F2): Positioned 20-25 metres behind square on the leg side.
- Mid-wicket (F3): Positioned 20 metres in front of square on the leg side.
- Mid-on (F4): Positioned 20-22 metres straight down the ground.
Step-by-Step Instructions
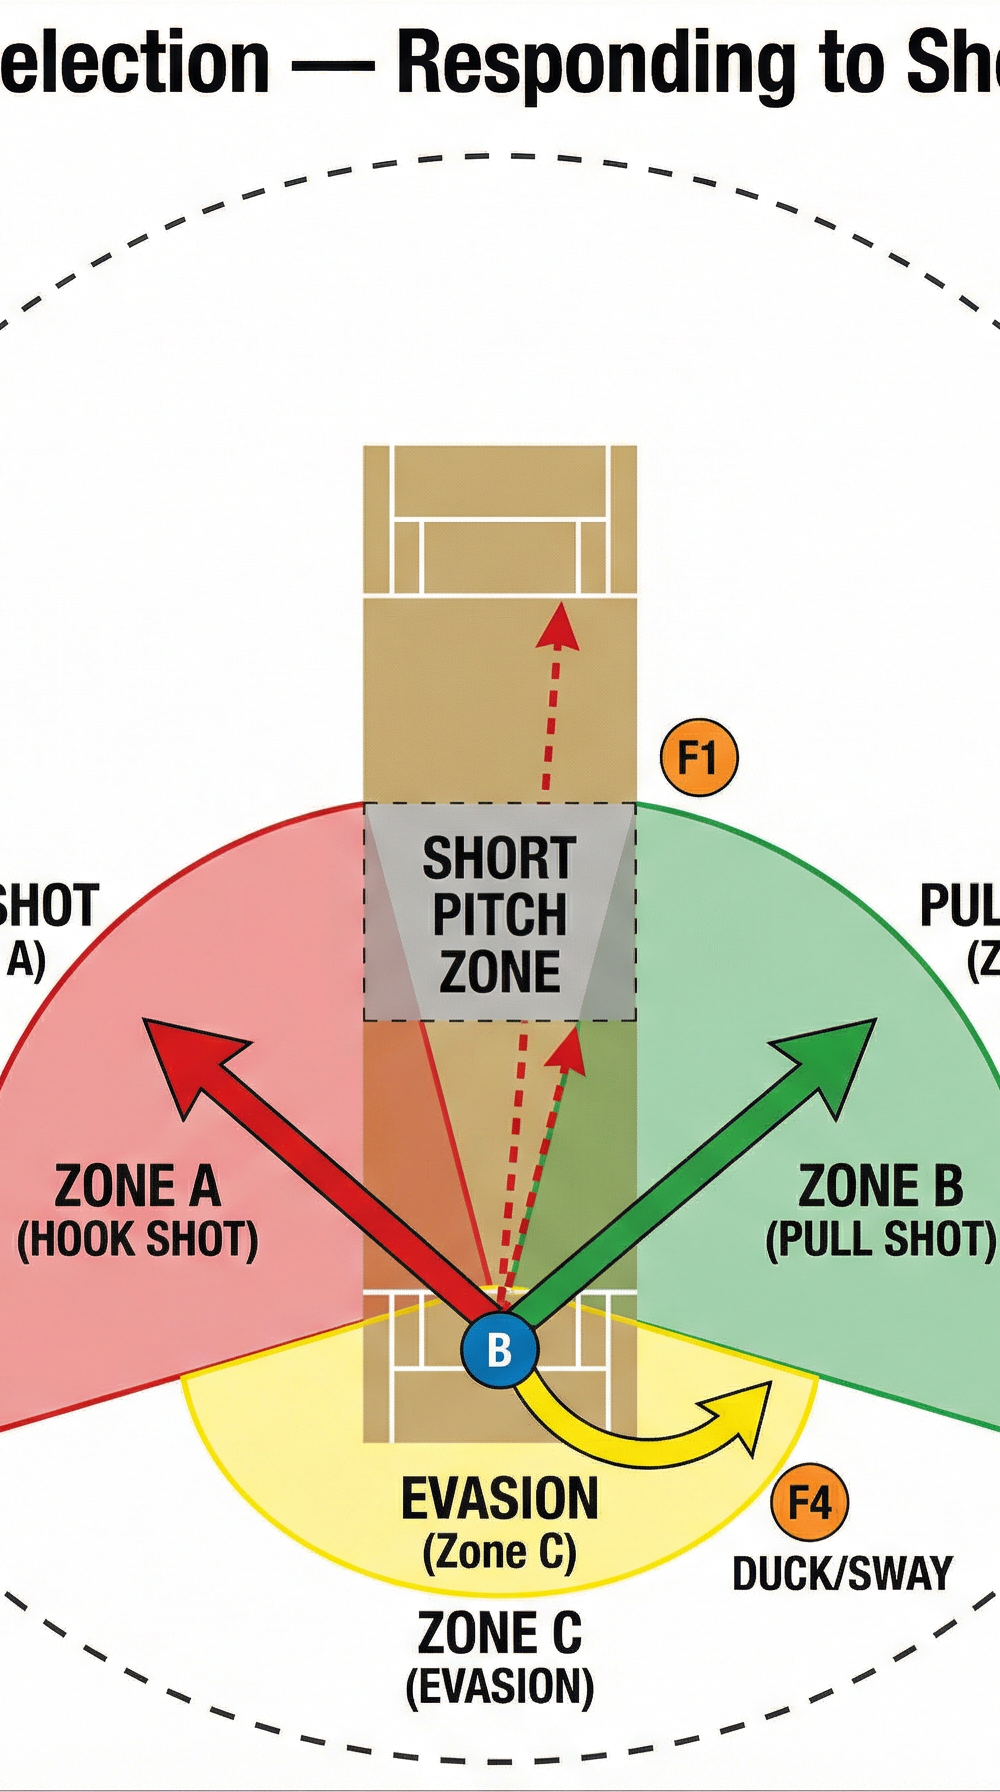
- Briefing and Demonstration: Begin by gathering the players and explaining the objectives of the drill. Demonstrate the three primary responses to a short ball: the pull shot, the hook shot, and ducking/swaying out of the line of the delivery.
- Positioning: Have the first batter (B1) take guard at the batting crease. The bowler or throwdown specialist (BW) should be ready at the bowling crease.
- Target Practice: The bowler aims to land the ball consistently within the marked "Short Pitch Zone". The goal is to produce deliveries that rise steeply toward the batter's upper body.
- Execution: The batter must quickly assess the line and length of the delivery and execute the appropriate response. If the ball is on the body, they may choose to duck or sway. If the ball is outside off stump or sitting up nicely, they should execute a pull or hook shot.
- Feedback Loop: After each delivery, provide immediate, concise feedback on the batter's footwork, head position, and shot selection.

Key Coaching Points

- Early Recognition: The batter must pick up the length of the ball early out of the bowler's hand. Look for the release point and the trajectory.
- Weight Transfer: For attacking shots (pull/hook), the batter must transfer their weight onto the back foot quickly, pushing back and across the crease.
- Head Position: Keep the head still and eyes level. The head should move toward the line of the ball, not away from it.
- High Hands: When executing the pull or hook, the hands must start high. The bat should come down from above the ball to keep it along the ground, rolling the wrists upon impact.
- Eyes on the Ball: When evading (ducking/swaying), the batter must keep their eyes on the ball at all times. Never turn the back or take the eyes off the delivery.
Common Mistakes
- Taking the Eye Off the Ball: The most dangerous mistake is flinching, closing the eyes, or turning the head away from a short delivery.
- Weight on the Front Foot: Getting stuck on the front foot makes it impossible to play a controlled pull shot or to evade effectively.
- Dropping the Hands: Starting the bat swing from a low position often results in a top edge, as the bat is coming up at the ball rather than down over it.
- Pre-meditation: Deciding to play a pull shot before the ball is bowled can lead to poor execution if the ball is not genuinely short.
Variations & Progressions

To keep the drill engaging and to challenge the players as they improve, introduce the following variations:
- Pace Variation: Gradually increase the speed of the deliveries. Start with underarm throws, progress to overarm throwdowns, and finally use a fast bowler or a bowling machine.
- Tennis Ball Drill: For players struggling with fear, use a tennis ball or a softer synthetic ball. This builds confidence in getting into the right positions without the fear of injury.
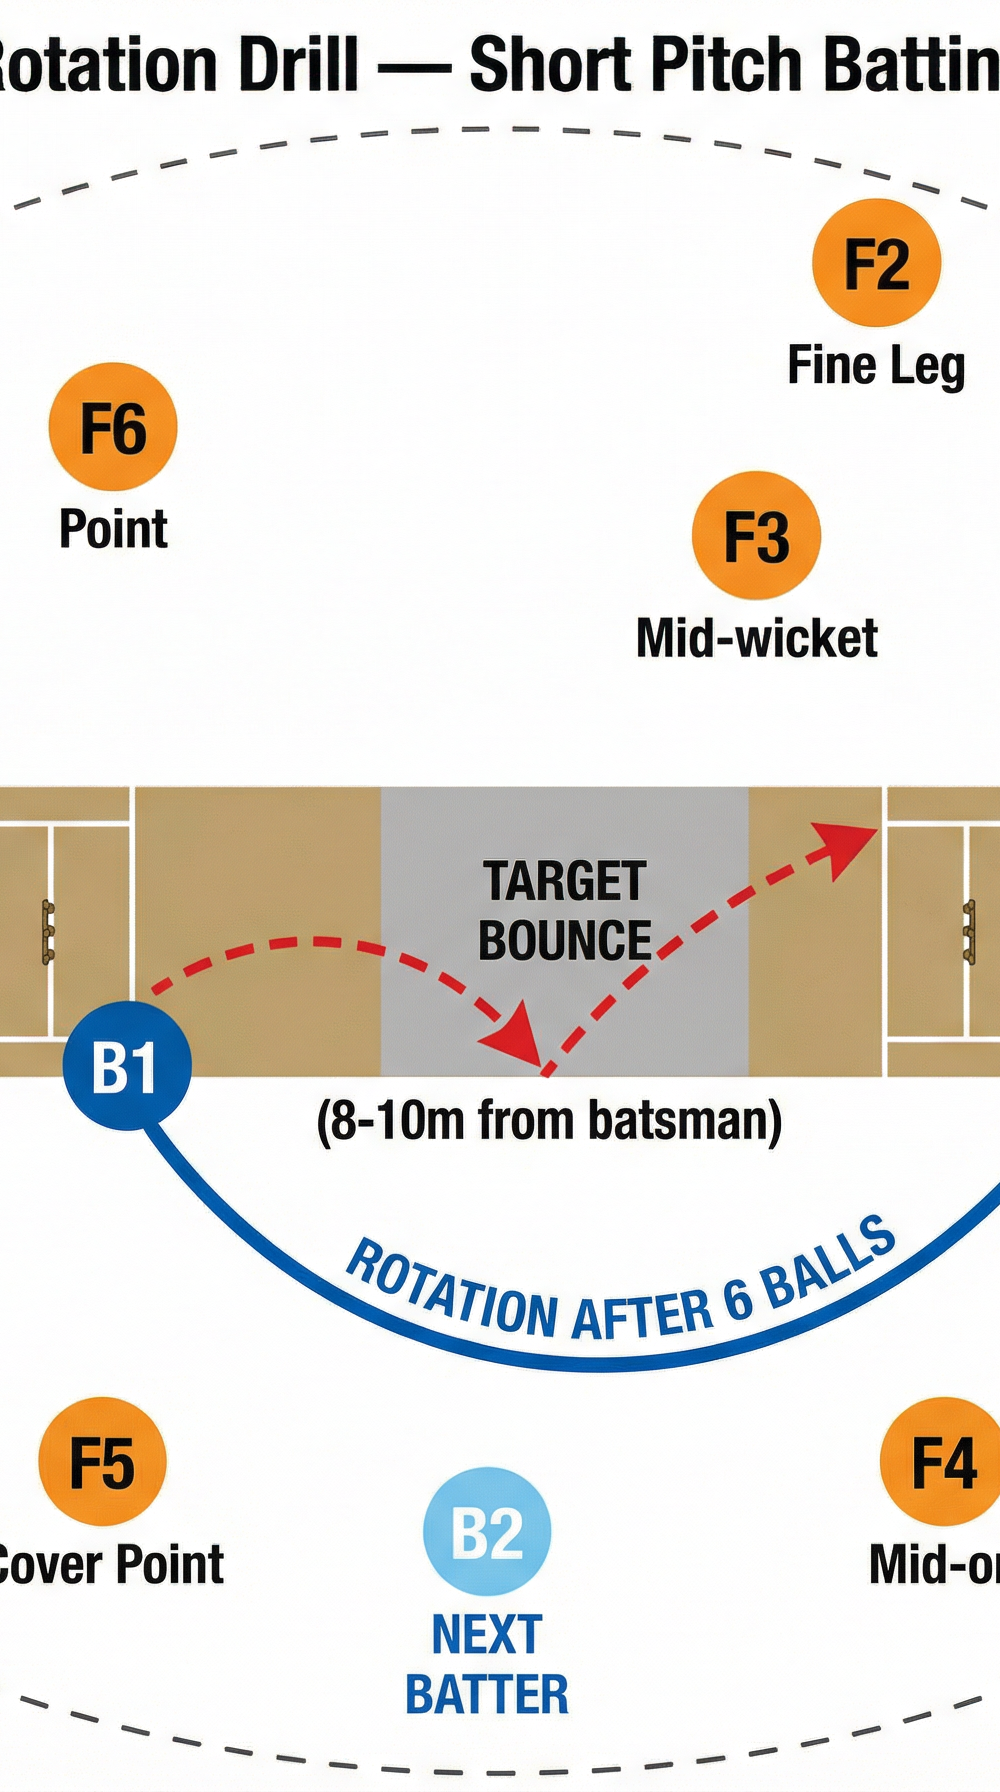
- The Rotation Drill: Implement a rotation system where multiple batters and fielders are involved. Each batter faces an over (6 balls) of short-pitched deliveries before rotating out to a fielding position, while a new batter steps in. This simulates match intensity and keeps everyone active.
Age Adaptations

- Under 10s / Under 12s: Focus purely on evasion techniques (ducking and swaying) using tennis balls or incredibly soft incrediballs. Do not encourage hooking at this age.
- Under 14s: Introduce the pull shot using softer balls. Emphasize rolling the wrists to keep the ball down.
- Under 16s and Open: Full integration of all shots using hard cricket balls. Increase the pace and incorporate the rotation drill to simulate match pressure.