Bowling Run-Up Alignment Drill: Groove Your Corridor & Eliminate No-Balls
A structured, marker-based drill that teaches bowlers of all ages to build a repeatable, straight run-up corridor, land legally at the crease, and deliver consistently from over or around the wicket.
Equipment Needed
Overview
Consistency in bowling begins long before the ball leaves the hand — it starts the moment a bowler takes their first stride. The Bowling Run-Up Alignment Drill is a foundational session tool designed to ingrain a straight, repeatable approach path that terminates in a legally delivered ball from a controlled crease position. Poor run-up alignment is one of the most common — and most correctable — causes of no-balls, wide deliveries, and inconsistent release points at every level of the game.
This drill is appropriate as a warm-up activity at the start of any bowling session, as a remedial tool for bowlers who are repeatedly bowling no-balls, or as a structured technical session in its own right. It works equally well in a nets environment or on an open oval ground. Coaches should expect to run this drill for 20–30 minutes as a standalone session, or 10–15 minutes as a warm-up block within a broader bowling skills session.

Setup

Equipment Required
| Item | Quantity | Purpose |
|---|---|---|
| Cricket balls (or wind balls) | 6–12 | Bowling repetitions |
| Flat rubber marker cones (15 cm) | 8–10 | Stride markers along run-up corridor |
| Coloured tape or chalk line | 1 roll | Mark the alignment corridor on the pitch |
| Stumps (full set) | 1 set (3 stumps + bails) | Bowling end target reference |
| Measuring tape | 1 | Set accurate run-up distances |
| Coach's clipboard / session card | 1 | Record no-ball counts and stride data |
Pitch & Field Setup
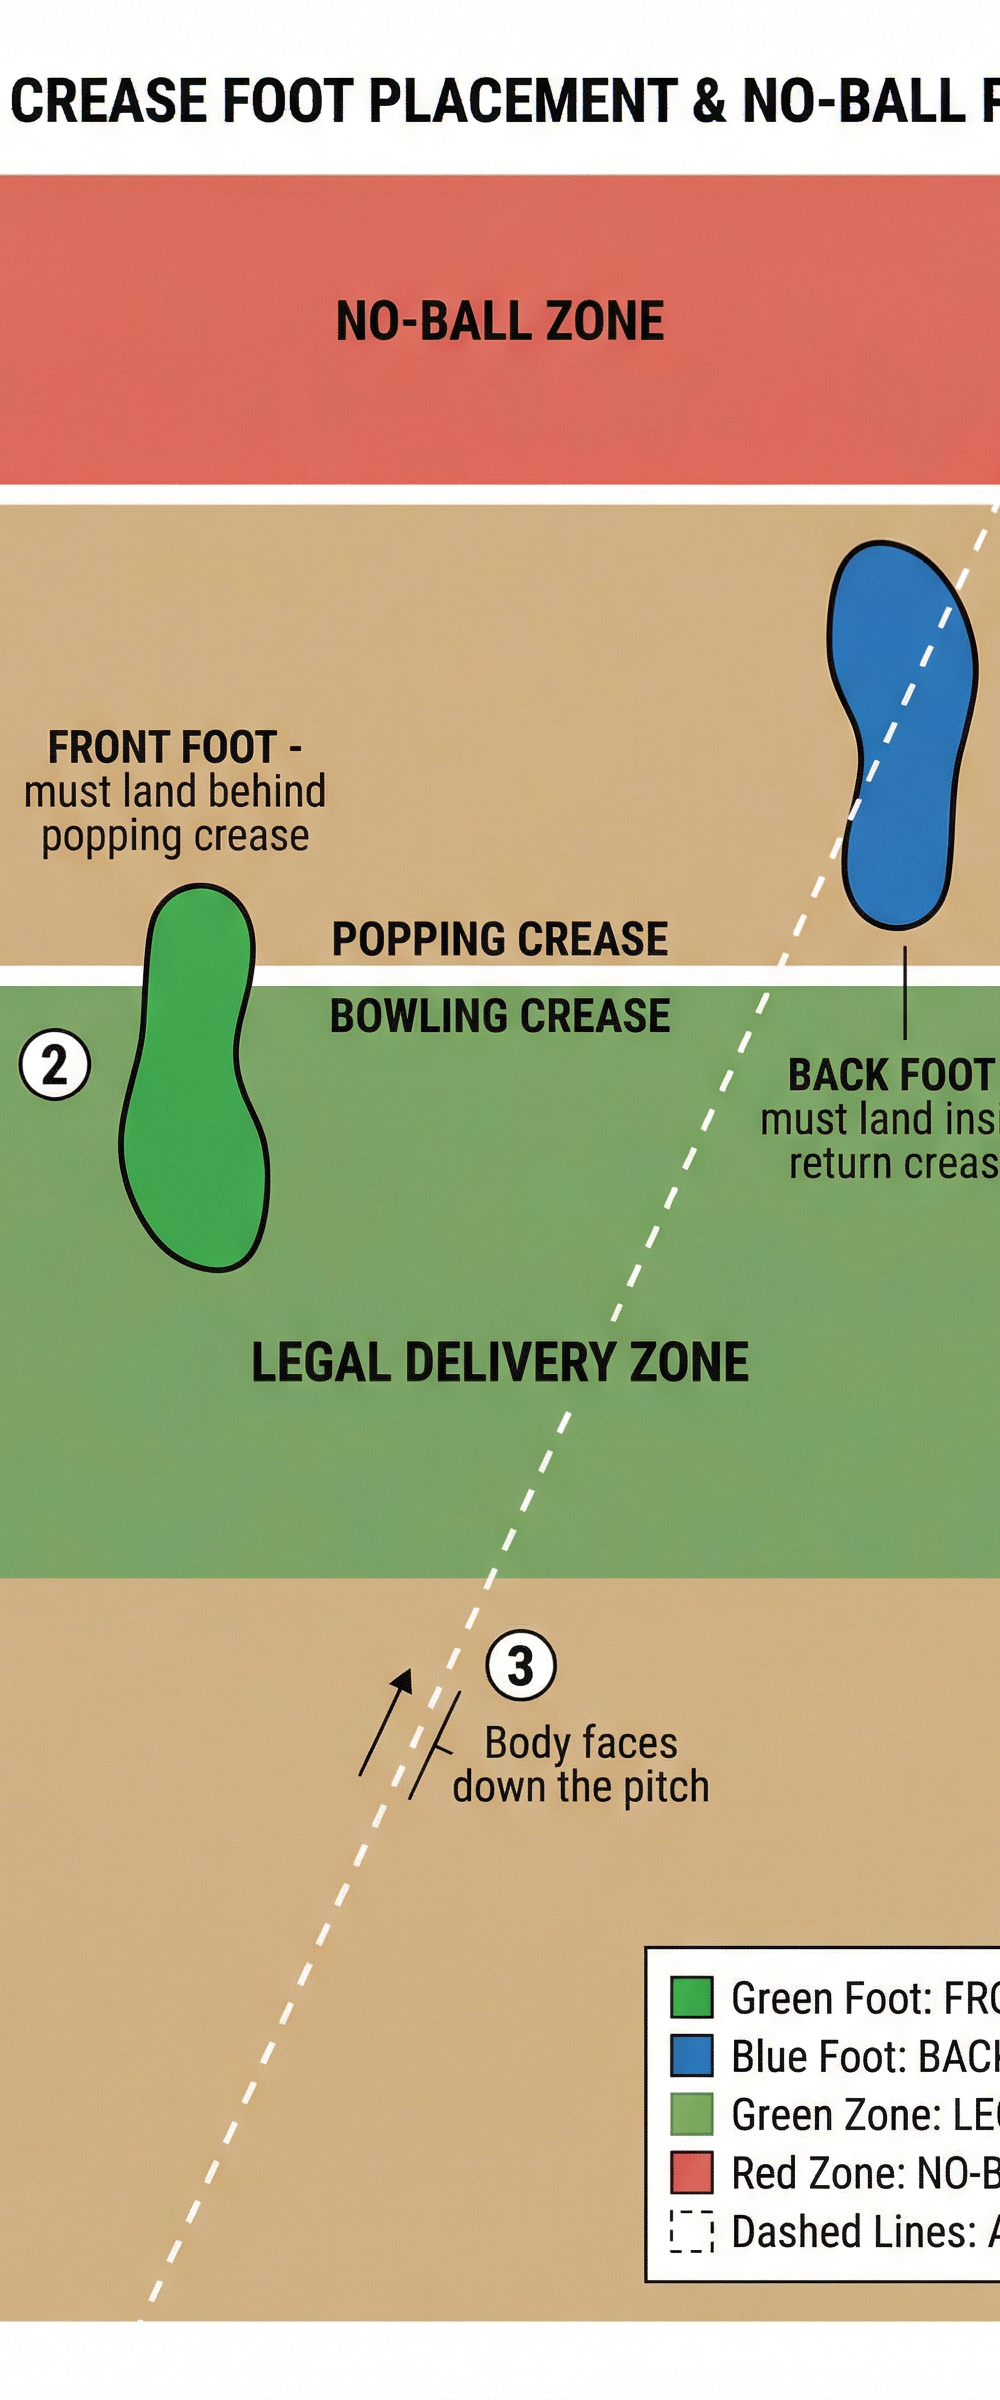
This drill is run on a standard 22-yard (20.12 m) cricket pitch within an oval ground. Use the bowling end crease as your reference point. The bowling crease is 8 feet 8 inches (2.64 m) wide; the popping crease sits 4 feet (1.22 m) in front of it toward the batsman; the return creases run perpendicular at each end.
- Using the measuring tape, measure back from the bowling crease along the pitch centre line to the bowler's personal run-up distance (typically 15–25 yards for medium-pace; 8–12 yards for spin).
- Lay a chalk line or coloured tape straight down the centre of the pitch from the run-up start mark to the bowling crease. This is the Alignment Corridor.
- Place 5 flat marker cones at equal intervals of 4–5 yards along the corridor, numbered 1 (start) through 5 (crease approach). These are the Stride Markers.
- Ensure the popping crease is clearly visible. If on a practice surface, re-chalk the crease lines before the session.
Player Positions
- Bowler (B): Starts at the run-up mark, behind Cone 1.
- Wicket-Keeper (WK): Positioned 5–8 metres behind the stumps at the batting end, in a ready stance to receive deliveries.
- Feeder / Coach (C): Stands side-on at the bowling crease, 2–3 metres to the off side, observing foot placement and corridor adherence.
- Waiting Bowlers: Queue 5 metres behind the run-up start, off the corridor line.
Step-by-Step Instructions

Step 1 — Mark the Personal Run-Up.
Before the drill begins, each bowler walks their run-up at a slow jog to find their natural stride length. The coach uses the measuring tape to confirm the start mark and places a cone at the bowler's trigger position (the final 2-step approach before the delivery stride). This is unique to each bowler and must be recorded.
Step 2 — Walk-Through at Pace Zero.
The bowler walks slowly from Cone 1 to the crease, placing each foot deliberately alongside the Stride Markers. The coach checks that the bowler's hips and shoulders remain square to the batting end stumps throughout. No ball is held at this stage — the focus is purely on footwork and alignment.
Step 3 — Jog-Through with Ball (No Delivery).
The bowler jogs the run-up at 50% effort, holding the ball in the bowling grip. At the crease, the bowler completes the delivery stride but does not release the ball — instead, they freeze at the point of release and the coach checks: (a) front foot behind the popping crease, (b) back foot inside the return crease, (c) hips open toward fine leg, (d) eyes level and focused on the target.
Step 4 — Full Delivery at 75% Effort.
The bowler now runs in and delivers the ball at three-quarter pace. The coach calls "IN" or "OUT" immediately after the front foot lands to indicate whether the delivery is legal. The wicket-keeper confirms the ball's direction and length. The bowler retrieves the ball and returns to the queue.
Step 5 — Full Delivery at Match Pace.
Once the bowler has completed 3 legal deliveries at 75%, they progress to full match pace. The coach now records the number of no-balls per set of 6 deliveries. The target is zero no-balls in a set of 6.
Step 6 — Corridor Adherence Check.
After each set of 6 deliveries, the coach reviews whether the bowler's footprints (visible on a damp pitch or chalk surface) remain within 30 cm of the alignment corridor line. Any deviation wider than 30 cm is flagged and corrected before the next set.

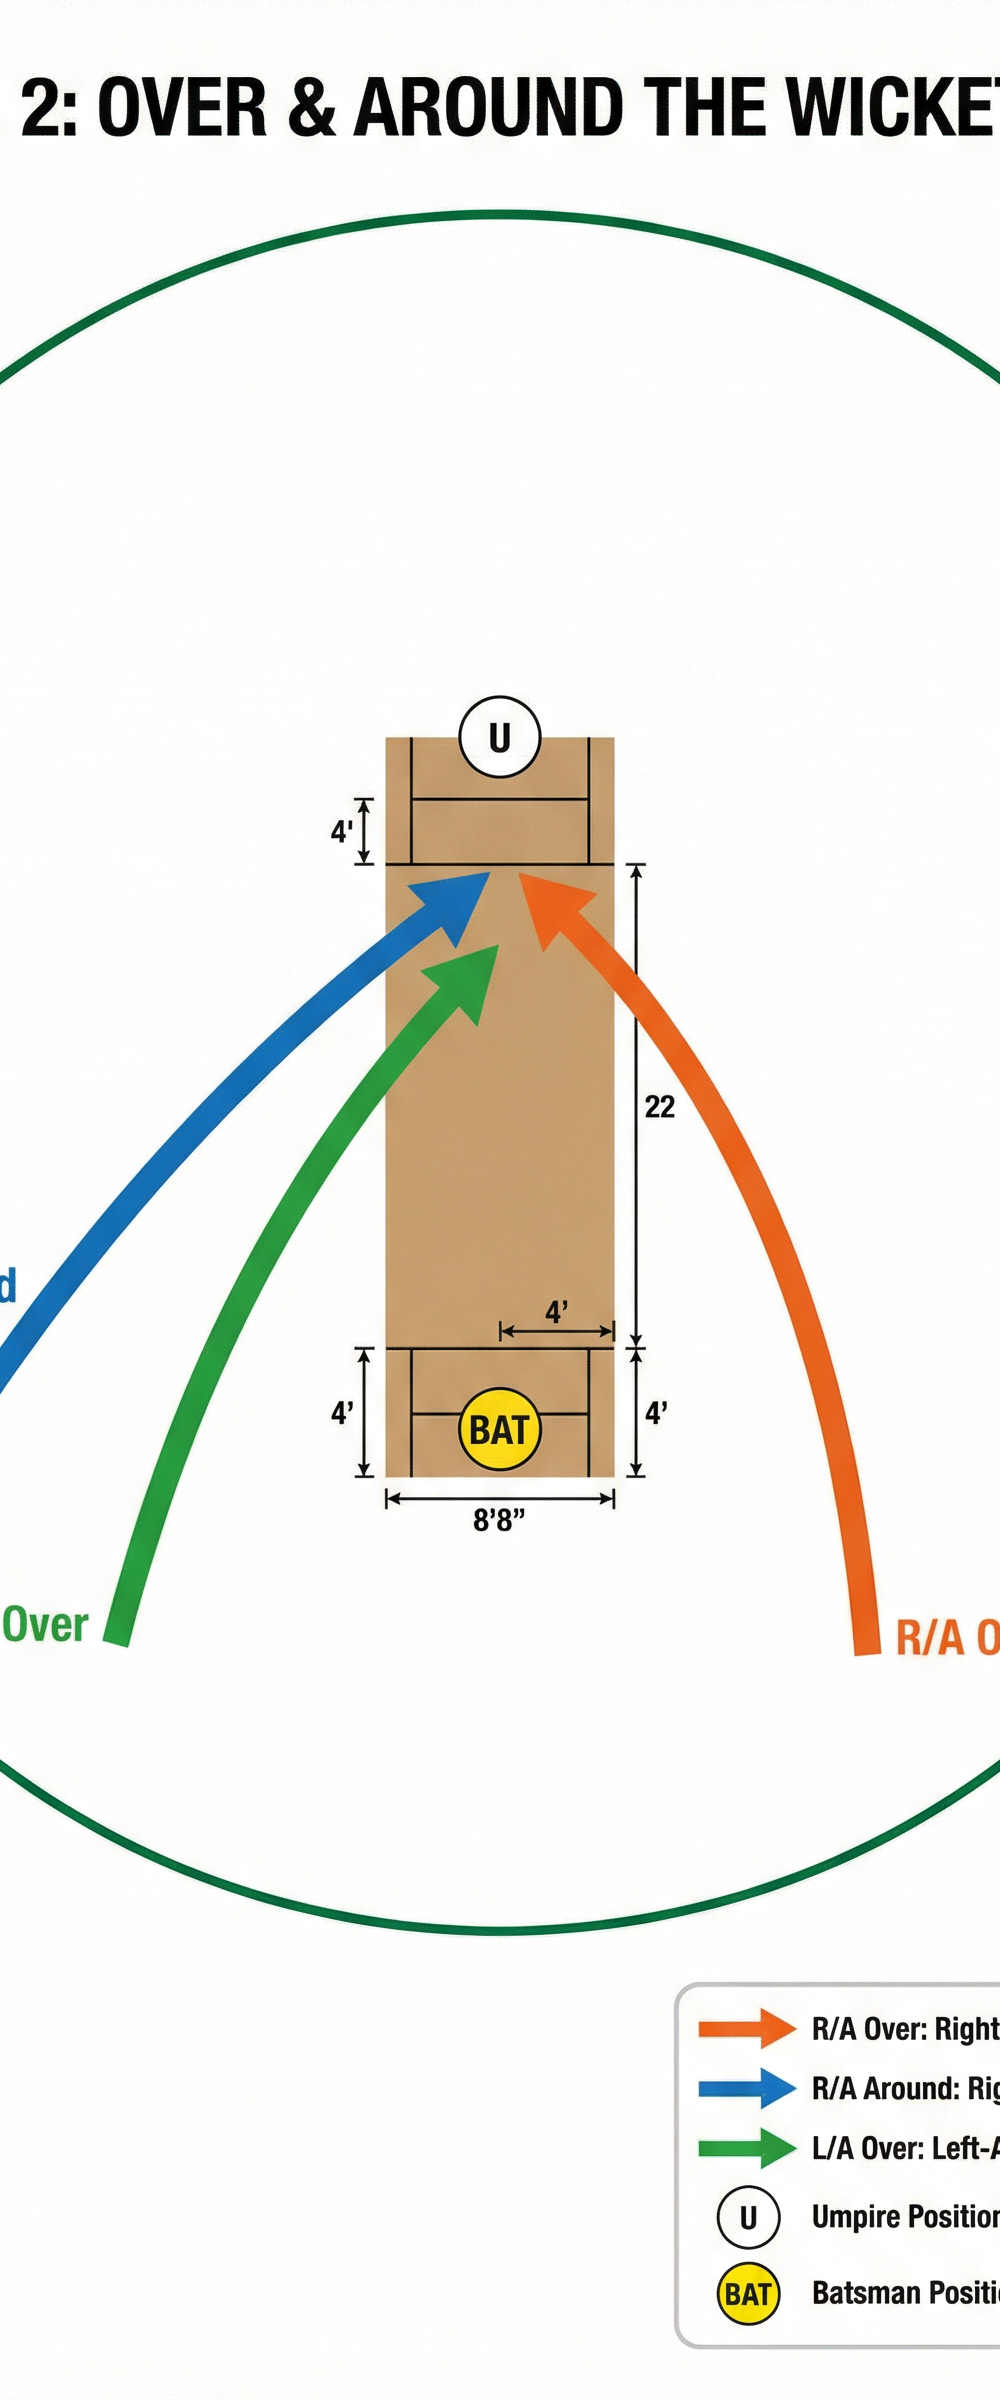
Step 7 — Over and Around the Wicket.
Once the bowler is consistently legal and aligned from their primary angle, repeat Steps 3–6 from the alternate angle (over or around the wicket). Refer to Diagram 2 for the correct approach path for each delivery type. The run-up start mark shifts laterally by approximately 1–1.5 metres for the alternate angle.
Key Coaching Points

1. The run-up is a straight line, not a curve.
Many bowlers unconsciously arc their run-up, particularly in the final 3–4 strides. Reinforce that the corridor line is non-negotiable. If the bowler's hips are not square at the crease, the run-up has drifted. Use the chalk line as objective evidence — footprints don't lie.
2. The trigger step sets everything up.
The final 2 steps before the bound (the "gather") determine crease position more than any other phase. Coach bowlers to identify a consistent trigger point — a specific marker or pitch scuff — where they initiate the gather. Consistency here eliminates 80% of no-ball problems.
3. Eyes on the target from the top of the bound.
At the peak of the delivery bound, the bowler's eyes should be locked on the target area at the batting end. A bowler who looks down at the crease during the delivery stride will lose alignment and release point consistency.
4. Front arm drives the alignment.
The non-bowling arm (front arm) should point directly at the target during the delivery stride. A front arm that collapses inward or swings across the body will rotate the hips prematurely and drag the ball down leg side. Cue: "Point your front elbow at the stumps."
5. Back foot parallel to the crease.
For a side-on or semi-open action, the back foot should land parallel (or close to parallel) to the bowling crease. A back foot that lands pointing down the pitch indicates an open-chested action developing, which changes the release angle and increases injury risk to the lower back.
6. Decelerate through the crease, not before it.
A common fault is the bowler subconsciously slowing down in the final 3 strides to "control" their foot placement. This kills pace and disrupts rhythm. Reinforce that the crease is not a stopping point — it is a passing point. The bowler should be accelerating through the crease.
Common Mistakes

Mistake 1 — The Banana Run-Up.
The bowler arcs wide to the off side in the final 5 yards, arriving at the crease from an angle rather than straight. This causes the ball to be dragged down leg side and increases the risk of a wide. Correction: Place two additional cones at 3 yards and 1 yard from the crease along the corridor. The bowler must pass inside both cones on every delivery.
Mistake 2 — Front Foot Landing Too Close to the Stumps.
The bowler's front foot lands on or near the return crease rather than in the centre of the pitch, narrowing the delivery angle and increasing no-ball risk. Correction: Place a coloured marker 30 cm inside the return crease as a visual target for front foot landing. Reinforce the cue: "Land in the middle, not the gutter."
Mistake 3 — Inconsistent Run-Up Length.
The bowler's stride length varies between deliveries, meaning the trigger step lands in different positions each time. This is the primary cause of persistent no-balls. Correction: Video the bowler from the side across 10 deliveries and count strides. Identify the most common stride count and lock it in as the standard. Mark the start point with a permanent cone.
Mistake 4 — Looking Down at the Crease.
The bowler drops their head and eyes to check foot placement during the delivery stride, disrupting their release point and losing sight of the target. Correction: Use the verbal cue "Eyes up, trust the feet." Reinforce that crease awareness must be proprioceptive (felt), not visual. Repeat the walk-through phase until foot placement is automatic.
Mistake 5 — Stopping the Run-Through.
After releasing the ball, the bowler plants both feet and stops abruptly on the pitch. This is both a safety hazard (risk of collision with the batsman) and a technical fault, as it indicates the bowler was decelerating before release. Correction: Insist on a minimum 3-stride follow-through past the crease, finishing to the off side of the pitch. Use a cone placed 3 yards past the crease as the follow-through target.
Variations & Progressions
Variation 1 — Blindfold Walk-Through.
Remove the visual cues by having the bowler close their eyes (or wear a blindfold) during the walk-through phase (Step 2). The bowler must rely entirely on proprioception to navigate the corridor and land at the crease. After completing the walk-through, they open their eyes and check their foot position relative to the crease markings. This builds the kinaesthetic awareness required for consistent crease placement under match pressure.
Variation 2 — Reduced Corridor Width.
Narrow the alignment corridor from 60 cm to 30 cm by placing two parallel chalk lines along the run-up. The bowler must keep all footfalls within the narrower corridor. This is an excellent challenge for experienced bowlers who have mastered the standard corridor and need a greater precision stimulus.
Progression 1 — Live Batsman with Alignment Scoring.
Introduce a batsman (in full protective equipment) at the striking end. The coach scores each delivery: 2 points for a legal delivery in the corridor of uncertainty (off stump to middle stump), 1 point for a legal delivery outside this zone, 0 points for a wide or no-ball. Bowlers compete in sets of 6 to add competitive pressure while maintaining the alignment focus.
Progression 2 — Fatigue-State Alignment.
Run the drill at the end of a full training session rather than the beginning. Bowlers complete a 5-minute conditioning circuit (shuttle runs or skipping) immediately before their set of 6 deliveries. This simulates the late-innings fatigue state in which alignment faults most commonly appear in match conditions, and trains the bowler to maintain technical discipline under physical stress.
Age Adaptations

| Age Group | Key Modifications |
|---|---|
| Under 10 (Kwik Cricket) | Use a shorter run-up of 5–8 yards. Replace chalk lines with brightly coloured rope laid on the ground. Focus only on Steps 1–4 (no full-pace delivery). Use a wind ball or soft ball. Reward correct corridor adherence with stickers or points rather than focusing on no-balls. |
| Under 12 | Use a run-up of 8–12 yards. Introduce the concept of over and around the wicket (Diagram 2) but only after the primary angle is consistent. Allow 2 no-balls per set of 6 as an acceptable threshold before progressing. |
| Under 14 | Full drill as written. Introduce the fatigue-state progression (Progression 2) for physically mature players. Begin recording no-ball counts across sessions to track improvement over time. |
| Under 16 / Open | All variations and progressions apply. Introduce video analysis — film from behind the bowler and from side-on simultaneously. Review footage with the bowler immediately after the set to develop self-coaching awareness. Set a performance standard of zero no-balls in 3 consecutive sets of 6 before the bowler is considered to have "passed" the drill. |
Coaching Note: This drill is most effective when repeated across multiple sessions rather than run once in isolation. Aim to include a 10-minute alignment block in every bowling session for a minimum of four consecutive weeks. Meaningful, lasting change in run-up mechanics requires hundreds of correct repetitions — not dozens.