Death Overs Bowling Plan: Executing Under Pressure
Master the art of closing out an innings with this comprehensive guide to death overs bowling, featuring tactical field settings, target zones, and variation sequences.

Equipment Needed
Overview
The death overs (typically overs 16–20 in a T20, or 41–50 in an ODI) are the crucible of limited-overs cricket. This set play resource is designed to equip coaches and bowlers with a structured approach to restricting runs and taking crucial wickets during the final stages of an innings. It focuses on clarity of thought, precise execution of key deliveries (particularly the yorker), and setting fields that protect the boundaries while creating pressure. The primary goal is to make the batsman hit to the longest parts of the ground or against their natural swing.
Setup
To run this set play in a practice environment, you will need a full 22-yard pitch and a clear understanding of the field dimensions.
Equipment Needed:
- 6–12 high-quality white or red cricket balls (depending on the format).
- Target markers or flat cones to designate bowling zones on the pitch.
- Optional: A bowling machine for repetitive practice of variations.
Field Setup:
The field must be set defensively, anticipating aggressive stroke play. The standard death overs field typically employs five fielders on the boundary (the maximum allowed in most formats during this phase).

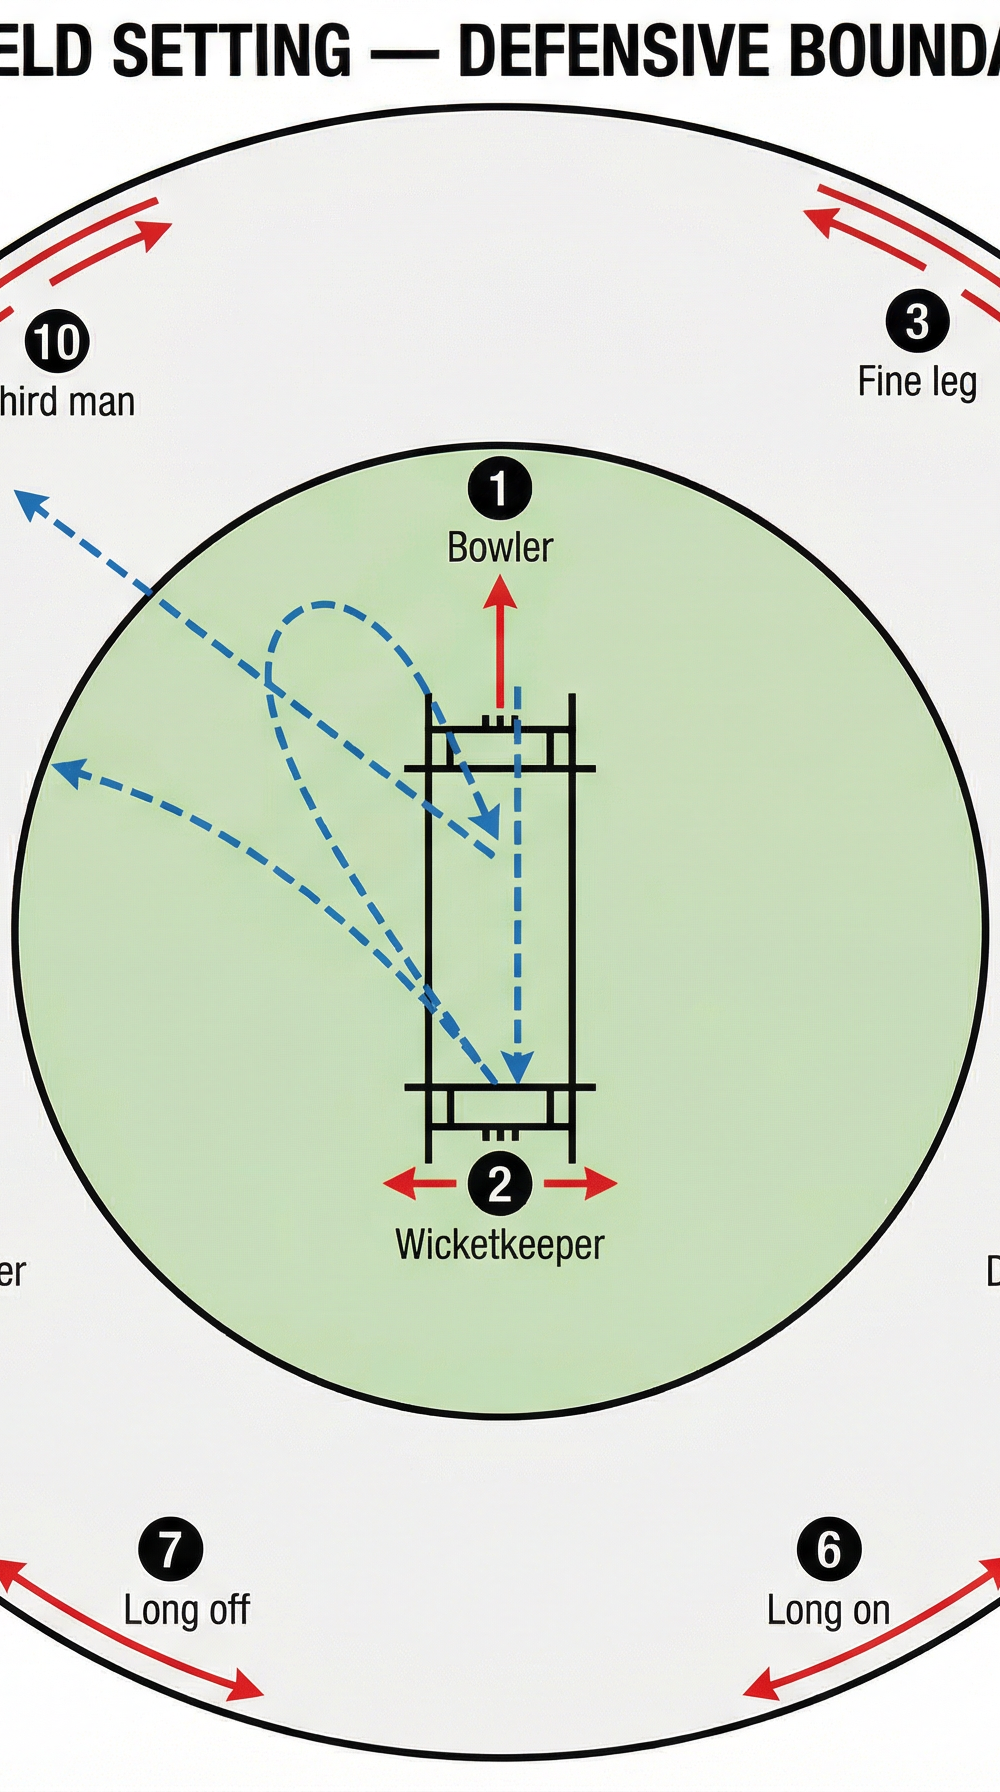
Player Positions:
- Bowler (1): Executing the plan from the bowling crease.
- Wicketkeeper (2): Standing back for pace, crucial for gathering wide deliveries.
- Fine Leg (3): Positioned on the boundary, roughly 45 degrees behind square, to protect against sweeps and scoops.
- Deep Square Leg (4): On the boundary, guarding against the pull shot.
- Deep Midwicket (5): A key boundary rider for the slog sweep or powerful leg-side heaves.
- Long On (6): Protecting the straight boundary.
- Long Off (7): Protecting the straight boundary on the off-side.
- Deep Extra Cover (8): Guarding against the lofted drive over the infield.
- Deep Point (9): Positioned on the boundary for the square cut or wide yorker slashes.
- Third Man (10): On the boundary to cover edges and the reverse ramp.
Note: The exact placement of the five boundary riders will depend on the bowler's specific plan — for example, packing the off-side for wide yorkers.
Step-by-Step Instructions
- Establish the Base Plan: Before the over begins, the bowler and captain must agree on the primary target zone based on the batsman's strengths and the field setting. The default base delivery should be the yorker.
- Set the Field: Ensure the field is set precisely to the agreed plan. If the plan is wide yorkers, ensure Deep Point and Third Man are in place. If targeting the stumps, ensure Long On, Long Off, and Deep Midwicket are secure.
- Visualise the Target: The bowler must focus intently on the specific target zone (e.g., the base of the off stump) during their run-up.
- Execute the Primary Delivery: Bowl the planned delivery with full commitment. Do not decelerate the arm speed, even when bowling variations.
- Assess and Adapt: After each delivery, quickly assess the outcome. Did the batsman anticipate it? Was the execution flawed? Adapt the next delivery based on this immediate feedback.
- Implement Variations: Introduce variations (slower balls, bouncers) strategically, not randomly. A variation is only effective if it disrupts the batsman's expectation established by the base plan.

Key Coaching Points

- Clarity over Complexity: It is better to execute a simple plan perfectly than a complex plan poorly. Ensure the bowler is 100% clear on what they are trying to bowl before starting their run-up.
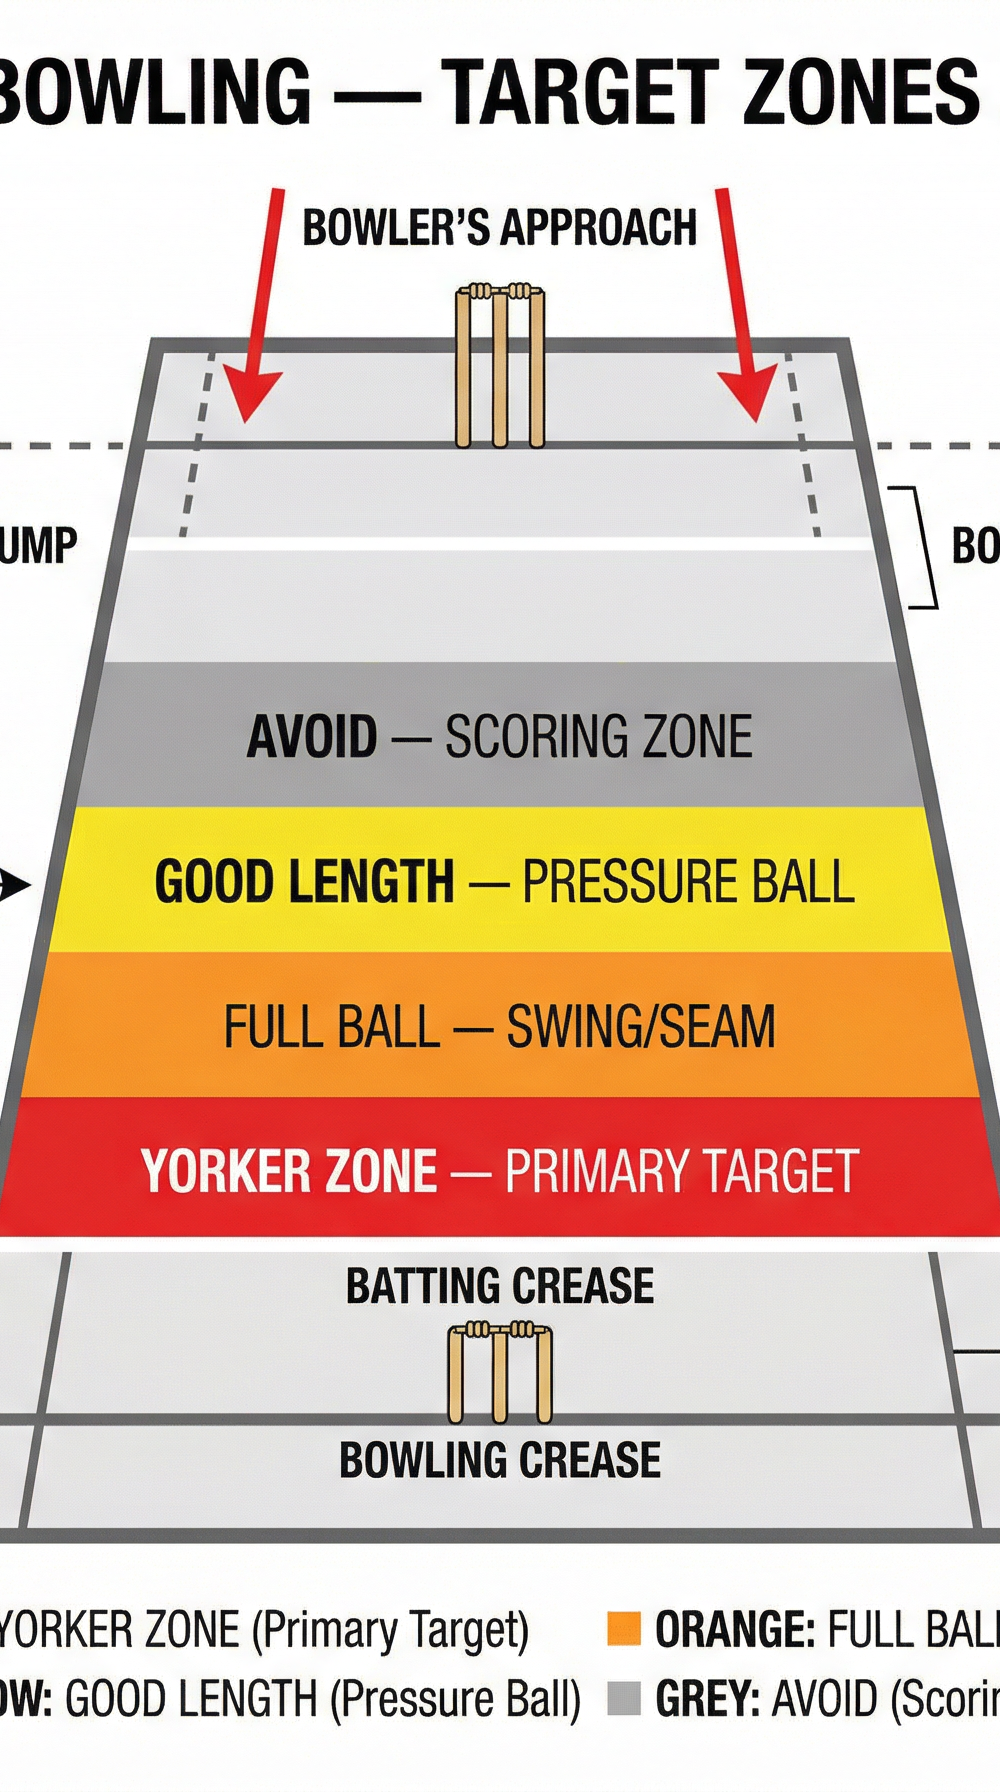
- Commitment to the Yorker: The yorker remains the most effective death delivery. Bowlers must practice it relentlessly until they can hit the target zone (the red zone in Diagram 2) under pressure.
- Arm Speed on Variations: When bowling slower balls (e.g., back-of-the-hand, off-cutter), the arm speed must remain identical to a stock fast ball to deceive the batsman.
- Fielding Synergy: The bowler must bowl to their field. If the field is set for wide yorkers, bowling a straight half-volley is a critical error.
- Breathing and Routine: Encourage bowlers to take a deep breath at the top of their mark to lower their heart rate and focus their mind.
Common Mistakes

- Predictability: Bowling the same delivery (even a good one) too often allows the batsman to set up for it.
- Missing the Length: Missing a yorker length slightly results in a full toss or a half-volley, both of which are prime scoring opportunities for the batsman.
- Bowling to the Batsman's Strength: Failing to adapt the plan when a new batsman comes to the crease or when the current batsman is clearly dominating a specific zone.
- Rushing the Over: Fast bowlers often rush back to their mark after being hit for a boundary. They must learn to pause, reset, and plan the next ball.
Variations & Progressions

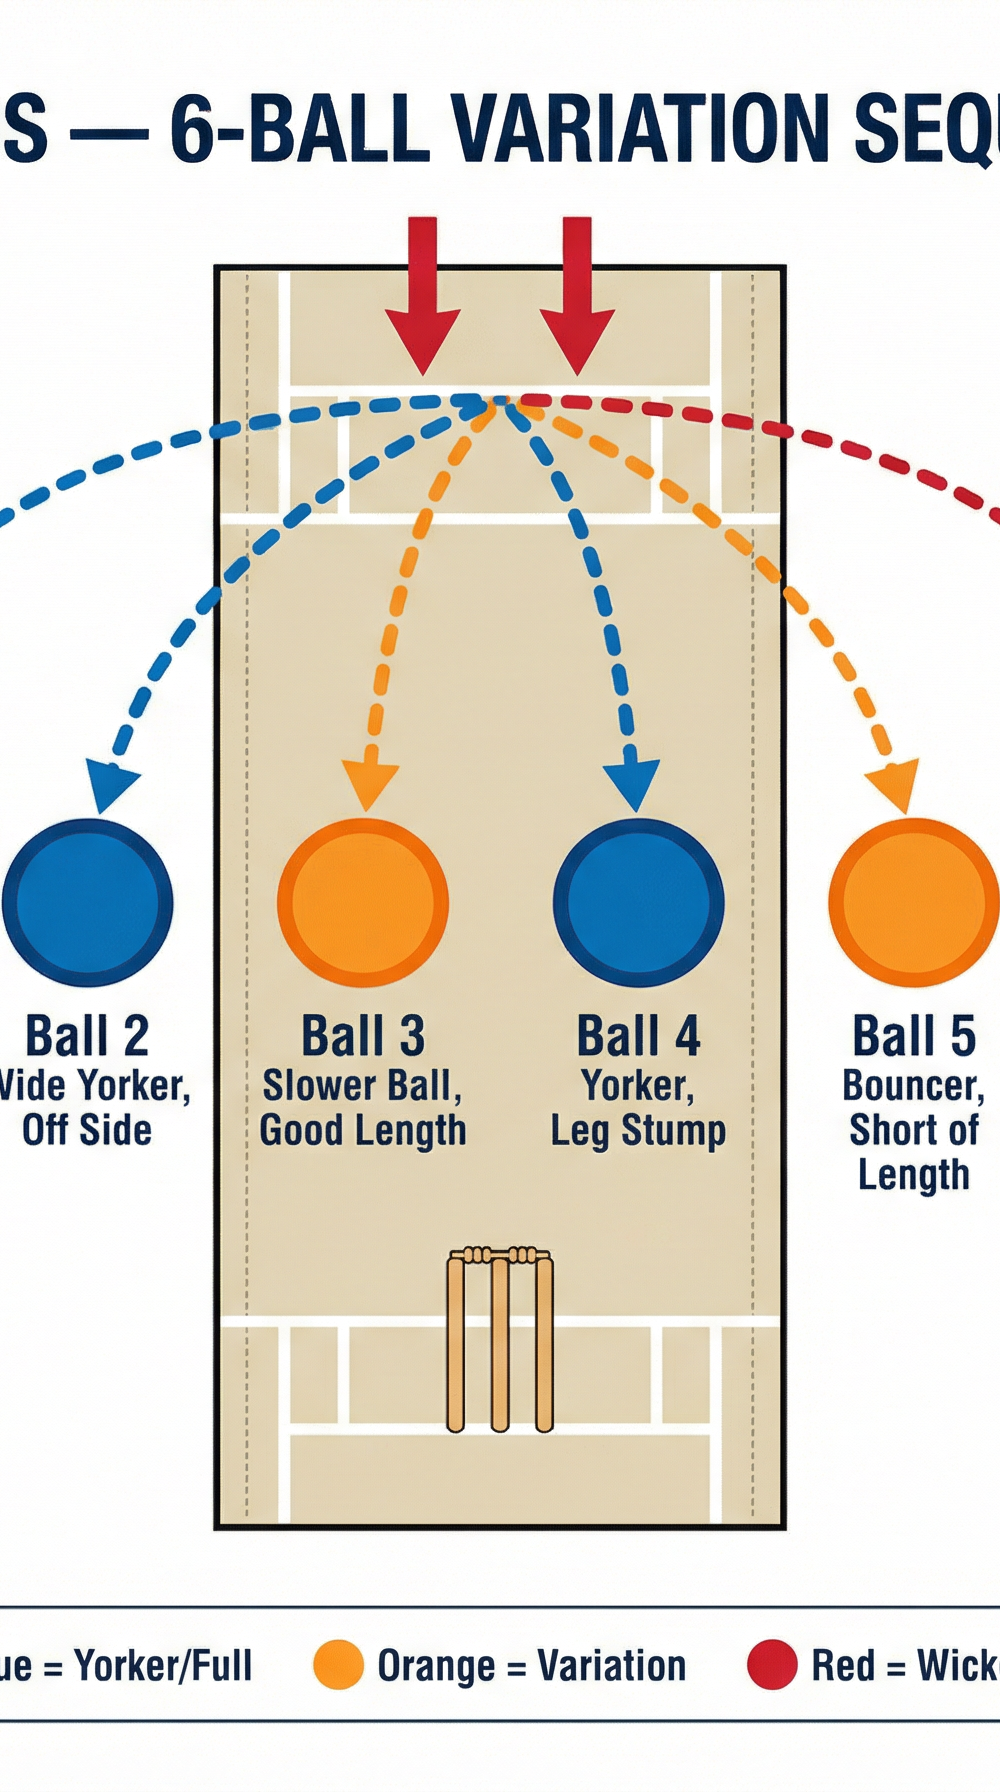
The 6-Ball Sequence Plan:
Advanced bowlers should plan their overs in sequences rather than ball-by-ball. This involves setting the batsman up over multiple deliveries before delivering the wicket ball.

- Progression 1 — Target Practice: Use flat cones to create target zones (yorker, wide yorker, bouncer). Award points for hitting the zones during net sessions to build competitive pressure.
- Progression 2 — Scenario Training: Set up match simulations (e.g., "You need to defend 12 runs off the last over"). This introduces pressure and tests decision-making under realistic conditions.
- Variation — The Wide Yorker Strategy: Shift the field heavily to the off-side and practice bowling consistently outside the off-stump, forcing the batsman to reach for the ball and reducing their power.
Age Adaptations
| Age Group | Focus | Field Complexity | Deliveries Introduced |
|---|---|---|---|
| Under 12 | Accuracy and good length | Simple 3–4 boundary riders | Stock delivery only |
| Under 14 | Yorker introduction and one slower ball | 4 boundary riders | Yorker + one variation |
| Under 16 | Full death over plan | Full 5 boundary riders | Yorker, slower ball, bouncer |
| Open | Scenario-based pressure training | Dynamic field changes | Full repertoire + wide yorker |
- Under 12s: Focus entirely on accuracy and hitting a good length consistently. Introduce the concept of a yorker, but do not expect consistent execution. Field settings should be basic and non-distracting.
- Under 14s: Begin structured practice of the yorker and one reliable slower ball. Introduce the concept of bowling to a specific field and the importance of field synergy.
- Under 16s & Open: Full implementation of the death overs plan, including complex field settings, multiple variations, and scenario-based pressure training to replicate match conditions.