Defensive Field Setting for Spin: Controlling the Game Through Intelligent Placement
Master the art of setting a defensive spin field — learn exactly where to place your nine fielders, how to read the pitch and batsman, and how to build pressure that forces errors without conceding easy runs.

Equipment Needed
Overview
Setting a defensive field for spin bowling is one of the most tactically nuanced skills a cricket captain and coach can develop. Unlike pace bowling, where field placement often reacts to raw pace and bounce, spin bowling demands a field that works in concert with the bowler's primary weapon: turn, drift, and deception. A well-set defensive spin field achieves three simultaneous goals — it plugs the scoring gaps that the batsman most wants to exploit, it creates psychological pressure by denying easy singles, and it positions close catchers to capitalise on the edge or the mistimed sweep.
This set play is most effectively deployed when your spin bowler has established a consistent line and length, when the pitch is offering appreciable turn (typically from the second session of a day's play or on a worn surface), or when you are defending a modest total and need to dry up the run rate while building pressure. It is equally valuable in T20 and 50-over cricket as a mid-innings containment strategy, and in four-day cricket as a wicket-taking trap once the batsman has been tied down.
Setup

Equipment Required
| Item | Quantity | Notes |
|---|---|---|
| Cricket balls (match or training) | 6–12 | Use worn balls to simulate real spin conditions |
| Cones (coloured) | 20 | Mark fielding positions and zones |
| Stumps (full set) | 2 sets | Both ends of the 22-yard pitch |
| Batting pads, gloves, helmet | 2 sets | For live batting practice |
| Coaching whiteboard / field diagram card | 1 | Brief players before taking the field |
Pitch and Field Dimensions
This field setting is designed for a standard oval cricket ground with a boundary of approximately 65–75 metres from the centre of the pitch. The pitch itself is 22 yards (20.12 m) in length. All fielding positions referenced below assume a right-arm off-spin bowler bowling over the wicket to a right-handed batsman. Mirror the field horizontally for left-arm spin or left-handed batsmen.
Player Positions — Standard Defensive Spin Field

Diagram 1 illustrates the standard nine-player defensive spin field. Solid red arrows indicate fielder movement toward the ball; dashed yellow arrows show the ball's flight and spin trajectory.
| # | Position | Distance from Bat | Side | Role |
|---|---|---|---|---|
| 1 | Bowler | At crease | Centre | Delivers the ball; follows through to cover drive zone |
| 2 | Wicket-keeper | 1–2 m back (standing back) | Centre | Takes deflections; communicates with bowler |
| 3 | Slip | 3–4 m behind bat, 1 m off-side of keeper | Off-side | Catches outside edge off turn |
| 4 | Silly mid-on | 4–5 m from bat, straight | Leg-side | Catches bat-pad from ball turning into right-hander |
| 5 | Mid-off | 28–32 m from bat | Off-side | Cuts off the straight drive; saves the single |
| 6 | Mid-on | 28–32 m from bat | Leg-side | Cuts off the on-drive; saves the single |
| 7 | Cover point | 38–42 m from bat | Off-side | Covers the cut and the push through covers |
| 8 | Square leg | 38–42 m from bat | Leg-side | Covers the sweep; plugs the leg-side gap |
| 9 | Fine leg | 50–55 m, behind square | Leg-side | Saves the fine sweep and the glance |
Coach's Note: The keeper standing back (rather than up to the stumps) is the default for this defensive field. It gives the keeper extra time on the ball and reduces the risk of byes, which is critical when defending. Reserve the keeper standing up for the attacking variation described in Diagram 2.
Step-by-Step Instructions

Step 1 — Brief the Bowler First (2 minutes)
Before placing any fielders, stand with your spin bowler at the top of their mark. Agree on the primary attacking line: for an off-spinner bowling over the wicket to a right-hander, this is middle-and-off stump, landing on a good length (6–7 metres from the batting crease). The field is built to protect against the batsman's natural responses to this line — the drive, the sweep, and the cut.
Step 2 — Set the Close Catchers (positions 3 and 4)
Place your slip fielder (3) approximately 3–4 metres behind the bat and 1 metre to the off-side of the keeper. This catcher is targeting the outside edge when the ball turns sharply away. Place silly mid-on (4) approximately 4–5 metres from the batsman, slightly forward of square on the leg-side. This fielder must wear a helmet and be alert to the ball that turns into the right-hander and takes the inside edge or the pad.
Step 3 — Set the Inner Ring (positions 5 and 6)
Mid-off (5) and mid-on (6) should be positioned at 28–32 metres, slightly straighter than traditional positions to cut off the straight drive. Instruct both fielders to start in a low, balanced stance and to be ready to sprint in toward the pitch on the bowler's release — this is the most common scoring zone for a batsman trying to work the spin.
Step 4 — Set the Outer Ring (positions 7, 8, and 9)
Cover point (7) at 38–42 metres covers the cut shot and the push through the off-side. Square leg (8) at 38–42 metres is your primary sweep-stopper — position this fielder slightly finer than traditional square leg (approximately 100–105 degrees from the batsman) to account for the fine sweep. Fine leg (9) at 50–55 metres behind square plugs the glance and the fine sweep that beats square leg.
Step 5 — Walk the Field with Your Players (3 minutes)
Before live practice, physically walk each fielder to their cone. Explain the why behind each position: "You're at cover point because when the ball pitches on off-stump and doesn't turn, the batsman will cut. Your job is to stop the four and make them run hard twos." Understanding purpose dramatically improves fielder concentration and decision-making.
Step 6 — Set Fielder Triggers
Instruct each fielder to take two steps toward the bat as the bowler enters their delivery stride. This closes the gap, improves reaction time, and communicates aggression to the batsman. The close catchers (3 and 4) should be in a low, crouched stance with weight on the balls of their feet.
Step 7 — Communicate the Plan to the Keeper
The wicket-keeper is your eyes behind the play. Brief them to call "outside edge" or "bat-pad" loudly after each delivery so the slip and silly mid-on know whether they were in the right position. This feedback loop is essential for micro-adjustments during an over.
Key Coaching Points

1. The Field Serves the Bowler's Primary Ball
Every fielder placement must be justified by the bowler's most likely delivery. If your off-spinner bowls predominantly on off-stump turning away, your field must protect the off-side first. Never set a field for a delivery the bowler cannot consistently bowl.
2. Deny the Batsman's Preferred Scoring Zone
Before setting the field, ask yourself: "Where does this batsman score most of their runs?" A batsman who loves the sweep needs square leg and fine leg plugged. A batsman who drives needs mid-off and cover point tight. The field is a direct response to the individual batsman, not a generic template.
3. Close Catchers Must Be Brave and Alert
Silly mid-on and slip are high-risk, high-reward positions. Fielders in these positions must wear appropriate protective equipment and must be mentally prepared for the ball to come at them hard and fast. Rotate these players every 4–5 overs to maintain concentration levels.
4. The Inner Ring Creates the Pressure; the Outer Ring Saves the Boundary
Mid-off and mid-on are your pressure fielders — their job is to force the batsman to run hard singles rather than score freely. Cover point, square leg, and fine leg are your boundary savers. The balance between these two rings determines whether you are truly defending or simply giving away easy runs.
5. Adjust After Every Two Overs
A defensive spin field is not static. After every two overs, review where the batsman has scored and where they have been beaten. If they are consistently sweeping fine, bring fine leg squarer. If they are pushing into the covers, bring cover point straighter. Tactical flexibility is the mark of an experienced captain.
6. Bowl to the Field — Not Around It
Coach your bowler to understand that the field is set for their best ball. If they bowl a full toss or a long hop, the field becomes irrelevant. Reinforce the principle: line and length first, field placement second.
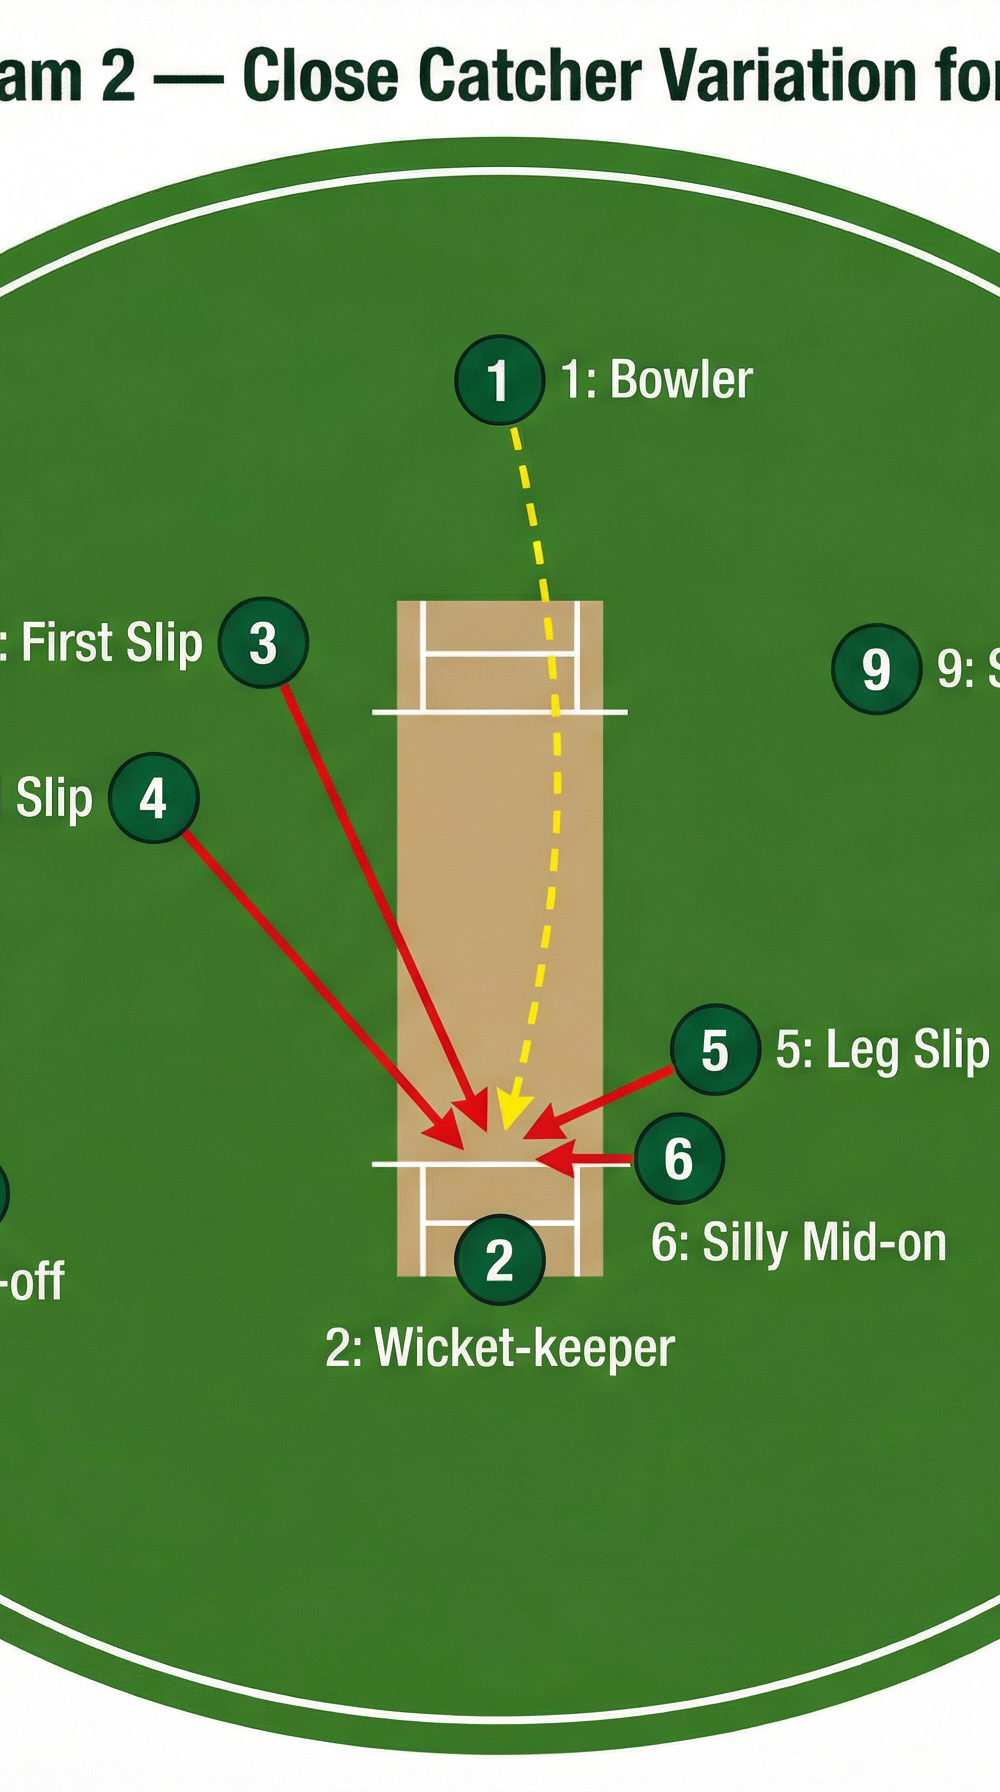
Close Catcher Variation for Significant Turn


Diagram 2 shows the attacking close-catcher variation, deployed when the pitch is offering significant turn and the keeper stands up to the stumps. Red arrows show the close catchers converging on the bat-pad zone; dashed yellow shows the ball's spinning trajectory.
When the pitch is turning sharply and the bowler is bowling with control, transition to the close-catcher variation shown in Diagram 2. The key changes from the standard field are:
- Keeper stands up to the stumps (position 2), removing the stumping opportunity while also catching the outside edge that doesn't carry to slip.
- First slip (3) and second slip (4) are both deployed, targeting the edge off significant turn.
- Leg slip (5) is added close on the leg-side behind the bat, targeting the inside edge and the bat-pad.
- Silly mid-on (6) remains in place, now forming a tight cordon of four close catchers around the bat.
- Short fine leg (9) replaces fine leg, positioned at approximately 20 metres to cut off the glance and the tickle.
This field sacrifices boundary protection in favour of catching opportunities. Use it only when you have the bowling control to justify it — a loose ball with this field set will cost four runs.
Common Mistakes
Mistake 1 — Setting the Field Too Deep Too Early
Many coaches default to a defensive field with all nine fielders on or near the boundary. This is a reactive, passive strategy that concedes easy singles and allows the batsman to rotate the strike freely. A true defensive spin field has an active inner ring at 28–42 metres that forces the batsman to earn every run.
Mistake 2 — Placing Silly Mid-on Without a Helmet
This is a safety issue as much as a tactical one. Any fielder within 10 metres of the bat on the leg-side must wear a helmet. Coaches who skip this step expose their players to serious injury and undermine the fielder's confidence and concentration.
Mistake 3 — Forgetting to Adjust for the Left-Handed Batsman
When a left-handed batsman comes to the crease, the entire field must be mirrored. Slip moves to the leg-side, silly mid-on moves to the off-side, and fine leg moves to third man. Coaches who fail to communicate this adjustment quickly will concede easy runs in the transition overs.
Mistake 4 — Static Fielders Who Don't Move on the Bowler's Stride
Fielders who stand flat-footed until the ball is struck are always a step behind. Every fielder in this set-up must be coached to take their two-step trigger movement as the bowler enters their delivery stride. This single habit can save 8–12 runs per innings.
Mistake 5 — Ignoring the Bowler's Follow-Through Zone
The bowler (position 1) after delivering the ball is a fielder. For an off-spinner bowling over the wicket, their follow-through naturally takes them toward the off-side. Coach them to complete their follow-through and immediately assume a fielding position covering the straight drive zone between mid-off and mid-on — a gap that is often left unguarded.
Variations and Progressions

Variation 1 — The Ring Field (Easier)
For younger or less experienced teams, simplify the field by removing the close catchers (slip and silly mid-on) and placing all nine fielders in a ring at approximately 30–35 metres. This is easier to set and maintain, reduces injury risk, and still creates pressure by denying boundaries. It is the ideal starting point for Under-12 and Under-14 groups learning field placement concepts.
Variation 2 — The Leg-Side Trap (Advanced)
For an experienced off-spinner bowling around the wicket into the rough outside the right-hander's leg stump, shift the field heavily to the leg-side: place three fielders on the leg-side boundary (fine leg, square leg, mid-wicket), two close catchers (leg slip and short fine leg), and only mid-off and cover on the off-side. This forces the batsman to play across the line against the spin — a high-risk shot that generates wickets.
Progression — Live Pressure Drill
Once players understand the field, run a 10-over pressure simulation: the batting pair must score at least 5 runs per over, and the fielding team must take at least 2 wickets. Rotate the bowling and fielding units every 5 overs. Debrief after each rotation by asking fielders: "Where did we give away runs? Where did we create pressure?" This builds tactical awareness faster than any static drill.
Age Adaptations

| Age Group | Key Modifications |
|---|---|
| Under 10 | Use only 6 fielders. Remove close catchers entirely. Focus on mid-off, mid-on, cover, square leg, and fine leg. Use a softer training ball. |
| Under 12 | Introduce the ring field (Variation 1). Begin teaching the concept of "bowling to a field." Use 8 fielders. |
| Under 14 | Introduce slip and silly mid-on with helmets. Begin discussing field adjustments for left-handed batsmen. |
| Under 16 | Run the full 9-player field. Introduce the close-catcher variation (Diagram 2). Begin discussing over-by-over tactical adjustments. |
| Open / Senior | Full tactical implementation including the leg-side trap variation. Introduce captain-led field-setting decisions during live match simulations. |
Final Coaching Thought: The best defensive spin fields are set by captains and coaches who have watched the batsman carefully for at least two overs before making changes. Patience and observation are the foundations of intelligent field placement. Teach your players to think about the game, not just react to it.