Elite Slip Cordon Reaction & Catching Drill
Develop lightning-fast reflexes and flawless catching technique in your slip cordon with this high-intensity reaction drill using a slip cradle.

Equipment Needed
1. Overview
The slip cordon is arguably the most critical catching area on a cricket field. Matches are frequently won or lost based on the reliability of the fielders positioned behind the wicket. This elite reaction drill is designed to simulate the unpredictable deflections that occur off a batsman's edge, challenging fielders to react instantly and secure catches cleanly.
By utilizing a slip cradle (or a similar deflecting surface), coaches can create a highly variable environment that mimics match conditions far better than standard straight catching. This drill not only hones hand-eye coordination and reaction speed but also reinforces the correct low, athletic ready position essential for slip fielding. It is best used during the intensive fielding segment of a practice session, particularly leading up to a match where the pitch is expected to offer pace and bounce.
2. Setup

Proper setup is crucial for ensuring the drill is both safe and effective.
Equipment Needed:
- 1 Slip Cradle (or a ribbed catching board)
- 6–8 high-quality cricket balls (match condition preferred)
- Wicket-keeping gloves (optional for the coach/feeder)
Field Setup & Player Positions:
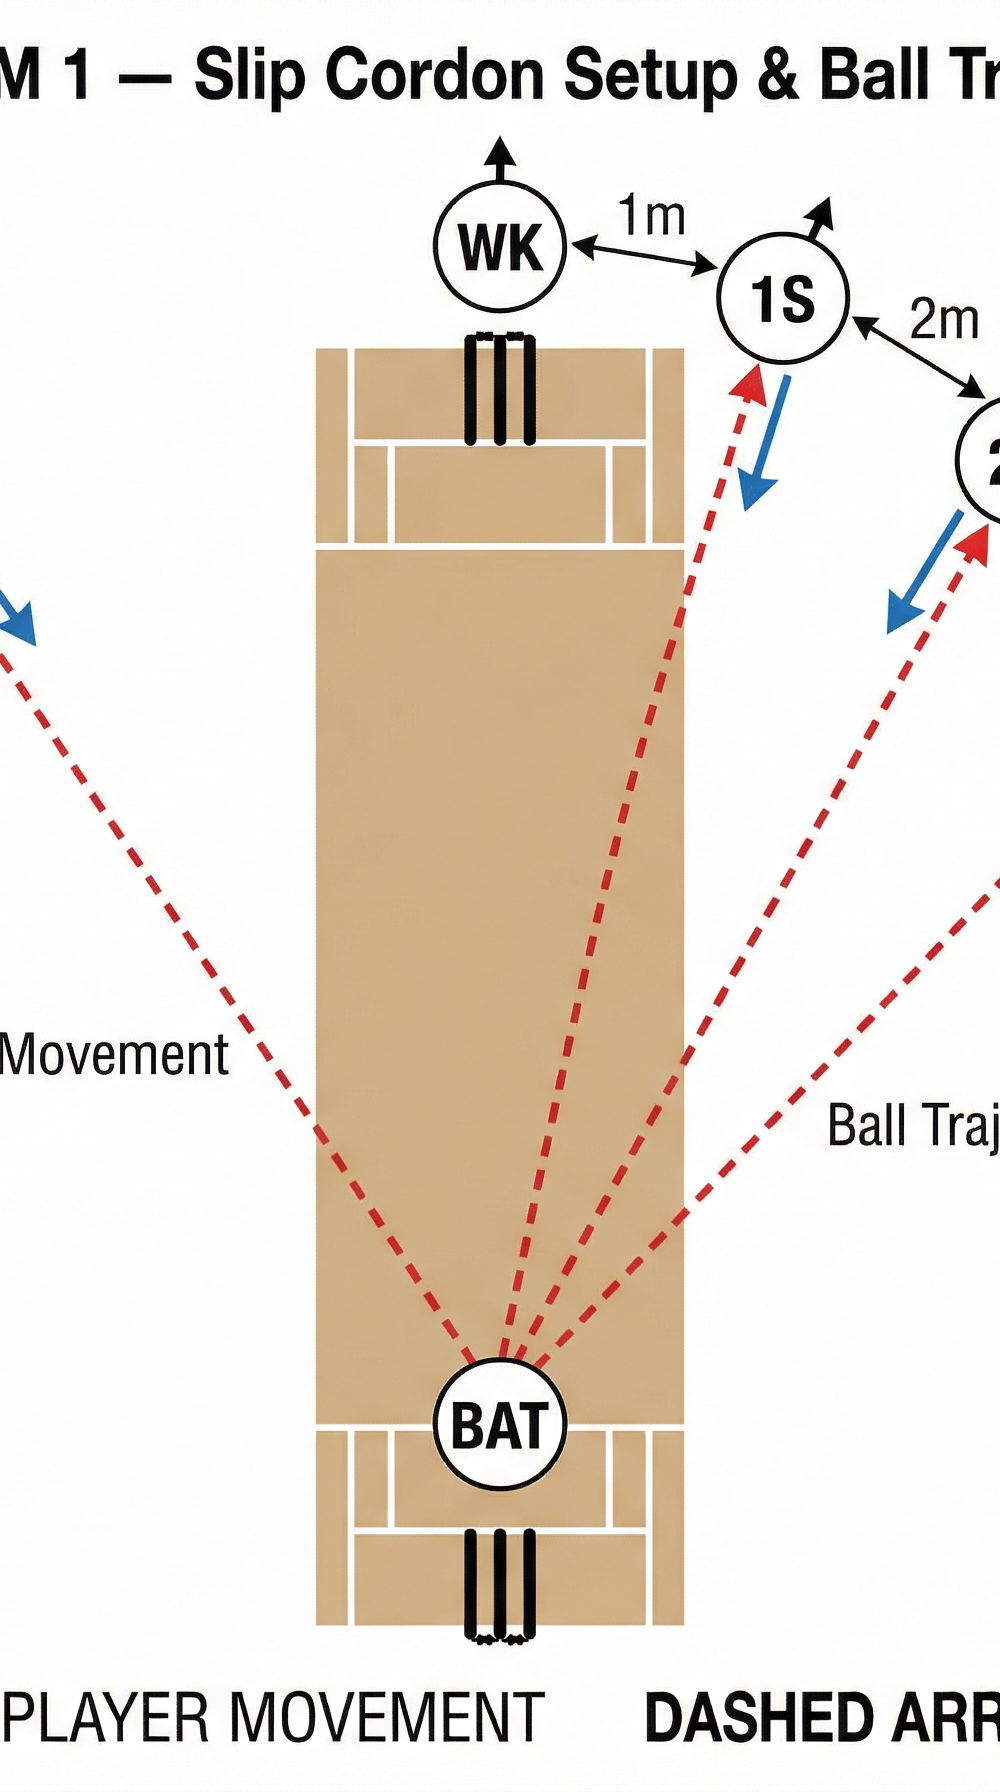
Position the slip cradle on a flat, even surface, ideally on the outfield grass to allow for safe diving. The Coach/Feeder (FC) stands approximately 5 metres in front of the slip cradle. The Fielders form a slip cordon arc behind the cradle, with First Slip (1S), Second Slip (2S), and Third Slip (3S) in a staggered, curved line. Fielders should be positioned 3 to 4 metres behind the cradle, with approximately 1.5 metres of lateral space between each position to prevent collisions.

Diagram 1 — Slip Cordon Setup & Ball Trajectory: The standard cordon arrangement showing WK, 1S, 2S, 3S, and GU positions relative to the batsman, with dashed red arrows indicating ball trajectory off the edge and solid blue arrows showing fielder movement to take the catch.
3. Step-by-Step Instructions
Follow these numbered steps to execute the drill smoothly and maintain a high tempo throughout the session.
- Establish the Cordon. Have the three fielders take up their positions as 1S, 2S, and 3S. Ensure they are spaced correctly (1.5m apart) and staggered slightly in depth — 1S deepest, 3S slightly further forward — mirroring a realistic match setup.
- Assume the Ready Position. On the coach's command, all fielders must drop into the correct ready stance: knees bent, weight slightly forward on the balls of the feet, and hands positioned low and relaxed, ready to move in any direction.
- The Feed. The coach throws the ball firmly onto the slanted surface of the slip cradle. Vary the throw in pace and angle to create unpredictable deflections that simulate different edge trajectories.
- React and Catch. As the ball deflects off the cradle, fielders must track the trajectory instantly. The fielder closest to the ball's path reacts, moves laterally or dives if necessary, and attempts to secure the catch cleanly with soft hands.
- Reset and Repeat. After the catch is taken (or dropped), the fielder immediately returns the ball to the coach or places it in a bucket. The entire cordon resets their ready position immediately for the next feed. Maintain a tempo of one feed every 8–10 seconds.
- Rotate Positions. After a set of 10–15 feeds, rotate the fielders through the positions (1S → 2S → 3S → 1S) so everyone experiences different angles of deflection and varying distances from the cradle.

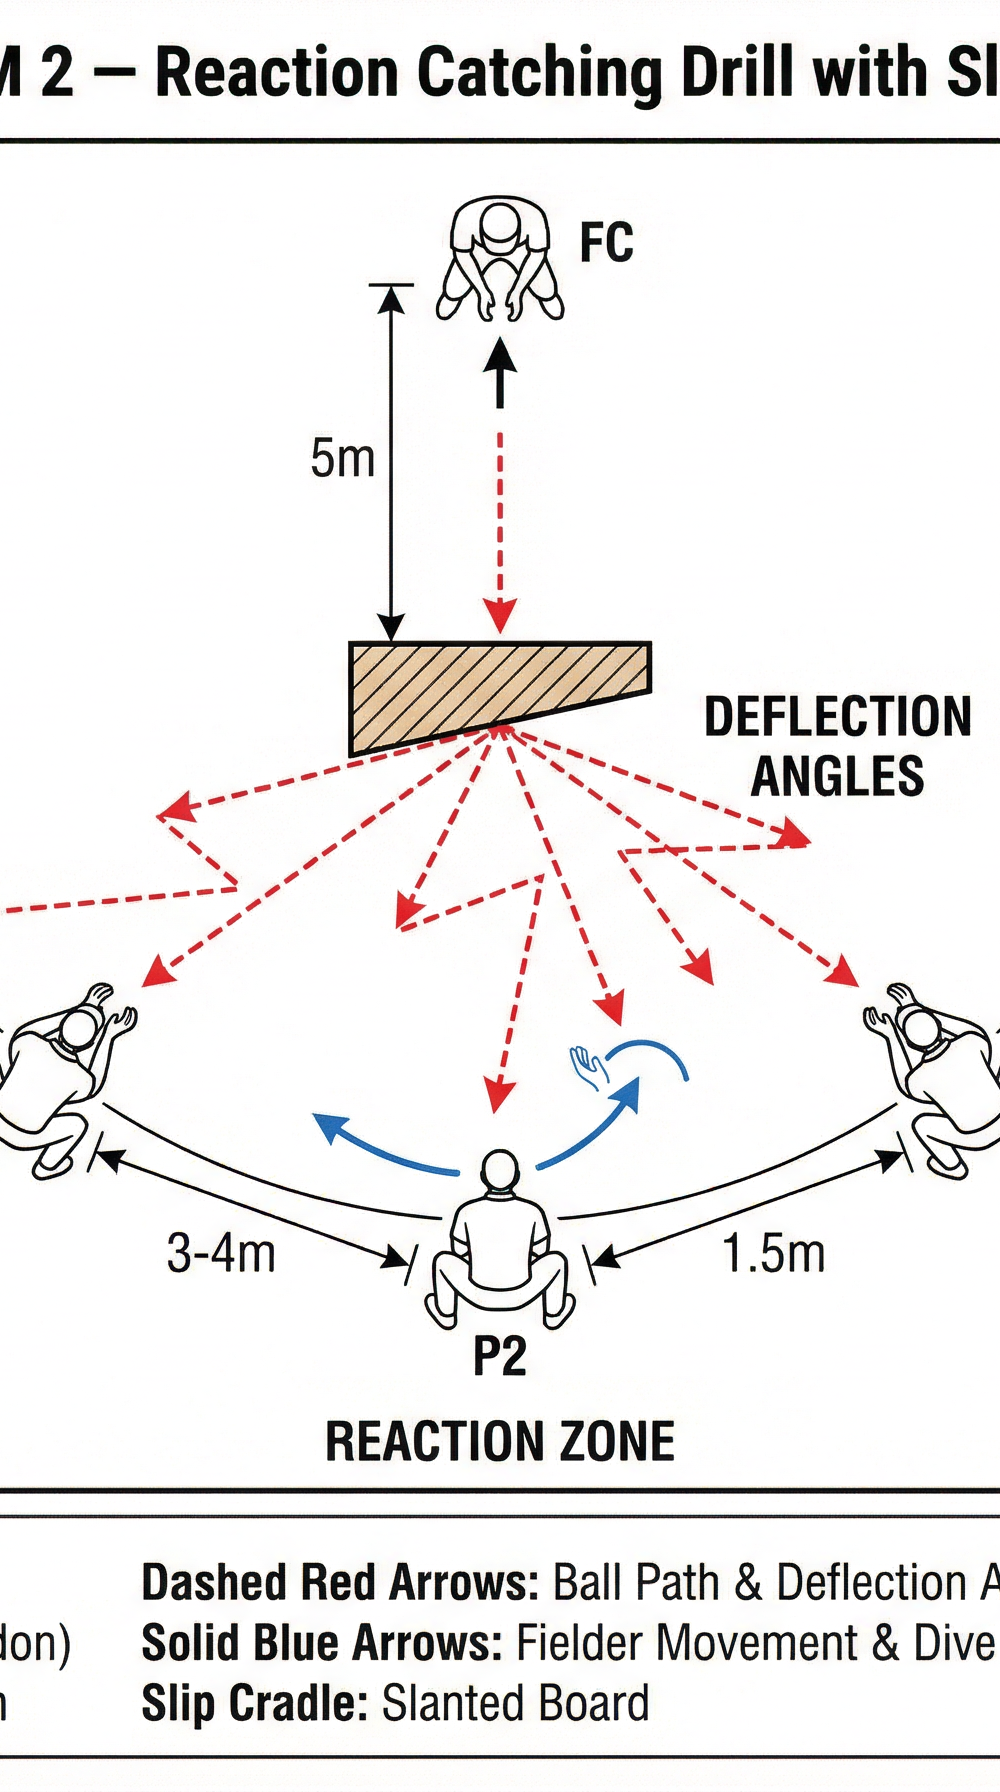
Diagram 2 — Reaction Catching Drill with Slip Cradle: The coach (FC) feeds the ball onto the cradle from 5 metres, creating multiple deflection angles toward P1, P2, and P3 in the reaction zone. The inset panel illustrates the correct low ready position.
4. Key Coaching Points
To maximise the effectiveness of this drill, focus on these five critical technical elements during every repetition.
The Low Base is the foundation of all good slip catching. Fielders must stay low with hips down and head steady. It is always easier to push up for a high catch than to drop down for a low one. If a player is standing tall, stop the drill and correct immediately.
Soft Hands are what separate elite slip fielders from average ones. The hands should "give" with the ball upon impact to absorb the force, preventing the ball from bouncing out. Fingers should point down for low catches (below the knee) and up for catches above chest height.
Watch the Ball, Not the Feeder. Fielders must track the ball from the coach's hand, onto the cradle, and right into their own hands. A common error is anticipating the bounce rather than watching it continuously — this leads to misreads and dropped catches.
Weight Transfer and Footwork. Weight should be on the balls of the feet, never flat-footed or on the heels. This allows for explosive lateral movement or diving when the ball deviates sharply. Encourage small, active weight shifts as the ball is fed.
Clear Communication. While reactions must be instantaneous, fielders should call "Mine!" if the ball is clearly in their zone to avoid dangerous collisions between slips. Practise this communication habit from the first session.
5. Common Mistakes

Watch for these four frequent errors and correct them immediately to prevent bad habits from forming.
| Mistake | What It Looks Like | How to Correct It |
|---|---|---|
| Rising too early | Fielder stands up as the ball is fed, losing the low base | Enforce a 'stay low until the catch is taken' rule |
| Hard hands / snatching | Ball pops out of hands on contact | Drill soft-hand technique with a tennis ball first |
| Flat-footed stance | Weight on heels, slow lateral movement | Insist on weight on balls of feet; use a 'bounce test' |
| Poor spacing | Hesitation or collision when ball splits the gap | Mark positions with cones before the drill begins |
6. Variations & Progressions
Keep the drill challenging and engaging by introducing these variations once the base technique is solid.
One-Handed Catches (Advanced Progression): Challenge players to take catches with only their dominant hand, then their non-dominant hand. This forces extreme focus and dramatically improves hand-eye coordination. Use a softer ball initially.
Blind Start (Elite Progression): Have the fielders face away from the cradle. The coach shouts "Turn!" just as the ball hits the cradle, drastically reducing reaction time to a fraction of a second. This is a high-intensity variation best used with experienced players.
Reaction Ball Variation: Replace the standard cricket ball with a rubber reaction ball or hexagonal ball for an unpredictable, highly erratic bounce that tests pure reflexes without the risk of finger injuries from hard ball impacts.
7. Age Adaptations
Modify the drill to suit the developmental stage and physical readiness of your players.
Under 10s & Under 12s: Use softer balls (Incrediballs or tennis balls) to build confidence and remove fear of injury. Reduce the distance between the coach and the cradle to 3 metres, and feed the ball underarm for slower, more predictable deflections. Focus entirely on the ready position and soft hands.
Under 14s & Under 16s: Transition to hard cricket balls with a worn, softer outer. Increase the pace of the feed and vary the angle of deflection more aggressively. Introduce the Blind Start progression to challenge their developing reflexes. Begin introducing position rotation.
Open/Senior: Use match-quality balls at full pace. The coach feeds with high intensity, aiming for the edges of the cradle to create extreme, match-realistic deflections. Enforce competitive elements (e.g., a team catch-count target) to simulate match pressure and accountability.