Fielding Relay & Throwing Accuracy Drill
A high-intensity fielding drill that builds relay chain communication, throwing technique, and stump-hitting accuracy under match-realistic pressure.
Equipment Needed
Overview
The Fielding Relay & Throwing Accuracy Drill is one of the most match-realistic fielding exercises you can run at any level of the game. It replicates the exact scenario fielding sides face dozens of times per innings: a ball hit to the deep outfield, a relay chain required to return it quickly, and a final throw aimed at the stumps or the wicketkeeper's gloves. Done well, this drill simultaneously develops gathering technique, relay communication, throwing mechanics, and decision-making under pressure — all within a single, high-energy activity.
Use this drill during the fielding block of any training session, ideally after a warm-up that has activated the shoulder and hip rotators. It works equally well as a standalone 20-minute activity or as the centrepiece of a full fielding-focused session. It is particularly valuable in the 4–6 weeks leading into a season, when sharpening the connection between outfielders and the infield is a priority.
Setup

Equipment Required
| Item | Quantity | Notes |
|---|---|---|
| Cricket balls (or tennis balls for juniors) | 6–10 | Enough to keep queues moving |
| Stumps and bails | 2 sets | One at each end of the pitch |
| Coloured cones | 12 | 4 per relay station |
| Measuring tape or marked rope | 1 | For accurate zone distances |
| Bibs (two colours) | 12–16 | For team identification in competitive variation |
| Scoreboard or whiteboard | 1 | Optional — for competitive scoring |
Field Setup
This drill is run on a standard cricket oval. Use the 22-yard (20.1 m) pitch as your central reference point.
- Deep Outfield Start Zone: Place a cone cluster 60–70 m from the bowling crease, in the region between deep mid-wicket and long-on. This is where the ball is fielded.
- Relay Station 1 (RS1): Position a cone 35–40 m from the stumps, in the mid-on or mid-off region. This is the first relay fielder's station.
- Relay Station 2 (RS2): Position a cone 12–15 m from the stumps, in the cover or point region. This is the second relay fielder's station.
- Target Stumps: A full set of stumps at the bowler's end, with the wicketkeeper standing up to the stumps.
For the competitive team version (see Diagram 2), set up two mirror-image lanes side by side, each 5 m wide, with identical cone placements and a separate set of stumps per lane.
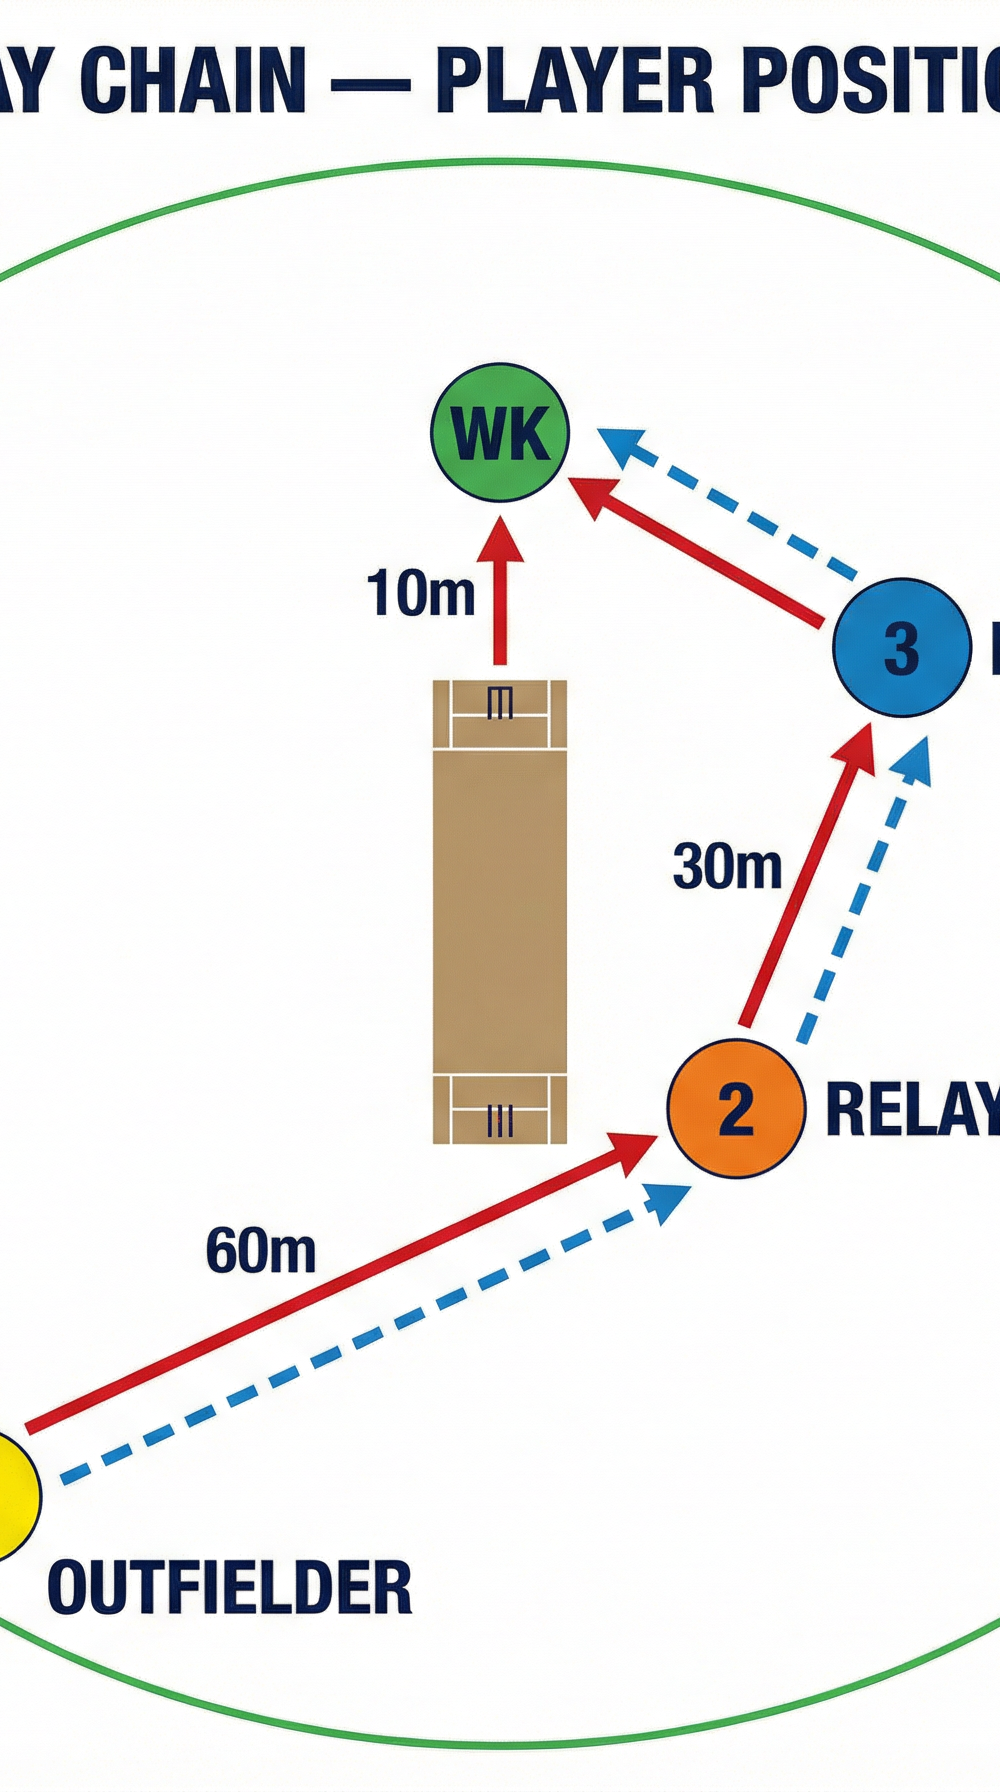
Diagram 1 above shows the relay chain player positions and ball movement path from the deep outfield through two relay stations to the wicketkeeper at the stumps.
Player Positions
For the base drill, you need a minimum of 4 players per lane:
- Outfielder (P1): Positioned at the deep outfield cone. Collects the ball and initiates the relay.
- Relay Fielder 1 (P2): Stationed at RS1 (35–40 m from stumps). Receives from P1 and re-throws to P2.
- Relay Fielder 2 (P3): Stationed at RS2 (12–15 m from stumps). Receives from P2 and delivers the final throw to the stumps.
- Wicketkeeper (WK): Positioned at the stumps. Receives the final throw and calls for it loudly.
With larger squads, queue remaining players behind P1 in the outfield and rotate after each completed relay.
Step-by-Step Instructions

Brief the squad (2 minutes). Gather all players at the stumps end. Explain the relay chain sequence, the communication calls, and the target. Demonstrate the correct relay body position — side-on to the next target, weight on the front foot, non-throwing arm pointing at the target.
Players take positions. P1 moves to the deep outfield start zone. P2 moves to RS1. P3 moves to RS2. The wicketkeeper takes position at the stumps. Remaining players queue behind P1.
Coach rolls or hits the ball to the outfield. Use a throw-down, a hit from a bat, or a rolled ball to simulate a fielding scenario. Call "GO!" as the ball is released.
P1 gathers and throws to P2. P1 sprints to the ball, uses a two-handed low gather (or a long-barrier technique for balls rolling away), and immediately releases a flat, chest-height throw aimed at P2's chest. P1 calls "YES!" as they release.
P2 receives and re-throws to P3. P2 catches the ball with two hands, turns side-on toward P3, and delivers a quick, accurate throw to P3's chest. P2 calls "YOURS!" as they throw.
P3 receives and throws at the stumps. P3 catches, sets their feet quickly, and delivers a flat, accurate throw aimed at the top of the stumps. Encourage P3 to aim for the bails — a direct hit is the goal.
WK collects and calls time. The wicketkeeper collects the ball (or retrieves a missed throw), holds the ball up, and calls "DONE!" The coach or a designated scorer records whether it was a direct hit, a clean take, or a missed throw.
Rotate players. P1 moves to the back of the queue. P2 moves to the outfield start. P3 moves to RS1. WK moves to RS2. The next player in the queue becomes the new WK. This rotation ensures every player practises every position.
Run 3–4 complete rotations before moving to a variation or the competitive format.
Key Coaching Points

1. Relay fielder body position is everything.
The relay fielder must be side-on to their target before they receive the ball. A front-on receiving position kills momentum and adds 0.5–1 second to the return. Insist on it from the first repetition.
2. Throw to the chest, not the hands.
Coach players to aim at the receiver's chest, not their outstretched hands. A chest-height throw is catchable at any angle; a wide or low throw forces the relay fielder to adjust their body position and lose time.
3. Communication is non-negotiable.
Every throw must be accompanied by a verbal call. Silence in a relay chain leads to hesitation, dropped balls, and run-outs not taken. Make it a rule: no call, the rep is repeated.
4. The final throw must be flat and skidding.
A looping throw to the stumps gives the batsman time to dive back. The final relay throw should travel on a flat trajectory, arriving at stump height or below. If it bounces once just in front of the stumps, that is acceptable — it still arrives quickly.
5. Gather cleanly before throwing.
Rush the gather, rush the throw, miss the target. Reinforce the mantra: "Slow hands in, fast hands out." A clean, controlled gather takes 0.2 seconds; a fumble costs 2 seconds.
6. WK must give a clear target.
The wicketkeeper should hold their gloves in front of the stumps as a visual target for the final thrower. Encourage them to call "KEEPER!" loudly as P3 is about to release.
Common Mistakes

Mistake 1: Relay fielder running toward the ball before it arrives.
Many players instinctively move toward the incoming throw rather than holding their position and turning side-on. This shortens the relay distance unnecessarily and disrupts the chain. Correct it by placing a cone at each relay station — the player must keep one foot on the cone until the ball is within 5 m.
Mistake 2: Throwing arm-side release (the "helicopter" throw).
Junior and intermediate players often release the ball with a round-arm or sidearm action, causing the ball to tail away from the target. Stop the drill, demonstrate the correct high-elbow, over-the-top release, and have the player shadow-throw three times before continuing.
Mistake 3: P1 throwing off-balance after a long sprint.
After a 20–30 m sprint to the ball, players frequently throw while still moving forward, producing an inaccurate, arm-only throw. Coach P1 to plant their back foot before releasing. Use the cue: "Brake, gather, throw."
Mistake 4: The relay chain collapsing into a single long throw.
When the drill is competitive, P1 will often attempt to throw directly to the stumps, bypassing the relay chain. This defeats the purpose of the drill and reinforces poor game habits. Penalise bypassed relay stations with a 5-point deduction in the competitive format.
Mistake 5: WK not providing a verbal or visual target.
If the wicketkeeper is passive — hands down, silent — the final thrower has no reference point. Insist the WK is active, vocal, and presenting their gloves as a target on every single repetition.
Variations & Progressions


Diagram 2 above shows the competitive relay race format with two parallel lanes, relay exchange zones, and the concentric-circle scoring system around the target stumps.
Variation 1: Competitive Relay Race (Recommended for intermediate–advanced squads)
Split the squad into two teams of 4–6. Set up two identical lanes side by side (as shown in Diagram 2). Both teams run the relay simultaneously. The first team to complete the relay AND achieve the closest throw to the stumps wins the round. Use the concentric scoring zones (direct hit = 5 pts, inner zone = 3 pts, middle zone = 2 pts, outer zone = 1 pt) to add a precision element. First team to 20 points wins. This variation introduces match-pressure decision-making and is highly motivating for senior players.
Variation 2: Pressure Timer
Introduce a stopwatch. The coach calls the time for each completed relay chain (from ball release to WK collection). Set a target time — for example, 8 seconds for a 60 m relay chain. Teams that beat the target time earn a bonus point. This variation shifts focus from pure accuracy to the speed-accuracy trade-off that fielders must manage in a real match.
Variation 3: Reduced Relay (Beginner Regression)
For younger or less experienced players, remove RS2 and run a two-person relay only: P1 gathers in the outfield and throws to P2 at RS1, who then throws to the WK. Reduce the outfield distance to 30–35 m. This allows players to master the gather-and-throw sequence before adding the complexity of a full three-person chain.
Age Adaptations
| Age Group | Key Modifications |
|---|---|
| Under 10 | Use a tennis ball or Incrediball. Reduce outfield distance to 20 m. Run a one-relay chain only (P1 to P2 to WK). Focus purely on two-handed gathering and calling. No stumps — use a large target cone instead. |
| Under 12 | Use a Kookaburra Tuf-Pitch or similar. Reduce outfield to 35 m. Two-relay chain. Introduce verbal communication calls as a requirement. Begin introducing the side-on throwing position. |
| Under 14 | Full relay chain at 50 m. Introduce the competitive race format. Begin timing relays and setting target times. Introduce direct-hit scoring on stumps. |
| Under 16 / Open | Full 60–70 m relay chain. Full competitive format with scoring. Add a running batsman (coach or spare player jogging between cones) to simulate real match urgency. Introduce video review of throwing mechanics post-drill. |
Coach's Note: The best fielding teams in the world are not just athletically gifted — they are organised. The relay chain is a system, and like all systems it only works when every individual knows their role and executes it with precision. Run this drill with the same intensity and attention to detail you would bring to a batting or bowling session. Fielding wins matches.