Ground Fielding & Pick-Up Drill: Sprint, Collect, and Return
A high-intensity, coach-led drill that builds the core fielding skills every cricketer needs — explosive sprint approach, clean low pick-up, and accurate return throw to the stumps.

Equipment Needed
Overview
The Ground Fielding & Pick-Up Drill is one of the most fundamental and frequently used fielding exercises in cricket coaching. Its purpose is to develop the complete chain of skills required when a ball is hit along the ground in the outfield or inner ring: the explosive initial movement, the athletic low pick-up, the smooth ball-to-throwing-hand transfer, and the accurate return throw — either direct to the stumps or to the wicketkeeper. This drill is equally effective as a warm-up activity, a core skills session, or a high-intensity conditioning block depending on the pace and volume you set.
Use this drill at the start of a fielding-focused training session to establish good habits, or introduce it mid-session as a competitive element to raise intensity. It is suitable for all skill levels and can be scaled from a gentle technical walkthrough with beginners to a full-speed competitive circuit for senior or elite players.
Setup

Equipment Required
| Item | Quantity | Notes |
|---|---|---|
| Cricket balls (or tennis balls) | 10–15 | Use tennis balls for younger/beginner groups |
| Stumps and bails | 2 sets | Set at each end of the 22-yard pitch |
| Cones | 8–10 | Mark fielding zones and starting positions |
| Wicketkeeper's gloves | 1 pair | For the wicketkeeper role |
| Flat marker discs | 6 | Mark pick-up target zones |
Field Setup
Use a standard cricket oval with the 22-yard pitch as your central reference point. Place two sets of stumps at each end of the pitch. Mark six fielding start positions using cones, arranged in a fan shape from the batting-end stumps:
- Position 1 — Cover Point: 15 yards from the pitch, off-side
- Position 2 — Mid-Off: 15 yards from the pitch, on-side
- Position 3 — Point: 20 yards from the pitch, off-side
- Position 4 — Mid-On: 20 yards from the pitch, on-side
- Position 5 — Extra Cover: 25 yards from the pitch, off-side
- Position 6 — Mid-Wicket: 25 yards from the pitch, on-side
The feeder (coach or senior player) stands at the batting crease, positioned to roll or underarm-feed balls into each zone. The wicketkeeper takes up their standard position behind the bowler's-end stumps.

Diagram 1: Basic drill setup showing six fielding positions, feeder location, and ball-path zones across the infield.
Step-by-Step Instructions

Step 1 — Ready Position.
All fielders stand at their designated cone in a ready athletic stance: feet shoulder-width apart, weight on the balls of the feet, knees slightly bent, hands in front of the body, eyes on the feeder. Emphasise that stillness before movement is critical — a flat-footed fielder will always be late.
Step 2 — Feeder Calls a Zone.
The feeder calls out a position number (e.g., "Three!") and simultaneously rolls or underarm-feeds a ball at a realistic pace into that zone, aiming to land the ball 5–8 yards in front of the fielder's starting cone.
Step 3 — Sprint Approach.
The called fielder explodes forward immediately, taking short, powerful steps. The approach angle should be slightly to the side of the ball — never running straight at it — so the body is already aligned for a right-hand throw on pick-up (or left-hand for left-arm throwers).
Step 4 — The Pick-Up.
As the fielder reaches the ball, they lower their body by bending at the knees (not the waist), placing the leading foot alongside the ball (right foot for right-handers). The throwing hand scoops the ball into the non-throwing hand simultaneously, creating a two-handed secure pick-up. Eyes stay on the ball until it is in the hands.
Step 5 — Transfer and Throw.
In one fluid motion, the fielder transfers the ball from the pick-up into the throwing grip, rotates the hips and shoulders, and delivers an overarm throw aimed at the bowler's-end stumps. The non-throwing arm points toward the target to aid alignment. The throw should be flat and fast, arriving at stump height.
Step 6 — Wicketkeeper Receives.
The wicketkeeper calls "Yes!" to confirm they are ready and takes the return throw cleanly. If the fielder is too far out (beyond 30 yards), a relay fielder positioned at 15 yards can receive and re-throw to the keeper.
Step 7 — Rotate and Reset.
After each rep, the fielder returns to their cone and the next player in the queue (if groups are used) takes their turn. Rotate fielders through all six positions so every player practises both off-side and on-side pick-ups.

Diagram 2: The four-phase movement sequence — sprint, pick-up, transfer, and throw — showing ball path, player movement, and relay throw option to the wicketkeeper.
Key Coaching Points

1. Approach Angle is Everything.
The single biggest technical error in ground fielding is running straight at the ball. Insist that fielders approach from a slight angle (approximately 20–30 degrees off the ball's line) so their body momentum carries them into a natural throwing position. Drill this footwork pattern before adding the ball.
2. Bend at the Knees, Not the Back.
A common injury risk and technical flaw is bending at the waist to pick up the ball. Coaches should cue: "Get your backside down, not your head down." The leading knee should almost graze the ground on a clean low pick-up. This keeps the back straight and the eyes level with the ball.
3. Two Hands Until the Last Moment.
Encourage fielders to use both hands to secure the ball on pick-up, even if the final throw is one-handed. The non-throwing hand acts as a guide and prevents fumbles on uneven surfaces. Only in a run-out emergency should a one-handed pick-up be attempted.
4. The Transfer Must Be Automatic.
The moment between pick-up and throw is where runs are lost. Players should practise the ball-to-throwing-grip transfer as a standalone drill (rolling the ball between hands while stationary) until it becomes a reflex. Time from pick-up to release should be under 1.5 seconds for infield positions.
5. Throw at Stump Height — Not the Keeper's Head.
A flat, skimming throw at stump height gives the wicketkeeper the best chance of a run-out. High looping throws waste time and are harder to collect. Cue: "Throw through the stumps, not over them."
6. Communication Between Fielder and Keeper.
The wicketkeeper must call loudly and clearly. Fielders must acknowledge. This communication habit, built in training, prevents confusion during match pressure. Introduce a rule in the drill: no throw without a verbal confirmation from the keeper.
Common Mistakes
Mistake 1 — Flat-Footed Starting Position.
Many players stand upright and static, costing them 1–2 metres of ground before they even start moving. Correction: insist on the ready stance before every feed. Use a "bounce" cue — players gently bounce on their toes as the feeder winds up to ensure they are already loaded and moving.
Mistake 2 — Running Straight at the Ball.
This forces an awkward cross-body pick-up and a weak throw from a poor base. Correction: place a cone 1 metre to the right of the ball (for right-handers) and instruct fielders to run to the cone first, then collect the ball. This trains the correct approach angle.
Mistake 3 — Picking Up with One Hand.
Players who are rushed or overconfident attempt one-handed pick-ups and fumble. Correction: make two-handed pick-ups a non-negotiable rule during the drill. Only introduce one-handed technique as a specific advanced variation.
Mistake 4 — Stopping to Throw.
Some fielders come to a complete stop before throwing, adding 0.5–1 second to their return time. Correction: encourage a "gather and go" technique — the final two steps before the throw should be a momentum-building stride pattern (right-left-throw for right-handers), not a dead stop.
Mistake 5 — High, Looping Return Throws.
Often caused by trying to throw too hard from an unbalanced base. Correction: reduce the distance first. Start fielders at 10 yards and gradually move them back only when the throw is consistently flat and accurate. Reinforce the non-throwing arm pointing at the target.
Variations & Progressions
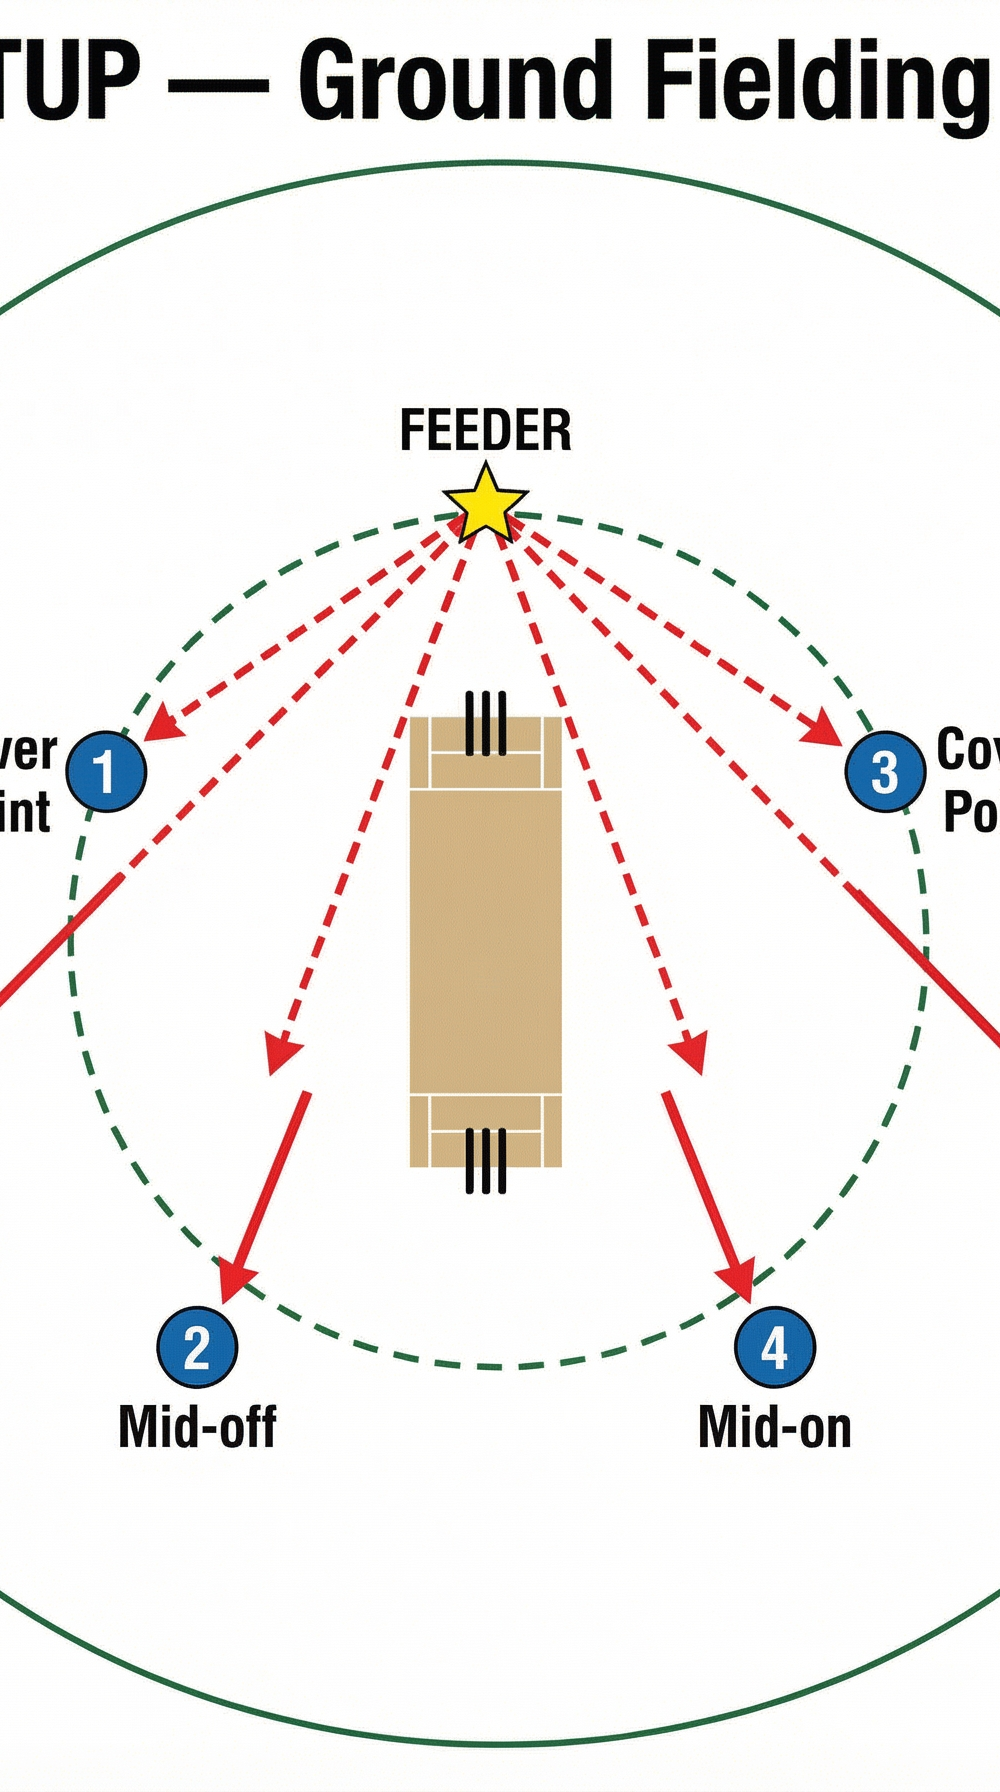
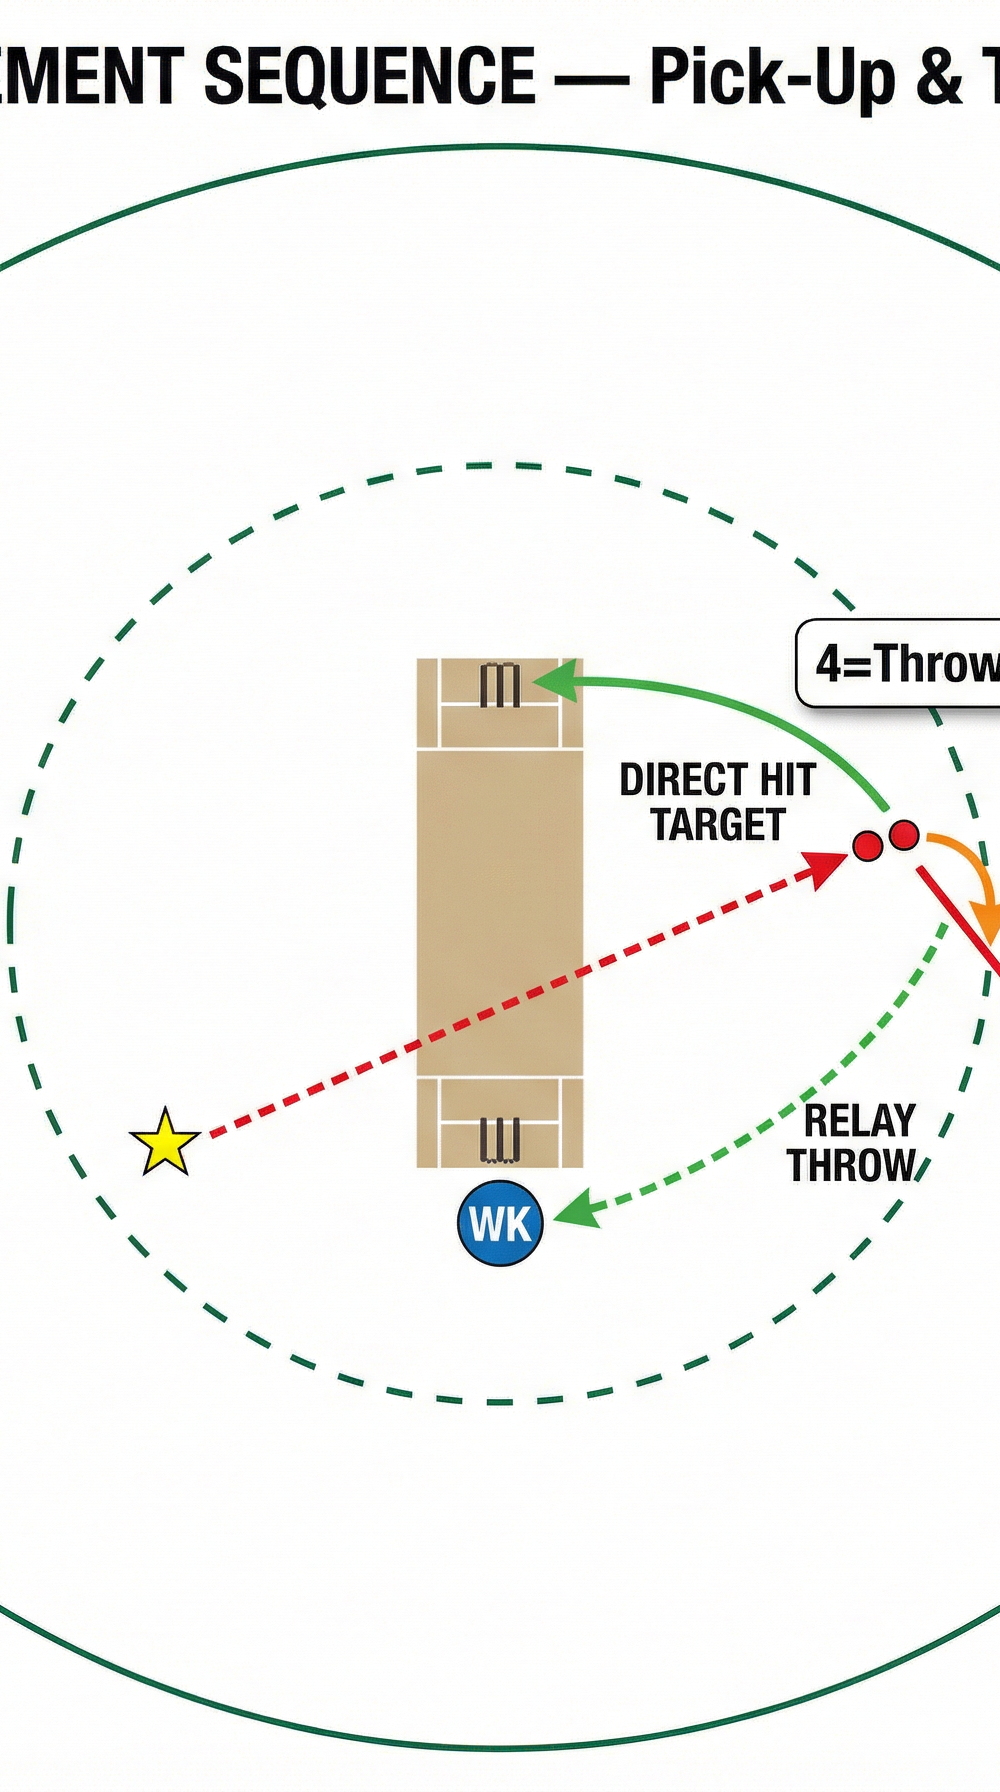
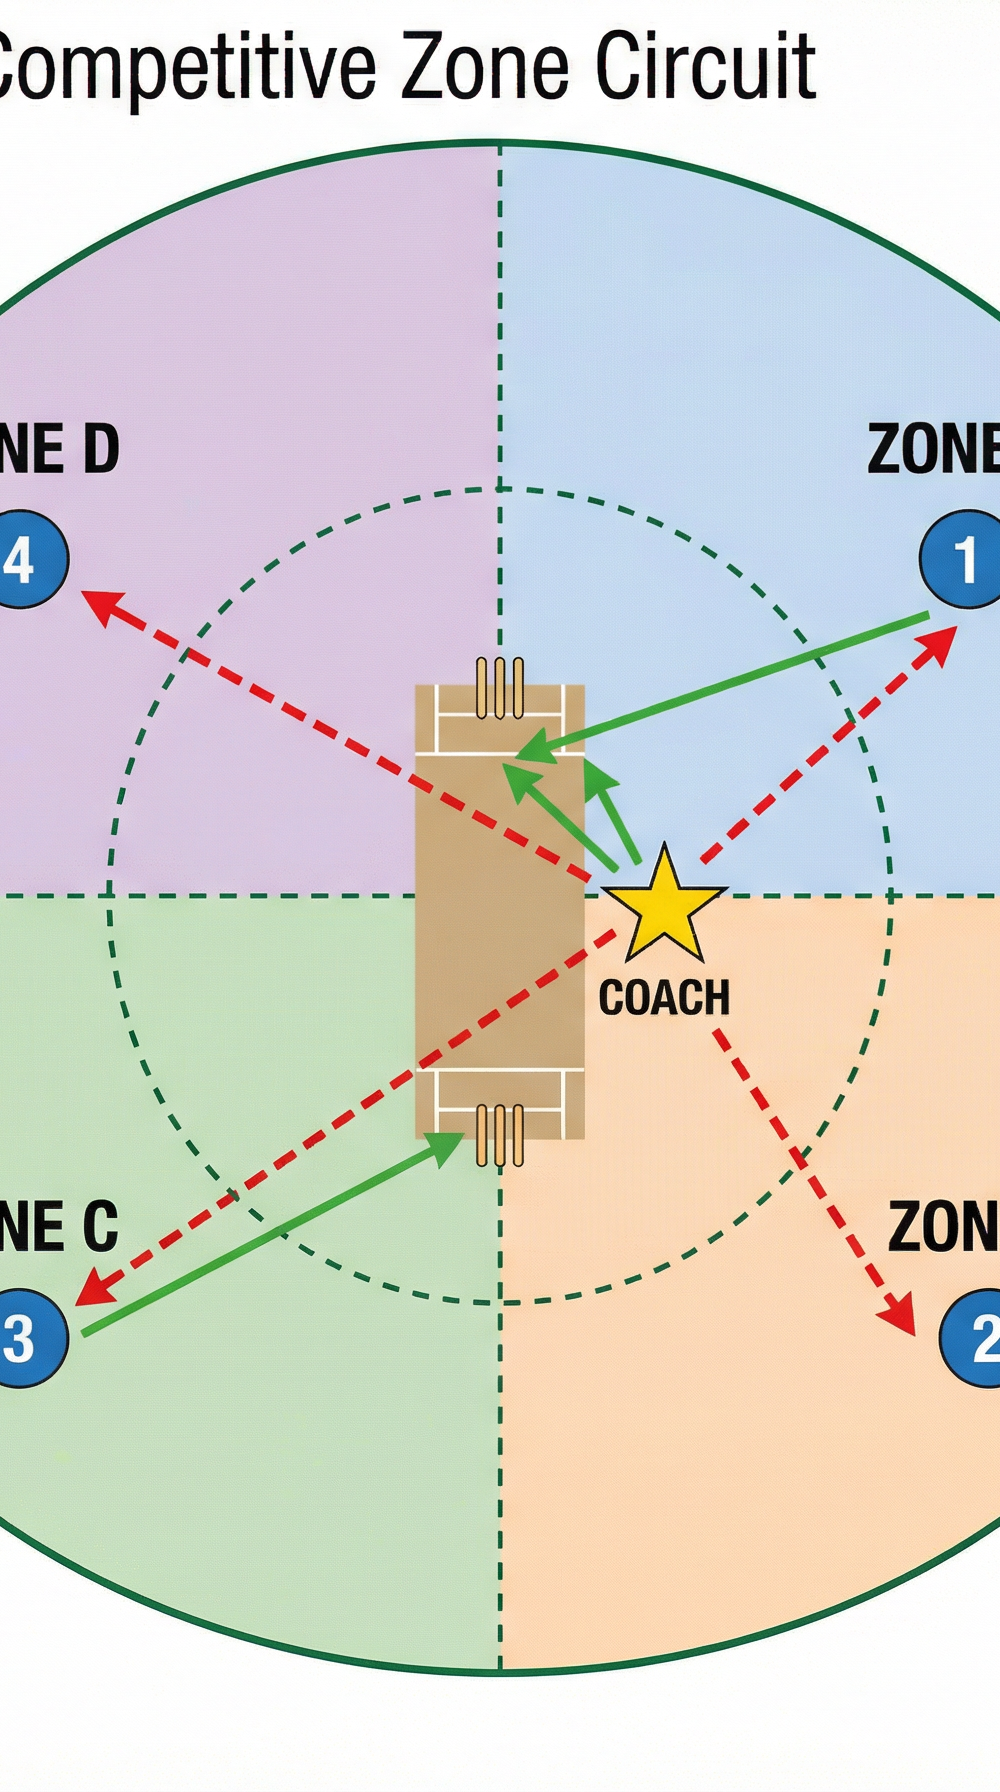
Diagram 3: Advanced Competitive Zone Circuit — four colour-coded zones with scoring, fielder rotation, and simultaneous multi-ball feeds for high-intensity progression.
Variation 1 — Moving Ball Feed.
Instead of rolling the ball directly to the fielder's zone, the feeder rolls the ball at an angle across the fielder's path, requiring them to adjust their sprint line mid-approach. This replicates the unpredictable nature of a match-day deflection or an angled drive.
Variation 2 — Simultaneous Two-Ball Feed.
Feed two balls to two fielders on opposite sides of the pitch at the same time. Both fielders must complete their pick-up and throw while being aware of the other player's throw path. This develops spatial awareness and communication under pressure.
Progression — Competitive Zone Circuit (Advanced).
Divide the field into four zones (A, B, C, D) as shown in Diagram 3. Assign one fielder per zone. The coach feeds balls randomly to any zone. Fielders score points: 2 points for a clean pick-up and throw that hits the stumps, 1 point for a clean pick-up and accurate throw to the keeper, 0 points for a fumble or overthrow. Fielders rotate zones every 4 reps. The fielder with the highest score after a full rotation wins. This progression adds competition, replicates match pressure, and keeps intensity high throughout.
Age Adaptations

| Age Group | Key Modifications |
|---|---|
| Under 10 (Junior) | Use a soft foam or tennis ball. Reduce distances to 8–10 yards. Focus only on Steps 1–4 (approach and pick-up). Do not require an overarm throw — underarm returns to the feeder are sufficient. Emphasise fun and repetition over speed. |
| Under 12–14 (Development) | Use a tennis ball or incrediball. Distances of 12–18 yards. Introduce the full sequence including overarm throw. Omit the competitive scoring until technique is consistent. Allow 2–3 seconds for the pick-up-to-throw transfer. |
| Under 16 (Intermediate) | Use a standard cricket ball. Full distances (15–25 yards). Introduce the Moving Ball Feed variation. Begin timing the pick-up-to-release interval. Introduce the relay throw option for longer distances. |
| Open/Senior (Advanced) | Full cricket ball, full distances, full competitive circuit. Add pressure elements: a batter running between the wickets to create a genuine run-out scenario. Introduce one-handed pick-up technique for designated emergency situations. |