Elite Ground Fielding & Pick-Up: The Complete Drill Series
Master the art of attacking ground fielding with this progressive drill series designed to improve pick-up technique, speed to the ball, and throwing accuracy under pressure.
Equipment Needed
1. Overview
Ground fielding is the backbone of any successful fielding unit in cricket. The ability to attack the ball, pick it up cleanly, and release a fast, accurate throw can create run-outs and save crucial runs. This drill series focuses on the fundamental mechanics of the ground pick-up, progressing from a controlled environment to high-pressure, match-like scenarios.
This resource is ideal for coaches looking to instill an attacking mindset in their fielders, ensuring they approach the ball with speed, maintain a low center of gravity, and execute the pick-up and throw seamlessly.
2. Setup
To run these drills effectively, you will need a standard cricket oval or a large open grass area. The setup is simple but requires precision to ensure players get the maximum benefit from the repetitions.
Equipment Needed:
- 10-15 Cricket balls (or incrediballs for younger age groups)
- 8-10 Marker cones
- 1 set of stumps (or a target stump/cone)
- Wicket-keeping gloves (optional, for the receiver)
Field Setup:
- Utilize the 22-yard pitch area or measure out a similar distance on the outfield.
- Place the target stumps at one end of the pitch.
- The coach or feeder should be positioned at the opposite end of the pitch, or at a specific feeding station depending on the drill variation.
3. Step-by-Step Instructions
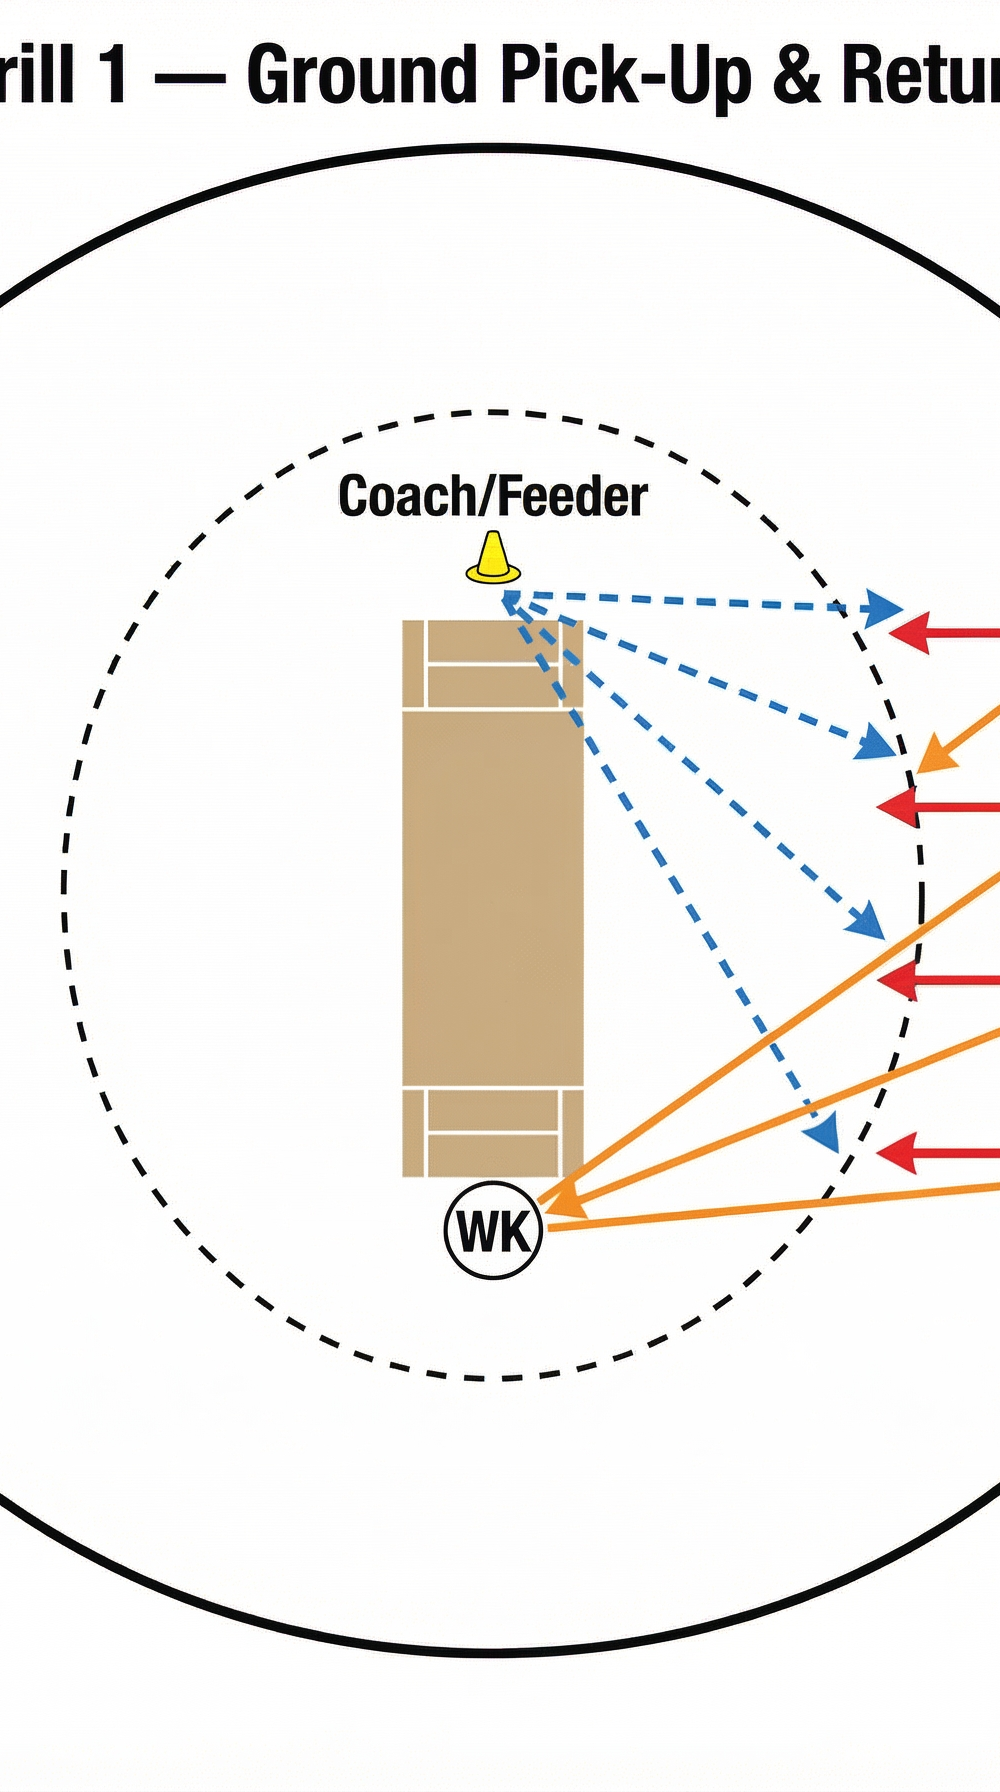
Drill 1: Ground Pick-Up & Return
This foundational drill focuses on the mechanics of attacking the ball and executing a clean pick-up and throw.

- Positioning: Set up four cones in a line, approximately 15 meters away from the feeder (coach). Place one player at each cone (P1, P2, P3, P4). A wicket-keeper (WK) stands behind the stumps at the feeder's end.
- The Feed: The coach rolls the ball along the ground toward the first player (P1).
- The Attack: P1 sprints aggressively toward the ball, decelerating slightly as they approach to establish a strong, low base.
- The Pick-Up: P1 picks up the ball using two hands (or one hand outside the line of the front foot, depending on the coach's focus), keeping their head over the ball.
- The Throw: P1 immediately transitions into a throwing position and fires a flat, hard throw to the WK over the stumps.
- Rotation: After throwing, P1 returns to their cone. The coach then feeds P2, and the sequence continues down the line.
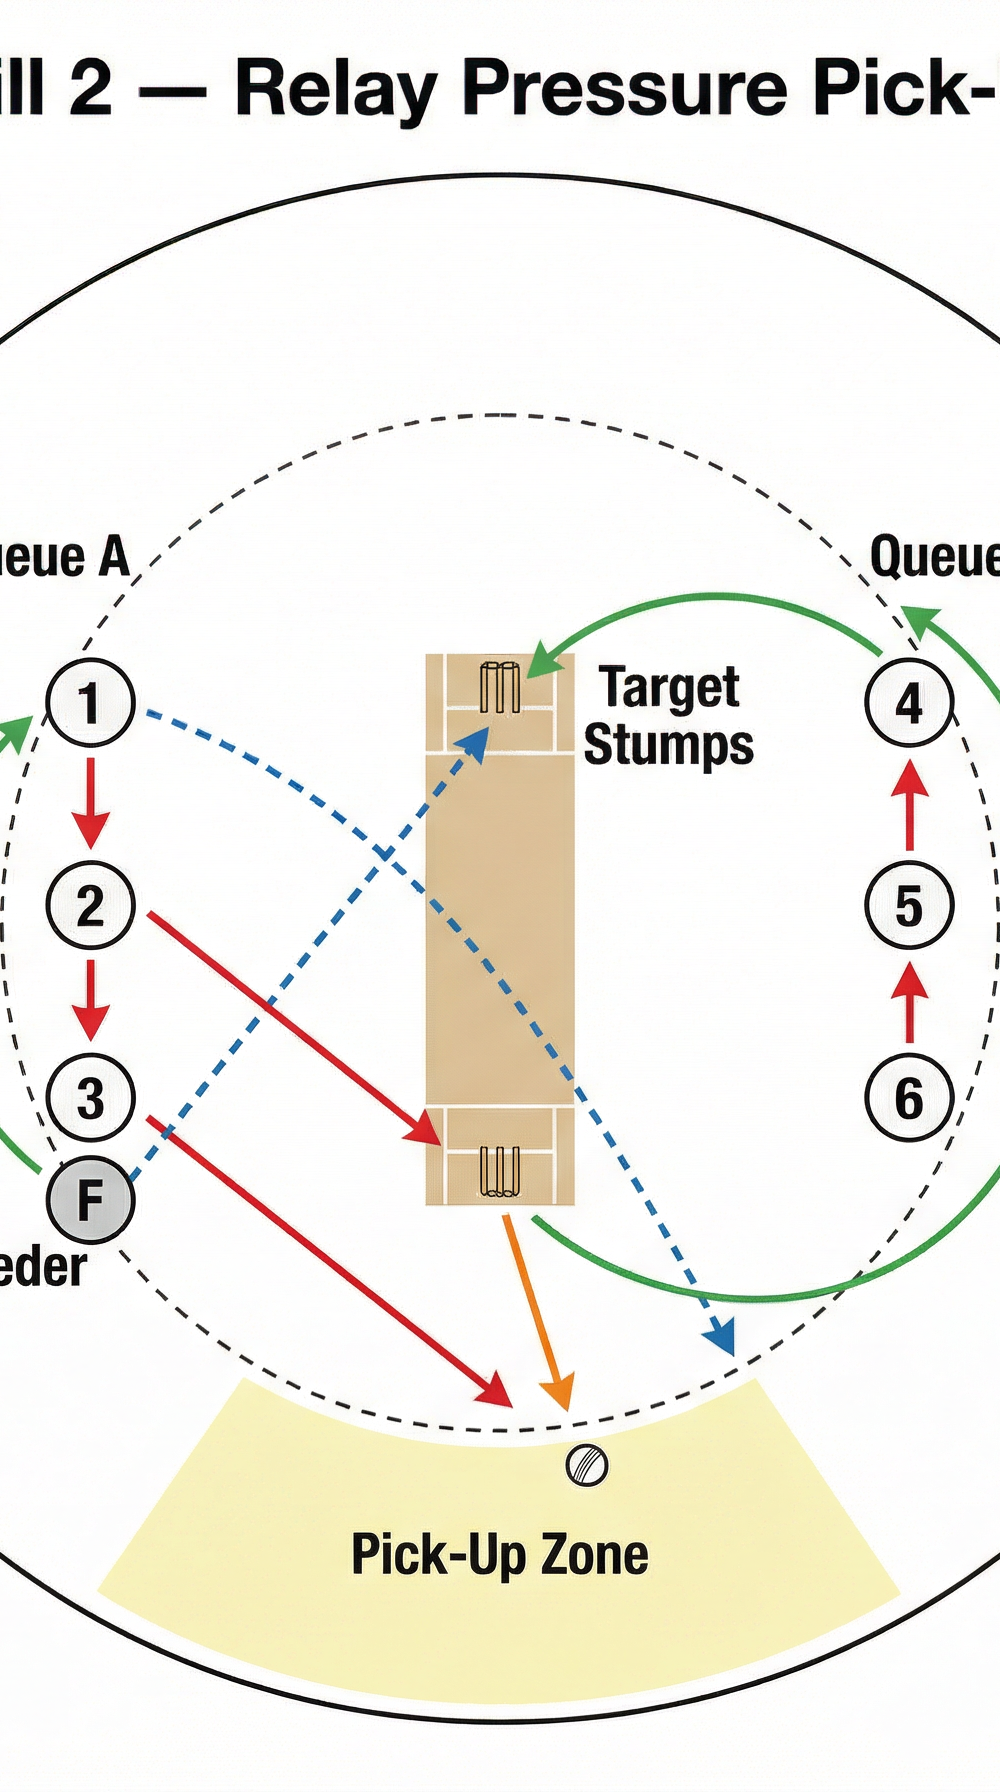
Drill 2: Relay Pressure Pick-Up
This progression adds a competitive element and requires players to perform the pick-up under time pressure.
- Positioning: Divide the players into two equal queues (Queue A and Queue B) starting 20 meters from the target stumps. The feeder stands to the side, at a mid-off position.
- The Feed: The feeder rolls the ball into the designated 'Pick-Up Zone' in front of the stumps.
- The Race: The first player in Queue A sprints diagonally to intercept the ball in the Pick-Up Zone.
- The Execution: The player must pick up the ball cleanly on the run and execute a direct hit on the target stumps, or throw to a designated catcher.
- The Reset: After the throw, the player loops around the back of the stumps and joins Queue B.
- Continuous Flow: As soon as the first player throws, the feeder rolls the next ball for the first player in Queue B, creating a continuous, high-tempo relay.
4. Key Coaching Points
- Attack the Ball: Encourage players to sprint off the mark. The faster they get to the ball, the more time they have to execute the pick-up and throw.
- Low Base: As players approach the ball, they must lower their center of gravity by bending their knees, not just their back. Their head should be directly over the ball at the point of pick-up.
- Soft Hands, Hard Throw: The pick-up should be smooth and controlled (soft hands), immediately followed by a powerful, flat throw.
- Momentum Toward Target: Ensure players are stepping toward their target as they release the ball. Their momentum should carry them forward after the throw.
- Eye on the Ball: Emphasize watching the ball all the way into the hands. Taking the eyes off the ball prematurely to look at the target is a common cause of fumbles.
5. Common Mistakes
- Running Past the Ball: Players sprinting too fast without decelerating, causing them to overrun the ball or pick it up behind their body.
- Bending at the Waist: Fielders bending their back rather than their knees, leading to a stiff posture, poor balance, and a higher chance of fumbling.
- Throwing Off-Balance: Attempting to throw before establishing a solid base or without aligning the body toward the target.
- Snatching at the Ball: Trying to grab the ball too aggressively instead of letting it come into the hands smoothly.
6. Variations & Progressions
- One-Handed Pick-Up: Progress to one-handed pick-ups (outside the line of the front foot) for balls hit slightly wider or when extreme speed is required.
- The 'Crow Hop': Introduce the 'crow hop' footwork technique for generating more power on the throw from the deep.
- Moving Target: Have the receiver (WK) move slightly, requiring the fielder to adjust their throw on the run.
- Competitive Scoring: Introduce a point system (e.g., 3 points for a direct hit, 1 point for a clean pick-up and accurate throw) to increase pressure.
7. Age Adaptations
- Under 8s & Under 10s: Use softer balls (incrediballs or tennis balls). Focus entirely on the two-handed pick-up technique and getting the body behind the ball. Keep distances short (10 meters).
- Under 12s & Under 14s: Introduce the one-handed pick-up for wider balls. Increase the distance to 15-20 meters and begin emphasizing the speed of the transition from pick-up to throw.
- Under 16s & Open: Run the drills at match intensity. Incorporate complex relay variations, direct hit challenges, and throwing from the boundary edge.