Middle Overs Run Chase Mastery: The Anchor-Striker Blueprint (T20 & ODI)
Master the art of building a match-winning platform in overs 7–15 of a run chase by deploying the Anchor-Striker partnership model, disciplined shot selection across four scoring zones, and smart strike rotation to keep the scoreboard ticking without sacrificing wickets.

Equipment Needed
Overview
The middle overs of a run chase — typically overs 7 through 15 in a T20 match or overs 11 through 35 in a 50-over game — represent the most tactically demanding phase of batting. The powerplay has ended, the fielding restrictions are lifted, and the bowling captain will pack the infield with five or six fielders inside the 30-yard circle. For the batting side, this is the phase that defines the chase: too conservative and the required run rate climbs to an unmanageable level; too aggressive and a cluster of wickets collapses the innings.
This set play — the Anchor-Striker Blueprint — gives your batsmen a clear, repeatable framework for navigating the middle overs. The strategy is built around three non-negotiable principles: (1) maintaining a required run rate of no more than 1.2× the current run rate at any point in this phase, (2) protecting wickets by ensuring at least one set batsman is always at the crease, and (3) identifying and exploiting the four scoring zones on the oval ground to manufacture runs against all bowling types.
This play is most effective when your team is chasing a target of 140–180 (T20) or 250–310 (ODI) and has lost one or two early wickets. It is equally applicable as a proactive strategy when the top order is still intact and the aim is to build a match-winning platform.
Setup
Equipment Required
| Item | Quantity | Notes |
|---|---|---|
| Cricket balls (red or white) | 6–12 | Match-weight, used or new |
| Batting pads, gloves, helmet | 2 sets | For both active batsmen |
| Batting cones / markers | 8 | Mark scoring zone boundaries |
| Bowling machine (optional) | 1 | Set to 70–85 mph for simulation |
| Whiteboard / coaching board | 1 | For pre-session tactical briefing |
| Scoreboard or run-rate tracker | 1 | Digital or manual |
Pitch and Field Setup
Use a standard 22-yard pitch on a full-size oval ground (minimum 137 metres diameter). Set up the 30-yard fielding restriction circle using cones if not already marked. For training purposes, place 8 coloured cones around the outfield to demarcate the four scoring zones as shown in Diagram 2.
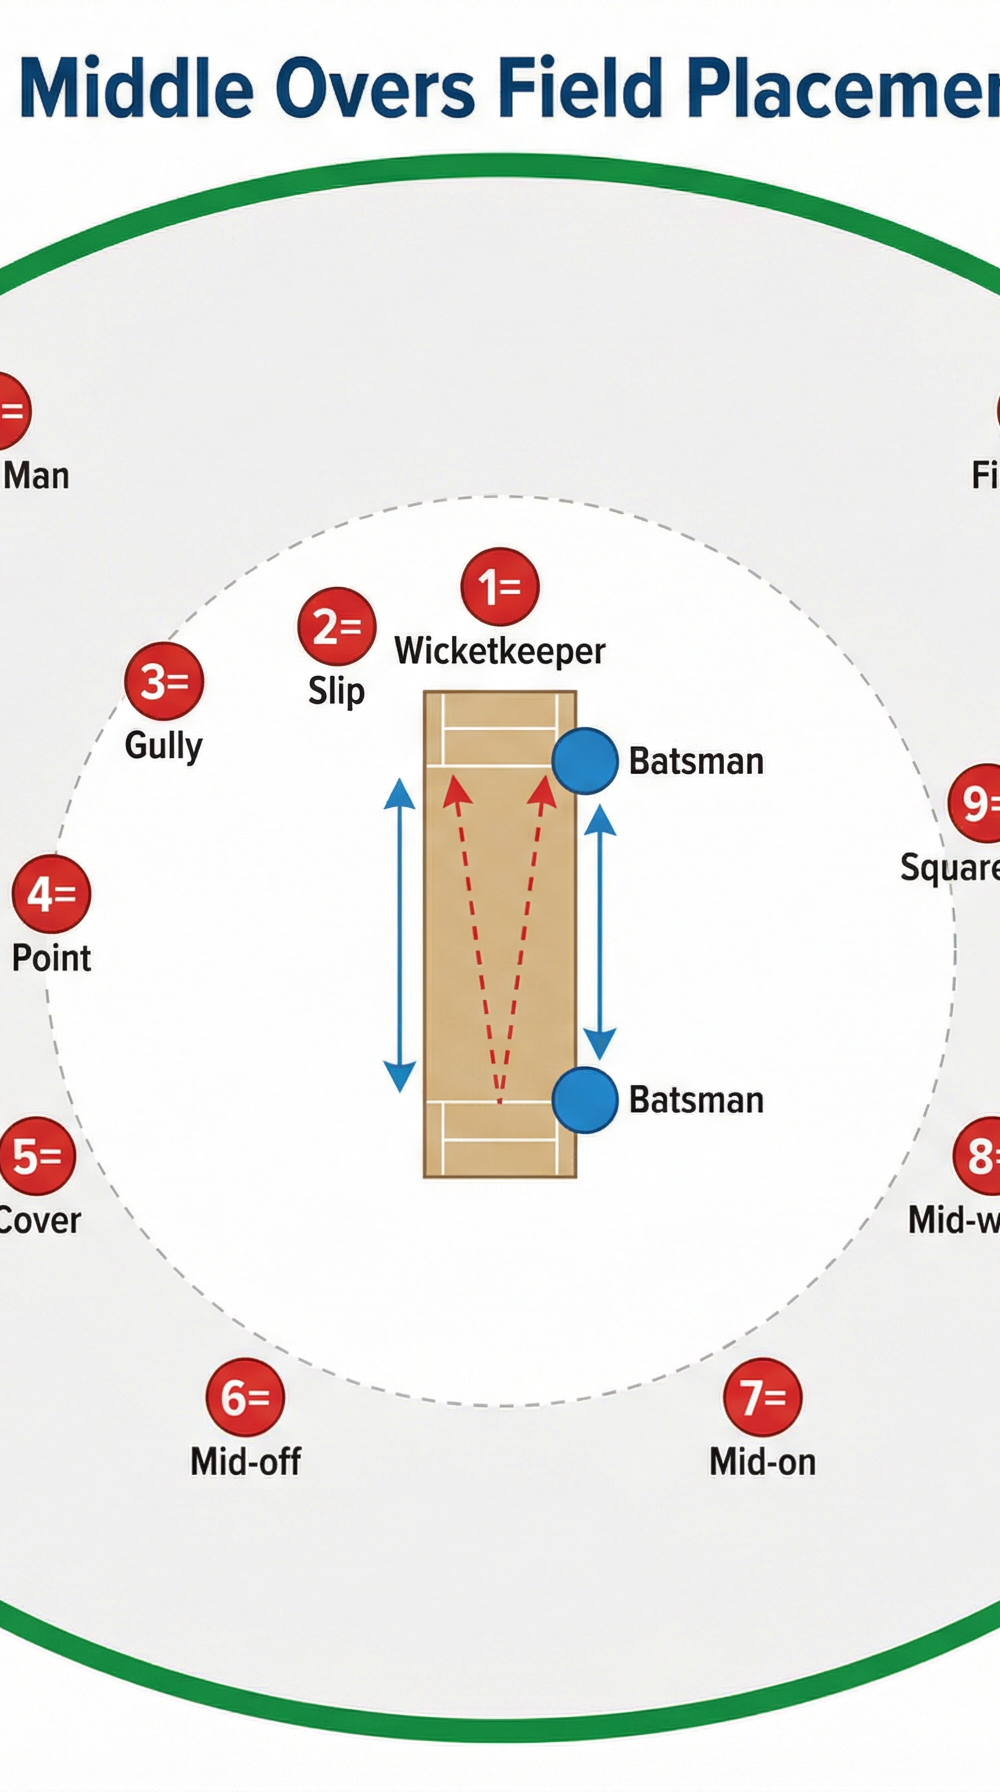
For the fielding side, position a standard middle-overs defensive field: Wicketkeeper (1) directly behind the stumps, Slip (2) at first slip, Gully (3) at 45° off-side, Point (4) at square off-side on the circle, Cover (5) at 45° off-side on the circle, Mid-off (6) straight off-side 20 metres from the pitch, Mid-on (7) straight leg-side 20 metres from the pitch, Mid-wicket (8) at 45° leg-side on the circle, Square Leg (9) at square leg on the circle, Fine Leg (10) on the deep leg boundary, Third Man (11) on the deep off boundary.

Diagram 1 shows the standard middle-overs defensive field. Note the packed infield with only Fine Leg (10) and Third Man (11) on the boundary, creating the scoring zone challenge your batsmen must solve.
Player Roles
B1 — The Striker: The more aggressive batsman. Responsible for boundary scoring and maintaining the required run rate. Takes on the bowling in Zones A (straight hitting) and C (leg-side).
B2 — The Anchor: The more composed, technically correct batsman. Responsible for rotating strike, calling runs, and ensuring wicket preservation. Operates primarily in Zones B (off-side) and D (deflection).
Step-by-Step Instructions
Phase 1 — Pre-Innings Briefing (5 minutes before batting)
Step 1. Gather both middle-order batsmen and review the target. Calculate the required run rate (RRR) at the start of the middle overs. Write it on the coaching board.
Step 2. Assign roles explicitly: identify who is B1 (Striker) and who is B2 (Anchor) based on current form, match-up against the bowling attack, and batting position.
Step 3. Agree on the "par score" checkpoint: at the end of over 10 (T20) or over 20 (ODI), what score must the team be at to stay on track? This becomes the batsmen's internal target.
Step 4. Review the opposition's middle-overs bowling plan. Identify the primary wicket-taking bowler and the defensive/containment bowler. The Anchor takes the wicket-taker; the Striker targets the containment bowler.
Phase 2 — Overs 7–10: Consolidation and Acceleration
Step 5. The Anchor (B2) takes guard and plays the first two balls of each over with a "see the ball, play the ball" mindset — no premeditated shots. The goal is to assess the bowler's length and line before committing.
Step 6. From ball 3 onwards, both batsmen execute the Zone Rotation Protocol: every full-length delivery outside off stump is driven through Zone B (cover/point) for 1–2 runs; every full-length delivery on leg stump is flicked through Zone C (mid-wicket/square leg) for 1–2 runs; every short-of-length delivery is pulled or cut for Zone A (straight) or Zone B.
Step 7. The Striker (B1) targets one boundary per over in Zone A (straight hit over mid-off or mid-on). This is the "free hit" ball — typically the fourth or fifth ball of the over when the bowler has been put under pressure by the preceding singles.
Step 8. Running between wickets: call loudly and early. The Anchor calls "YES," "NO," or "WAIT" within 0.5 seconds of the ball being struck. Both batsmen back up 2–3 metres at the non-striker's end on every delivery.

Diagram 2 illustrates the four scoring zones. Coaches should drill batsmen to identify which zone is "open" (least defended) at the start of each over and communicate this to their partner.
Phase 3 — Overs 11–15: Controlled Acceleration
Step 9. At the over-10 checkpoint, recalculate the RRR. If the team is at or below par, the Striker shifts into "attack mode": targeting Zones A and C for boundaries, with a minimum of one boundary every two overs.
Step 10. If the team is above par (behind the rate), the Anchor temporarily adopts a more aggressive approach — targeting Zone D (fine leg/third man deflections) for quick singles and looking to hit the first ball of each over through Zone A.
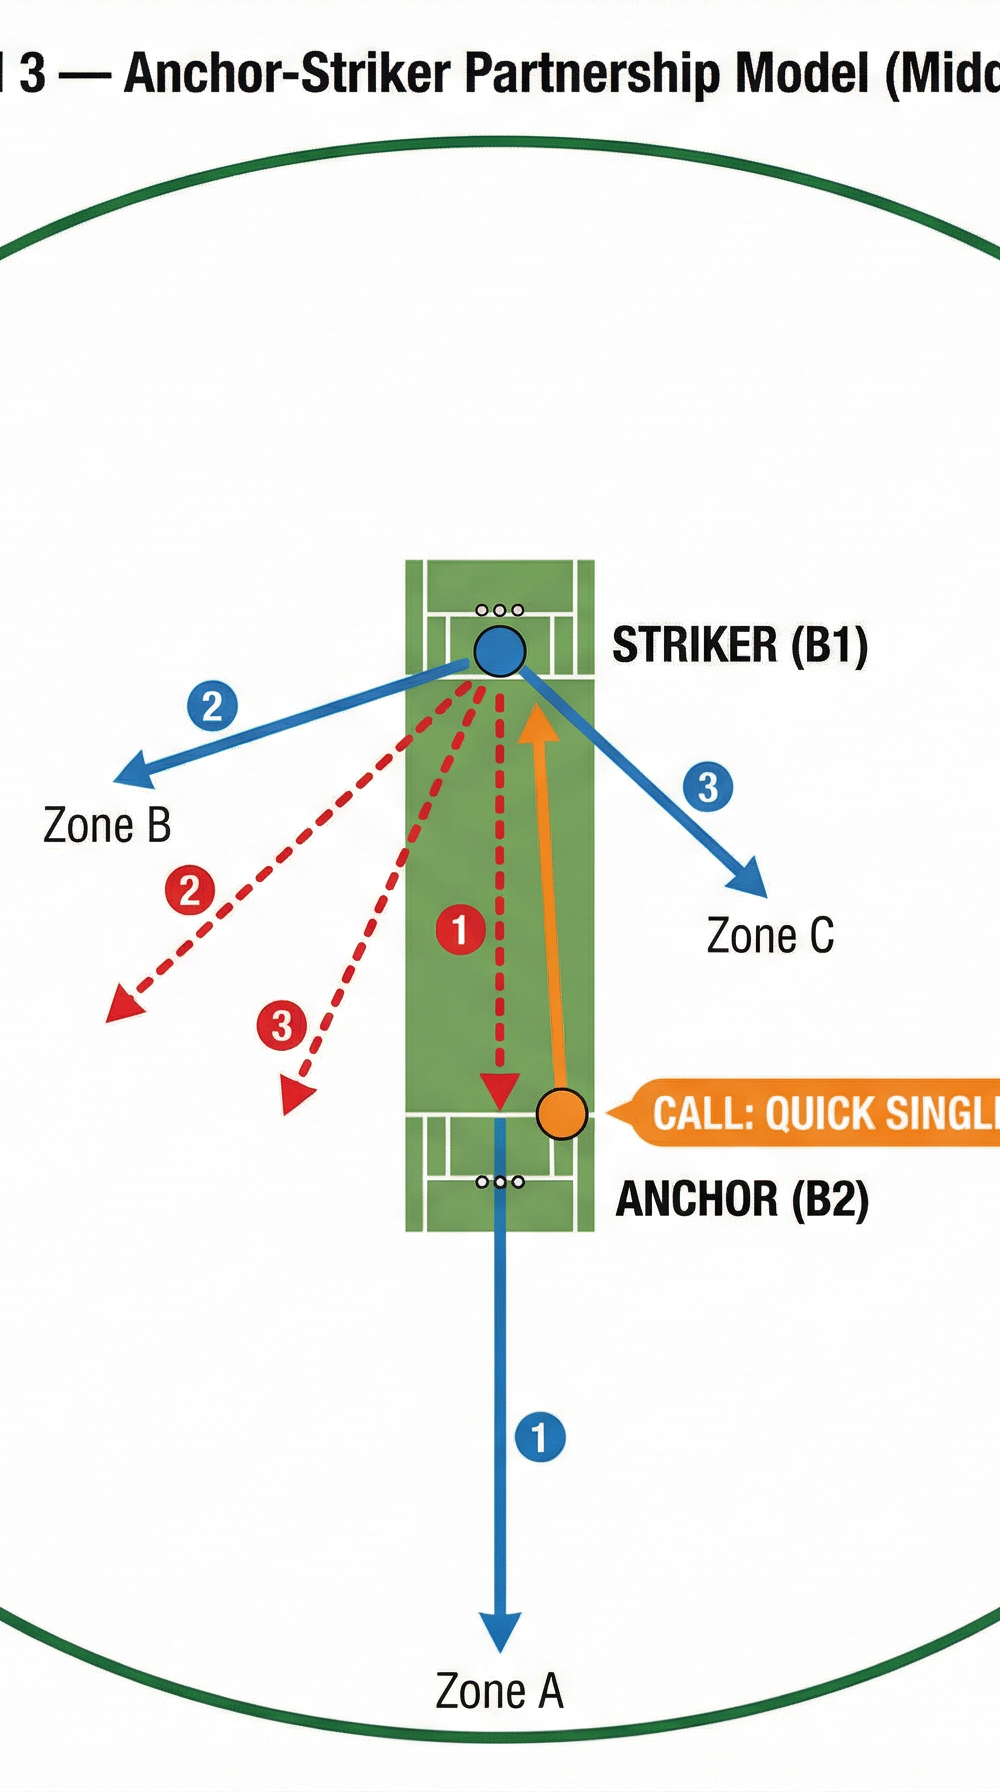
Step 11. The Anchor-Striker model (see Diagram 3) operates on a 3-ball rotation cycle: balls 1–2 are played for singles to rotate strike; ball 3 is the Striker's "power ball" — an aggressive shot targeting the boundary.
Step 12. Against spin bowling in the middle overs, both batsmen use the crease aggressively: the Striker steps down the pitch to drive through Zone A; the Anchor uses the sweep shot to Zone C (fine leg/square leg) for 1–2 runs.

Diagram 3 shows the Anchor-Striker partnership in action. The Anchor (B2, orange) calls the quick single after the Striker (B1, blue) plays into Zone B or C, ensuring strike rotation and keeping the scoreboard moving.
Key Coaching Points

1. Run Rate Awareness is Non-Negotiable. Both batsmen must know the required run rate at all times. Coaches should call out the RRR every two overs during training simulations. Batsmen who are unaware of the run rate make reactive, panic-driven decisions in the final overs.
2. The Anchor's Role is Underrated. Many junior coaches focus exclusively on the Striker's boundary hitting. In reality, the Anchor's ability to rotate strike, call sharp singles, and occupy the crease under pressure is the foundation of a successful run chase. Emphasise this role in every session.
3. Zone Identification Before Each Over. Before the first ball of every over, both batsmen should have a 10-second conversation: "Where is the gap? What is the bowler's plan?" This pre-ball awareness converts reactive batting into proactive batting.
4. The "Power Ball" Concept. Teach batsmen that not every ball needs to be a boundary attempt. The power ball is earned by the preceding 3–4 balls of disciplined singles and dot-ball absorption. When the bowler is under pressure, the boundary opportunity opens naturally.
5. Running Between Wickets as a Scoring Tool. In the middle overs, quick singles and twos are as valuable as boundaries. A pair of batsmen who convert every misfield into two runs and every defensive push into a single will score 8–10 extra runs per 5-over spell without taking any additional risk.
6. Partnership Communication Under Pressure. When the required run rate climbs above 10 per over (T20), panic sets in. Coaches must drill batsmen to have a 5-second "reset conversation" between overs: "We are fine. One ball at a time. Next boundary in Zone A." This verbal reset prevents rash shot selection.
Common Mistakes

Mistake 1 — Neglecting the First Two Balls of Each Over. Batsmen frequently attempt a premeditated big shot off ball 1, get out to a good delivery, and collapse the innings. Drill the "see it, play it" rule for the first two balls of every over, regardless of the run rate.
Mistake 2 — Both Batsmen Adopting the Striker Role Simultaneously. When the run rate climbs, both batsmen panic and attempt boundaries on every ball. This leads to a cluster of wickets and a collapsed chase. Reinforce role clarity: only one batsman is the Striker at any given time.
Mistake 3 — Ignoring Zone D (Deflection Shots). Batsmen often overlook the fine leg and third man regions, which are almost always defended by a single deep fielder. The glance, the glide, and the late cut are high-percentage shots that yield 1–2 runs with minimal risk. Drill these shots explicitly.
Mistake 4 — Poor Running Between Wickets Communication. "Yes-No-Wait" calls must be made within 0.5 seconds. Hesitation causes run-outs, which are the most demoralising dismissals in a run chase. Use cone-drill exercises to train calling speed and decisiveness.
Mistake 5 — Failing to Reset After a Boundary. After hitting a boundary, batsmen often attempt another boundary immediately, gifting the bowler a wicket with a loose shot. Teach the "boundary-then-single" rule: after every boundary, the next ball must be played for a controlled single to reset the bowler's mindset.
Variations and Progressions

Variation 1 — The Pinch-Hitter Swap. In overs 11–13, if the Anchor has been at the crease for 20+ balls and the run rate is climbing, the batting team sends in a pinch-hitter (a lower-order aggressive batsman) to temporarily take the Striker role. The Anchor remains to guide the new batsman through the first 4–6 balls before the pinch-hitter takes over boundary duties.
Variation 2 — The Spin-Targeting Adjustment. When the opposition deploys two spinners in tandem during the middle overs, both batsmen shift to an aggressive "use your feet" approach: the Striker steps down to drive through Zone A; the Anchor uses the reverse sweep to Zone B. This disrupts the spinner's length and field placement.
Progression 1 — Pressure Simulation Drill. Run the full middle-overs scenario with a live bowling attack. Set a specific run target for overs 7–15 (e.g., score 65 runs in 9 overs with a maximum of one wicket). Introduce a "pressure ball" rule: if the batsman plays a dot ball on balls 4, 5, or 6 of an over, the coach calls "pressure" and the batsman must score off the next ball or face a penalty (e.g., 5 runs deducted).
Progression 2 — Fielding Variation Challenge. After batsmen have mastered the standard field, the coach randomly repositions two fielders at the start of each over without telling the batsmen. This forces real-time zone identification and adaptability, replicating the match scenario where the fielding captain adjusts between overs.
Age Adaptations

| Age Group | Key Modifications |
|---|---|
| Under 10 | Use a shorter pitch (15 yards), a softer ball, and only two scoring zones (leg-side and off-side). Focus exclusively on calling "YES" or "NO" and running hard between wickets. Remove the RRR concept entirely. |
| Under 12 | Introduce the four scoring zones using coloured cones. Simplify the Anchor-Striker model to "one batter hits, one batter runs." Use underarm or slow-medium pace bowling to allow shot development. |
| Under 14 | Introduce the RRR concept and the par-score checkpoint. Begin drilling the 3-ball rotation cycle. Introduce the sweep and glance shots for Zone C and Zone D. |
| Under 16 | Full implementation of the Anchor-Striker Blueprint. Introduce the pinch-hitter variation and the spin-targeting adjustment. Begin video analysis of shot selection patterns. |
| Open / Senior | Full match simulation with live bowling, fielding variations, and pressure drills. Introduce opposition bowling analysis and pre-innings match-up planning. |