Middle Overs Run Chase Mastery: The 3-Phase Batting Blueprint (Overs 11–20)
Teach your batters to read the game, rotate strike intelligently, and time their acceleration perfectly across overs 11–20 to win T20 and 50-over run chases under pressure.

Equipment Needed
Overview
The middle overs of a run chase — typically overs 11 to 20 in a T20 or overs 20 to 40 in a 50-over match — represent the most tactically demanding phase of batting. After the powerplay restrictions are lifted, the fielding side floods the outfield with defensive placements, drying up boundaries and forcing batters into poor shot selection or risk-laden strokes. Without a clear plan, batting partnerships collapse through a combination of dot balls, unnecessary risks, and a failure to read the required run rate.
This set play resource gives coaches a structured, three-phase framework — Consolidate, Accelerate, Launch — that teaches batters to manage the middle overs intelligently. The strategy is built around disciplined strike rotation, gap identification, partnership communication, and precise timing of the acceleration phase. It is applicable to T20 (overs 11–20) and 50-over cricket (overs 20–40), and can be drilled in net sessions, scenario-based practice, and full middle practice.
When to use this strategy: Deploy this framework when your team is chasing a competitive total and the required run rate sits between 7.5 and 11 runs per over at the start of the middle phase. It is most effective when you have established batters at the crease who can build a partnership and read the field.
Setup

Equipment Required
- Full cricket oval (minimum 55m boundary on all sides; standard oval approximately 137m x 128m)
- 22-yard pitch with crease markings at both ends
- 2 sets of stumps with bails
- Minimum 6 cricket balls (red or white)
- Batting pads, gloves, helmets, and guards for batters
- Fielding cones or markers to designate scoring zones (red, green, yellow)
- Whiteboard or coaching clipboard for pre-session briefing
- Scoreboard or run-rate calculator (app or manual)
Field & Pitch Setup
Set the field as a realistic middle-overs defensive configuration. The 30-yard inner circle must be marked. Place fielders in the following positions to simulate a standard defensive field:
| Position No. | Position Name | Location |
|---|---|---|
| 1 | Wicket-keeper | Behind stumps, standing back |
| 2 | Point | Square on the off-side, 25m from bat |
| 3 | Cover-point | 45 degrees off-side, 30m from bat |
| 4 | Mid-off | Straight, just outside the 30-yard circle |
| 5 | Mid-on | Straight on the leg-side, just outside 30-yard circle |
| 6 | Mid-wicket | 45 degrees on-side, 30m from bat |
| 7 | Square leg | Square on the leg-side, 28m from bat |
| 8 | Fine leg | Behind square on the leg-side, on the boundary |
| 9 | Long-on | Straight boundary on the leg-side |

Diagram 1: Middle overs field placement showing the three scoring zones — the Danger Zone (red, off-side boundary arc), Preferred Running Zone (green, on-side gaps), and Rotate Strike Zone (yellow, straight).
Step-by-Step Instructions

Pre-Session Briefing (10 minutes)
Step 1 — Establish the Scenario. Before players take the field, present the match scenario clearly on the whiteboard: "We are chasing 175. After 10 overs we have scored 65/2. Required run rate is 8.67. We have 10 overs remaining. Our job is to get to 130 by over 17 — then launch."
Step 2 — Assign Roles. Designate two batters as the opening partnership for the drill. Assign one as the dominant striker (the batter who will face the majority of deliveries) and one as the rotation specialist (the batter whose primary job is to keep strike moving and call for singles).
Step 3 — Identify the Scoring Zones. Walk both batters to the pitch and physically point out the three scoring zones using cones (refer to Diagram 1). Explain: "The red zone is where you lose wickets trying to hit boundaries into a packed off-side field. The green zone through mid-wicket and square leg is where you find your singles and twos. The yellow zone straight is where you rotate strike."
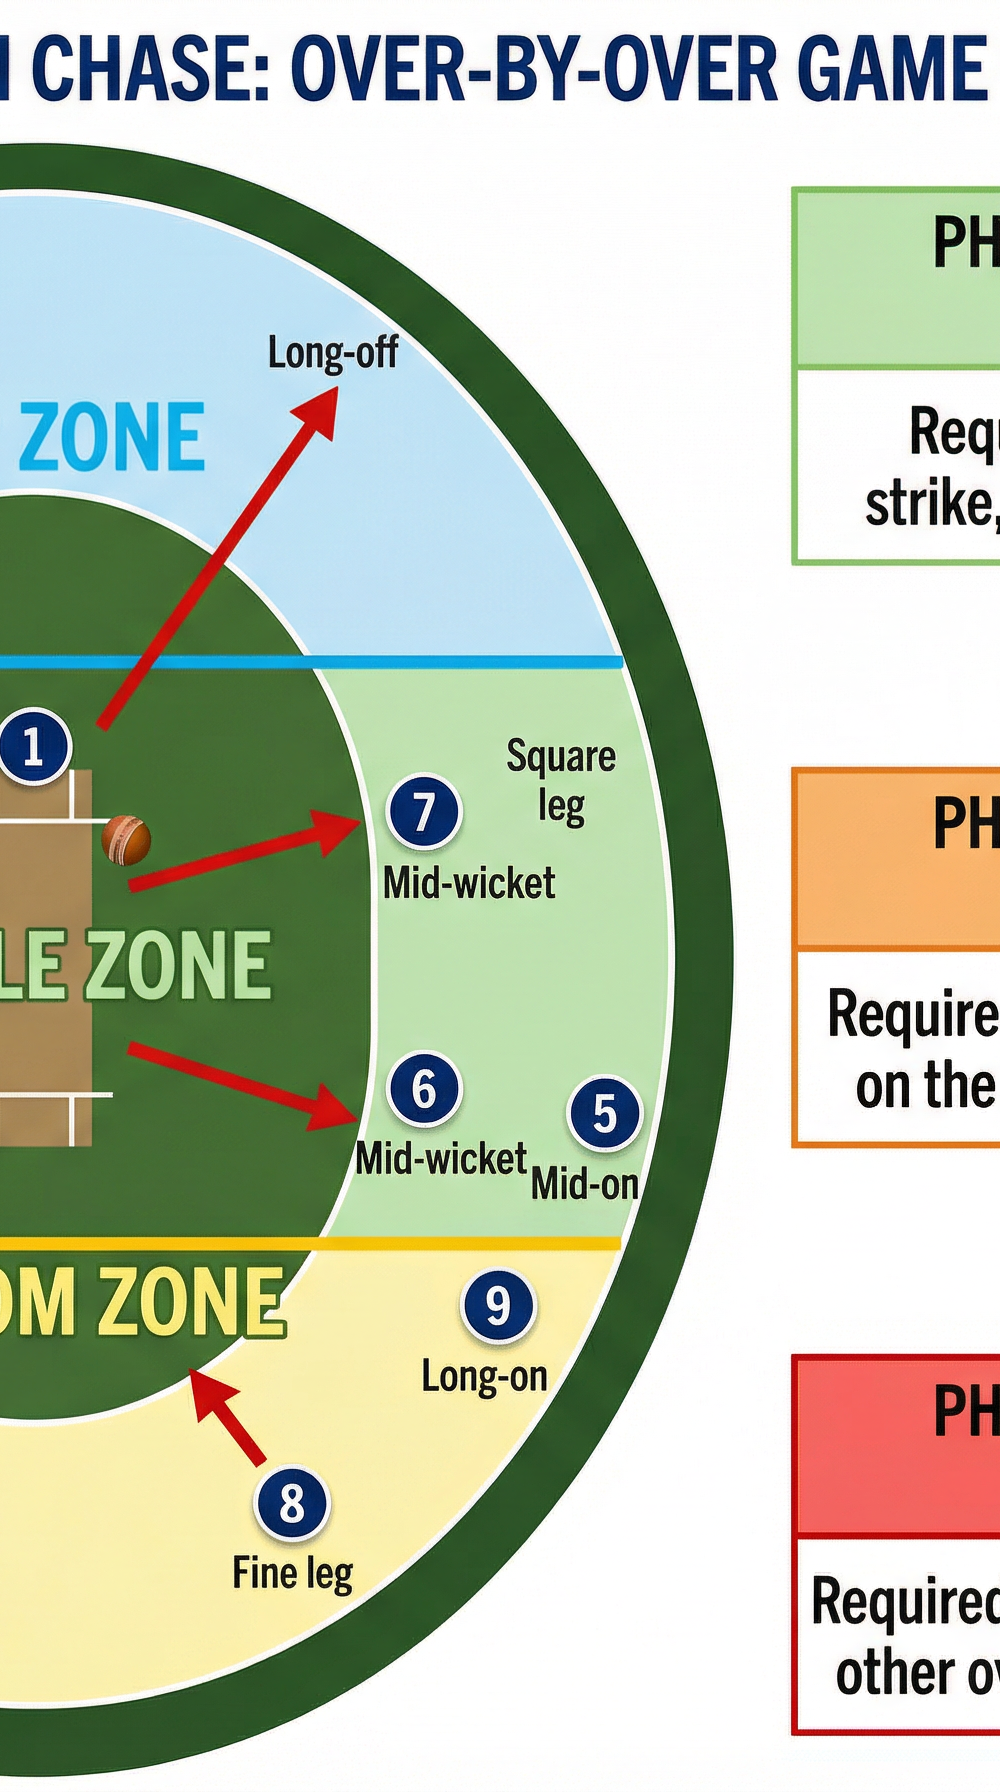
Phase 1 — Consolidate (Overs 11–14)
Step 4 — Rotate Strike, Deny Dot Balls. The primary objective in overs 11–14 is to keep the scoreboard ticking at a minimum of 6 runs per over using singles and twos. Batters should target the gaps at mid-wicket, square leg, and through the covers with controlled drives. The non-striker must back up to within 1 metre of the popping crease before the ball is delivered.
Step 5 — Partnership Communication. Implement the "call-and-confirm" running protocol: the striker calls "Yes", "No", or "Wait" immediately after playing the shot; the non-striker confirms with "Yes" or "No" before committing. Both batters must be decisive — hesitation is the primary cause of run-outs in the middle overs.
Step 6 — Identify the Spinner. In most middle-over spells, the opposition will deploy spin bowling. Brief batters to use their feet — stepping down the pitch 1–2 metres to the spinner — to disrupt length and create scoring opportunities through the leg-side. Sweep shots to the square leg and fine leg gaps are high-percentage scoring options.
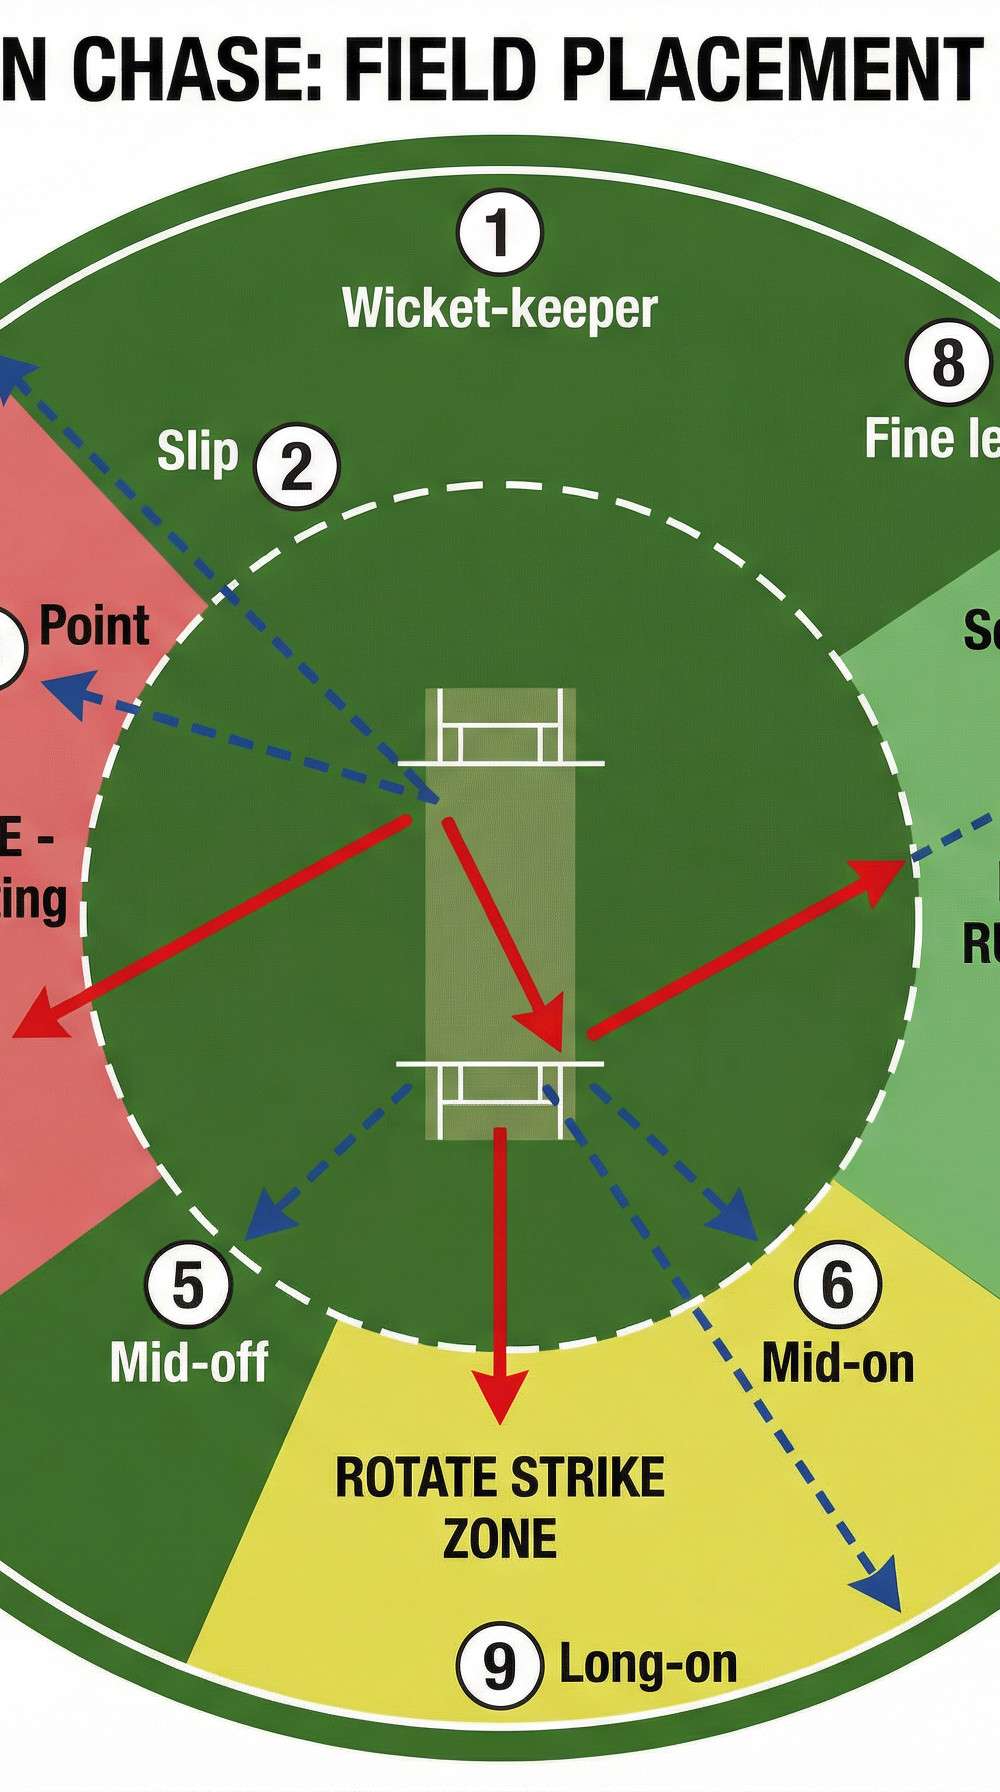
Diagram 2: Strike rotation and partnership plan — showing the four-step sequence of gap identification, non-striker backing up, running the single, and converting into two runs when the ball reaches the outfield gap.
Phase 2 — Accelerate (Overs 15–17)
Step 7 — Read the Required Run Rate. At the start of over 15, the batting pair must assess the required run rate. If it has crept above 9.5, the acceleration phase must begin immediately. Coach batters to look for the following scoring opportunities: (a) the gap between cover and mid-off when the fielder is straight; (b) the mid-wicket boundary when the fielder is at square leg; (c) the slog-sweep over mid-wicket against the spinner.
Step 8 — Target the Spinner's Variations. Spinners in the middle overs will bowl defensive lines — typically into the rough outside off stump or angled into the pads. Coach the striker to pre-meditate the sweep shot against the off-spinner and the reverse sweep against the left-arm spinner when the field is set defensively. The key is to disrupt the bowler's length by moving early.
Step 9 — Boundary Every Third Over. Set a minimum target of one boundary every three overs during the acceleration phase. This keeps the required run rate manageable without forcing batters into reckless hitting. Boundaries should be planned — not reactive — based on field placement.
Phase 3 — Launch (Overs 18–20)
Step 10 — Power Hitters In. If wickets are in hand, the number 5 or 6 batter should be padded up and ready from over 16. The launch phase requires batters who can hit the ball over the infield and clear the boundary rope. Brief the incoming batter on the field setting and the two or three specific shots they will target.
Step 11 — Boundary or Two Every Over. In the final three overs, the target is a minimum of 10 runs per over. Batters should back themselves to hit the ball straight — long-on and long-off gaps — and through mid-wicket. Yorkers should be anticipated and scooped or flicked to fine leg.
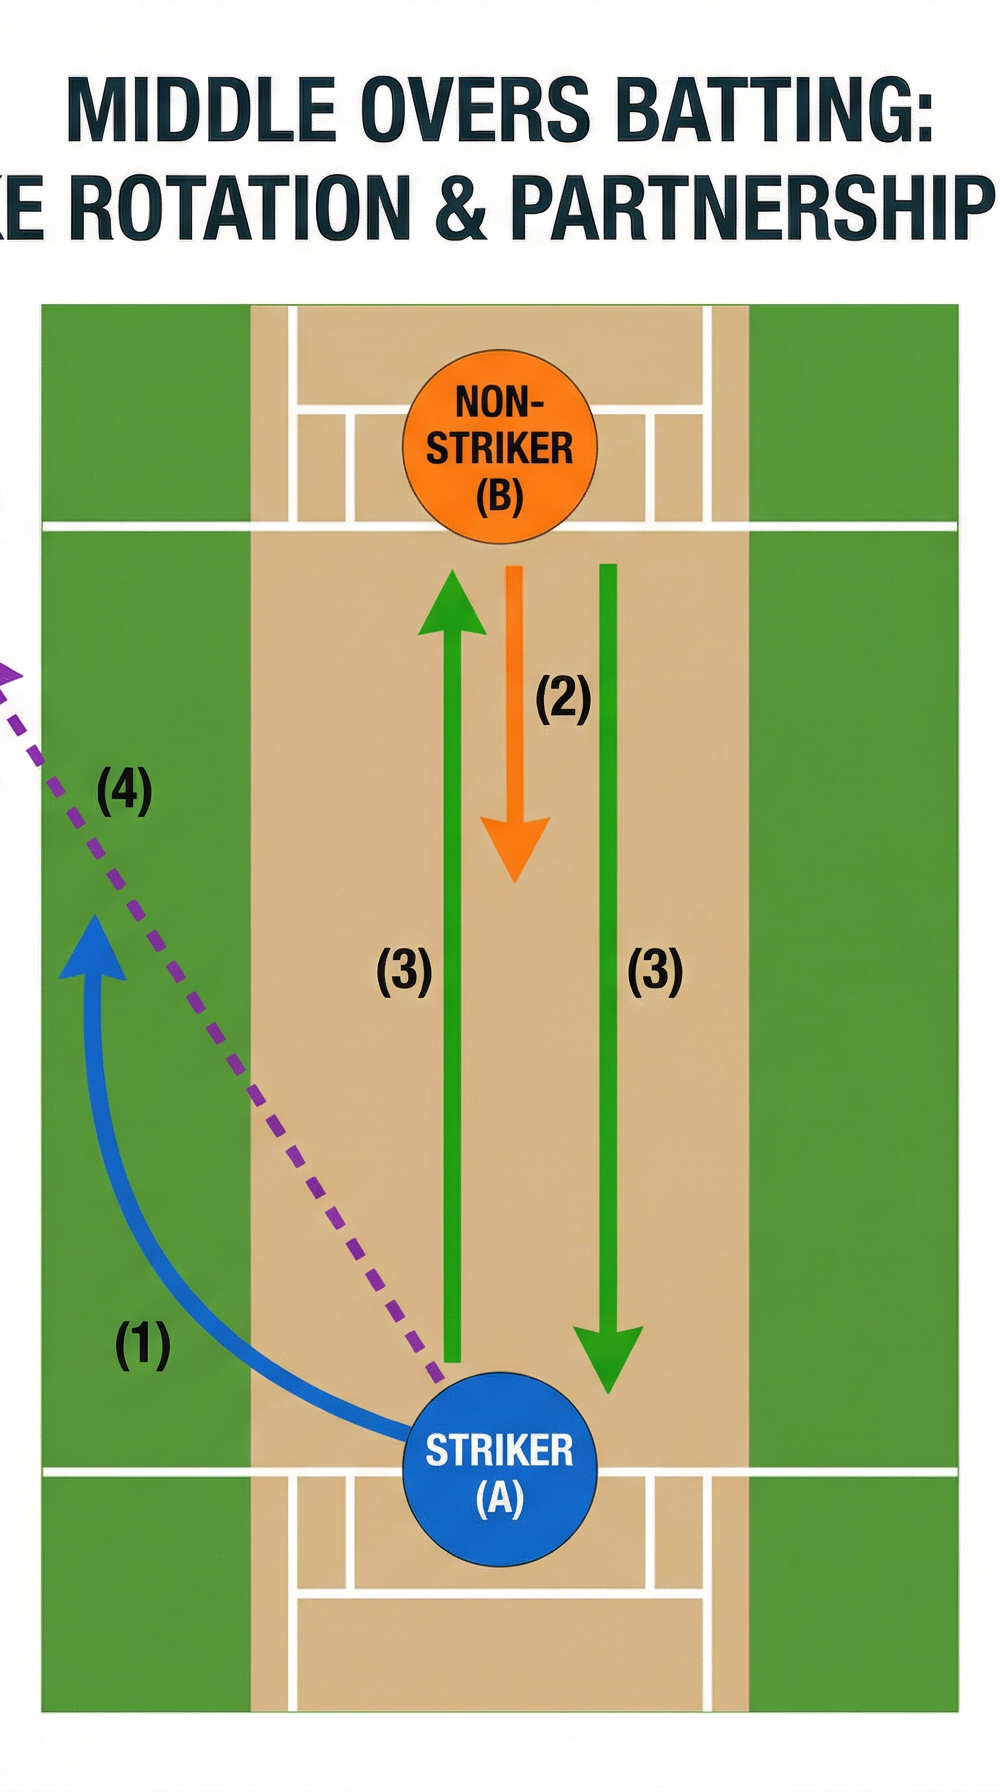
Diagram 3: The over-by-over game plan showing the three-phase framework (Consolidate, Accelerate, Launch) mapped against field zones and required run rate triggers.
Key Coaching Points

The dot ball is the enemy, not the boundary. In the middle overs, a sequence of three dot balls is more damaging than a single wicket. Drill batters to find a single off every second delivery as a minimum baseline — even a nudge to fine leg or a push to mid-on counts.
Read the field before the ball is bowled. Batters must develop the habit of scanning the field as the bowler runs in. Identify the two largest gaps before each delivery and pre-select the shot. Reactive batting in the middle overs leads to mistimed shots and wickets.
Non-striker backing up is non-negotiable. The non-striker backing up to within 1 metre of the popping crease before delivery turns a comfortable single into a comfortable two. Drill this in every net session — it is a habit, not a decision.
Respect the required run rate trigger points. Coach batters to check the required run rate at overs 14, 17, and 19. These are the three decision points where the batting pair must consciously shift gears. A required run rate under 9 at over 14 means Phase 1 can continue; above 9.5 means Phase 2 must begin immediately.
Partnership is a strategy, not a coincidence. The best middle-overs partnerships are built on communication, complementary roles, and shared situational awareness. Batters should talk between every over — confirming the plan, identifying the threat bowler, and agreeing on the next milestone target.
Pick your boundary ball, not your boundary moment. Batters should not decide to hit a boundary and then look for the ball to hit. Instead, they should identify the deliverable ball — a full ball on the pads, a short ball at hip height, a wide half-volley — and execute the pre-planned shot. Patience is the foundation of the launch phase.
Common Mistakes
Mistake 1 — Going for the big shot too early. Batters who attempt to hit boundaries in overs 11–13 against a packed off-side field consistently get caught at cover or mid-off. The field is set precisely to invite this shot. Coach your batters to recognise this trap and redirect their aggression into running hard between the wickets instead.
Mistake 2 — Failing to rotate the strike. Many batters, particularly those who are set and comfortable, fall into the habit of playing out maidens against tight bowling. Remind them that a maiden over in a run chase is equivalent to conceding a wicket — the required run rate climbs, pressure builds, and the next batter is forced into a high-risk shot.
Mistake 3 — Poor calling and hesitation between wickets. The most common cause of run-outs in the middle overs is indecision. Batters who call "wait" and then change to "yes" — or who fail to call at all — put their partner in an impossible position. Implement a strict calling protocol in every drill: the striker always calls, the non-striker always confirms, and both commit immediately.
Mistake 4 — Ignoring the spinner. Middle-over spinners thrive when batters play them from the crease. Batters who refuse to use their feet against spin allow the bowler to bowl to their field and dry up the scoring. Drill the use of feet — stepping to the pitch of the ball — as a fundamental skill in every middle-overs practice session.
Mistake 5 — Losing track of the required run rate. Batters who do not know the required run rate cannot make informed decisions about when to accelerate. Introduce a simple rule: both batters must know the required run rate at the start of every over. Use a scoreboard, a coach on the boundary, or a simple mental calculation (runs needed divided by overs remaining).
Variations & Progressions

Variation 1 — Scenario Cards. Write 10 different match scenarios on cards (e.g., "Chasing 160, 8 overs left, 72 needed, 4 wickets in hand") and deal them randomly to batting pairs before each drill. This forces batters to adapt their phase selection in real time rather than following a fixed script.
Variation 2 — Fielding Restriction Drill. Allow only 4 fielders outside the 30-yard circle for the first 6 balls of each over (simulating a powerplay), then release all 9 fielders for the next 6 balls. This teaches batters to recognise and exploit fielding restrictions when they occur within the middle overs.
Progression 1 — Live Bowling with Pressure Scoring. Move from throwdowns and bowling machines to live bowling from your best middle-overs bowlers. Add a pressure scoring system: batters score double points for runs scored in overs 18–20, but lose 5 points for every wicket lost. This replicates the risk-reward calculation of the launch phase.
Progression 2 — Consequence Running. If the batting pair fails to reach the over-by-over milestone (e.g., 20 runs from overs 11–14), both batters complete a physical consequence (e.g., 10 shuttle runs) before the next drill. This builds the mental association between poor middle-overs execution and match consequences.
Age Adaptations

Under 12 (Soft Ball or Tape Ball): Simplify the framework to two phases only — Steady (rotate strike, find singles) and Go (hit boundaries in the last 2 overs). Use a shorter boundary (30m) and reduce the field to 6 players. Focus exclusively on calling and running — do not introduce field-reading or required run rate concepts at this age.
Under 14–16 (Hard Ball, Club Level): Introduce all three phases but use a simplified required run rate trigger: "If the number on the scoreboard says we need more than 9 an over, it's time to accelerate." Focus on the sweep shot against spin and the use of feet. Begin introducing field-reading as a pre-delivery habit.
Open Age / Senior Club: Run the full framework as described, including scenario cards, live bowling, and consequence running. Add video review sessions where batters watch back their middle-overs performance and identify the specific balls where they failed to rotate strike or misread the field. Introduce the concept of the "partnership run rate" — the combined run rate of the two batters at the crease — as a real-time performance metric.