Middle Overs Run Chase Strategy: Rotating Strike, Reading the Field & Accelerating at the Right Moment
Master the art of the middle overs run chase — teach your batters to rotate strike intelligently, exploit field gaps, build pressure-proof partnerships, and time the acceleration phase to win matches from any position.

Equipment Needed
Overview
The middle overs of a limited-overs run chase — typically overs 11 to 20 in a T20 or overs 16 to 35 in a 50-over match — represent the most tactically demanding phase of batting. The powerplay has ended, the fielding captain has spread the field, and the bowling side is working hard to dry up runs and build pressure. This is the phase where run chases are won or lost.
This set play resource equips coaches with a structured, repeatable framework to teach batters how to assess the required run rate, rotate strike efficiently, identify and exploit field gaps, build match-winning partnerships, and time the acceleration phase with precision. When executed well, this strategy keeps the scoreboard ticking at 7–8 runs per over without sacrificing wickets, setting up a clean platform for the death overs assault.
When to use this strategy: Deploy this framework in any limited-overs run chase where the team is within 10–15% of the required run rate at the end of the powerplay. It is equally applicable in T20 (overs 7–15), List A (overs 16–35), and junior formats scaled to match length.
Setup

Equipment Required
- Full cricket oval ground (approximately 130m × 110m ellipse, or scaled equivalent)
- 22-yard pitch (standard or junior-scaled to 16 yards for U12 and below)
- 2 sets of stumps with bails
- 1 red or white cricket ball per pair (use incrediball/tennis ball for junior groups)
- Batting pads, gloves, helmet, and box for each batter (minimum 4 batters active)
- Whiteboard or cone markers for pre-session tactical briefing
- Scoreboard or run-rate tracking app (coach's phone is sufficient)
Pitch & Field Setup
Set the field as it would appear in a genuine middle-overs defensive field: two fielders inside the 30-yard circle (Mid-Off and Mid-On), with the remaining nine spread across the boundary arc. Refer to Diagram 1 for the exact positioning of all 11 fielding positions.

Diagram 1 shows the standard middle-overs field placement from the batting team's perspective. Fielders 9 (Long-On), 10 (Long-Off), and 11 (Deep Mid-Wicket) protect the boundary, while Fielders 3 (Cover Point) and 6 (Square Leg) are pushed back to the edge of the 30-yard circle. The key gaps exploitable by the batting pair are between Cover Point and Long-Off (the "V" region), and between Square Leg and Fine Leg on the leg side.
Player Positions
| Position | Role | Location |
|---|---|---|
| Striker (Batter 1) | Primary run scorer, gap exploiter | Batting crease, facing end |
| Non-Striker (Batter 2) | Partnership anchor, backing up | Non-striker's crease |
| Mid-Off (F4) | Fielder, cut off straight drives | 25–30 yards from stumps, off-side |
| Mid-On (F5) | Fielder, cut off on-drives | 25–30 yards from stumps, on-side |
| Long-On (F9) | Deep boundary, leg-side | On the boundary, straight |
| Long-Off (F10) | Deep boundary, off-side | On the boundary, straight |
| Deep Mid-Wicket (F11) | Deep boundary, leg-side | On the boundary, square leg side |
| Cover Point (F3) | Sweeper cover | 30-yard circle edge, off-side |
| Square Leg (F6) | Sweeper leg | 30-yard circle edge, leg-side |
| Fine Leg (F7) | Boundary protection | On the boundary, fine leg |
| Third Man (F8) | Boundary protection | On the boundary, third man |
Step-by-Step Instructions

Step 1 — Pre-Innings Tactical Briefing (5 minutes before batting)
Gather both incoming batters at the whiteboard or cone-marked area. Display the required run rate and overs remaining. Establish the "par score" target for the end of the middle overs: in a T20 chase, if 120 is needed off 20 overs, the pair should aim to reach 80–85 by over 15. Assign roles clearly — one batter is the "anchor" (targeting a strike rate of 110–120), the other is the "aggressor" (targeting 140–160 when set).
Step 2 — First 3 Overs of the Middle Phase: Assess and Settle (Overs 11–13)
Both batters take the first 3–4 balls of each over to read the bowler's length, pace, and field placement. The priority is dot-ball avoidance, not boundary hitting. Every delivery should be worked for at least a single. Coach the striker to use soft hands and deflect into gaps at Cover Point and Square Leg — these are the two most consistently open areas in a spread field. The non-striker must back up aggressively, standing 2–3 yards out of the crease at the point of delivery to convert twos into threes on misfields.
Step 3 — Strike Rotation Protocol: The 1s and 2s System
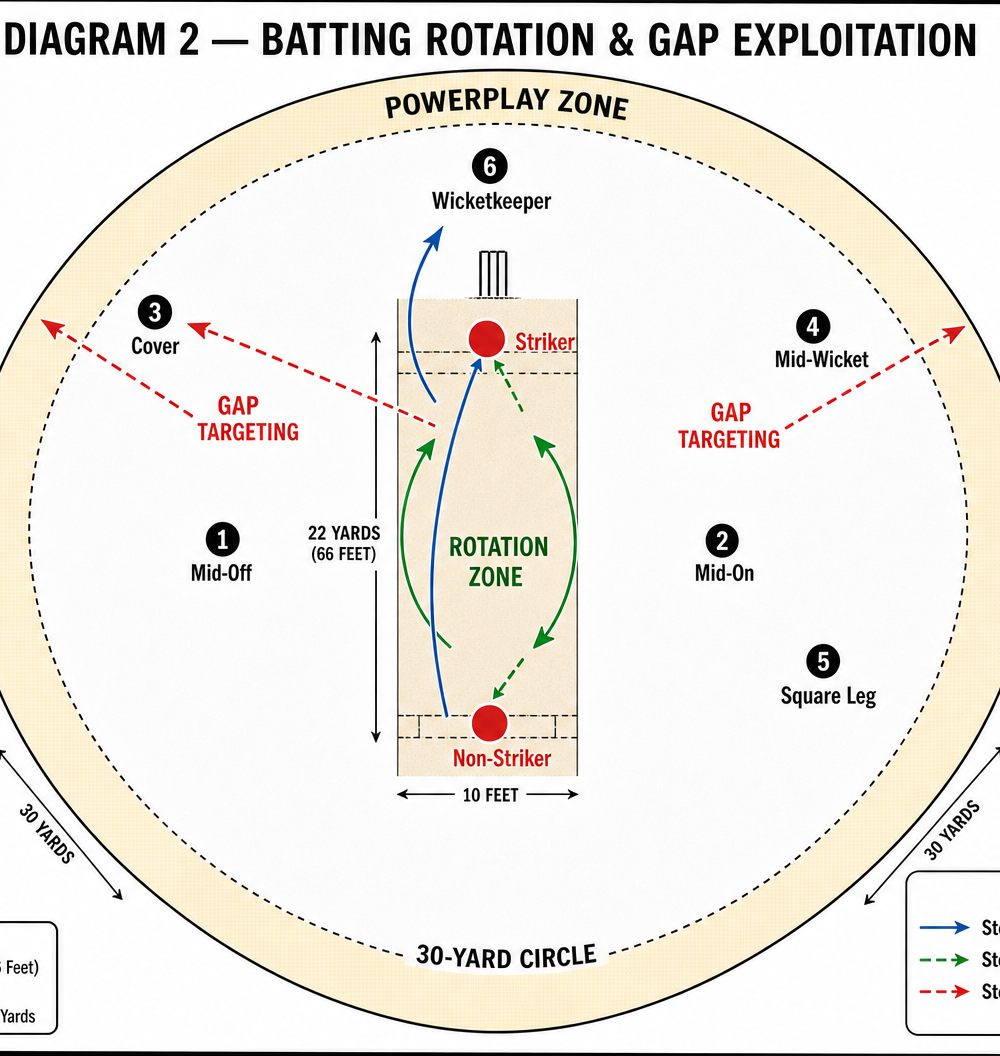
Instruct batters to operate on a deliberate rotation system. The goal is no more than 2 consecutive dot balls per batter. After 2 dots, the striker must manufacture a single — even if it means a push into the off-side for a defensive one. Use the "traffic light" system: Green = boundary ball (attack), Amber = rotation ball (work for 1–2), Red = dot ball (acceptable once per over, never twice in a row). Refer to Diagram 2 for the rotation zones and gap-targeting areas.
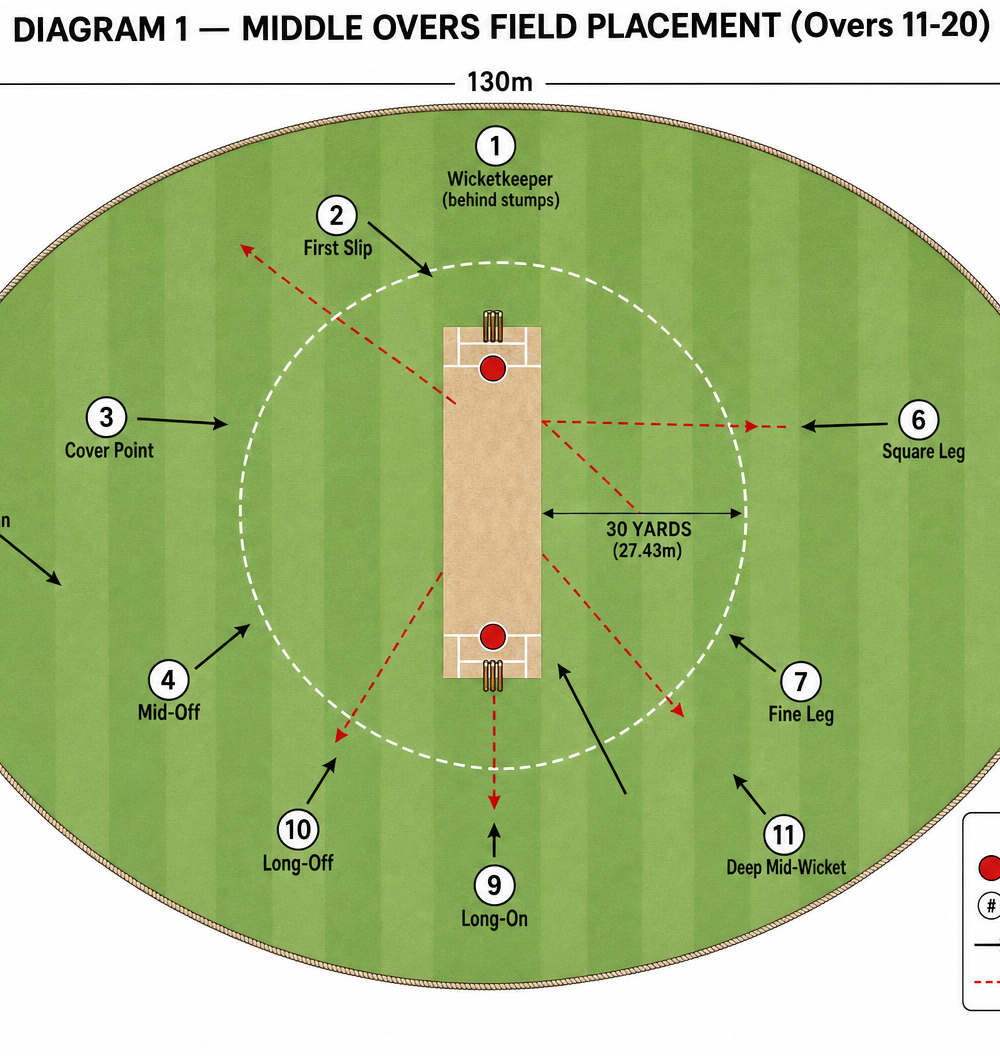
Diagram 2 illustrates the Rotation Zone between the two batters' creases and the primary Gap Targeting zones. The Cover gap (between positions 1 and 3) and the Mid-Wicket gap (between positions 2 and 4) are the two highest-percentage areas for the batting pair to target with controlled drives and flicks. The dashed red arrows show the ideal ball direction for each gap.
Step 4 — Partnership Communication: The Mid-Pitch Conference
After every 10 balls, the batting pair must meet briefly at mid-pitch (between deliveries, not mid-over). The conversation should cover three things: (1) current required run rate vs. actual run rate, (2) which bowler is bowling tightest and should be targeted for rotation only, and (3) which bowler is offering width or pace to attack. Coach this as a 30-second structured debrief, not a casual chat. Use the phrase: "Rate — Bowler — Target."
Step 5 — The Acceleration Trigger (Final 5 Overs of the Middle Phase)
Once the partnership has consumed 8–10 overs together and the required run rate has been maintained or reduced, the aggressor batter shifts into acceleration mode. The trigger point is: required run rate rises above 9.5 per over OR fewer than 8 overs remain. At this point, the aggressor targets the Long-On and Long-Off boundary with straight sixes, and the Cover and Mid-Wicket gaps with flat-bat fours. The anchor continues to rotate and preserve their wicket for the death overs.
Step 6 — Wicket-in-Hand Protocol
If a wicket falls during the middle overs, the incoming batter takes 4–6 balls to settle before resuming the rotation protocol. The surviving set batter immediately adopts the anchor role, regardless of their previous designation. Coach the incoming batter to play the first ball back to the bowler — no risk, no reward until they have read the conditions.
Key Coaching Points

Run rate awareness is a batting skill. Batters must know the required run rate at all times. Coaches should call it out every 5 overs during training sessions so players build the habit of mental arithmetic under pressure.
The single is the most important scoring shot in the middle overs. A well-placed push into the Cover gap or a dab to Fine Leg is worth as much as a boundary when the field is spread. Reinforce this constantly — celebrate the intelligent single, not just the six.
Partnerships are built on communication, not talent. The mid-pitch conference after every 10 balls is non-negotiable. Batters who communicate outperform batters who guess.
Identify the "banker" bowler early. Every bowling attack has one bowler who is easier to score off in the middle overs. The batting pair must identify this bowler by over 12 and target them for 10–12 runs per over, compensating for the tighter bowlers.
The aggressor role is earned, not assumed. Acceleration should only begin once the required run rate is under control and the batter is set (minimum 15 balls faced). Premature aggression is the number one cause of middle-overs collapses.
Body language is tactical. Coach batters to project calm confidence between deliveries. Fielding sides feed off visible pressure in the batting pair. A composed walk between wickets, a deliberate guard-taking routine, and eye contact between partners all signal control.
Common Mistakes

Mistake 1 — Chasing the required run rate too early. Batters who see a rising required run rate in overs 12–14 panic and attempt big shots before they are set. This leads to soft dismissals to mid-off or mid-on. Correction: Enforce the "first 6 balls" rule — no attacking shots until the batter has faced at least 6 deliveries in the middle phase, regardless of run rate.
Mistake 2 — Both batters in anchor mode simultaneously. When two cautious batters are at the crease, the run rate drifts and pressure builds exponentially. Correction: Assign roles explicitly before each pair goes out. One anchor, one aggressor — always. Rotate the aggressor role if a wicket falls.
Mistake 3 — Ignoring the non-striker's backing-up position. Many junior and intermediate batters stand flat on the crease as non-striker, costing the team 1–2 runs per over in missed twos and threes. Correction: Use a cone placed 2 yards outside the non-striker's crease as a visual marker. The non-striker must be at or beyond the cone at the point of delivery.
Mistake 4 — Targeting the same gap repeatedly. Once a batter hits two consecutive shots to Cover Point, the fielding captain moves the sweeper. Batters who do not adapt get cut off. Correction: Introduce the "two-shot rule" in training: after hitting the same gap twice, the batter must switch to the opposite side of the field for the next scoring shot.
Mistake 5 — Poor calling between wickets. Run-outs in the middle overs are catastrophic. Vague calls of "yes," "no," and "wait" cause hesitation. Correction: Drill the calling protocol: the striker calls for all shots in front of square, the non-striker calls for all shots behind square. Calls must be loud, early, and decisive.
Variations & Progressions
Variation 1 — Pressure Scenario Drill (Intermediate)
Set the batting pair a specific target: 60 runs off the last 8 overs of the middle phase, with only 3 wickets remaining. The coach controls the field and can "remove" a wicket at any point by calling "out" after a dot ball sequence. This forces batters to manage risk under genuine pressure and practice the wicket-in-hand protocol in real time.
Variation 2 — Bowler-Type Rotation (Advanced)
Use three different bowlers in sequence — a spinner, a medium-pacer, and a fast bowler — each bowling 3-over spells. The batting pair must adapt their rotation strategy to each bowler type: sweeping the spinner, working the medium-pacer through the off-side, and using the pace of the fast bowler to deflect to fine leg and third man. This builds the tactical flexibility required at senior level.
Progression — Blind Field Drill
For advanced groups, do not tell the batting pair where the fielders are positioned before the over begins. They must read the field in the first 2 balls and adapt. This replicates the real match experience of facing a captain who changes the field between overs and develops genuine cricket intelligence rather than pre-programmed responses.
Age Adaptations

| Age Group | Pitch Length | Ball Type | Key Focus | Simplified Rule |
|---|---|---|---|---|
| Under 10 | 12 yards | Incrediball/Tennis | Calling between wickets | "Yes or No — say it loud" |
| Under 12 | 16 yards | Incrediball/Tennis | Strike rotation, no dot balls | "Never two dots in a row" |
| Under 14 | 18 yards | Leather/Composite | Gap identification, partnership | "Traffic light" system |
| Under 16 | 20 yards | Leather | Run rate management, roles | Full strategy, 3-over spells |
| Open/Senior | 22 yards | Leather | Full tactical framework | All 6 steps applied |
Under 10 & Under 12: Focus exclusively on the calling protocol and basic strike rotation. Remove the run rate element entirely — simply reward pairs who score the most runs in 6 overs without getting run out. Use the incrediball to reduce fear of the ball and encourage positive footwork.
Under 14: Introduce the "traffic light" system and the mid-pitch conference. Assign anchor and aggressor roles but allow batters to self-select based on feel. Begin introducing the concept of the "banker" bowler.
Under 16 & Open: Apply the full six-step framework. Introduce the blind field drill and the pressure scenario variation. At this level, batters should be calculating required run rate independently and making real-time tactical decisions without coach input during the innings.