New Ball Opening Attack Plan: Seam & Swing Dominance in the First 10 Overs
Master the art of the new ball opening spell with a structured field placement, disciplined bowling lines, and a coordinated two-pronged pace attack designed to take wickets and build pressure in the first 10 overs.

Equipment Needed
Overview
The new ball is the most potent weapon available to a fielding captain in any format of cricket. In the first 10 overs of an innings, the ball is hard, shiny, and capable of significant seam movement off the pitch and swing through the air. The New Ball Opening Attack Plan is a coordinated set play that aligns field placement, bowling lines, lengths, and swing strategy to maximise wicket-taking opportunities while simultaneously restricting the scoring rate.
This plan is most effective on pitches offering seam movement — typically fresh, green-tinged surfaces — or in atmospheric conditions with overhead cloud cover and humidity. It is designed for use in all formats (Test, List A, and T20) but is most comprehensively applied in longer formats where sustained pressure across multiple overs is the primary objective. Coaches should introduce this plan from Under-14 level upwards, once players have developed basic seam bowling technique and fielding discipline.
When to use this plan:
- At the start of any innings when a new ball is available
- In conditions offering seam movement (green pitch, overcast skies, morning sessions)
- When your two opening bowlers have contrasting styles (e.g., outswing vs. inswing, or right-arm vs. left-arm)
- When the batting side has inexperienced or technically vulnerable openers
Setup
Equipment Required
| Item | Quantity | Notes |
|---|---|---|
| New cricket ball (leather, match standard) | 1 | Seam upright for maximum movement |
| Full-size cricket stumps | 2 sets | Both ends set up |
| Batting pads, gloves, helmet | 2 sets | For batters in practice |
| Fielding cones (optional) | 10 | To mark fielder starting positions |
| Coaching whiteboard / tablet | 1 | For pre-session tactical briefing |
Pitch and Field Dimensions
This plan is set on a standard oval cricket ground with a 22-yard (20.12m) pitch at the centre. The oval boundary should be approximately 65–75 metres from the centre of the pitch. Fielders are positioned within the 30-metre inner circle for the initial attack phase (overs 1–6 in limited-overs cricket, or the captain's discretion in Tests).
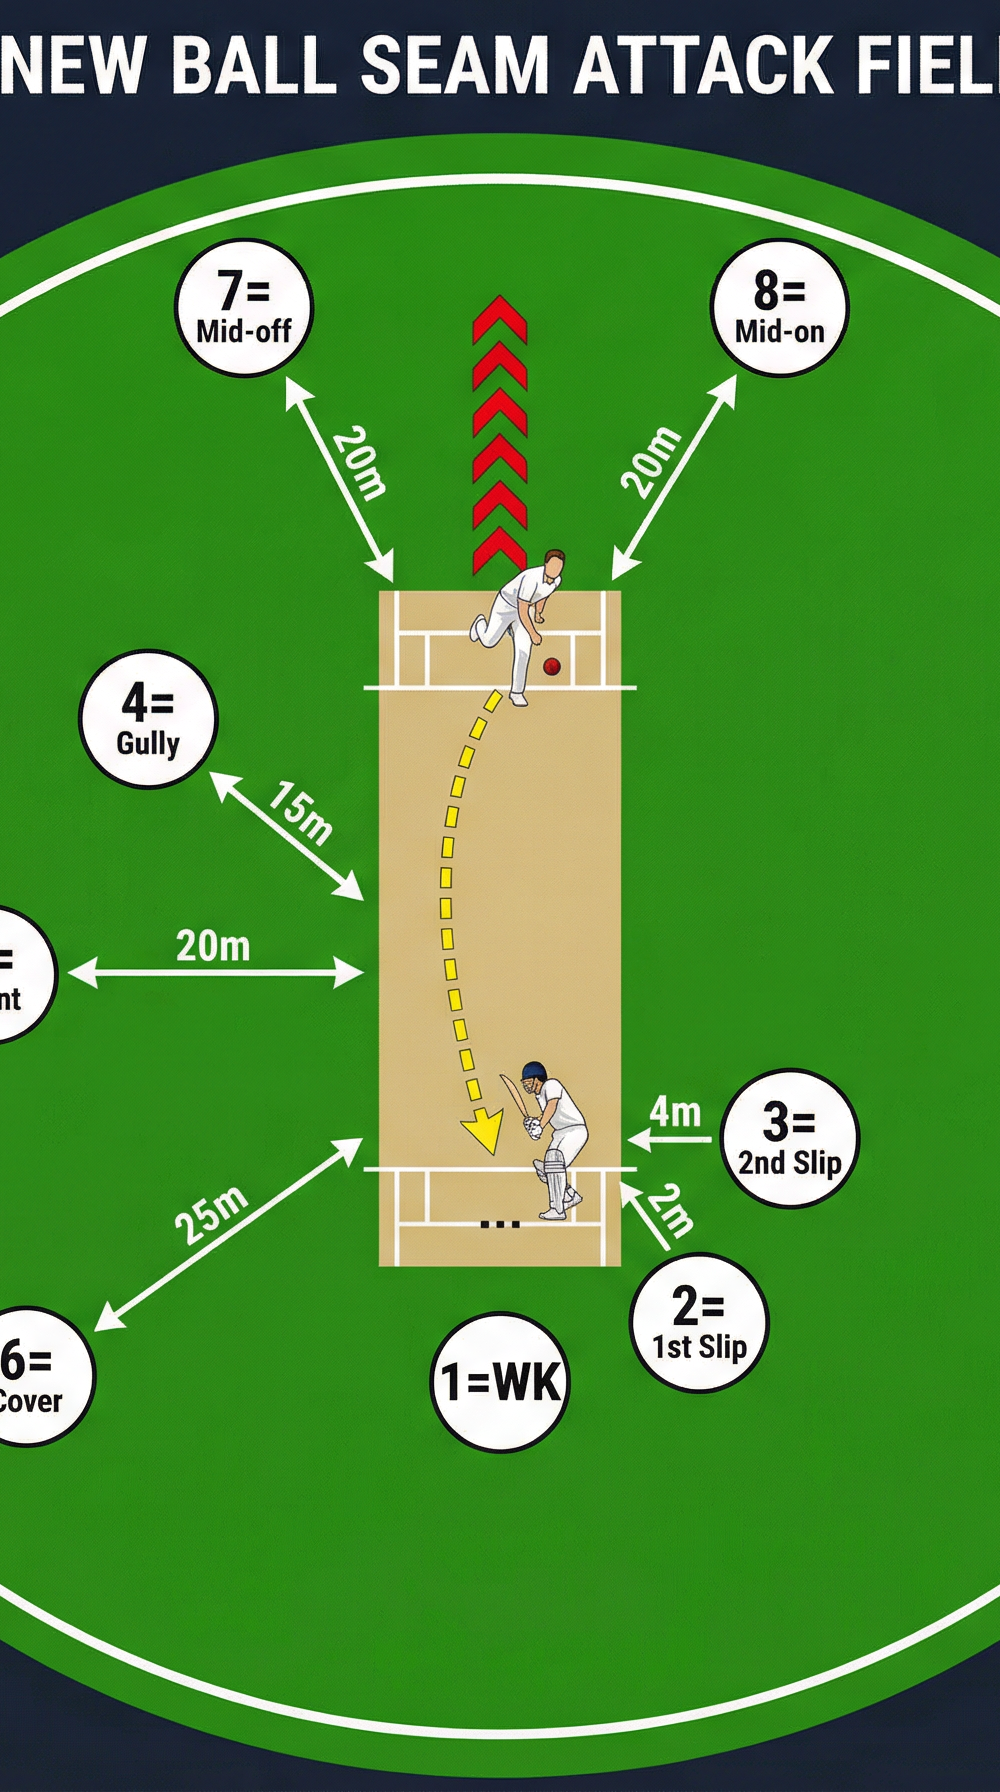
Player Positions (Right-Handed Batter, Right-Arm Over-the-Wicket Bowler)
Refer to Diagram 1 below for the full field map.

| # | Position | Location | Role |
|---|---|---|---|
| 1 | Wicketkeeper (WK) | 1.5m directly behind the stumps | Takes edges, directs slip cordon |
| 2 | 1st Slip | 2m to keeper's right | Catches outside edge, low and high |
| 3 | 2nd Slip | 4m to keeper's right | Catches wider outside edge |
| 4 | Gully | 45° off side, 15m from bat | Catches thick outside edge and cut shots |
| 5 | Point | Square off side, 20m from bat | Stops cut shots, saves singles |
| 6 | Cover | 30° off side, 25m from bat | Covers drives, saves singles |
| 7 | Mid-off | Straight, 20m from bowler | Covers straight drives, backs up throws |
| 8 | Mid-on | Leg side, 20m from bowler | Covers on drives, backs up throws |
| 9 | Fine Leg | 45° leg side, near boundary | Catches top edges, saves leg-side runs |
| 10 | Third Man | Off side boundary | Saves edges through the slip cordon |
Coach's Note: This is a classic 3-slip, 1-gully attacking field. The absence of a square leg and mid-wicket is intentional — it invites the batter to play on the leg side, which is a higher-risk scoring zone early in an innings.
Step-by-Step Instructions

Phase 1 — Pre-Match Briefing (10 minutes before play)
- Gather both opening bowlers and the wicketkeeper together for a private tactical briefing. Outline the batting order you are facing and identify the primary threat (e.g., "Their No. 1 is a strong driver — we keep it full and outside off stump to bring the slip cordon into play.").
- Assign each bowler a specific role: Bowler A (primary outswing bowler) attacks the off stump with the shiny side of the ball facing the leg side; Bowler B (inswing or seam-up) operates from the opposite end, angling into the right-hander's body.
- Set a clear over-by-over target: aim for no more than 4 runs per over in the first 6 overs, with a wicket target of 2 wickets in the first 10 overs.
- Confirm the field with the captain. Walk each fielder to their cone-marked position before the first ball is bowled.
Phase 2 — The Opening Spell (Overs 1–6)
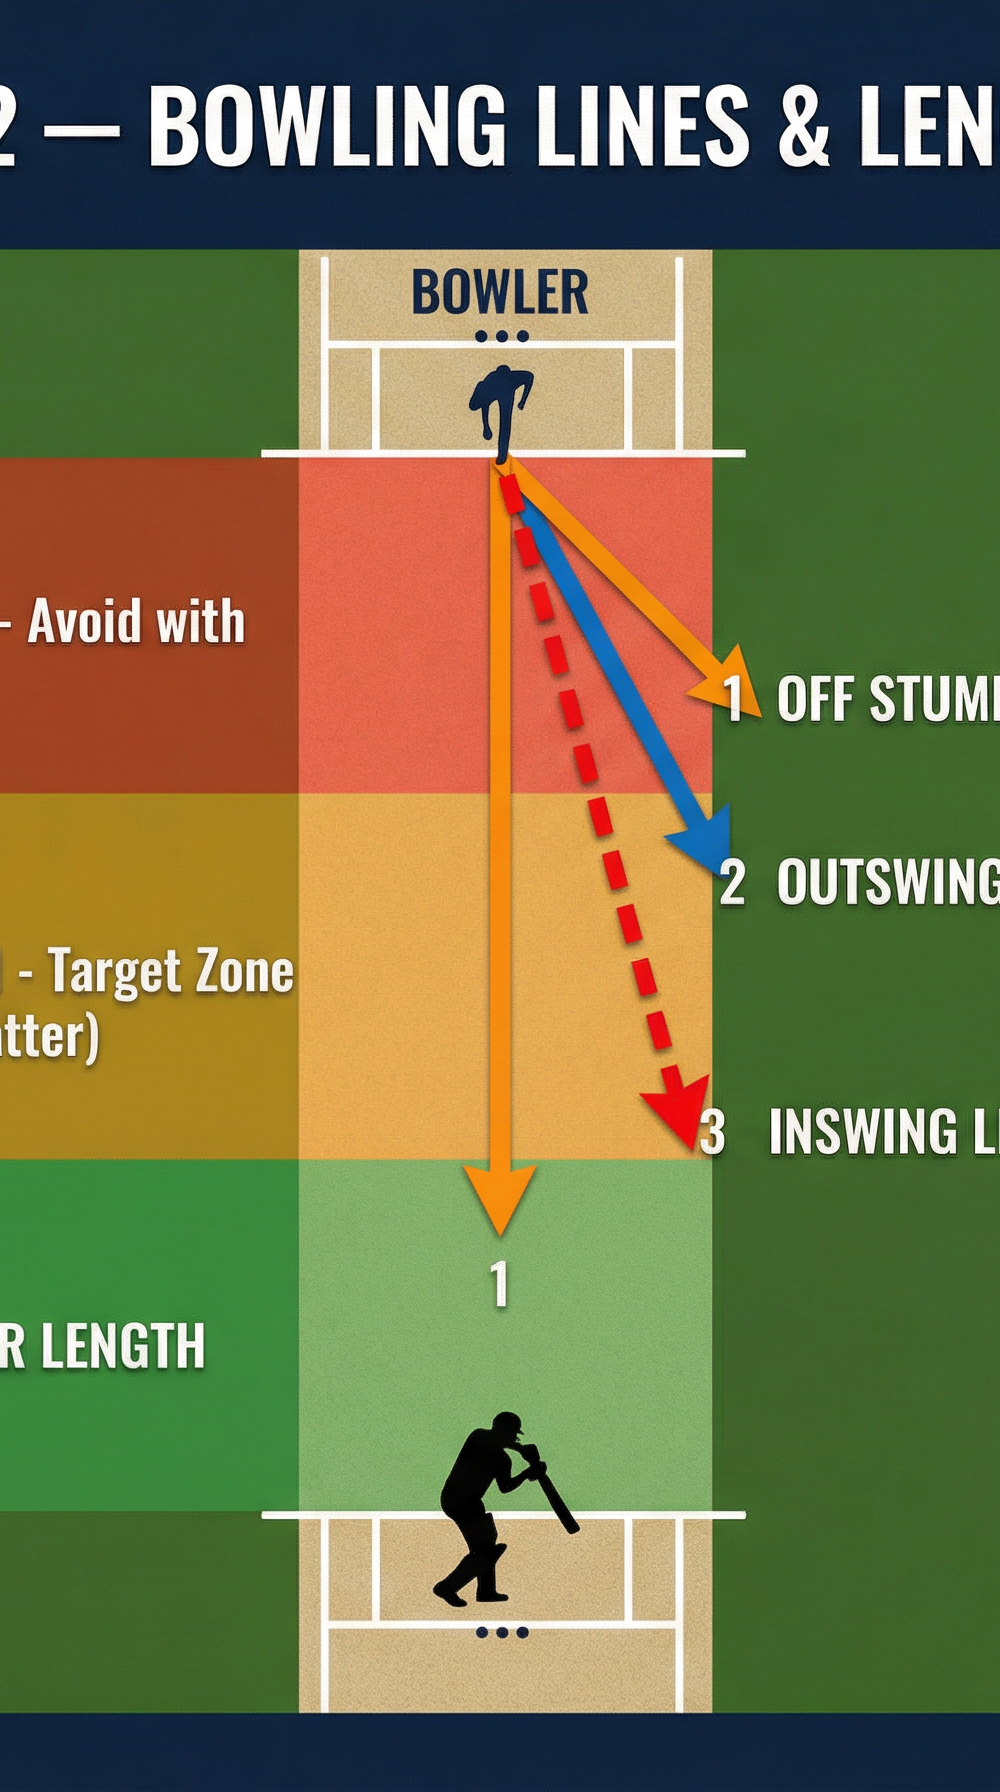
- Bowler A opens from the end with the most favourable wind or slope. The primary bowling line is off stump to 4th stump (see Diagram 2), landing in the good length zone 6–8 metres from the batter's crease. The ball should be held with the seam upright and the shiny side on the leg side to encourage outswing.
- Bowler B operates from the opposite end. If bowling inswing, the line shifts to middle-to-off stump, angling into the right-hander's body. This creates a complementary threat: the batter must play at deliveries on both sides of the stumps from alternate ends.
- Every fielder must be alert and on their toes as the bowler enters their delivery stride. Fielders in the slip cordon should adopt a low, balanced stance with hands below waist height.
- After every 2 overs, the captain and wicketkeeper should confer briefly (15 seconds maximum) to assess whether the field needs adjustment based on the batter's scoring patterns.

Phase 3 — Mid-Spell Adjustment (Overs 7–10)
- If no wicket has fallen by over 7, introduce a variation delivery: Bowler A bowls one fuller, swinging delivery (Zone C — full/yorker length) to the right-hander's off stump. This changes the batter's length expectation and can produce a caught-behind or LBW.
- Consider moving Gully to a Leg Slip position if the batter has been repeatedly fending deliveries off the body — this exploits the inswing angle.
- If conditions are not assisting swing, both bowlers should focus on seam movement off the pitch: land the ball on the seam, slightly angled across the right-hander, and allow natural deviation to create edges.
- At the end of over 10, conduct a full field reset. If wickets have fallen, consider bringing a spinner on from one end while retaining one pace bowler to maintain pressure.
Key Coaching Points

Seam Position is Non-Negotiable. Every delivery with the new ball must be bowled with the seam upright. Even a 5-degree tilt reduces movement potential by 40–50%. Spend time in warm-up having bowlers check their grip in front of a coach before the spell begins.
Length Consistency Wins Matches. The good length zone (6–8 metres from the batter's popping crease) is the most difficult length to play — it is neither short enough to pull nor full enough to drive with certainty. Bowlers must resist the temptation to bowl short in search of aggression.
The Slip Cordon Must Communicate. Before each delivery, the first slip should call the field to ensure all three catchers are aware of the bowler's intended line. A missed edge due to a fielder being out of position is a coaching failure, not just a player failure.
Bowl to the Field, Not Around It. If the field is set for outswing (slips and gully in place), the bowler must bowl the outswing line. Bowling down leg when the field is set for off-side catches is a waste of a delivery and creates pressure on the fielding team.
Patience is a Skill. Coaches must reinforce that a maiden over with no wicket is a positive outcome. The new ball plan is a pressure-building exercise — wickets are often the result of accumulated pressure over 4–6 overs, not a single brilliant delivery.
Wicketkeeper as Field General. The keeper sees the ball from the moment it leaves the bowler's hand and is best placed to read swing and seam direction. Empower your keeper to communicate field adjustments to the captain in real time.
Common Mistakes
Bowling Too Short Too Early. Young or inexperienced fast bowlers often try to intimidate batters with short-pitched deliveries in the opening overs. With the new ball, this sacrifices swing and seam movement and allows the batter to play off the back foot with greater confidence. Correct this immediately by placing a cone at the good length landing zone and requiring the bowler to hit it on every delivery during practice.
Neglecting the Shine. The new ball's swing potential depends on maintaining the shine on one side. Fielders must return the ball to the bowler via the keeper — never bouncing it on the pitch or rubbing it on the ground. Establish a strict ball-return protocol from day one.
Slip Fielders Standing Too Deep. A common error is slips standing 5–6 metres behind the stumps, which reduces catching range for low, fast edges. First and second slip should stand no more than 3–4 metres behind the stumps for a fast bowler on a hard pitch. Use a throw-down drill to calibrate correct depth.
Losing the Bowling Plan Under Pressure. When a batter hits a boundary, inexperienced bowlers often abandon their line and length in search of a wicket. Coaches must reinforce the plan verbally between overs: "Stick to off stump, good length — the plan is working."
Ignoring the Left-Handed Batter. If a left-handed batter comes to the crease, the entire field must rotate. Coaches should rehearse this field change in training so it takes no more than 30 seconds to reset. Failure to adjust quickly gifts the batting side easy singles.
Variations and Progressions

Variation 1 — The Left-Arm Over-the-Wicket Angle
If Bowler B is left-arm, the inswing angle to a right-handed batter becomes significantly more acute, angling into the body from wide of the crease. Adjust the field by moving 2nd slip to a leg slip position and bringing mid-wicket in to 15 metres to cut off the flick off the pads. This variation is particularly effective against batters who are strong through the off side.
Variation 2 — The Reverse Swing Phase (Overs 40+ in Tests)
Once the ball is 40+ overs old and one side has been maintained, reverse swing becomes available. Bowler A now holds the ball with the rough side on the leg side and aims for the inswing line (middle stump). The field shifts: remove one slip and bring in a short mid-wicket to account for the inswing trajectory. This variation requires bowlers to have been briefed on ball maintenance throughout the innings.
Progression — Pressure Scenario Drill
For advanced squads, run a live pressure scenario: set the full new-ball field, place two batters at the crease, and challenge the bowling attack to take 2 wickets within 10 overs while conceding fewer than 40 runs. Score the drill and debrief using video replay. This replicates match conditions and builds decision-making under pressure.
Age Adaptations

| Age Group | Key Modifications |
|---|---|
| Under 12 | Use a softer incrediball or Kookaburra Tuf-Pitch ball. Reduce the slip cordon to 1 slip only. Focus solely on good length and off stump line — do not introduce swing concepts yet. Field in a ring of 6 with 2 deep fielders. |
| Under 14 | Introduce the 2-slip field and the concept of outswing vs. seam-up. Begin discussing bowling to a plan. Use cones to mark the good length zone on the pitch during practice. |
| Under 16 | Full 3-slip field. Introduce the inswing/outswing contrast between the two bowlers. Begin video analysis of bowling lines using a phone camera behind the stumps. |
| Open / Senior | Full plan as described above, including reverse swing phase and left-arm variation. Add pre-match batter analysis (video scouting) to inform specific field adjustments for individual batters. |
Final Coaching Thought: The new ball is a privilege, not a right. Every player on the field must understand their role in this plan — from the slip fielder who dives full-length to their right, to the mid-off who backs up every throw with precision. When 11 players execute a coordinated new-ball plan, the result is not just wickets — it is a fielding performance that demoralises the opposition and energises your own team.