Mastering the Powerplay: Attacking Field Setting Play
Learn how to deploy an aggressive Powerplay field setting to maximise early wickets while controlling the run rate in the crucial first 6 overs.

Equipment Needed
1. Overview
The Powerplay in limited-overs cricket (T20 and ODI) represents the most critical phase of the innings. With fielding restrictions in place — typically allowing a maximum of two fielders outside the 30-yard circle during the first six overs — the batting side is highly incentivised to attack and clear the infield.
This set play focuses on an Attacking Powerplay Field Setting, designed to counter aggressive batting by creating pressure, inducing false shots, and securing early wickets. By strategically positioning fielders inside the circle and matching them with specific bowling lines, coaches can teach their teams to turn the Powerplay from a defensive nightmare into an attacking opportunity.
2. Setup

Equipment Needed: Standard cricket balls (new balls preferred for realistic swing), stumps, markers or cones to delineate the 30-yard circle if not clearly marked, and full protective gear for the batsman and wicket-keeper.
Pitch and Field Setup: A standard 22-yard cricket pitch located centrally within an oval ground. Clearly mark the 30-yard fielding restriction circle using cones if the permanent line is faded. The full oval ground should measure approximately 65 metres from the centre to the boundary.
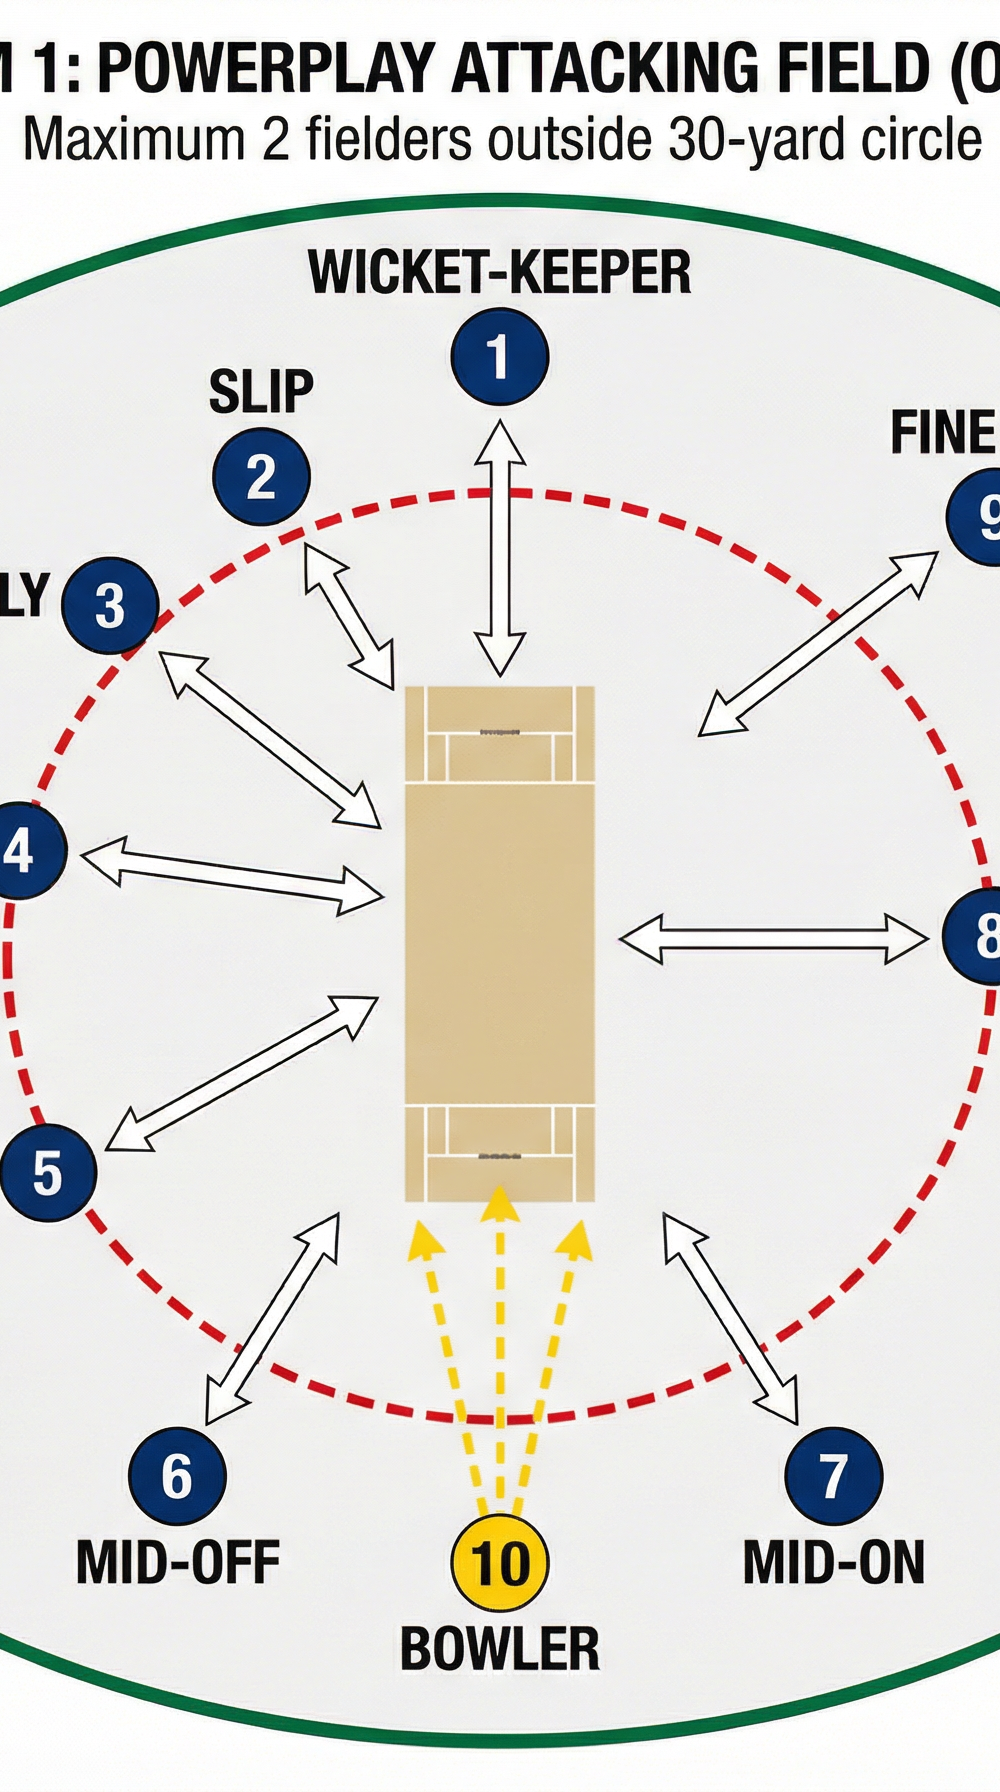
Player Positions: 11 players are required. The captain or coach will direct the field placement based on the diagrams provided below.
| # | Position | Zone | Role |
|---|---|---|---|
| 1 | Wicket-Keeper | Behind stumps | Stumpings, leg-side catches |
| 2 | First Slip | 2m off-side of keeper | Edge catches |
| 3 | Gully | 45° off-side, 15m from bat | Cut/thick edge |
| 4 | Point | 30-yard circle, 90° off-side | Cut shot coverage |
| 5 | Cover | Inside 30-yard circle, 60° off-side | Drive interception |
| 6 | Mid-off | 20m from bowler's end, off-side | Straight drive |
| 7 | Mid-on | 20m from bowler's end, on-side | On-drive |
| 8 | Square Leg | 30-yard circle, 90° on-side | Pull/sweep |
| 9 | Fine Leg | Near boundary, 150° on-side | Top-edge, boundary saver |
| 10 | Bowler | Bowling crease | Primary attacking weapon |
3. Step-by-Step Instructions
Implementing this field setting requires clear communication and precise execution from the bowler and the captain. Follow these steps to set up the play.
Step 1: Establish the Core Attacking Ring
Begin by setting the essential close-catching and inner-ring positions. Place the Wicket-Keeper (1) at a standard depth for fast bowlers or up to the stumps for medium-pace bowlers. Position a First Slip (2) to capitalise on the new ball's movement, approximately 2 metres to the off-side of the keeper. Add a Gully (3) at 45 degrees from the bat, 15 metres out, to cover the aggressive square cut or thick outside edge.
Step 2: Secure the Off-Side Boundary Savers
Position Point (4) and Cover (5) firmly on or just inside the edge of the 30-yard circle. These players must be agile, as their primary role is to cut off forceful drives and square cuts that aim to pierce the infield. Mid-off (6) should be positioned straighter, approximately 20 metres from the bowler's end stumps on the off-side, ready to intercept straight drives.

Step 3: Organise the On-Side Containment
On the leg side, position Mid-on (7) straighter, mirroring Mid-off, approximately 20 metres from the bowler's end stumps. Place Square Leg (8) on the 30-yard circle to guard against the pull or sweep shot.
Step 4: Deploy the Boundary Riders
With only two fielders permitted outside the 30-yard circle, strategic placement is vital. For this attacking setup, position Fine Leg (9) on the boundary to protect against wayward leg-side deliveries or top-edged pulls. The second boundary rider — typically deployed at Third Man or Deep Square Leg depending on the bowler's pace and line — provides crucial insurance against the thick outside edge or the ramp shot.
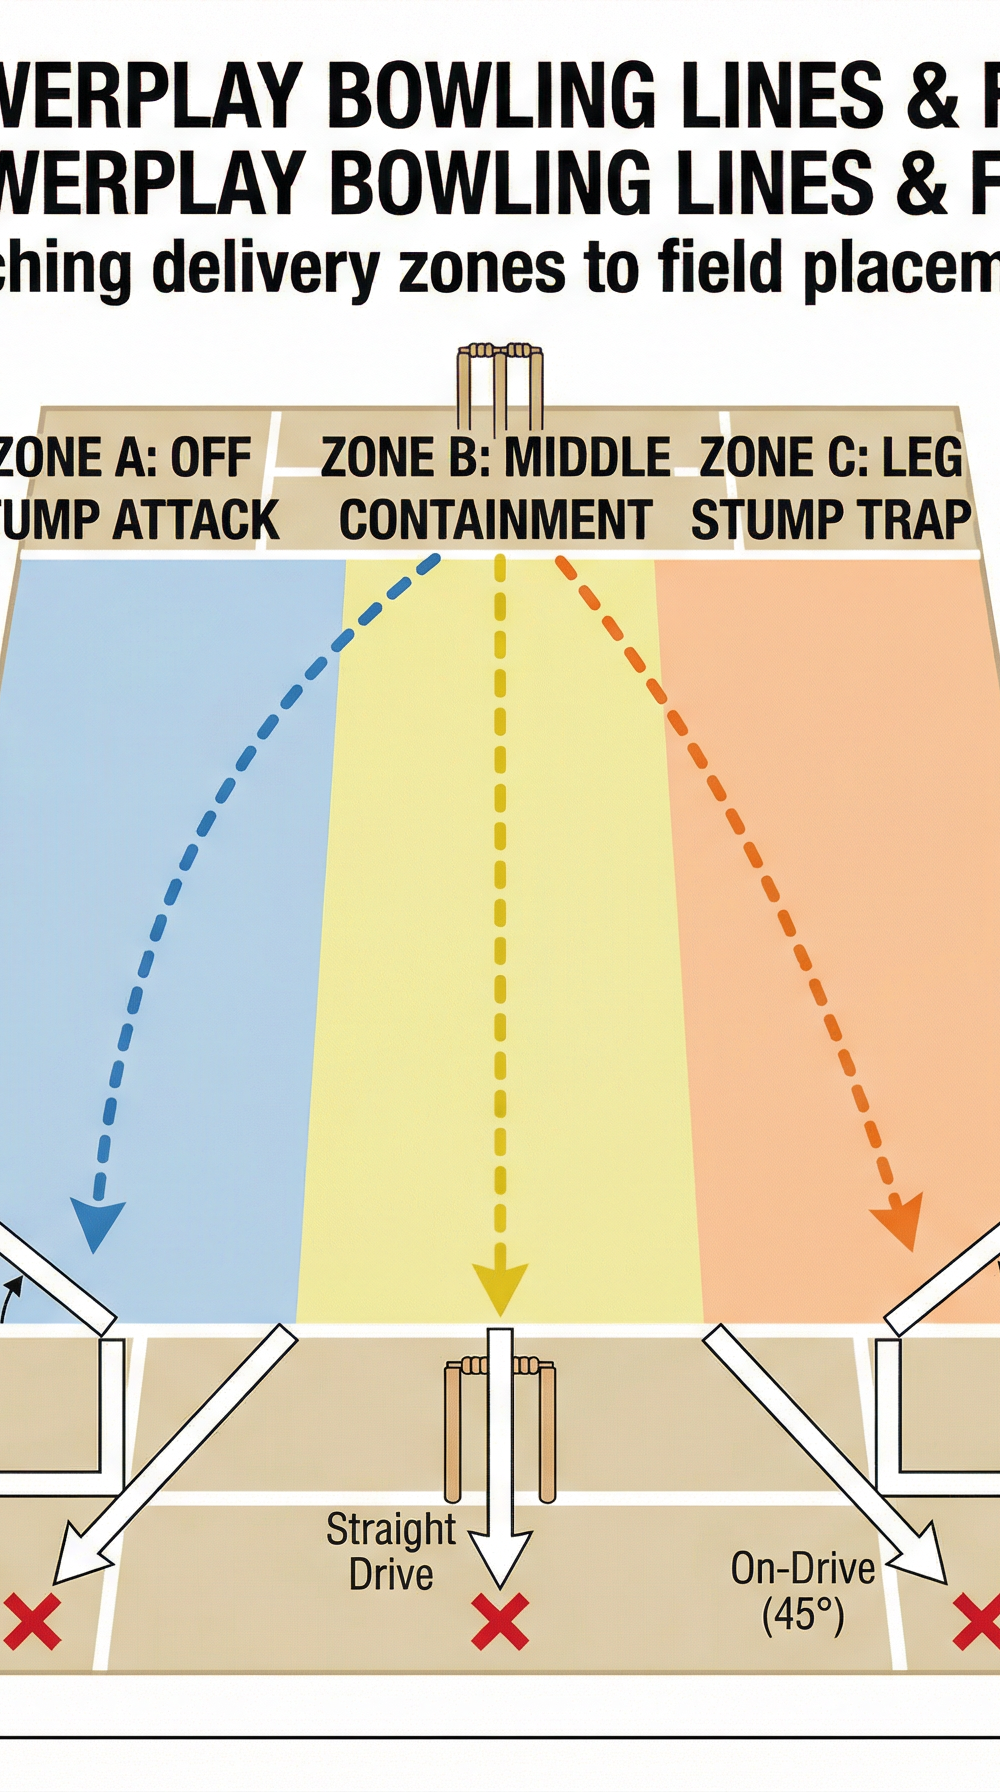
Step 5: Execute the Corresponding Bowling Plan
The field setting is only as effective as the bowling execution. The bowler (10) must bowl to the field. For this setup, the primary target is Zone A — a consistent line on or just outside the off-stump, inviting the drive while bringing the slip and gully into play. Bowling full and straight maximises the chance of lbw or bowled dismissals, while a fractionally short ball should be directed at the body to generate the pull or top-edge.

Step 6: Adjust for the Left-Handed Batsman
When the batting hand changes, the field must rotate swiftly. The captain must ensure that the slip cordon and point/cover fielders transition seamlessly to the new off-side, while the leg-side fielders adjust accordingly. Pre-plan this rotation before the innings so every fielder knows their mirrored position without hesitation.

4. Key Coaching Points
To maximise the effectiveness of this set play, emphasise the following points with your players.
Bowler Discipline is Non-Negotiable. The bowler must consistently hit the top of off-stump or just outside. Bowling wide or too straight completely negates the off-side heavy field and releases all pressure. Reinforce this by using a target zone marked with cones during net practice.
Ring Fielder Anticipation. Fielders at Point, Cover, and Square Leg must be on their toes, walking in as the bowler delivers. They must anticipate the ball's direction based on the batsman's trigger movement rather than simply reacting to the shot.
Slip Cordon Focus. The Slip and Gully fielders must maintain intense concentration for every delivery. In the Powerplay, edges fly quickly; low stances, soft hands, and eyes level with the ball are essential for securing these vital catches.
Captain's Proactivity. The captain must be willing to make subtle adjustments — moving Cover a few metres wider or bringing Point in closer — based on the batsman's specific strengths or weaknesses, without abandoning the core attacking philosophy.
Swift Transitions. When the strike rotates between a right-handed and left-handed batsman, the field must adjust immediately and without confusion. Slow transitions waste time, disrupt the bowler's rhythm, and can result in penalty runs.
5. Common Mistakes

Watch for these frequent errors when implementing this field setting.
Bowling onto the Pads. If the bowler strays onto the batsman's pads with an off-side heavy field, it results in easy boundaries through the sparsely populated leg side. Correct this immediately by reinforcing the target zone during the over break.
Static Infielders. Fielders standing flat-footed on the 30-yard circle allow the batsman to easily pierce the gaps or steal quick singles. Insist on a dynamic, walking-in approach for every delivery.
Deep Slip Positions. Positioning the slip cordon too deep causes edges to fall short of the fielders. The depth must be carefully calibrated to the bowler's pace and the pitch's bounce — faster bowlers require deeper slips, while medium-pacers should have their cordon closer.
Ignoring the Match Situation. Stubbornly maintaining an attacking field when a specific batsman is aggressively dominating the bowling is a common captaincy error. Coaches must teach captains to read the game and know when to transition to a containment strategy, even during the Powerplay.
6. Variations & Progressions

Adapt the set play to challenge your players or suit different match scenarios.
Progression 1 — The Squeeze: Move the Cover and Point fielders five yards closer to the bat to actively cut off the single, forcing the batsman to play high-risk aerial shots to clear the infield. This is most effective against a batsman who is looking to rotate strike rather than hit boundaries.
Progression 2 — The Double Slip: For genuine fast bowlers or on green, seaming pitches, remove the boundary rider at Fine Leg, bring them inside the circle at Short Fine Leg, and add a Second Slip to maximise catching opportunities. This is a high-risk, high-reward setup that requires exceptional bowling accuracy.
Variation 1 — The Leg-Side Trap: If the batsman is exceptionally strong through the off-side, shift the focus entirely. Move the Cover fielder to Mid-Wicket, push Square Leg back to the boundary, and instruct the bowler to bowl a strict middle-and-leg stump line (Zone C). This creates a packed on-side field that dares the batsman to hit against the spin of the field.
7. Age Adaptations

Modify the implementation of this set play based on the age and skill level of your team.
Under 10s / Under 12s: Focus primarily on the four basic positions — Mid-off, Mid-on, Cover, and Square Leg — and introduce the concept of the 30-yard circle as a visual boundary. Simplify the bowling plan to simply hitting the stumps consistently. Avoid using slip and gully at this stage, as the catching demands are too advanced.
Under 14s / Under 16s: Introduce the slip and gully positions and begin explaining the relationship between the bowler's line and the field placement. Practice the swift rotation required when the batting hand changes, using walk-through drills before live practice.
Open / Senior: Execute the full tactical plan, including the subtle variations and progressions. Demand high intensity from the inner ring, precise execution from the bowlers, and sharp decision-making from the captain. Introduce video analysis of the field settings to reinforce learning between sessions.