Powerplay Field Setting: Maximising Wicket-Taking Opportunities in Overs 1–6
Master the art of Powerplay field placement — learn how to position your nine fielders, switch between seam and spin configurations, and apply zone-based pressure to take wickets and restrict runs in the first six overs.

Equipment Needed
Overview
The Powerplay is the most tactically consequential phase of any limited-overs cricket match. In T20 and One-Day International (ODI) formats, the fielding side is restricted to a maximum of two fielders outside the 30-yard (27.4 m) inner circle during overs 1–6, which fundamentally shapes how a captain and coach must think about field placement. Used correctly, the Powerplay is not merely a defensive concession to the batting side — it is a prime wicket-taking window. With the ball at its freshest, seam movement and swing are at their peak, and a well-drilled field can funnel the batsman into precisely the dismissal your bowler is hunting.
This resource gives you, the coach, a complete blueprint for setting and communicating Powerplay fields. It covers the standard attacking template, the key adjustments for seam versus spin bowling, and the zone-based pressure map your players need to understand to execute the plan under match pressure.
When to use this set play: Deploy this structured Powerplay field setting in any T20 or 50-over match from the very first ball. It is equally applicable in training simulations, match-scenario net sessions, and fielding drills.
Setup

Equipment Required
- Full-size oval cricket ground (minimum 55 m boundary on all sides; standard oval approximately 130–150 m in diameter)
- 22-yard (20.1 m) pitch with clearly marked batting, bowling, and popping creases
- Two sets of stumps and bails
- Cones or marker discs to mark the 30-yard inner circle (place 8–10 cones at equal intervals)
- Coloured training bibs to differentiate fielding groups during drills
- Coaching whiteboard or printed field-setting cards for pre-session briefing
- At least one ball per bowler in the rotation (ideally a new Dukes, Kookaburra, or SG ball)
Player Positions — Standard Powerplay Template
The table below defines the nine fielding positions used in the standard Powerplay attacking field. Positions 1–7 are inside or on the edge of the 30-yard circle; positions 8 and 9 are the two permitted boundary fielders.
| # | Position | Side | Distance from Pitch Centre | Role |
|---|---|---|---|---|
| 1 | Wicket-Keeper (WK) | Off/On | 1–2 m behind stumps | Takes edges, stumpings, directs field |
| 2 | First Slip | Off | 3–5 m behind WK | Catches outside edges off seam/swing |
| 3 | Point | Off | 15–18 m from pitch, square | Cuts off square drives, run-outs |
| 4 | Cover | Off | 18–22 m, forward of square | Covers off-side drives |
| 5 | Mid-Off | Off | 18–22 m, straight | Straight drives, bowler's end backing up |
| 6 | Mid-On | Leg | 18–22 m, straight | On-drives, backing up non-striker end |
| 7 | Square Leg | Leg | 15–18 m, square | Pulls, sweeps, leg-side deflections |
| 8 | Fine Leg | Leg | On or near boundary | Protects fine leg boundary |
| 9 | Third Man | Off | On or near boundary | Protects third man boundary |

Diagram 1: Standard Powerplay field setting for overs 1–6. Note the two boundary fielders (Fine Leg and Third Man) and the attacking cordon of Slip, Point, and Cover on the off-side.
Step-by-Step Instructions

Step 1 — Pre-Match Briefing (10 minutes before warm-up)
Gather your fielding group and use the printed field-setting card or whiteboard to walk through the Powerplay plan. Identify your two opening bowlers, confirm which end each will bowl from, and assign each fielder their starting position. Emphasise the two non-negotiable rules: (a) no more than two fielders outside the 30-yard circle, and (b) every fielder inside the circle must be on the circle or inside it — not drifting beyond it.
Step 2 — Cone the 30-Yard Circle Before Play
Arrive early and place 8–10 orange cones at equal intervals around the 30-yard inner circle. This gives your fielders a physical reference point during warm-up and the opening overs. Remove cones before the match begins but ensure players have mentally locked in the boundary of the circle.
Step 3 — Set the Seam Bowling Field (Overs 1–2)
For your first-change seam bowler, set the field as follows. Position the Wicket-Keeper standing back (approximately 18–22 m behind the stumps for pace above 120 km/h). Place First Slip 3–4 m to the keeper's right. Position Gully (if used instead of Point) at a 45-degree angle, 12–15 m from the bat. Cover and Mid-Off sit inside the circle on the off-side; Mid-On and Square Leg sit inside the circle on the leg-side. Fine Leg and Third Man guard the two boundary positions. Communicate to your bowler: target off-stump or just outside, full length, looking for the edge into the slip cordon.
Step 4 — Adjust for the Spin Option (Overs 3–6 if applicable)
If you introduce a spinner during the Powerplay, make the following adjustments immediately. Bring the Wicket-Keeper up to the stumps (standing up). Remove First Slip and replace with Silly Mid-On (approximately 4–5 m from the bat on the on-side) to create catching pressure. Move Short Extra Cover (approximately 6–8 m from the bat on the off-side) into a catching position. Shift Long-On to the boundary as your second permitted boundary fielder. This field creates a ring of close catchers while the spinner targets the rough outside off-stump.
Step 5 — Communicate Field Changes Between Overs
Use the 90-second over break to walk onto the field and physically point each fielder to their new position. Do not shout from the boundary — walk to the edge of the 30-yard circle and signal clearly. Designate your captain as the on-field communicator during play; they should echo your instructions from the coaching box.
Step 6 — Monitor the Scoring Zone Map
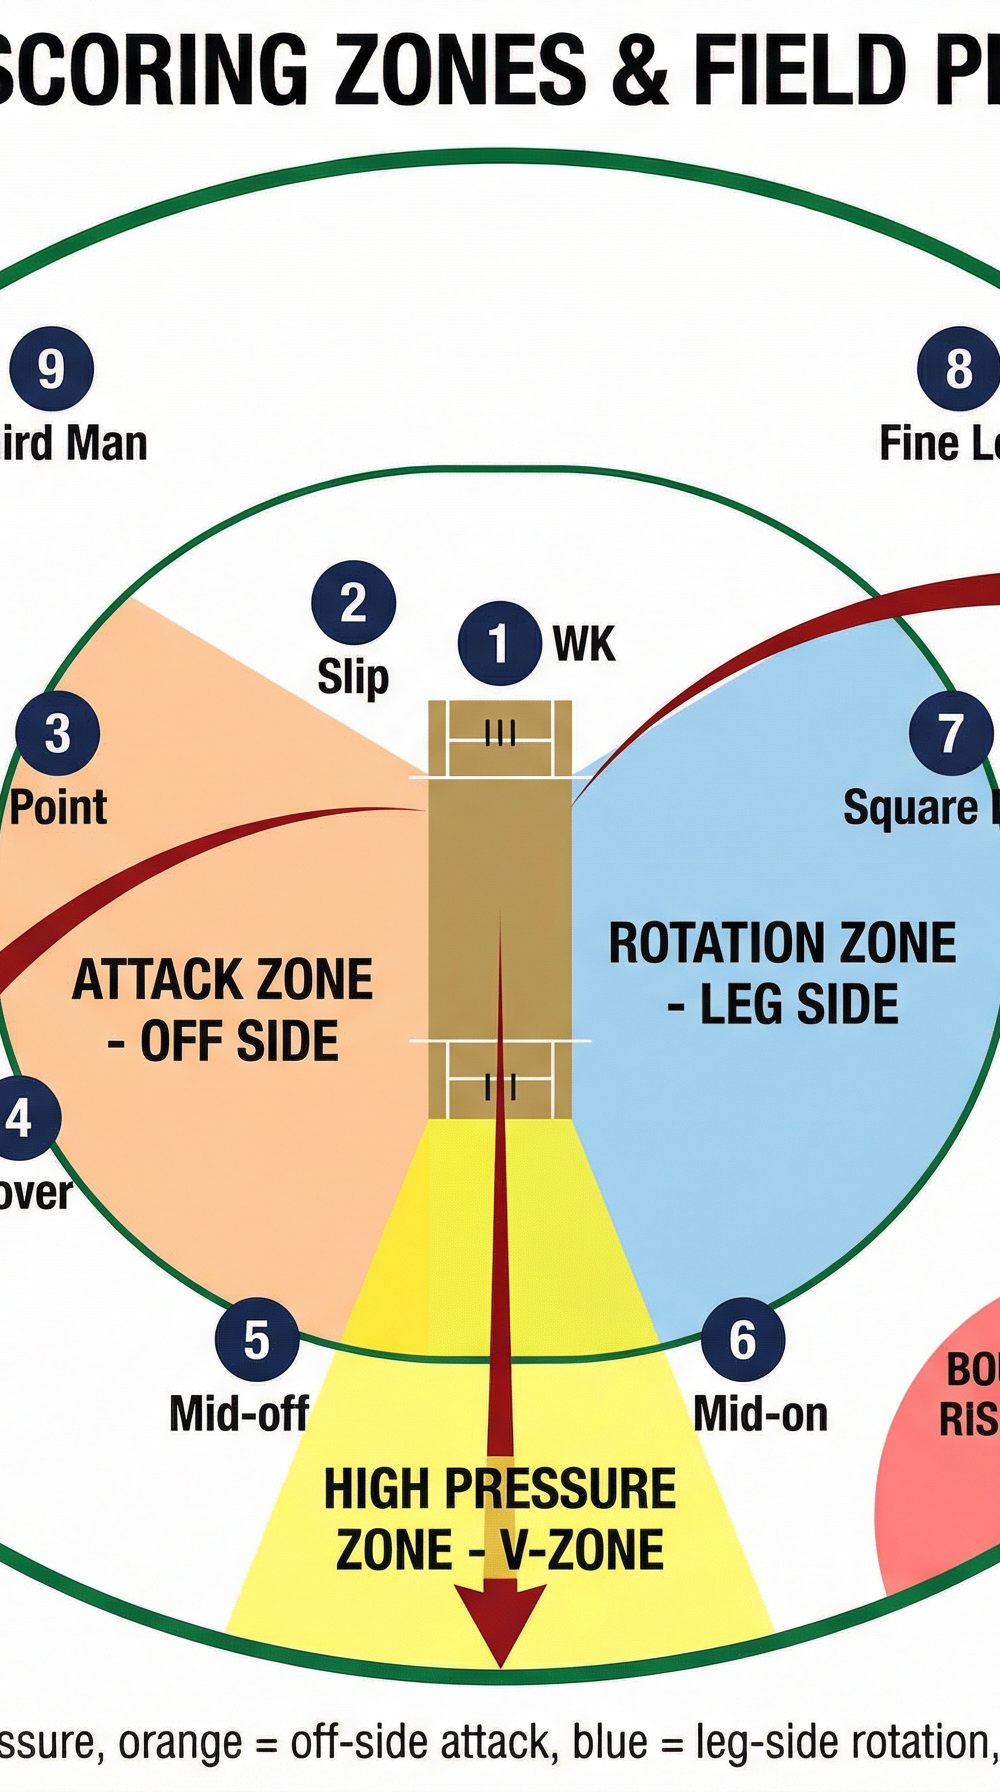
During the Powerplay, track where the batting side is scoring. Use the three-zone framework: the V-Zone (straight, between mid-off and mid-on), the Off-Side Attack Zone (cover to point), and the Leg-Side Rotation Zone (square leg to mid-wicket). If the batsman is consistently scoring through the V-Zone, push Mid-Off and Mid-On back to the inner circle edge. If they are cutting through Point, bring Point in tighter to cut off the single and force the aerial shot.

Diagram 3: Powerplay Scoring Zones and Field Pressure Map. Use this framework to read where the batsman is scoring and adjust your field in real time.
Step 7 — Review at the End of the Powerplay
At the drinks break or end of over 6, review your Powerplay data: runs conceded, wickets taken, and which scoring zones were exploited. Adjust your middle-overs field accordingly. Brief your captain on the plan for overs 7–15 based on what the Powerplay revealed about the batsman's preferred scoring areas.
Seam vs. Spin Field Adjustments

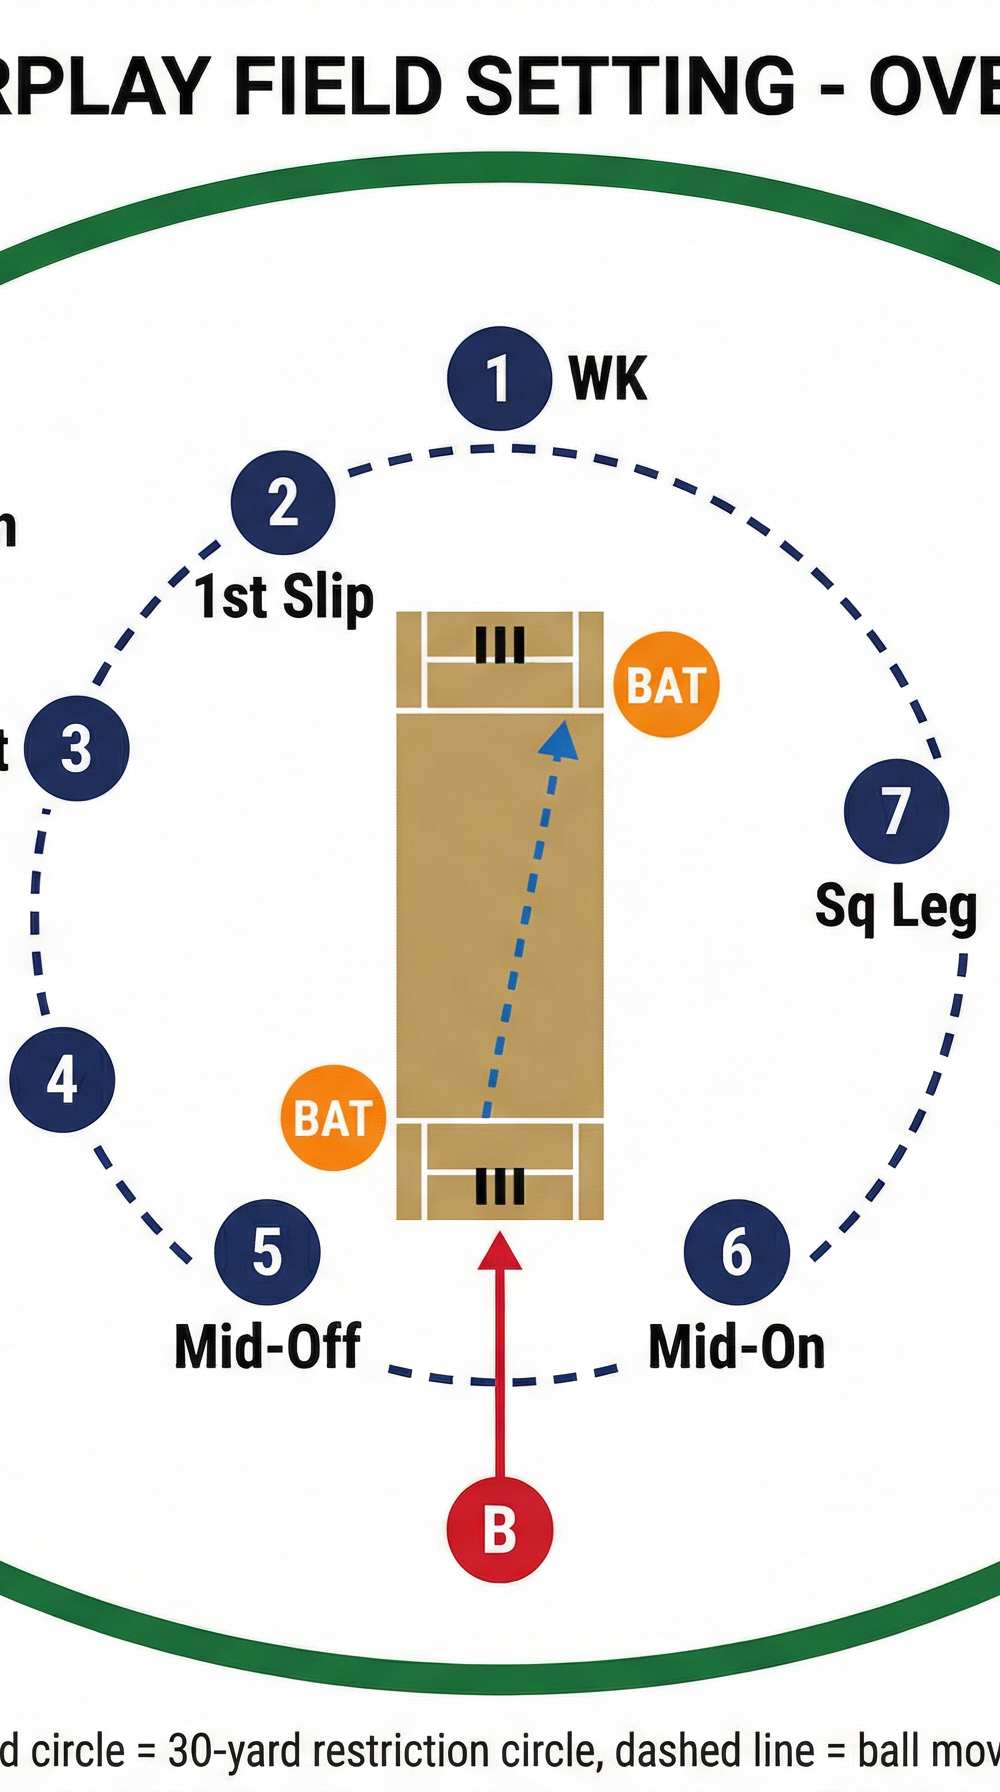
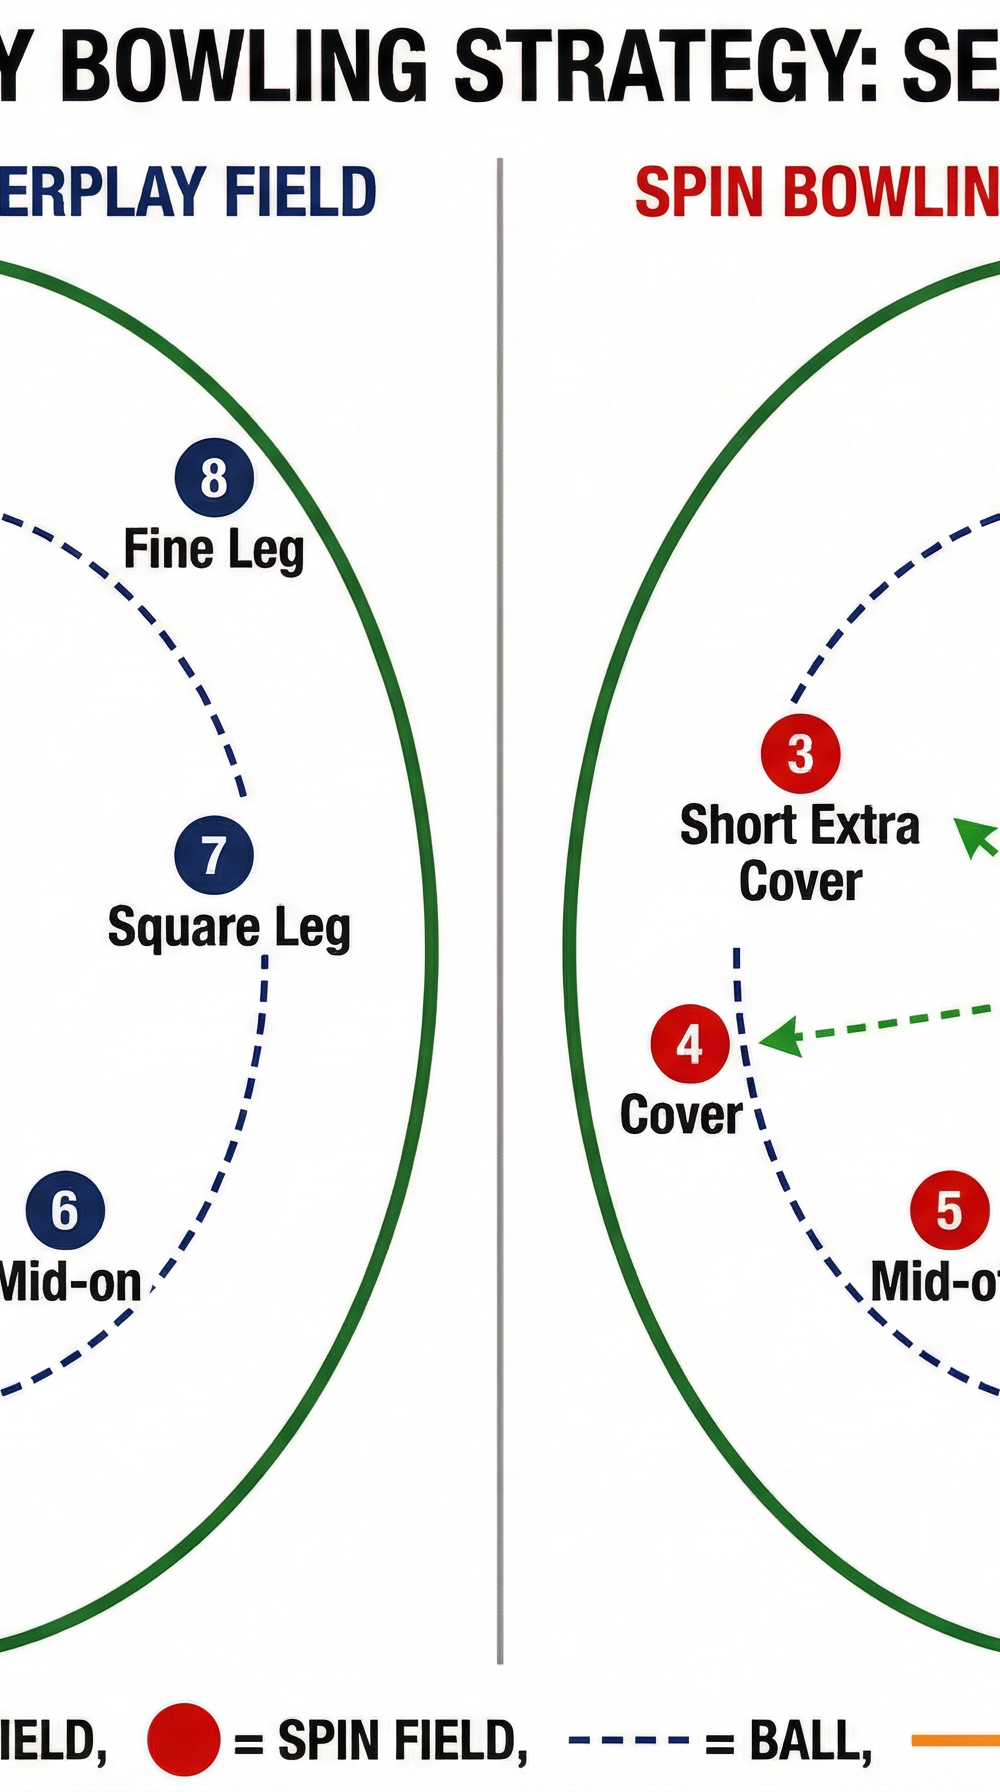
Diagram 2: Side-by-side comparison of the Seam Bowling Powerplay Field (left) and the Spin Bowling Powerplay Field (right). Note the key differences in the slip cordon, close catching positions, and boundary fielder placements.
The most common coaching error in the Powerplay is failing to adjust the field when switching from seam to spin. The table below summarises the critical differences your players must execute within the 90-second over change.
| Position | Seam Field | Spin Field | Reason for Change |
|---|---|---|---|
| Wicket-Keeper | Standing back (18–22 m) | Standing up to stumps | Stumping opportunity; pressure on batsman's feet |
| First Slip | Active position, 3–5 m from WK | Removed | Edges less likely to carry to slip off spin |
| Gully | Optional (replaces Point) | Removed | |
| Silly Mid-On | Not used | 4–5 m from bat | Close catching on the on-side |
| Short Extra Cover | Not used | 6–8 m from bat | Close catching on the off-side |
| Long-On | Not used | On boundary | Second permitted boundary fielder |
| Fine Leg | On boundary | Removed or brought in | Boundary risk lower for spin |
Key Coaching Points
1. The 30-Yard Circle Is a Hard Line — Enforce It Relentlessly.
Fielders have a natural tendency to drift beyond the inner circle during long spells. A fielder even 1–2 metres outside the circle in an illegal position can result in a no-ball penalty. During training, use the cone markers and call out any fielder who drifts. Make it a non-negotiable discipline.
2. The Wicket-Keeper Sets the Tone for the Entire Field.
Your keeper is the only player who can see the entire field at once. Train them to actively communicate with fielders — calling names, pointing to gaps, and confirming positions before each delivery. A vocal, alert keeper reduces field errors by at least 30% in practice observations.
3. Bowl to Your Field — Not Around It.
The most effective Powerplay bowling plans are built backwards from the field. If you have a slip in, your bowler must bowl a length that creates an edge — not a full toss or a short ball that the batsman can pull over square leg. Reinforce this in every net session: the field tells you where to bowl.
4. Pressure the V-Zone with Mid-Off and Mid-On Placement.
The straight V-Zone (between mid-off and mid-on) is the highest-value scoring area in the Powerplay because it is the most direct route to the boundary. Position Mid-Off and Mid-On at 20–22 m, angled slightly to close the straight gap. This forces the batsman to either hit over the top (high risk) or find the wider boundaries.
5. Fine Leg and Third Man Are Defensive Anchors — Use Them Wisely.
These are your two permitted boundary fielders. Position Fine Leg at 45 degrees behind square on the leg-side and Third Man at 45 degrees behind square on the off-side. Both should be positioned to cut off the glance and the thick outside edge respectively. Do not move them square — they lose their boundary-protection value.
6. Communicate Field Changes Before the Bowler Reaches Their Mark.
All field adjustments must be completed before the bowler begins their run-up. Establish a team rule: the captain signals the new field as soon as the previous ball is dead. Fielders move immediately. By the time the bowler turns at their mark, every player must be in position.
Common Mistakes

Mistake 1 — Too Many Fielders on the Off-Side.
Coaches often stack the off-side with Point, Cover, Extra Cover, and Mid-Off, leaving the leg-side exposed. Modern batsmen are adept at flicking and glancing through the leg-side for easy singles. Balance your field: a minimum of three fielders on the leg-side (Square Leg, Mid-On, and one of Fine Leg or Short Fine Leg) is essential.
Mistake 2 — Keeping the Same Field for Both Seam and Spin.
Failing to adjust when introducing a spinner is one of the most common Powerplay errors at junior and club level. The slip cordon that works for a 130 km/h seam bowler is largely redundant for a 75 km/h off-spinner. Make the switch to close catchers (Silly Mid-On, Short Extra Cover) and bring the keeper up immediately.
Mistake 3 — Fielders Standing Too Deep Inside the Circle.
Fielders positioned at 25–28 m inside the 30-yard circle give the batsman easy singles. In the Powerplay, your infield must be aggressive — Point at 15 m, Cover at 18 m, Square Leg at 15 m. This cuts off the single and forces the batsman to hit over the top, increasing the chance of a caught-and-bowled or a top-edge.
Mistake 4 — Not Reviewing the Powerplay Data.
Many coaches move straight from the Powerplay into the middle overs without analysing what happened. Take 90 seconds at the end of over 6 to note: which zones were scored in, which bowler was most economical, and which fielder was beaten. This data directly informs your middle-overs strategy.
Mistake 5 — Ignoring the Batsman's Handedness.
The standard Powerplay field is designed for a right-handed batsman. When a left-hander comes in, the entire field must mirror — Slip moves to the other side of the keeper, Fine Leg and Third Man swap, and the off-side/leg-side orientation reverses. Drill this mirror-field adjustment in training until it becomes automatic.
Variations & Progressions
Variation 1 — The Aggressive 5-Up Field (High-Risk, High-Reward)
For a bowler who generates significant movement (swing or seam), consider placing five fielders in catching positions: WK, First Slip, Second Slip, Gully, and Silly Mid-On. This leaves only one boundary fielder (Fine Leg) and removes Third Man entirely. Use this field for a maximum of 2–3 overs when conditions strongly favour the bowler (overcast skies, green pitch). The risk is conceding boundaries through the vacant third-man region, so the bowler must be disciplined to bowl full and on off-stump.
Variation 2 — The Defensive Powerplay Field (Protect a Small Total)
If you are defending a low total (under 120 in T20), you may choose to use both boundary fielders on the same side — for example, Fine Leg and Deep Square Leg — to protect the leg-side boundary against a batsman who favours the pull and sweep. This sacrifices the third-man position but plugs the most exploited boundary. Compensate by bowling tighter lines outside off-stump to reduce the frequency of leg-side shots.
Progression — Powerplay Simulation Drill (Match Intensity)
Set up a full match simulation: batting pair versus bowling group, 6-over Powerplay only. The fielding team must execute the correct field for each bowler (seam or spin) without coach prompting. Score runs and wickets as normal. After 6 overs, the coach reviews the field-setting decisions, identifies any illegal positions, and scores the fielding team on: (a) correct field for each delivery, (b) communication speed between overs, and (c) response to scoring zone data. Rotate batting and fielding groups. This drill builds match-ready decision-making under pressure.
Age Adaptations

Under 10 & Under 12 — Simplified 7-Player Field
For younger players on a modified pitch (14–16 yards) and smaller oval (40 m boundary), reduce the fielding group to 7 and use only the core positions: WK, Point, Cover, Mid-Off, Mid-On, Square Leg, and Fine Leg. Remove the slip cordon entirely — edges at this age rarely carry. Focus the coaching conversation on which side of the pitch to stand on (off-side vs. leg-side) rather than precise distances. Use coloured cones to mark each fielder's starting spot.
Under 14 & Under 16 — Introduce the 30-Yard Circle Concept
At this age group, players are ready to understand the fielding restriction rule. Introduce the 30-yard circle using cones and run the Powerplay simulation drill at reduced intensity. Begin teaching the seam vs. spin field adjustment, focusing first on the keeper's position (back vs. up to the stumps) as the primary indicator of which field to set. Introduce the scoring zone map as a post-session review tool rather than a live in-game tool.
Open/Senior — Full Tactical Implementation
Senior players should be able to execute all elements of this resource independently. The coach's role shifts from instruction to observation and refinement. Use video analysis of the Powerplay simulation drill to review field positions, communication timing, and zone coverage. Introduce opposition-specific field plans based on batsman tendency data (scoring wagon wheels, shot selection under pressure).