Running Between the Wickets: Communication, Calling & Conversion Drill
A progressive, game-realistic drill that sharpens batters' calling protocols, turning technique, and running judgement to eliminate preventable run-outs and maximise scoring opportunities.

Equipment Needed
Overview
Running between the wickets is one of the most undercoached and most costly skills in cricket at every level. A single miscommunication or a lazy turn at the crease can end an innings, swing momentum, and cost a team the match. This drill is designed to give coaches a structured, repeatable framework for teaching the full running-between-the-wickets skillset — from the initial call, through the sprint, to the grounded turn and the decision to run again.
Use this drill in the warm-up phase of a batting session (10–15 minutes), as a standalone fitness-with-purpose block, or as a pre-match activation exercise. It works equally well in a full net environment or on an open oval with a marked 22-yard pitch.
What this drill achieves:
- Instils a consistent three-call system ("Yes", "No", "Wait") under pressure
- Develops explosive acceleration from the crease and a low, grounded turning technique
- Builds the habit of bat-grounding and shoulder-checking before committing to a second run
- Improves communication and trust between batting partners
- Conditions batters to assess fielder position, ball trajectory, and distance in real time
Setup

Equipment Required
| Item | Quantity | Notes |
|---|---|---|
| Cricket stumps (or cone substitutes) | 2 sets | Set 22 yards apart |
| Batting crease markers (tape or cones) | 4 | Mark both batting and popping creases |
| Cricket bat | 1–2 | One per active batter |
| Tennis balls or incrediball | 6–8 | Safer for high-repetition drills |
| Cones (coloured) | 6 | Mark fielder zones and turning channels |
| Stopwatch | 1 | Coach times run completions |
| Whiteboard or cone labels | Optional | Display call cues for younger groups |
Field & Pitch Setup
Set up a standard 22-yard pitch on the oval or in the nets. Place stumps (or tall cones) at each end with a clearly marked popping crease 4 feet in front of each set of stumps. Use coloured cones to mark three fielder zones on the off side and leg side:
- Zone A — Straight (mid-on / mid-off region, 10–20 metres from the pitch)
- Zone B — Square (cover / mid-wicket region, 20–35 metres from the pitch)
- Zone C — Deep (long-on / long-off region, beyond 35 metres)
Place a coach or feeder at one end with a supply of balls. Position one fielder in Zone A to start. Additional fielders rotate in as the drill progresses.
Player Positions
- B1 (Striker): Takes guard at the striker's end (bottom of diagram). Holds bat in dominant hand, ready to play a shot.
- B2 (Non-Striker): Stands at the non-striker's end, bat grounded behind the popping crease, ready to back up 2–3 metres as the ball is bowled/fed.
- F1 (Fielder / Mid-On): Positioned in Zone A, leg side. Responsible for fielding and returning to the stumps.
- F2 (Fielder / Mid-Off): Positioned in Zone A, off side. Rotates with F1 on alternate repetitions.
- Coach / Feeder: Stands at the bowling crease end, feeds balls underarm or via a throw to simulate realistic ball placement.

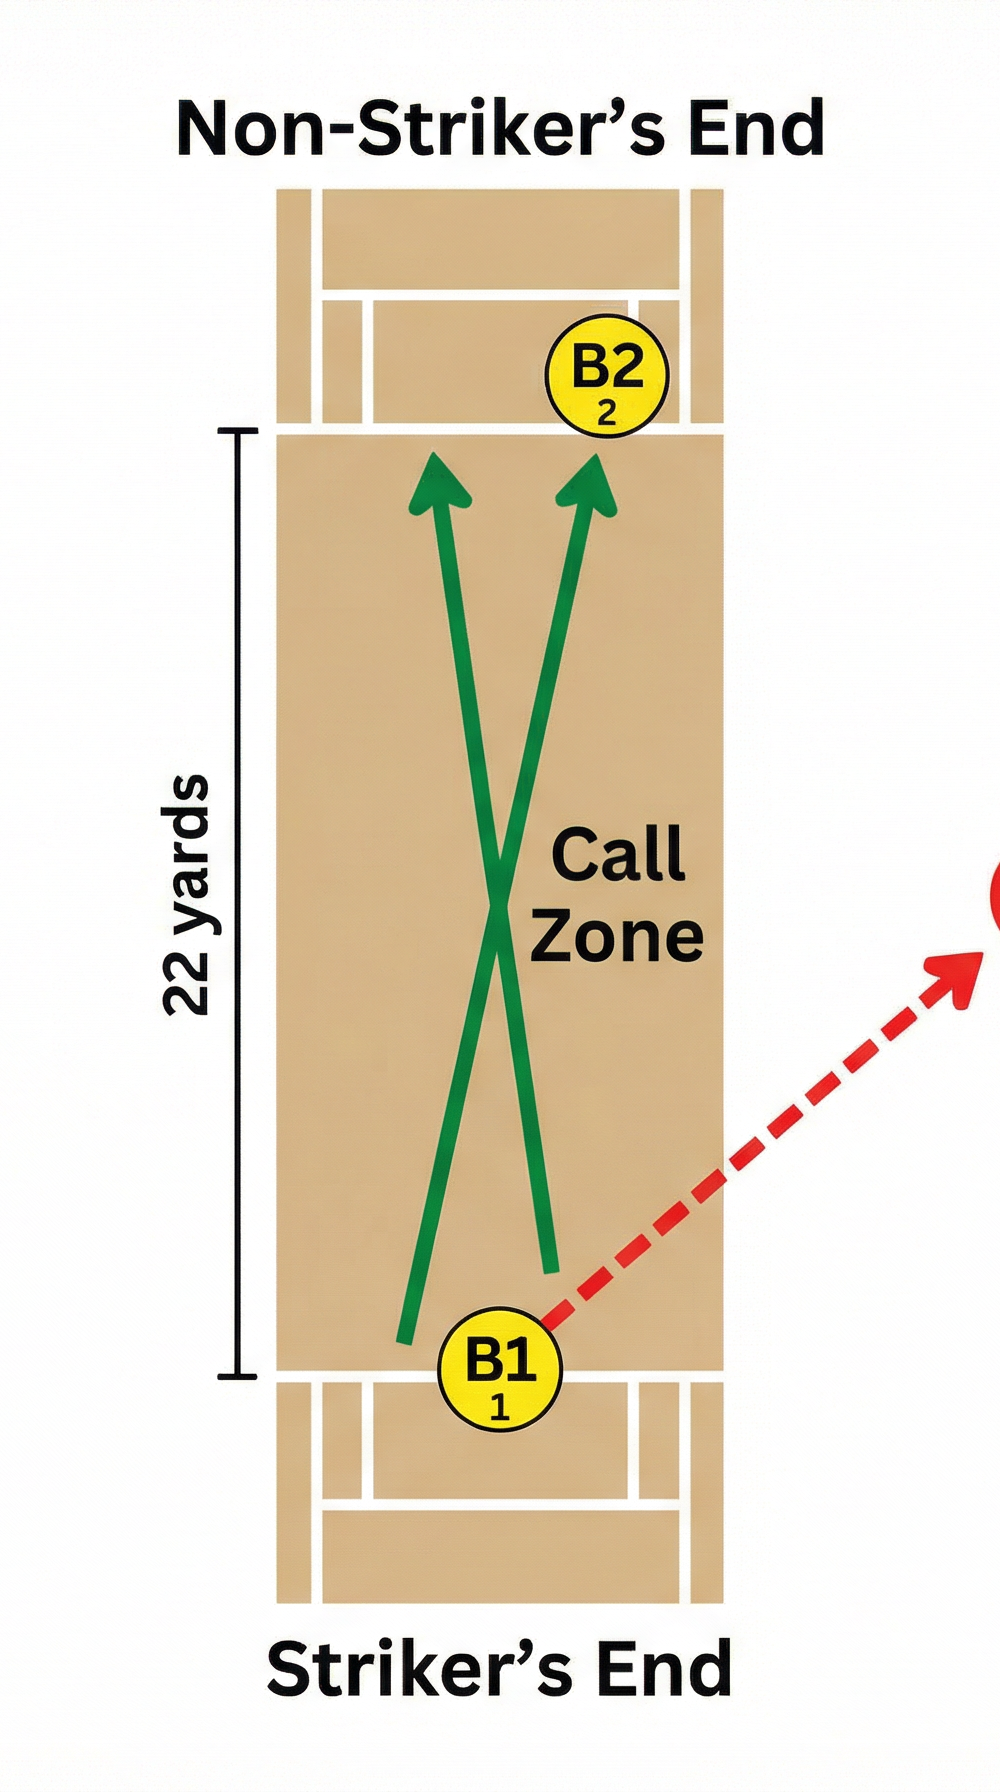
Diagram 1: Basic single-run setup. B1 (striker) plays the ball toward fielder F (mid-on). Solid green arrows show both batsmen completing a single. Dashed red arrow shows the ball's path to the fielder. The "Call Zone" at mid-pitch is where B1 must make the decisive call.
Step-by-Step Instructions

Phase 1 — The Basic Single (Repetitions 1–10)
- B2 backs up. As the coach prepares to feed, B2 advances 2–3 metres down the pitch, keeping the bat grounded behind the crease until the ball is released. This head-start is legal and critical.
- Coach feeds the ball to a specific zone (call out "Zone A leg side" before feeding so batters can anticipate).
- B1 plays the shot — a defensive push or a soft clip — directing the ball into the designated zone.
- B1 makes the primary call immediately after contact. For balls hit in front of the wicket (mid-on/mid-off region), B1 has the best view and MUST call loudly and decisively: "YES!", "NO!", or "WAIT!"
- Both batters sprint. On "Yes", both run immediately. B1 runs toward the non-striker's end; B2 runs toward the striker's end. Arms drive, heads up, bats carried in the outside hand.
- Ground the bat. Each batter must ground the bat behind the popping crease — not drag it, not tap it — a full, firm ground. Coach watches for this specifically.
- B1 shoulder-checks upon arriving at the non-striker's end. They look back toward the fielder to assess whether a second run is available.
- Reset. Coach calls "reset" and both batters return to their starting ends. Repeat 10 times, alternating the feed zone between leg side and off side.
Phase 2 — The Second Run Decision (Repetitions 11–20)
- After completing the first run, B1 does NOT automatically reset. Instead, B1 shoulder-checks and makes a second call — "Yes" or "No" — based on the fielder's position and the ball's distance from the stumps.
- If the call is "Yes", both batters immediately sprint back. The fielder (F1) attempts to run out the trailing batter by throwing to the stumps at the end the trailing batter is running toward.
- Coach scores each repetition: +1 for a completed second run, -1 for a run-out, 0 for a correctly declined second run.
- Rotate B1 and B2 roles every 5 repetitions so both batters practice calling from both ends.
Phase 3 — Live Pressure (Repetitions 21–30)
- Introduce a second fielder (F2) in Zone B. Now B1 must assess TWO fielders before calling.
- Coach feeds to any zone without calling it in advance. Batters must react in real time.
- Introduce a "hesitation penalty": if B1 takes more than 1 second after contact to make a call, the coach calls "run out" regardless of outcome. This trains decisive, early calling.

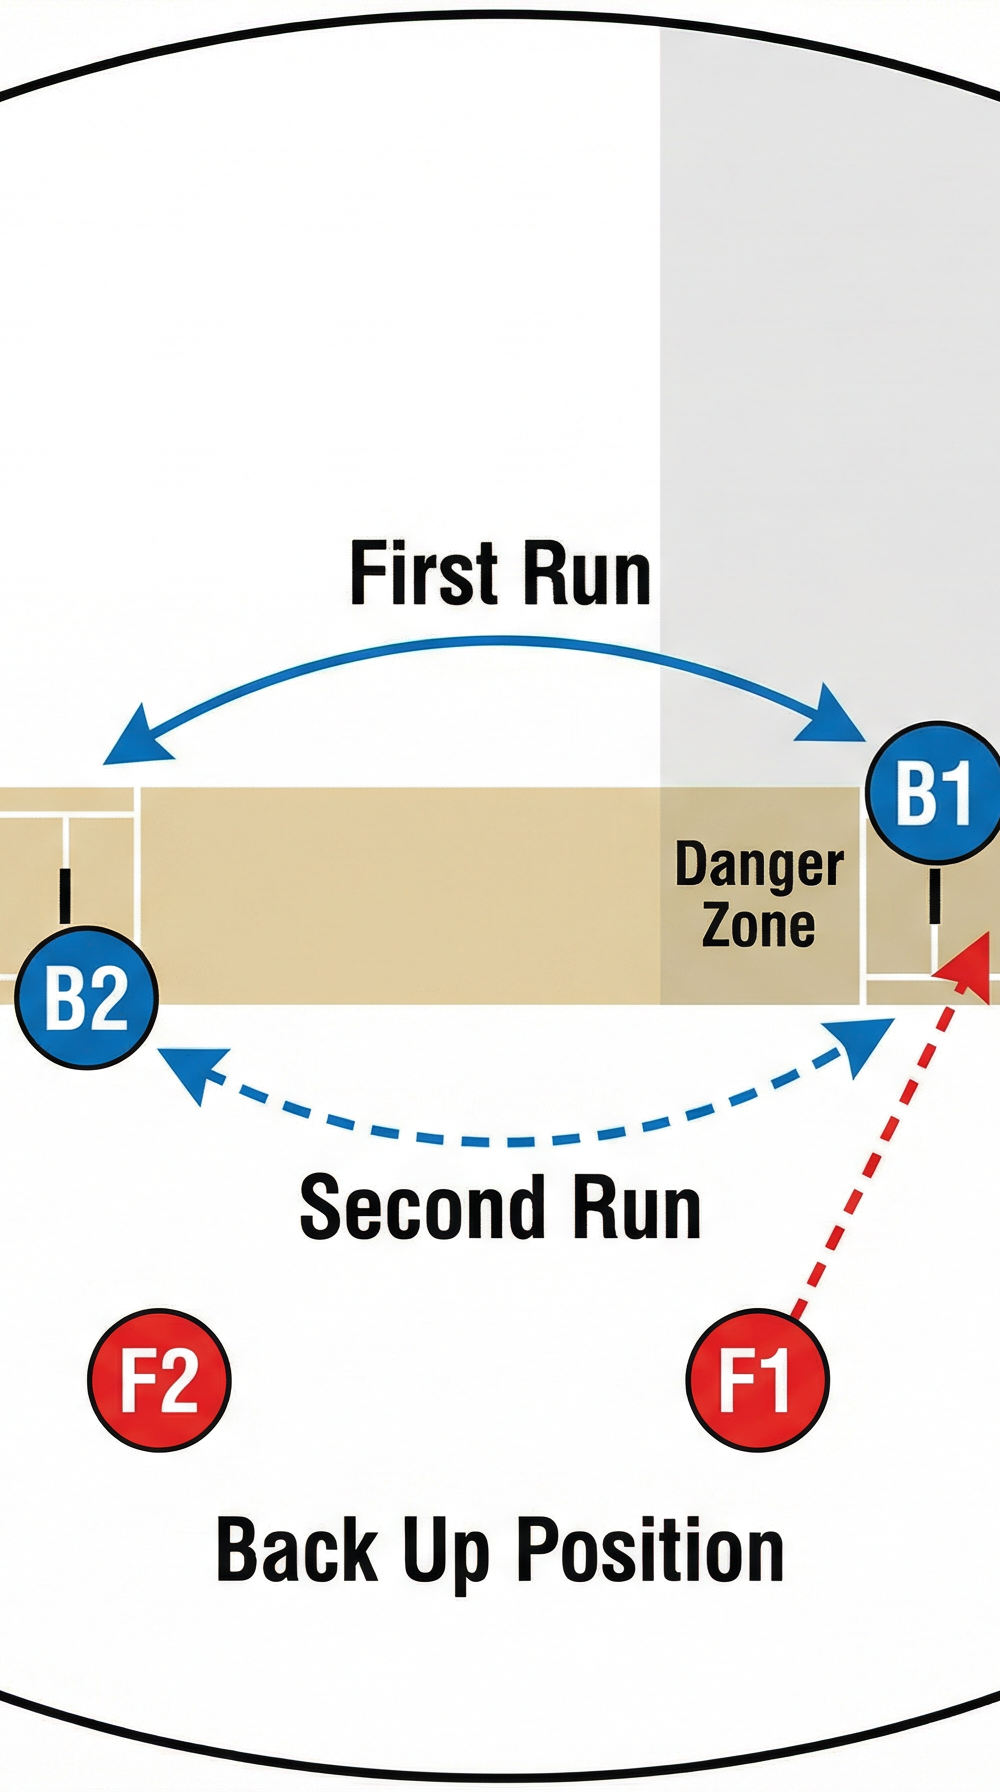
Diagram 2: Second-run decision scenario. B1 and B2 complete the first run (solid blue arrows). B1 shoulder-checks and calls for a second run (dashed blue arrows). Fielder F1 (mid-on) throws to the stumps (dashed red arrow). F2 (mid-off) and F3 (cover) show the broader fielding picture B1 must assess. The "Danger Zone" highlights the vulnerable moment when the trailing batter is mid-pitch.
Key Coaching Points
1. The caller owns the call — no shared responsibility.
For balls hit in front of the wicket (mid-on, mid-off, straight), the striker (B1) calls. For balls hit behind the wicket (fine leg, third man, point), the non-striker (B2) calls because they have the better sightline. Reinforce this ownership constantly — confusion between partners is the single biggest cause of run-outs.
2. Call early, call loud, call once.
The call must come within 0.5–1 second of contact. A late call forces the partner to make a split-second decision mid-run, which almost always ends badly. Coaches should stand 10 metres away and confirm they can hear every call clearly.
3. The turn is where runs are lost.
Most batters lose 0.5–1.0 seconds in a poor turn. Teach a low, wide turn: plant the outside foot, drop the shoulder, swing the bat arm through, and drive out of the turn with the first stride already heading back. The bat should be grounded in the same motion as the turn — not as a separate step.
4. Back up every ball, every time.
B2 must advance 2–3 metres down the pitch before every delivery. This is non-negotiable. A batter who does not back up is leaving a free run on the table every time. Make it a habit by stopping the drill and resetting if B2 fails to back up.
5. Shoulder-check before committing to the second run.
The shoulder-check at the end of the first run must become automatic. Batters should be looking for: (a) where the fielder is relative to the ball, (b) whether the fielder is moving toward the ball or already has it, and (c) which end the throw is likely to target.
6. Communicate the "Wait" call actively.
A "Wait" call is not a pause — it is an active hold. Both batters must stay in their crease, watch the ball, and be ready to go the instant the situation changes. Coaches should create "Wait" scenarios deliberately (e.g., a ball that deflects off the fielder's boot) to train this response.
Common Mistakes
Mistake 1: The striker calls "Yes" before watching the ball reach the bat.
Some batters call in anticipation of a good shot rather than in response to where the ball actually goes. If the shot is mishit, they are already committed to a run they cannot complete. Correction: Enforce a strict rule — no call is valid until after contact. Use slow-motion feeds to train the timing.
Mistake 2: Running with the bat in the wrong hand.
Batters frequently carry the bat in their dominant (top) hand during a run, which means it is on the inside of the turn — making the grounding action awkward and slow. Correction: The bat must always be in the outside hand relative to the direction of running. Drill this in isolation before adding the full run.
Mistake 3: Upright, high-centre-of-gravity turns.
Batters who run upright and then try to stop and turn lose enormous time. Correction: Introduce a "dive and ground" drill where batters practice the low, sliding turn at full speed. Reward the fastest ground-and-turn times with a stopwatch.
Mistake 4: Both batters calling simultaneously.
When both batters shout at the same time, neither hears the other and both hesitate. Correction: Assign clear calling responsibility by zone (as per Coaching Point 1) and reinforce it every session until it is automatic. Use a "silent partner" rule — the non-calling batter must stay silent until the call is made.
Mistake 5: Failing to run the first run hard when the second is available.
Batters who jog the first run to "assess" the second run often find they have run out of time to complete both. Correction: Emphasise that the first run must always be run at full pace. The shoulder-check happens at the crease, not mid-pitch.
Variations & Progressions

Variation 1 — Cone Gate Running (Easier)
For beginners or younger players, place two cones 1 metre either side of the pitch at the mid-point to create a "gate". Batters must run through the gate, which keeps them in a straight line and prevents the common error of drifting wide of the pitch. This also helps coaches identify batters who are crossing paths dangerously.
Variation 2 — Fielder Pressure Drill (Harder)
Add a live fielder who is actively trying to effect a run-out on every repetition. The fielder starts from a cone 15 metres away and must sprint to the ball and return it. This creates genuine time pressure and forces batters to make accurate, real-time assessments rather than theoretical ones.
Progression — Scenario Cards (Advanced)
Write 10 fielding scenarios on cards (e.g., "Fielder at mid-on, 12 metres, moving to his right"; "Ball to fine leg, fielder stationary, 25 metres"). Before each repetition, show the batter a card. They must call the correct number of runs before the feed. This develops pre-ball awareness and decision-making speed, mirroring the mental process elite batters use in match conditions.
Age Adaptations

| Age Group | Key Modifications |
|---|---|
| Under 10 | Use a 15-yard pitch. Focus only on Phase 1 (the basic single). Introduce the "Yes/No" call only — remove "Wait" to reduce cognitive load. Use soft foam balls. |
| Under 12 | Use the full 22-yard pitch. Introduce Phase 2 (second run decision) once Phase 1 is consistent. Add one fielder in Zone A only. |
| Under 14 | Run all three phases. Introduce the hesitation penalty. Add scenario cards for the top batting group. |
| Under 16 / Open | Full drill as described. Add a wicketkeeper behind the stumps to simulate the full fielding picture. Time each pair over 10 runs and post scores to create competitive accountability. |
For players with mobility considerations, reduce the pitch length to 15 yards and allow a walking pace for the turn. The calling and decision-making components remain identical and are the primary learning objective at all levels.