Mastering the Slip Cordon: Catching Field Setups for Fast Bowling
Learn how to effectively deploy and manage a slip cordon to create and convert catching opportunities against pace bowling.

Equipment Needed
1. Overview
The slip cordon is the engine room of a fielding side's catching strategy, particularly against fast and seam bowling. When the ball is new and swinging, or when a pitch offers seam movement and bounce, an aggressive slip setup is essential for taking wickets. This resource focuses on setting up a highly effective catching field behind the wicket, ensuring your team can capitalise on the edges created by your bowlers. By correctly spacing fielders and adapting to the bowler's line and length, coaches can maximize the pressure on the batsman and increase the likelihood of securing vital early breakthroughs.
2. Setup

Equipment Needed:
- 1 Cricket ball (new or semi-new to encourage swing/seam)
- Wicketkeeper gloves and pads
- Stumps and bails
- Cones or markers (optional, for training positioning)
Pitch & Field Setup:
This setup is utilized on a standard 22-yard cricket pitch located centrally within the oval. The primary focus is the arc from the wicketkeeper stretching towards the gully region on the off-side.
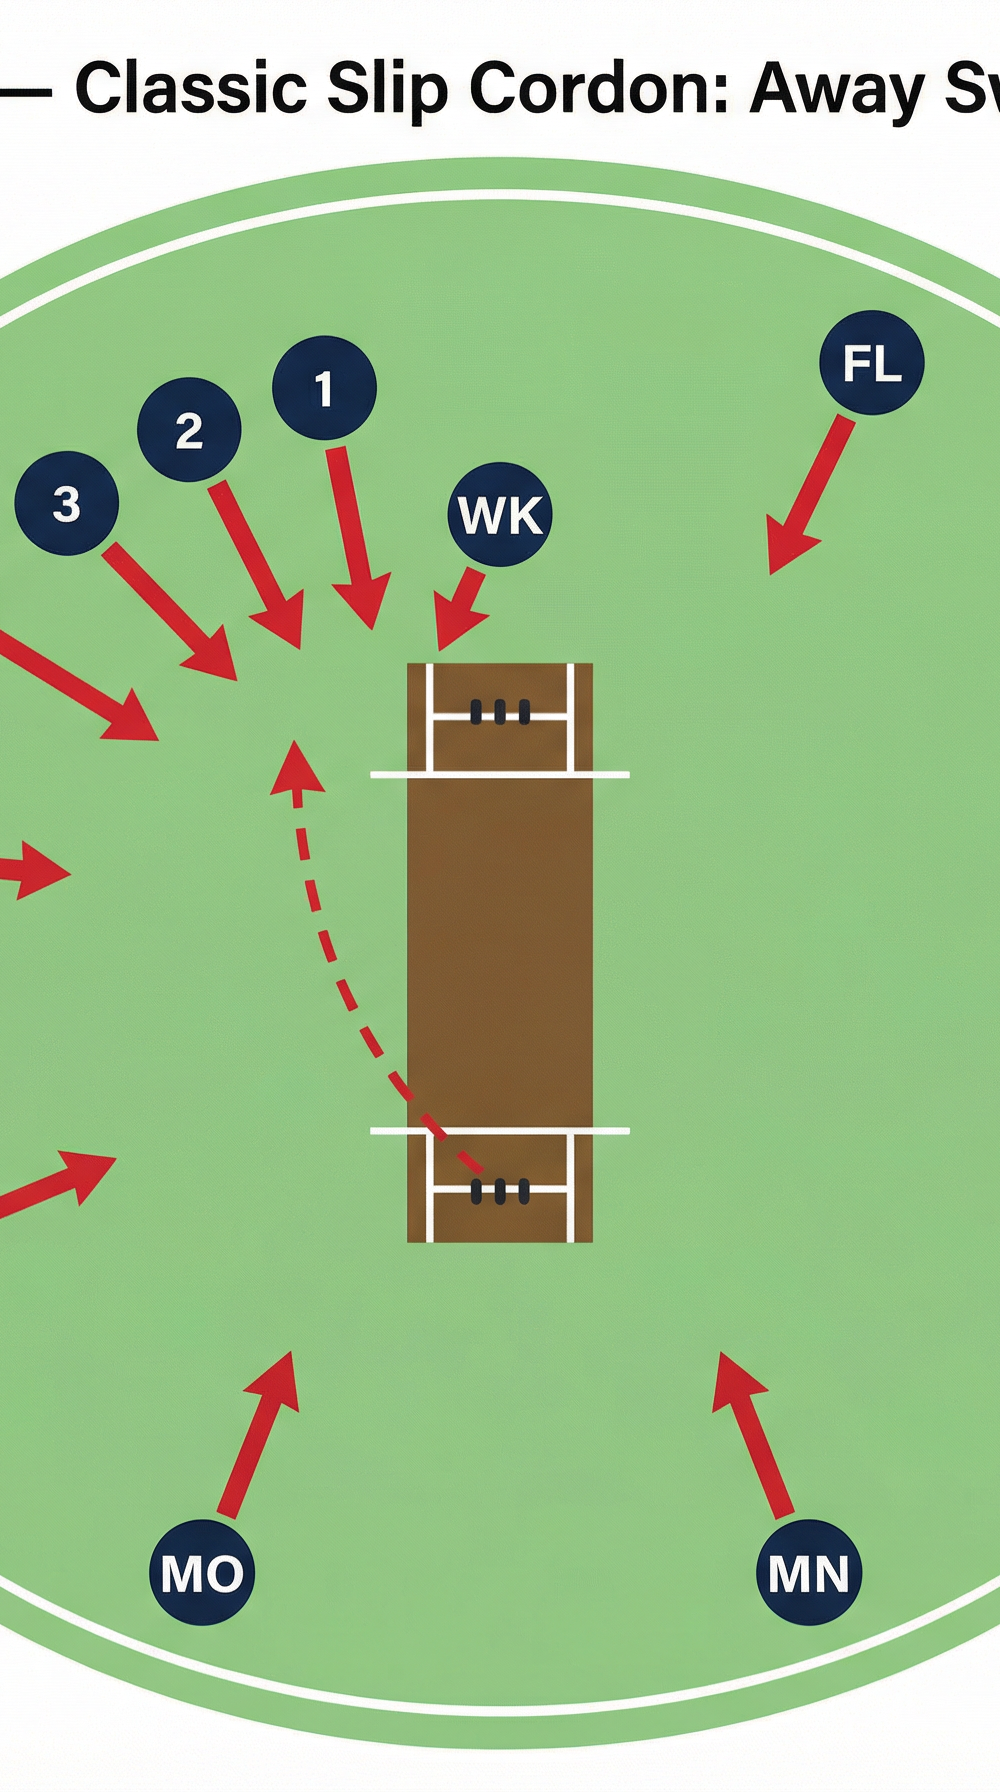
Player Positions (Classic Away Swing):
- Wicketkeeper (WK): Standing back at a distance appropriate to the bowler's pace, ensuring they take the ball at waist height.
- 1st Slip: Positioned slightly deeper than the wicketkeeper, spaced so they can comfortably dive to their right (for a right-handed WK) without colliding.
- 2nd Slip: Staggered slightly deeper again, about an arm's length plus a step away from 1st slip.
- 3rd Slip: Continuing the stagger, maintaining the same spacing from 2nd slip.
- Gully: Positioned squarer and often slightly further forward than the slips, covering the slashed or heavily deflected edge.

3. Step-by-Step Instructions

Step 1: Establish the Wicketkeeper's Position
The foundation of the cordon starts with the wicketkeeper. The WK must stand at a depth where the ball, after passing the stumps, is caught comfortably between knee and waist height. This dictates the depth of the entire slip cordon.
Step 2: Position 1st Slip
Place the 1st slip fielder based on the wicketkeeper's position. They should stand half a pace deeper than the keeper. The lateral spacing should allow both the keeper and 1st slip to dive fully with outstretched arms without their hands overlapping.
Step 3: Build the Cordon (2nd and 3rd Slips)
Add the 2nd and 3rd slips. Each subsequent slip should stand marginally deeper than the man inside him, creating a diagonal line or 'stagger'. This prevents fielders from obscuring each other's view of the batsman and the ball. The spacing between each slip should be consistent—roughly an arm's length plus a half-step.
Step 4: Set the Gully
The gully fielder is positioned wider and squarer than the slips. Their exact position depends on the pitch bounce and the batsman's tendencies. For a standard setup, they form the end of the catching arc, ready for thicker edges or shots played square of the wicket.
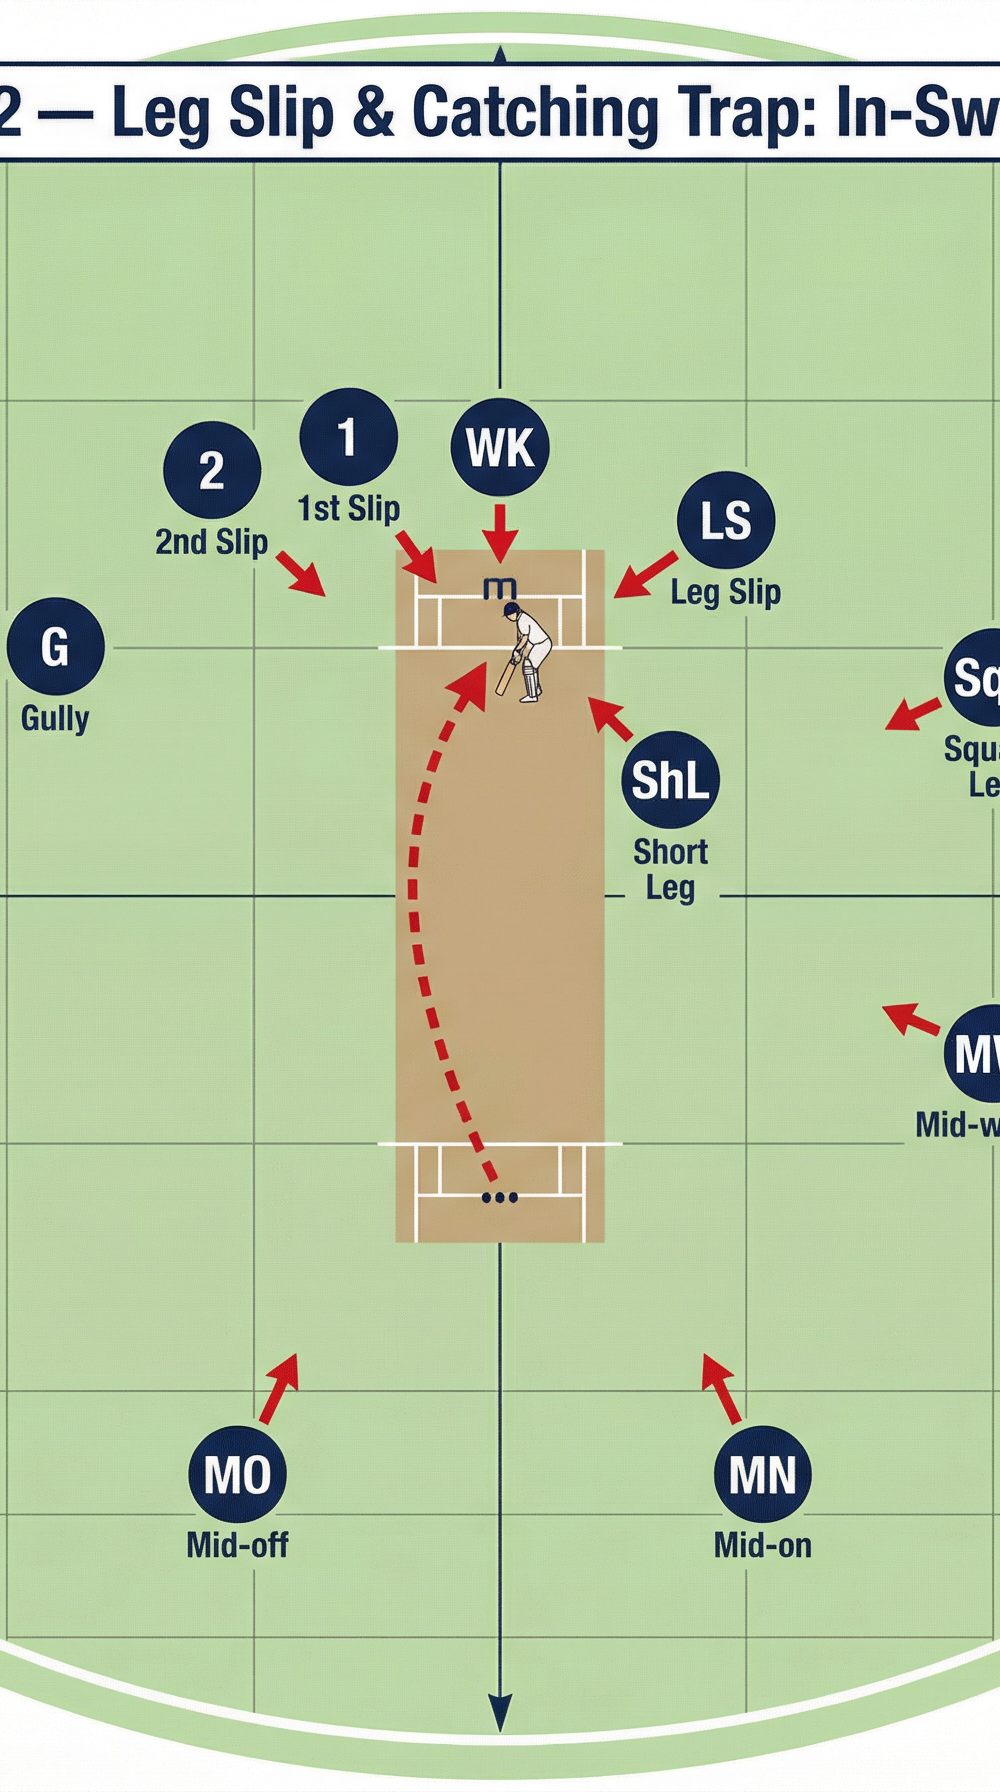
Step 5: Adjust for the Bowler's Plan
If the bowler is predominantly swinging the ball away (out-swing), strengthen the off-side cordon (Diagram 1). If the bowler is bringing the ball back into the right-hander (in-swing), the cordon can be reduced, and catchers moved to the leg side, such as a Leg Slip or Short Leg, to catch inside edges or fended deliveries (Diagram 2).

4. Key Coaching Points

- The Stagger: Emphasize the diagonal alignment. Slips must not stand in a flat line. The stagger ensures clear sightlines and appropriate reaction times based on the angle of deflection.
- Spacing: Fielders must trust their spacing. Standing too close leads to collisions and dropped catches; standing too wide creates gaps that edges will fly through.
- Posture and Base: Slip fielders should adopt a relaxed but athletic crouch, weight slightly forward on the balls of their feet, hands resting on or near their knees until the bowler enters their delivery stride.
- Watching the Ball: Teach fielders to watch the ball from the bowler's hand, onto the pitch, and right onto the bat. They must not simply stare at the bat waiting for the edge.
- Low Catching: The majority of slip catches are taken low down. Fielders must stay low in their stance and only rise if the ball is clearly travelling upwards.
5. Common Mistakes
- Creeping Forward: Fielders often unconsciously take a step forward as the ball is bowled, reducing their reaction time and risking the ball carrying over their heads.
- Standing Too Upright: A high centre of gravity makes it incredibly difficult to get down to low edges, which are the most common type of chance in the slips.
- Following the Bowler, Not the Ball: Fielders sometimes watch the bowler's follow-through rather than tracking the ball all the way to the bat, leading to late reactions.
- Uneven Spacing: When a fielder moves out of position, it creates a weak link in the cordon, either causing a gap or a potential collision.
6. Variations & Progressions
- The 'Spin' Cordon: Against spin bowling, the wicketkeeper stands up to the stumps. The slip fielder (usually only one) stands much closer and squarer, reacting to fine edges and deflections off the keeper's pads.
- The Leg-Side Trap: As shown in Diagram 2, shift focus to the leg side for in-swing bowlers or on pitches with variable bounce, utilizing a Leg Slip, Short Leg, and catching Mid-wicket to complement a reduced off-side cordon.
- Catching Practice Drill: Use a slip cradle or a coach hitting edges with a fungo bat to drill the cordon. Progress from announced edges to random edges to test reaction times.
7. Age Adaptations

- Under 10s / Under 12s: Focus heavily on the basics of catching (cup technique) and basic posture. Keep the cordon small (WK + 1 Slip) to avoid confusion. Use softer balls for confidence building.
- Under 14s: Introduce the concept of the stagger and proper spacing. Begin teaching the tactical reasons for having a gully versus a 2nd slip based on the bowler.
- Under 16s & Open: Implement full cordons. Demand high levels of concentration, perfect posture, and the ability to read the game situation to adjust their own depth and spacing dynamically.