T20 Innings Acceleration Masterclass: Phased Execution Plan
A comprehensive guide for coaches to teach batsmen how to structure a T20 innings, maximize the powerplay, rotate strike in the middle overs, and execute high-impact shots at the death to consistently post or chase down match-winning totals.

Equipment Needed
Overview
The modern T20 game demands a structured approach to batting. Gone are the days of aimless slogging; today's successful teams employ a calculated, phased acceleration plan. This set play resource is designed to help coaches train their batting units to understand the three distinct phases of a T20 innings: the Powerplay (Overs 1–6), the Middle Overs Consolidation (Overs 7–15), and the Death Overs Acceleration (Overs 16–20). By mastering this structured approach, teams can consistently post or chase down massive totals. Use this plan in pre-season camps, mid-week batting sessions, and as a pre-match tactical briefing tool.
Setup

Equipment Needed:
- Standard white cricket balls (at least 6)
- Full batting gear for all batsmen (helmet, pads, gloves, bat)
- Fielding markers/cones (minimum 20) to outline the 30-yard restriction circle
- Coloured target cones on the boundary to mark scoring zones
- Whiteboard or flip chart for pre-session tactical briefing
Pitch/Field Setup:
Use a standard 22-yard pitch on an oval ground (approximately 137m x 160m). Clearly mark the 30-yard fielding restriction circle with cones. Set up three distinct fielding configurations to simulate each phase of the innings. Assign a wicketkeeper and a full complement of fielders (9 fielders + WK + bowler = 11 fielding players) to create a realistic match environment.
Player Positions Required: 2 batsmen, 1 bowler, 1 wicketkeeper, 9 fielders = 13 players total.
Step-by-Step Instructions
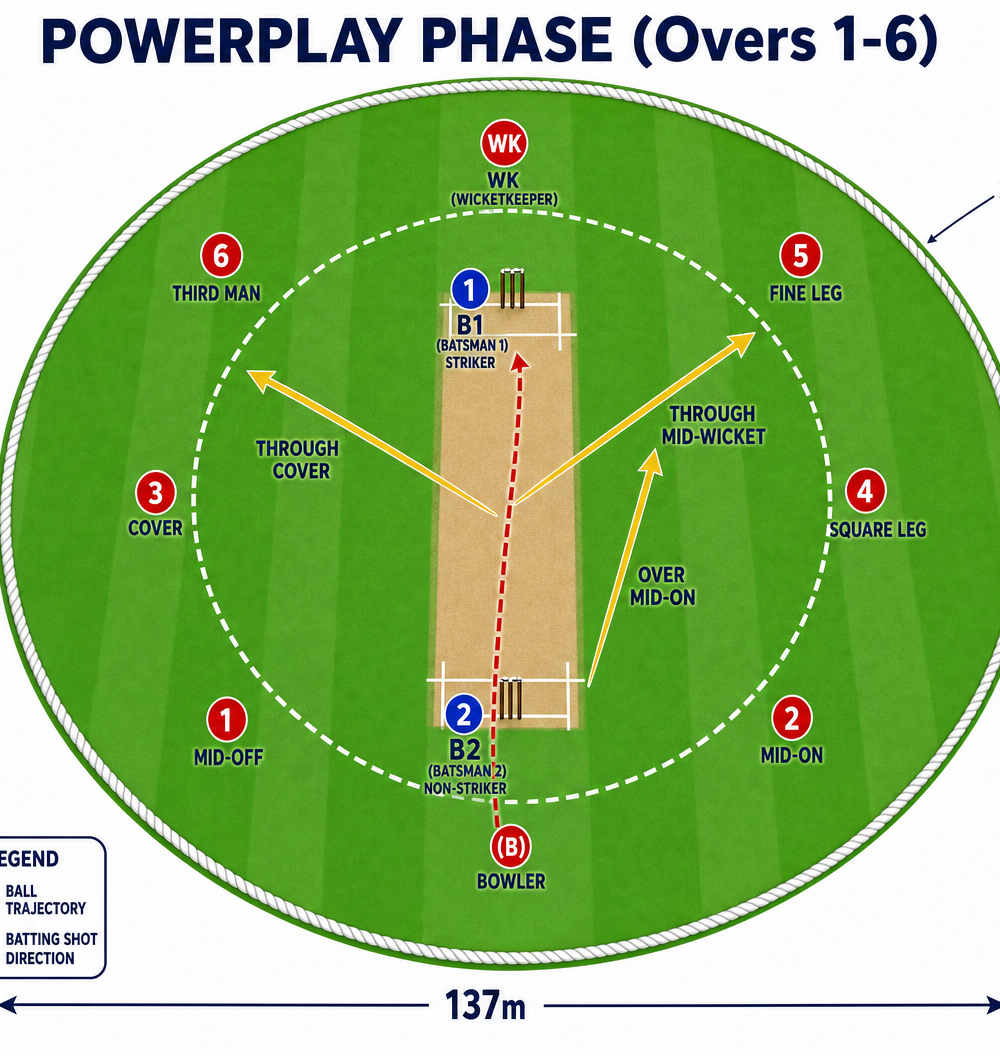
Phase 1 — The Powerplay (Overs 1–6)
Objective: Maximise the scoring rate while field restrictions are in place. Only two fielders are permitted outside the 30-yard circle during the powerplay, creating significant gaps in the outfield.

Step 1 — Assess the Conditions (Over 1): Batsmen B1 and B2 must quickly gauge the pace, bounce, and swing of the pitch within the first over. The first 3–4 balls are intelligence-gathering balls. Look for the bowler's default length and line.
Step 2 — Target the Infield Gaps (Overs 1–3): With only two fielders deep, batsmen should look to pierce the infield with strong, classical cricket shots — cover drives, straight drives, and square cuts — that find the gaps between mid-off, mid-on, cover, and square leg.
Step 3 — Take the Aerial Route (Overs 2–6): If the ball is pitched up (full length), B1 and B2 should confidently take the aerial route over the infield. Target the region over mid-off and mid-on, ensuring the bat comes through straight and the ball is hit with the full face.
Step 4 — Capitalise on Width (Overs 1–6): Any width offered outside off-stump must be punished. Batsmen should look to cut or slash aggressively over the point region, where there is no deep fielder during the powerplay.
Step 5 — Running Between Wickets: Even in the powerplay, turning ones into twos is critical. Push hard for the second run when the ball goes to a single fielder in the deep.
Phase 2 — Middle Overs: Rotate and Accelerate (Overs 7–15)
Objective: Maintain a healthy run rate of 7–8 runs per over without losing clusters of wickets. Build a platform for the final assault by combining smart rotation with opportunistic boundary hitting.

Step 1 — Prioritise Strike Rotation: As the field spreads (up to five fielders outside the circle), the focus shifts to aggressive running. B1 and B2 must actively look for quick singles by dropping the ball into gaps with soft hands — particularly off spinners and medium-pacers.
Step 2 — Identify the Gaps Between Boundary Riders: Identify where the deep fielders are stationed (e.g., deep mid-wicket, long-on, long-off, deep cover) and look to hit the ball firmly into the gaps between them for twos. A well-timed shot into a gap is worth as much as a boundary.
Step 3 — Punish the Bad Ball: While consolidation is key, batsmen must remain proactive. Any loose delivery — a full toss, a half-volley, or a short ball outside off-stump — must be dispatched to the boundary. Do not let the bowler off the hook.
Step 4 — Exploit Bowling Matchups: Identify favourable bowler-batsman matchups. If a left-arm spinner is bowling to a right-hand batsman, the batsman should look to dominate that over by using their feet and hitting with the spin through the leg side.
Step 5 — Wicket-in-Hand Principle: Aim to have at least 6 wickets in hand entering over 15. This preserves the batting depth needed for an explosive final five overs.
Phase 3 — Death Overs Acceleration (Overs 16–20)
Objective: Maximum damage. Target 10–15+ runs per over utilising 360-degree shot-making. Every ball is an opportunity to score.

Step 1 — Pre-meditation and Crease Movement: Batsmen should use the crease effectively. Moving deep in the crease converts a yorker into a half-volley; stepping across to the off-side opens up the leg side for a slog sweep or pull.
Step 2 — Access the 'V' and Cow Corner: Target the two primary power zones. Clear the front leg and swing freely through the line of the ball towards deep mid-wicket (cow corner) or straight down the ground over the bowler's head.
Step 3 — Innovative Stroke Play: Utilise ramps, scoops, and reverse sweeps to exploit the gaps behind the wicket — fine leg and third man — especially against pace bowlers executing yorkers or slower balls. These shots are high-percentage plays when executed correctly.
Step 4 — Running Hard Between the Wickets: Even in the death overs, turning ones into twos is crucial. Push the boundary riders hard and back your fitness and calling.
Step 5 — Communicate the Plan: B1 and B2 must communicate clearly at the end of every over. Agree on the plan for the next over — which bowler is coming on, where the fielders are, and which shot options are available.
Key Coaching Points

Intent from Ball One: Encourage batsmen to have a positive, attacking mindset from the very first delivery. Intent does not mean recklessness — it means looking to score off every ball while remaining in control of the shot selection.
Communication is Non-Negotiable: Loud, clear calling between B1 and B2 is the foundation of good running. 'Yes', 'No', and 'Wait' must be definitive and called early. Hesitation costs wickets.
Crease Utilisation: Teach batsmen how to use the depth and width of the crease to alter the bowler's length and create scoring opportunities. A batsman who stands in the same spot every ball is predictable and easy to bowl at.
Playing the Situation: The plan is a framework, not a rigid script. If early wickets fall, the consolidation phase may need to start earlier and last longer. Batsmen must read the game and adapt.
Execution Over Power: Remind players that timing and finding gaps often yield better results than sheer brute force, especially in the middle overs. A well-timed drive through the covers off a full-pitched delivery is more reliable than a slog over mid-wicket.
Boundary Awareness: Batsmen must always know where the fielders are on the boundary. Take 10 seconds at the start of each over to survey the field and identify the gaps.
Common Mistakes

Over-hitting Early in the Powerplay: Trying to hit every ball for six in the first three overs, leading to a loss of shape, poor timing, and early wickets. Reinforce that fours are just as valuable as sixes and far less risky.
Stagnation in the Middle Overs: Failing to rotate the strike, allowing dot ball pressure to build. A run of 4–5 dot balls almost always leads to a panic shot and a wicket. Drill the habit of looking for the single on every delivery.
Predictability at the Death: Staying static in the crease, allowing the bowler to easily execute their death bowling plans (e.g., wide yorkers or slower balls outside off-stump). Batsmen who do not move are easy to bowl at.
Poor Running Between the Wickets: Not pushing for the second run or hesitating on a clear two, costing 5–10 runs per innings. Use fielding simulation drills to sharpen running habits.
Ignoring the Match Situation: Batting according to a pre-set plan regardless of the match context — for example, playing conservatively when the team needs 15 an over, or swinging wildly when a steady hand is required.
Variations and Progressions

Progression 1 — Target Zone Practice: Place physical targets (large cones or mats) in specific scoring zones — over mid-off for the powerplay, deep mid-wicket for death overs — and award bonus points for hitting them. This sharpens shot selection and precision under pressure.
Progression 2 — Scenario Simulation: Set up a specific game scenario (e.g., 60 runs needed off 36 balls with 5 wickets in hand) and have the batsmen execute the plan against live bowling with a set field. Debrief after each scenario, focusing on decision-making.
Variation 1 — Spin vs. Pace Focus: Dedicate specific sessions to accelerating against spin (focusing on sweeps, reverse sweeps, and using the feet to get to the pitch of the ball) versus pace (focusing on ramps, pulls, and power hitting through the line).
Age Adaptations

Under 10s and Under 12s: Focus primarily on the basics of calling, running between the wickets, and hitting the ball straight. Introduce the concept of finding gaps rather than power hitting. Use a soft ball or incrediball to reduce fear and build confidence.
Under 14s and Under 16s: Introduce the concept of phases. Begin teaching basic field manipulation and the importance of rotating strike against spin. Start practising safe aerial shots over the infield in a controlled environment.
Open and Senior Players: Full implementation of the plan, including advanced 360-degree shot-making, complex bowling matchup exploitation, and high-pressure scenario training with full match simulation.