T20 Innings Acceleration Plan: Maximising Run Rate Across All 20 Overs
A phase-by-phase batting blueprint that teaches your players exactly when to consolidate, when to shift gears, and how to explode in the death overs to post or chase match-winning T20 totals.

Equipment Needed
Overview
The T20 Innings Acceleration Plan is a structured, phase-based batting framework designed to maximise run rate across all 20 overs without sacrificing wickets unnecessarily. Rather than approaching a T20 innings as a flat-out sprint from ball one, this plan teaches batters to read the match situation, build intelligently in the powerplay, consolidate through the middle overs, and then unleash controlled aggression in the death.
This resource is built around three distinct phases — Powerplay (Overs 1–6), Middle Overs (Overs 7–15), and Death Overs (Overs 16–20) — each with specific run-rate targets, shot-selection priorities, and partnership goals. Coaches should use this plan both as a session framework and as a pre-match briefing tool.
When to use this plan: Deploy this framework when preparing for any T20 fixture, whether your team is batting first and setting a target or chasing. It is equally applicable to club, representative, and age-group cricket. The principles scale from Under-12 through to open-age competition with minor modifications (see Age Adaptations below).
Target outcome: A batting innings that builds to a crescendo — a par score of 160–180 on a standard oval ground (approximately 137m × 137m boundary), or a chase executed with a run rate that keeps the required rate manageable at each drinks break.
Setup

Equipment Required
- Full batting kit for all participating batters (helmet, pads, gloves, box, bat)
- Bowling machine or live bowling (minimum 3 bowlers for rotation)
- 6 cricket balls (mix of new and older balls to simulate different phases)
- Cones to mark the 30-yard (27.4m) fielding restriction circle
- Cones to mark boundary rope (set at realistic oval dimensions)
- Whiteboard or laminated field-setting cards for each phase
- Scoreboard or run-rate tracking app (projected on screen if indoors)
- Video camera or tablet for review (optional but strongly recommended)
Pitch & Field Setup
Use a full 22-yard (20.1m) pitch. Mark the popping crease 4 feet (1.22m) in front of the stumps and the bowling crease at the stumps. Set the 30-yard (27.4m) fielding restriction circle with cones. For training, use a minimum of 8 fielders to replicate match conditions. If space is limited, use a synthetic pitch with a 60m boundary.
Player Positions — Batting Order Blueprint
| Batting Position | Role | Profile |
|---|---|---|
| 1 (Opener A) | Anchor/Striker | High strike rate (140+), technically sound, powerplay specialist |
| 2 (Opener B) | Aggressive Striker | Highest strike rate (160+), targets powerplay boundaries |
| 3 (No. 3) | Consolidator/Accelerator | Adaptable, bridges powerplay to middle overs |
| 4 (No. 4) | Middle-Overs Anchor | Strike rate 130+, builds platform for death |
| 5 (No. 5) | Death Specialist | Explosive hitter, yorker player, ramp/scoop expert |
| 6 (No. 6) | Death Specialist | Big hitter, 360-degree game |
| 7–11 | Tail Accelerators | Each must contribute 1–2 boundaries minimum |
Step-by-Step Instructions

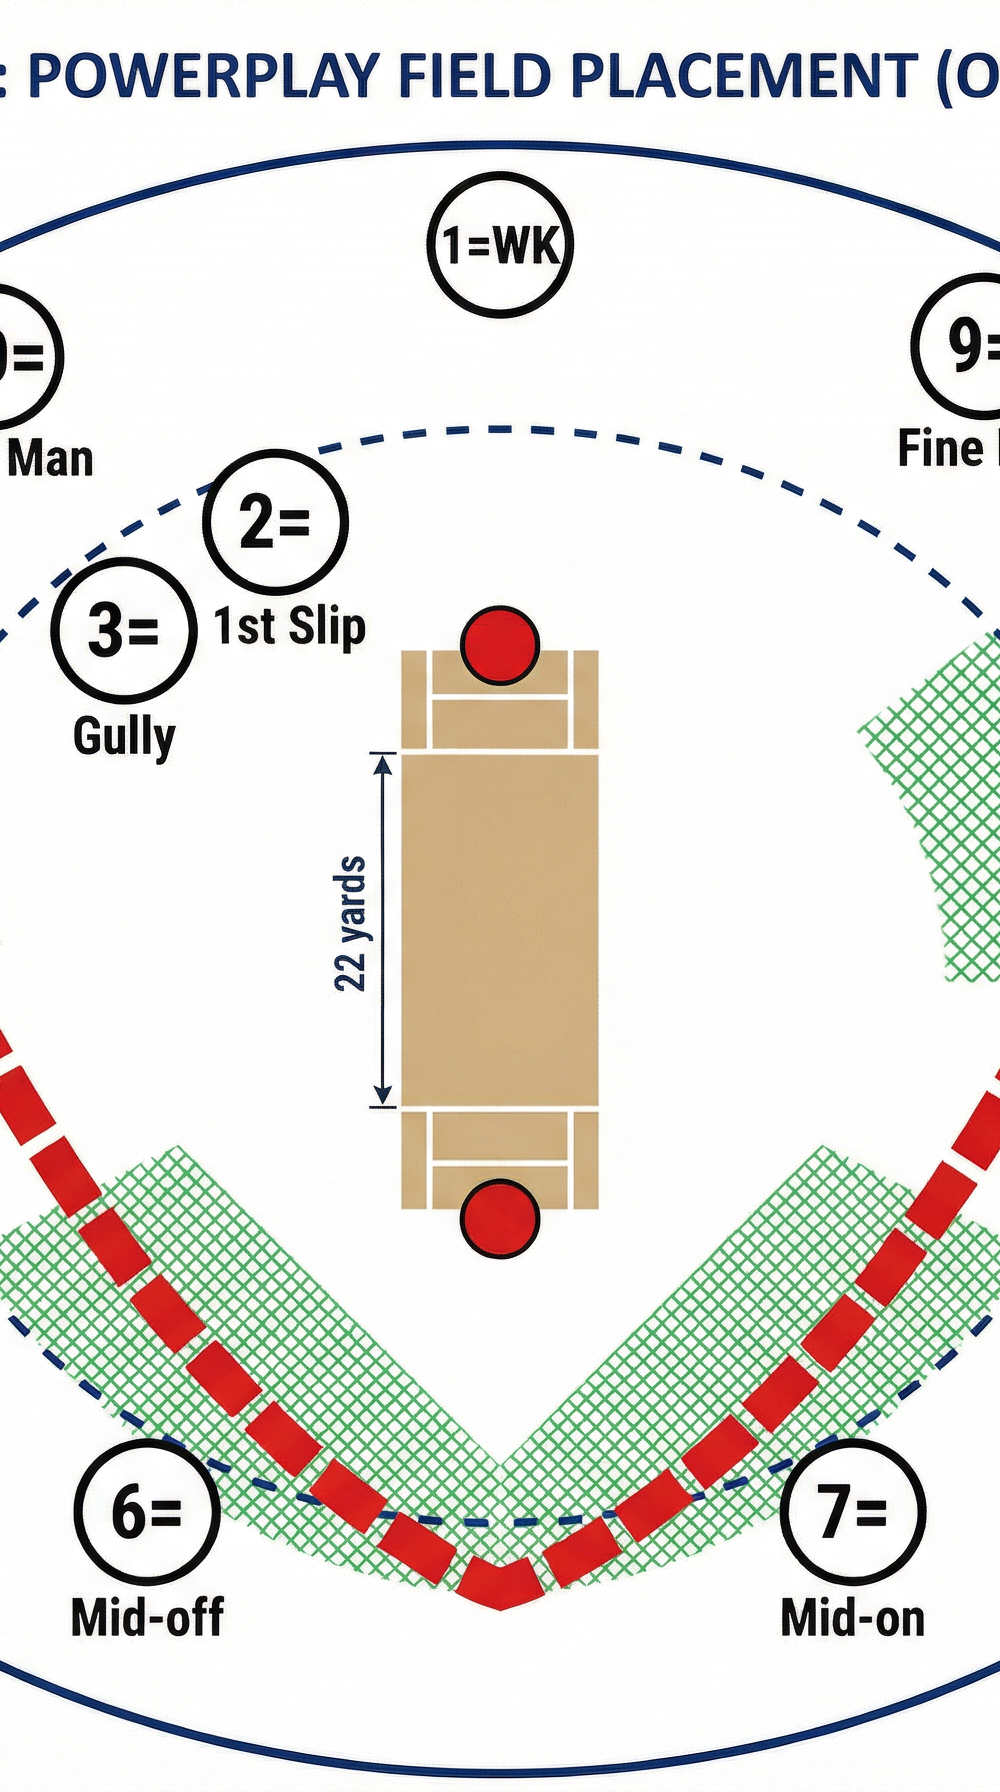
Phase 1 — Powerplay (Overs 1–6): Exploit the Field Restriction

Target run rate: 8.0–9.5 runs per over. Target score at end of over 6: 48–57 runs.
During the powerplay, only two fielders are permitted outside the 30-yard circle. This is the batting team's greatest structural advantage of the entire innings. The plan is to exploit the gaps — not to slog blindly.
Ball 1–6 (Over 1): Opener A takes strike against the new ball. The first priority is to sight the ball and identify the bowler's length. Look to play the first ball on merit — no pre-meditated shots. Opener B calls a quick single if the opportunity is there. Target: 6–8 runs from Over 1.
Overs 2–3: Both openers now have a feel for the surface and the bowlers. Activate the V-zone — the arc between mid-off and mid-on — for straight drives and lofted shots over the infield. Any width outside off stump is punished through point and cover. Any ball on the pads is worked through mid-wicket or flicked fine. Target: 7–9 runs per over.
Over 4 (Spinner or change bowler): If the opposition introduces a spinner in the powerplay, the plan shifts to using feet — either charging to drive straight or sweeping fine. Identify the spinner's length early and commit to the shot. Do not let the spinner settle into a rhythm by playing defensively.
Overs 5–6: These are the 'power overs' within the powerplay. Both batters should now be set. Target boundaries — specifically lofted drives over mid-off and mid-on (where no fielder is permitted on the boundary), and pull/hook shots off anything short. Aim for at least 3 boundaries across these two overs.
Wicket-in-hand rule: If a wicket falls in the powerplay, the incoming batter takes 6 balls to settle before accelerating. Do not send in a pinch-hitter unless the score is below 30 at the end of over 4.
Phase 2 — Middle Overs (Overs 7–15): Build the Platform
Target run rate: 7.5–8.5 runs per over. Target score at end of over 15: 110–130 runs.
The middle overs are where T20 innings are won and lost. The field spreads, bowlers attack with variation, and the run rate can stagnate if batters are not disciplined. The plan here is to rotate strike aggressively, take calculated risks against the weaker bowlers, and keep wickets in hand for the death.
Identify the 'banker' bowlers: Before the innings, the coach and captain identify the opposition's two weakest bowlers. These are the overs where the team targets 10+ runs. Against the stronger bowlers, a run rate of 6–7 is acceptable.
Strike rotation: Every dot ball creates pressure on the batting team. Batters must work the ball into gaps for singles — a nudge to third man, a dab to fine leg, a push to mid-wicket. The target is no more than 3 consecutive dot balls at any point in the middle overs.
The 'Power Over' within the middle overs: Identify one over between overs 10–13 — typically against a part-time bowler or a spinner bowling into the wind — and target it for 12–15 runs. Both batters pre-agree on this over during a mid-pitch conversation.
Partnership targets: Each partnership in the middle overs should have a run-rate target. If the partnership is running below 7.5 runs per over for 3 consecutive overs, one batter must take a calculated risk — a pre-meditated slog-sweep, a ramp, or a charge down the pitch.
Wickets in hand: The plan requires at least 5 wickets in hand at the start of over 16. If the team has lost 4 wickets by over 15, the death-overs strategy shifts to a more conservative approach, targeting 8 runs per over rather than 10+.
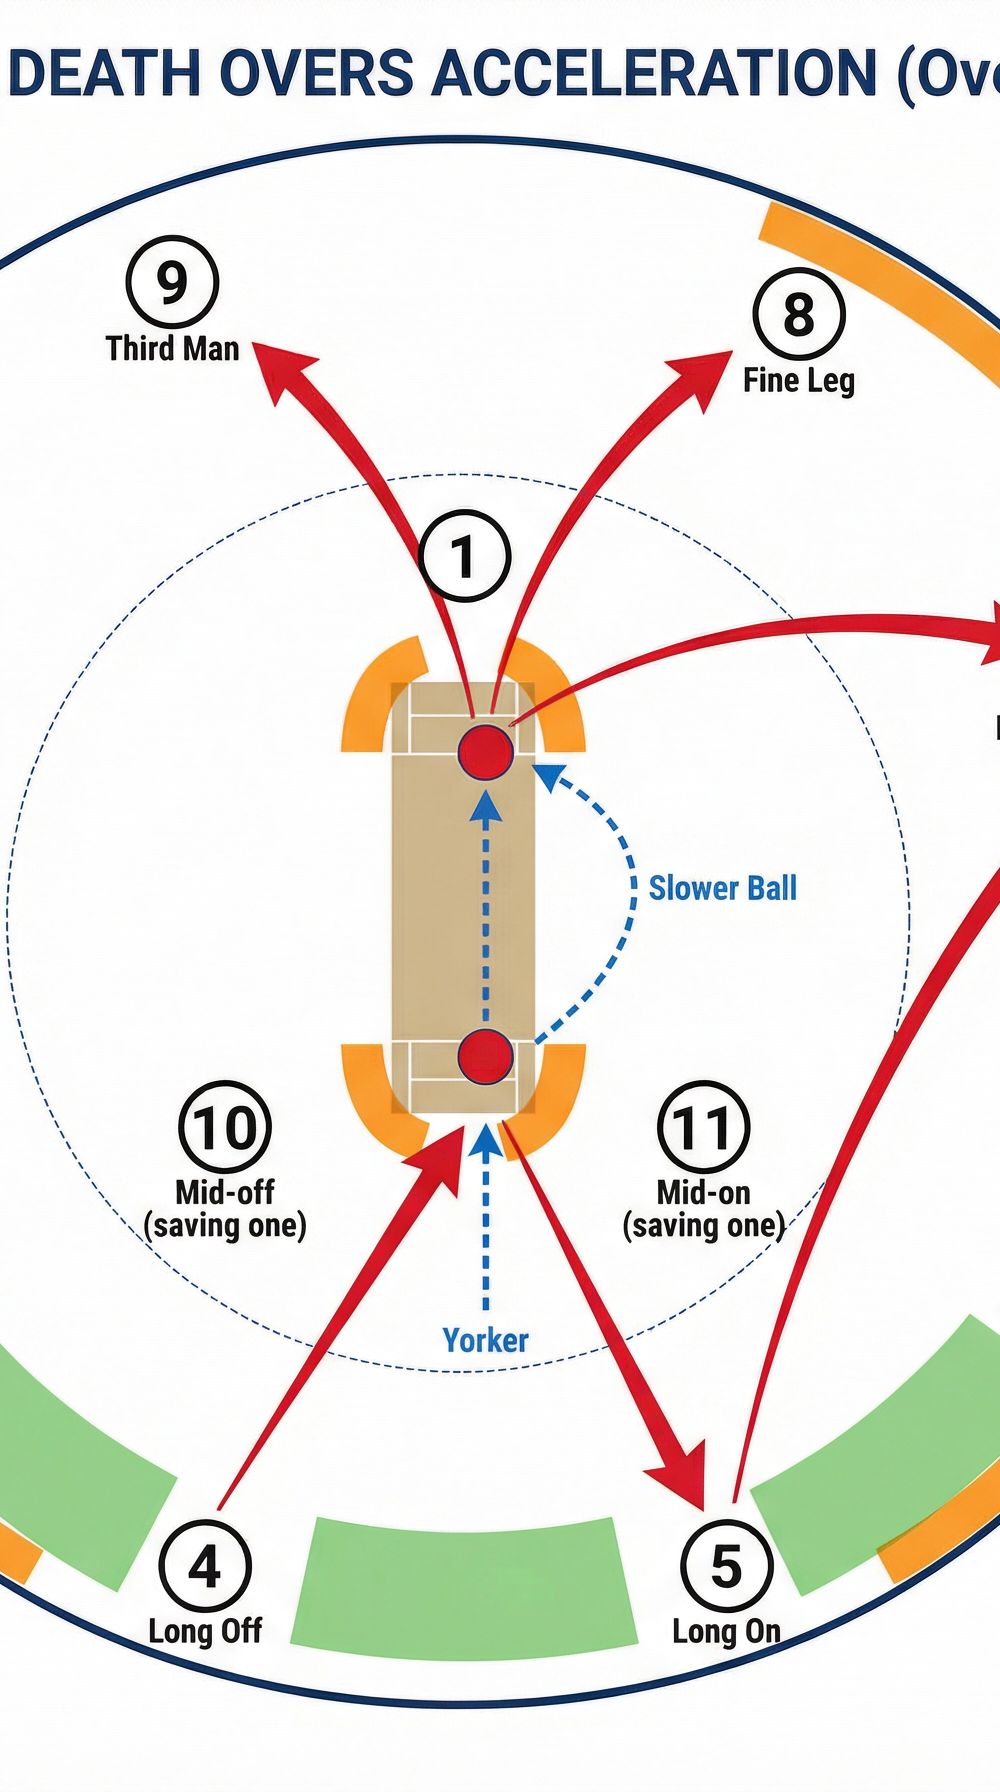
Phase 3 — Death Overs (Overs 16–20): Controlled Explosion

Target run rate: 10.0–13.0 runs per over. Target score at end of over 20: 160–180 runs.
The death overs require a specific skill set and a pre-planned shot menu. Batters should not improvise — they should execute pre-rehearsed shots against anticipated bowling plans.
Pre-match death-overs briefing: The coach briefs the No. 5 and No. 6 batters on the opposition's likely death-bowling plans — yorkers, wide yorkers, slower balls, bouncers. Each batter identifies their 'go-to' shots for each delivery type.
The Shot Menu (per delivery type):
- Full/Yorker length: Flick to fine leg, ramp over third man, or drive straight
- Short ball: Pull to deep mid-wicket, hook to fine leg, or duck and run
- Wide yorker: Scoop over third man, or slash over point
- Slower ball: Wait and loft over long-on or long-off
Over 16: The first batter in the death (No. 5) takes 3–4 balls to assess the bowler's plan, then activates. Target: 9–10 runs.
Overs 17–18: Full acceleration. Both batters commit to pre-meditated shots. No defensive shots unless the ball is genuinely unplayable. Target: 11–13 runs per over.
Overs 19–20: The final two overs are the 'free hit' mentality phase. Every ball is an opportunity for a boundary. The batter at the non-striker's end calls the shot before each delivery to ensure both players are aligned. Target: 12–15 runs per over.
Key Coaching Points

Phase awareness is non-negotiable. Every batter must know exactly which phase they are in and what the run-rate target is for that phase. Display the phase targets on a scoreboard or whiteboard at all times during training.
Dot balls are the enemy, not wickets. In T20 cricket, a dot ball is as damaging as a wicket in the wrong phase. Train batters to always have a 'release valve' shot — a safe single — available on every delivery.
The shot menu must be rehearsed, not improvised. Death-overs batting is not creativity under pressure — it is the execution of rehearsed skills under pressure. Spend at least 20 minutes per session on death-overs shot drills: ramps, scoops, ramps over third man, and slog-sweeps.
Partnership communication is a skill. Mid-pitch conversations between overs are tactical briefings, not social exchanges. Teach batters to communicate: current run rate, required rate, which bowlers are left, and the agreed plan for the next over.
Read the field before every ball. Before the bowler runs in, the batter should have identified the two biggest gaps in the field and pre-selected their preferred shot. This reduces reaction time and increases execution quality.
Wickets in hand drive the plan. The entire acceleration plan is contingent on wickets remaining. Coaches must reinforce the concept that a wicket in over 8 is more damaging than a dot ball in over 8 — because it removes the platform for death-overs acceleration.
Common Mistakes
Mistake 1 — Trying to accelerate too early. Many batters, particularly at junior level, attempt to hit boundaries from ball one regardless of the match situation. This leads to early wickets and collapses. Coaches should reinforce the 'earn the right to attack' principle — particularly for the anchor batter in the powerplay.
Mistake 2 — Losing wickets in clusters in the middle overs. The middle overs are where teams often lose 3–4 wickets in quick succession as batters attempt to force the pace against good bowling. Emphasise that a run rate of 7.5 in the middle overs is excellent, and that wickets in hand are worth more than a slightly elevated run rate.
Mistake 3 — No pre-planned shot menu for the death. Batters who improvise in the death overs are easily dismissed by experienced bowlers. Coaches must drill the shot menu in training until it becomes automatic. Use a bowling machine set to replicate yorkers and slower balls specifically.
Mistake 4 — Poor running between the wickets. In T20 cricket, sharp running converts 1s into 2s and 2s into 3s — this can add 15–20 runs to an innings without hitting a single boundary. Coaches should time batters running between the wickets and set a target of completing the first run in under 2.0 seconds from a standing start.
Mistake 5 — Ignoring the non-striker's role. The non-striker batter has a critical role: backing up aggressively (to convert misfields into 2s), calling clearly, and providing tactical information to the striker. Coaches should explicitly coach non-striker responsibilities in every batting session.
Variations & Progressions
Variation 1 — The Chase Adaptation. When chasing, the phase targets shift based on the required run rate. If chasing 160, the powerplay target becomes 55–60 (required rate: 9.2). If chasing 140, the powerplay target drops to 45–50 (required rate: 7.5). Coaches should create a simple laminated chase-rate card for each batter to reference during the innings.
Variation 2 — The Pinch-Hitter Powerplay. If the opposition bowls two quality seamers in the powerplay, send in the No. 5 or No. 6 as a pinch-hitter at No. 3. This batter's sole job is to hit boundaries in overs 3–5, then retire or get out — freeing the anchor batter to rebuild with a specialist middle-order player.
Progression 1 — Pressure Scenario Training. Run the session with a live scoreboard and set specific scenario targets: 'You are 45/2 after 6 overs, chasing 165. Plan your next 14 overs.' This forces batters to make real-time decisions under match-realistic pressure.
Progression 2 — Fielding Restriction Simulation. In training, physically restrict fielders to the 30-yard circle for overs 1–6, then release them for overs 7–15, and push all but two to the boundary for overs 16–20. This gives batters a visceral sense of how the field changes and reinforces the phase-based shot selection.
Age Adaptations

Under 12 & Under 14: Simplify the plan to two phases only — 'Build' (overs 1–8) and 'Attack' (overs 9–16 in a 16-over format). Remove the shot menu concept and replace it with three simple cues: 'Is the ball full? Drive it. Is the ball short? Pull it. Is the ball wide? Cut it.' Focus heavily on running between the wickets — this age group can gain 20–30 extra runs per innings through sharp running alone.
Under 16: Introduce the three-phase framework with simplified run-rate targets. Begin coaching the shot menu for the death overs, but limit it to two shots per delivery type rather than three. Introduce the concept of 'banker overs' in the middle phase.
Open Age: Implement the full plan as described. Add video analysis of the opposition's death-bowling patterns in the pre-match briefing. Introduce advanced concepts such as the 'match-up' — identifying which batter is best suited to face which bowler in the death overs based on their individual shot profiles.