Elite Fielding Relay and Throwing Accuracy Drill
Master the art of fast, accurate boundary relays and pinpoint infield throwing with this high-intensity, match-realistic fielding drill.

Equipment Needed
1. Overview
This drill is designed to simulate match-day pressure by combining deep outfield relays with precision infield throwing. In modern cricket, the ability to return the ball quickly and accurately from the boundary can mean the difference between a single and a two, or a run-out and a missed opportunity. This drill helps players understand their positioning, improve their throwing mechanics under fatigue, and develop the crucial communication needed for effective relay throws. Use this drill during the main body of a fielding session or as a high-intensity conditioning finish.
2. Setup

Equipment Needed:
- 10-15 cricket balls (use practice or match balls depending on the team's level)
- 4 target cones (preferably different colours for clarity)
- 1 set of stumps (or a target net/stump board)
- A bat for the coach to hit catches/ground fielding balls
Field Setup:
Utilise a standard 22-yard cricket pitch on an oval ground. The drill is split into two distinct phases or stations, which can be run simultaneously if you have a large squad and an assistant coach, or sequentially for smaller groups.
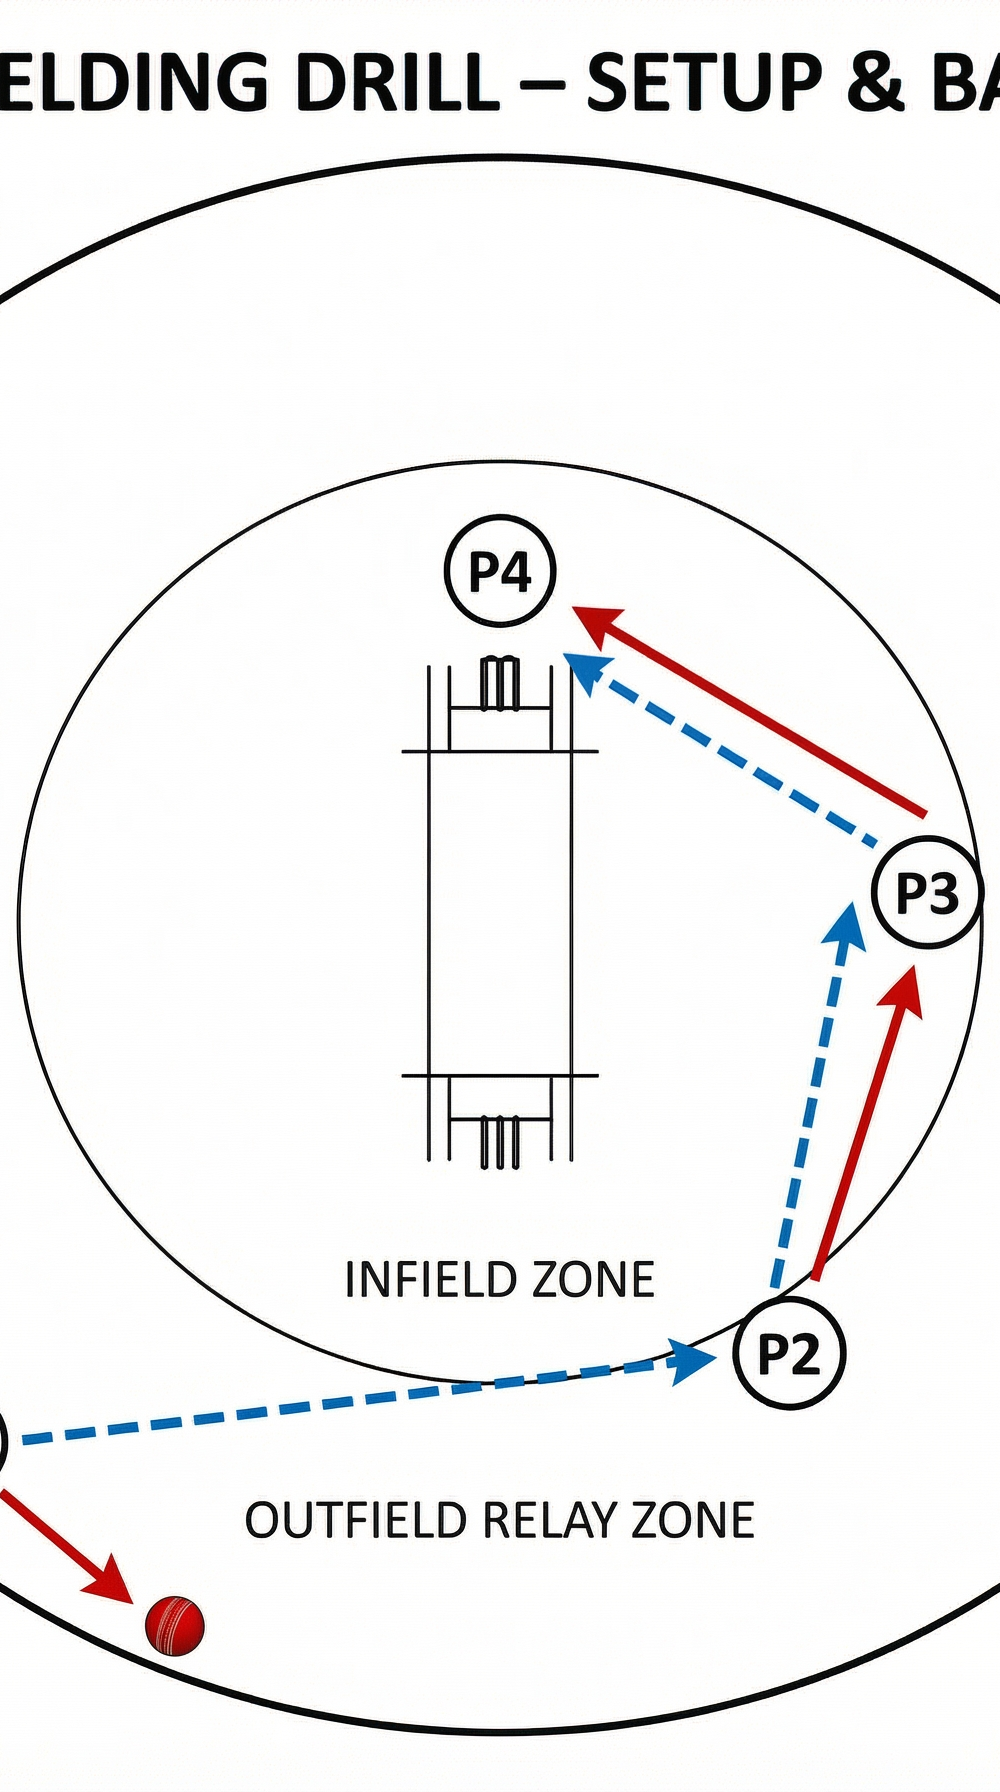
Player Positions:
- Player 1 (P1): Deep fine leg or deep square leg on the boundary.
- Player 2 (P2): Relay man positioned at mid-on or mid-wicket, approximately 30 metres from the pitch.
- Player 3 (P3): Infield relay/cover position, approximately 15 metres from the pitch.
- Player 4 (P4): Wicketkeeper or player standing behind the stumps to receive the final throw.

3. Step-by-Step Instructions

Phase 1: The Outfield Relay
- The coach stands near the pitch and hits a firm drive or lofted shot towards the boundary where Player 1 (P1) is stationed.
- P1 attacks the ball, fields it cleanly, and immediately looks for the relay man, Player 2 (P2).
- P2 must position themselves sideways on, providing a clear target (hands up, calling loudly) for P1.
- P1 throws a hard, flat throw to P2's chest height.
- P2 receives the ball and quickly transfers it to Player 3 (P3) in the infield, who then throws it to the wicketkeeper (P4) over the stumps.
- Rotate players after every 5 repetitions so everyone practices both the deep fielding and relay roles.
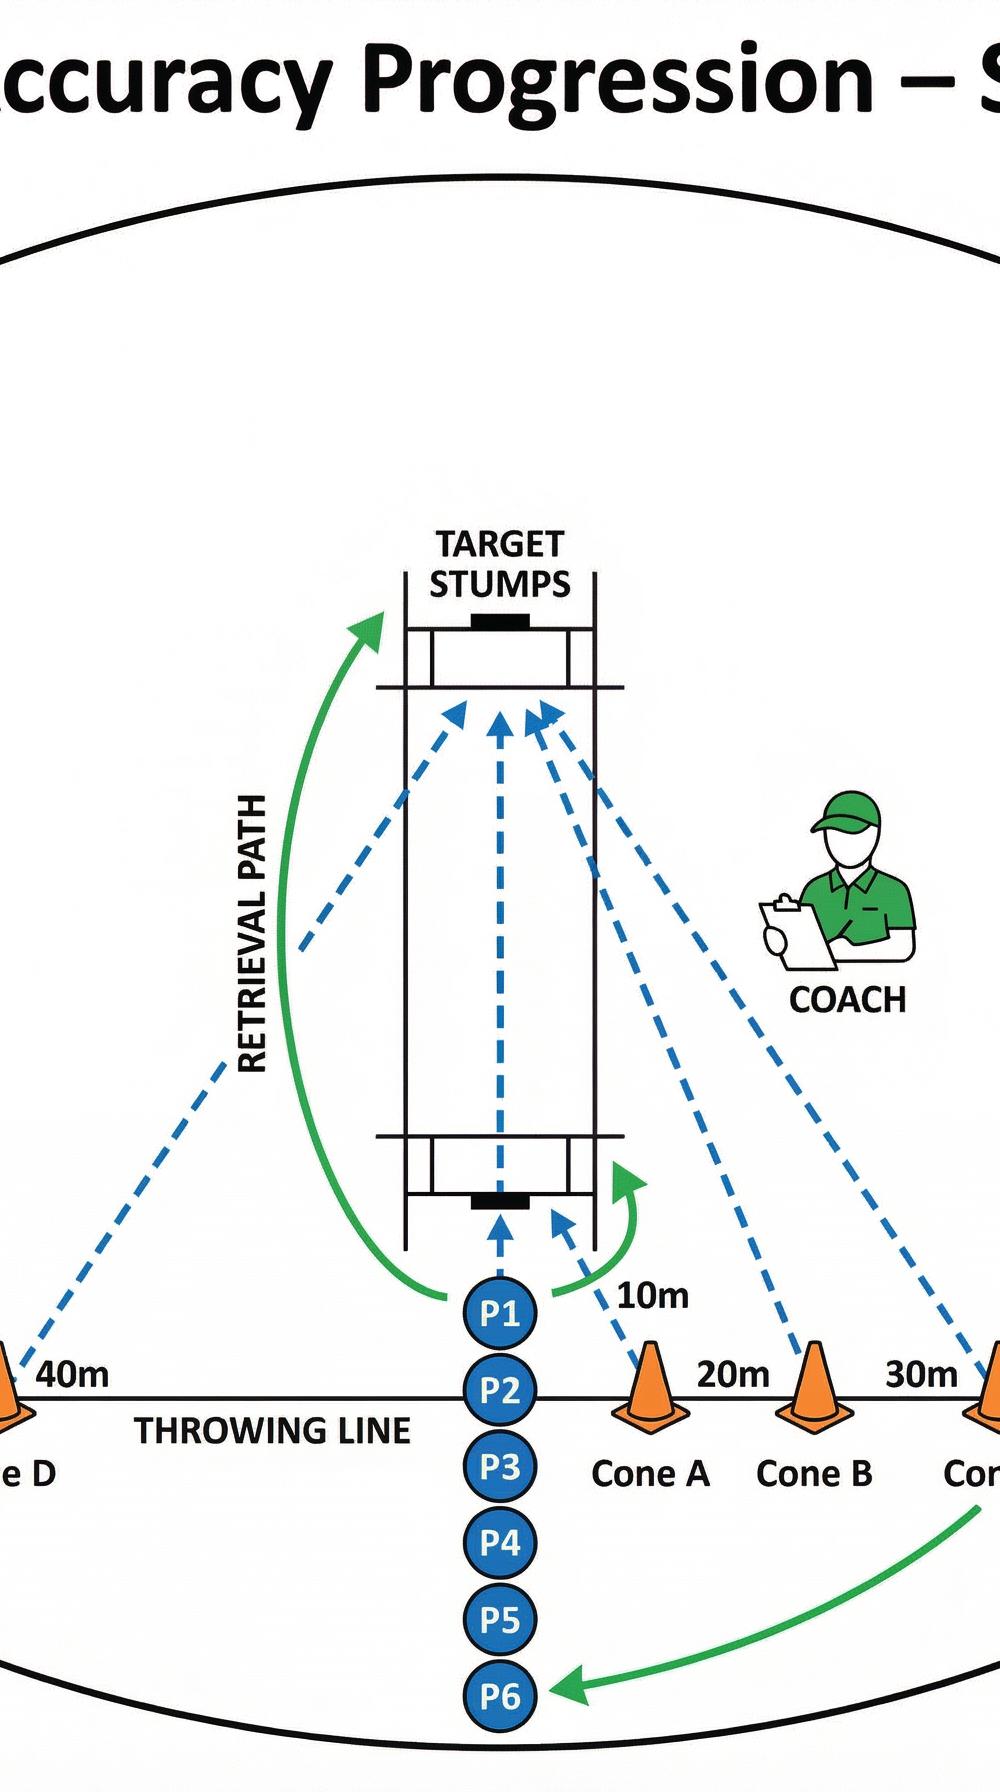
Phase 2: Throwing Accuracy Progression
- Set up four target cones (Cone A at 10m, Cone B at 20m, Cone C at 30m, Cone D at 40m) in a straight line extending away from the stumps.
- Players line up behind Cone D at the 40-metre mark.
- The coach rolls or hits a ball towards the first player in line.
- The player attacks the ball, picks it up cleanly, and executes a direct throw at the stumps.
- After throwing, the player sprints to retrieve their ball and joins the back of the queue.
- The coach can vary the starting cone to test accuracy from different distances.

4. Key Coaching Points
- Attack the Ball: Fielders must attack the ball aggressively to reduce the time the batting side has to run.
- Body Position: When throwing, ensure the front shoulder points directly at the target. The throwing arm should come over the top for maximum power and accuracy.
- The Relay Target: The relay player must turn side-on to the thrower, creating a large, visible target with their hands, and call loudly for the ball.
- Quick Release: Emphasise a quick transfer from glove/hand to throwing hand. The longer the ball stays in the hand, the more time the batters have.
- Follow Through: After releasing the ball, the fielder should follow through their throw towards the target to maintain momentum and accuracy.
5. Common Mistakes
- Throwing Off Balance: Fielders attempting to throw before they have properly set their feet, leading to wild, inaccurate throws.
- Relay Man Not Calling: The relay player failing to communicate or provide a clear target, causing the deep fielder to hesitate.
- Looping Throws: Throwing the ball in a high arc rather than a flat, hard trajectory. Looping throws take longer to arrive and are harder for the relay man or keeper to handle.
- Taking Eyes Off the Ball: Fielders looking up at the target before they have securely gathered the ball, resulting in fumbles.
6. Variations & Progressions
- Pressure Cooker: Introduce a timer or a point system. For example, the team must complete 10 successful relays within 60 seconds, or award points for direct hits on the stumps.
- Two-Ball Drill: Introduce a second ball into the drill to increase the cognitive load and force players to process information faster.
- Weak Arm Practice: Force players to execute the final infield throw with their non-dominant arm to develop ambidexterity in close-catching positions.
7. Age Adaptations
- Under 8s & Under 10s: Focus heavily on the basics of picking up the ball and throwing mechanics. Reduce the distances significantly (e.g., maximum 15-20m throws). Use softer balls to build confidence.
- Under 12s & Under 14s: Introduce the concept of the relay. Emphasise the importance of calling and providing a target. Distances can be increased to 30-40m.
- Under 16s & Open: Run the drill at full match intensity. Incorporate fitness elements (e.g., a 20m sprint before fielding the ball) to simulate late-innings fatigue. Expect high accuracy and rapid release times.