First Phase Strike: The 'Loop & Cut' Backs Move
Equip your backline with a devastating first-phase strike move designed to manipulate the defence and create overlaps on the outside.

Equipment Needed
1. Overview
The 'Loop & Cut' is a highly effective first-phase attacking move designed to be launched from a stable set-piece, typically a scrum or a clean lineout win. The primary objective is to manipulate the opposition's defensive line speed and alignment by introducing multiple viable attacking options simultaneously. By combining a hard, flat decoy line from the inside centre (12) with a looping run from the fullback (15), this play forces the defending fly-half and centres to make split-second read decisions. When executed with precision and timing, it creates a numerical advantage on the outside edge, allowing the outside centre (13) or winger (14) to break the gain line or exploit open space.
This move is particularly potent when the opposition defence employs a fast, blitzing system, as the intricate passing and dummy runners can easily disrupt their defensive integrity. It requires excellent communication, precise timing, and accurate passing under pressure.
2. Setup
To effectively drill this move, you will need a full-sized rugby pitch (100m x 70m) or a suitably marked training area. Ensure you have the following equipment ready:
- Rugby Balls: At least 3-4 balls to keep the drill flowing without unnecessary delays.
- Cones/Markers: Use cones to mark the initial set-piece position (e.g., a simulated scrum 15 metres from the left touchline), the defensive gain line, and the starting positions for the attacking backs.
- Bibs: Two sets of contrasting bibs to clearly distinguish the attacking backline from the defensive unit.
Pitch Setup & Player Positions
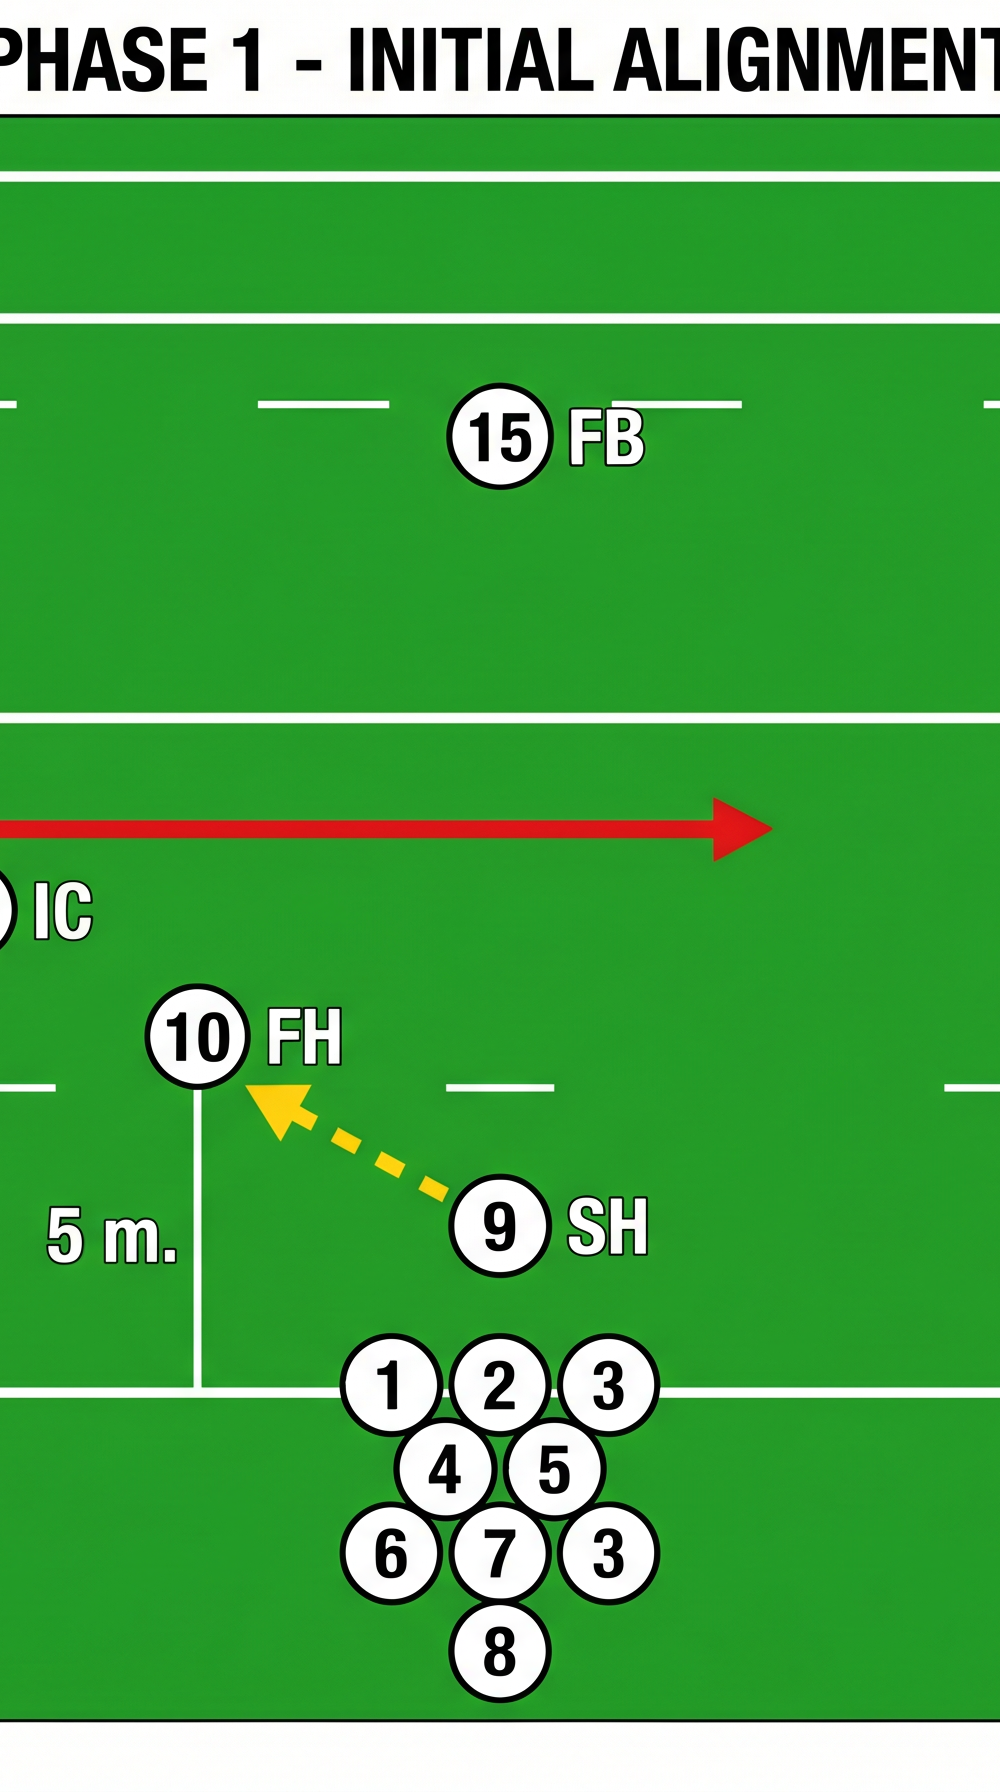
Set up a simulated scrum on the left-hand side of the pitch, approximately 15 metres in from the touchline. This provides ample open space on the right side for the move to develop.

- 9 (Scrum-half): Positioned at the base of the simulated scrum, ready to clear the ball quickly.
- 10 (Fly-half): Aligned relatively flat, approximately 5 metres deep and 5 metres wide of the scrum, ready to take the ball to the line.
- 12 (Inside Centre): Positioned 2 metres outside and slightly behind the 10. They must be ready to run a hard, direct 'cut' line back towards the gain line.
- 13 (Outside Centre): Positioned 2 metres outside the 12, ready to run an 'overs' line (drifting slightly outwards) to receive the ball out the back.
- 15 (Fullback): Positioned deep, approximately 10-12 metres behind the main attacking line, ready to inject pace and loop around the 10 and 12.
- 14 (Right Wing): Holding width on the right touchline, maintaining depth to ensure they do not overrun the play.
3. Step-by-Step Instructions
Executing the 'Loop & Cut' requires meticulous timing. Follow these steps to ensure the play flows smoothly:
- The Delivery: The 9 clears the ball rapidly and accurately from the base of the scrum to the 10. The pass must be firm and in front of the 10 to allow them to take it on the move.
- Engaging the Defence: The 10 catches the ball and immediately attacks the defensive line, running straight and hard to fix the opposing fly-half. They must carry the ball in two hands to maintain the threat of a pass, kick, or run.
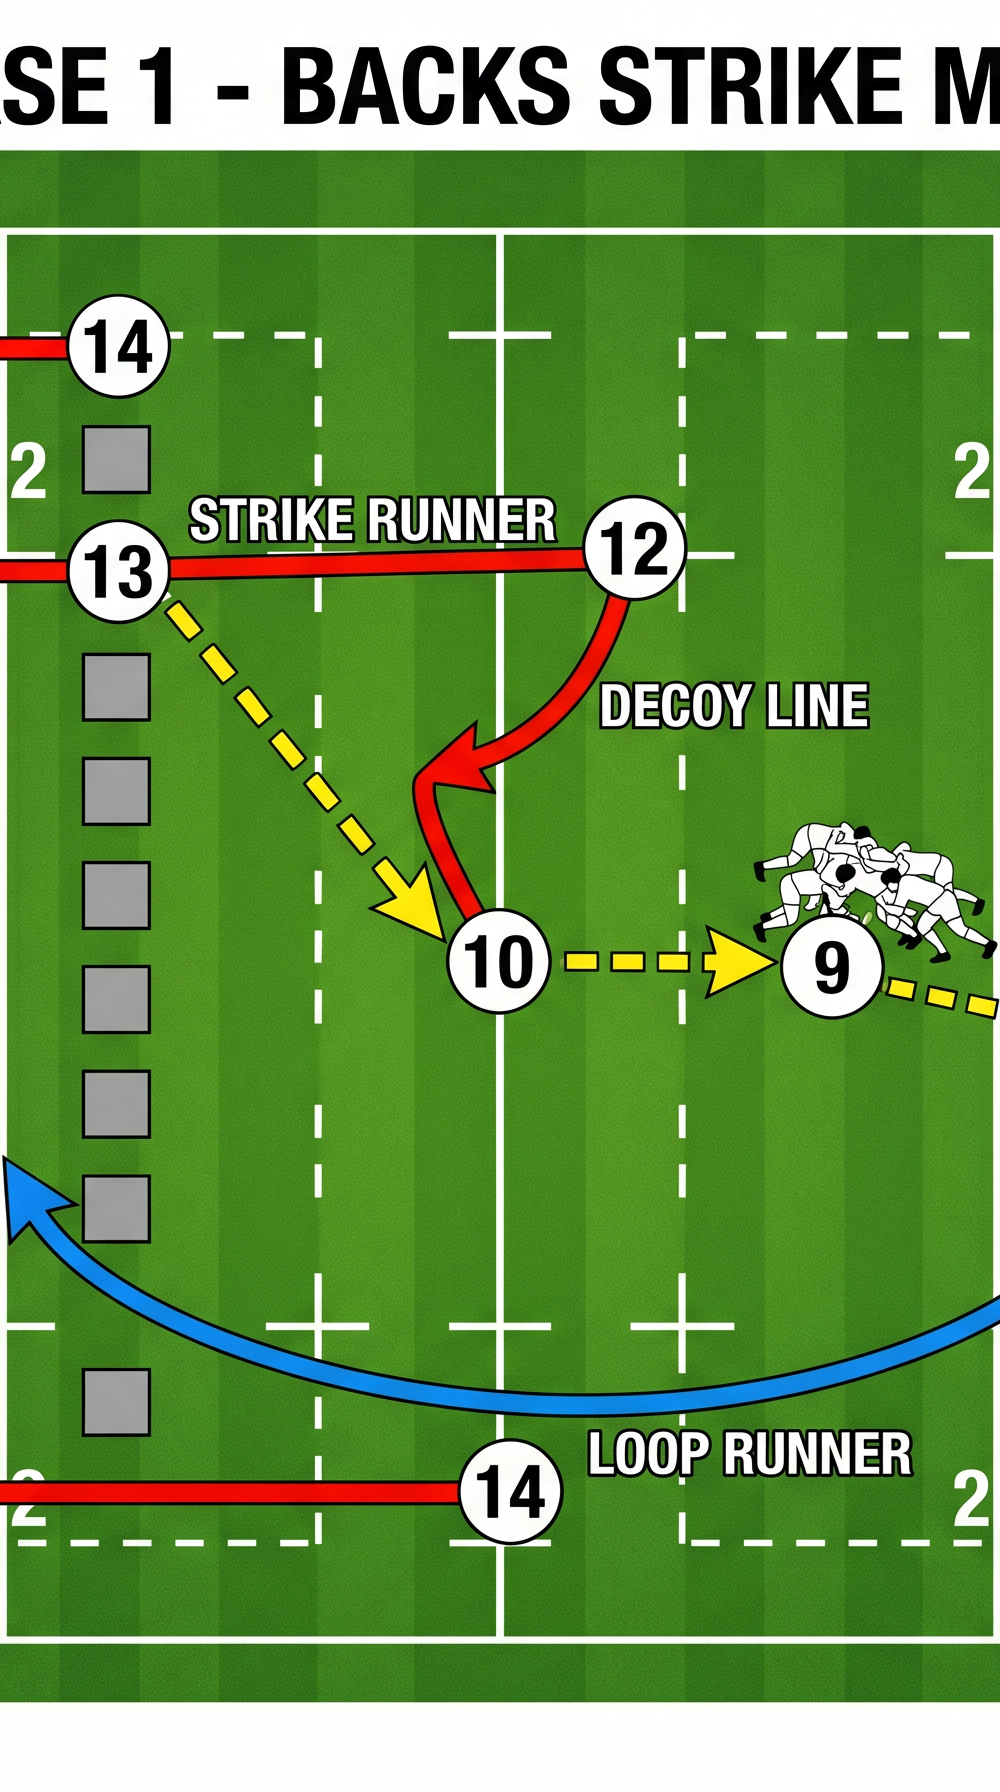
- The Decoy Line: As the 10 receives the ball, the 12 accelerates, running a hard, aggressive 'cut' line directly into the channel between the opposing 10 and 12. The 12 must call for the ball convincingly and sell the dummy run to draw the defenders inward.
- The Loop: Simultaneously, the 15 accelerates from their deep position, running a sweeping arc behind the 10 and 12. Their timing is crucial; they must arrive just as the 10 is ready to release the pass.
- The Distribution: The 10, having fixed the inside defenders and sold the dummy to the 12, executes a swift 'out the back' pass to the looping 15. This pass must be accurate and timed to hit the 15 at top speed.
- The Strike: The 15 catches the ball on the burst, now facing a disorganized or drifting defence. They immediately assess the situation and distribute the ball to the 13, who is running a strong outside line.
- Exploiting the Space: The 13 receives the ball in space, with the 14 maintaining width on the outside. The 13 can either break the line themselves, draw the final defender and pass to the 14, or put boot to ball if the space is closed down.
4. Key Coaching Points
To ensure the success of this set play, emphasize the following coaching points during practice:
- Timing is Everything: The entire move hinges on the timing of the 12's decoy run and the 15's loop. If the 12 is too early, the defence won't bite; if the 15 is too late, the 10 will be tackled before they can pass.
- Sell the Dummy: The 12 must run their line with absolute conviction, calling for the ball and presenting their hands as if they are genuinely expecting to receive it. Their job is to pull defenders out of position.
- Square Shoulders: The 10 must keep their shoulders square to the defensive line for as long as possible. Drifting sideways will simply push the defence across and close down the space for the outside backs.
- Depth and Pace: The 15 must start deep enough to build maximum speed before receiving the ball. Catching the ball flat-footed will kill the momentum of the attack.
- Communication: Clear, concise calls are essential. The 10 must dictate the play, while the 12 and 15 must communicate their readiness.
5. Common Mistakes
Watch out for these frequent errors and correct them immediately:
- Drifting 10: If the fly-half drifts laterally instead of attacking the line, they fail to fix the inside defenders, allowing the defence to easily slide across and cover the outside threat.
- Unconvincing Decoy: If the 12 jogs or runs a soft line, the defence will ignore them and focus on the wider runners. The decoy must be a genuine threat.
- Flat Fullback: If the 15 starts too flat or fails to accelerate, they will receive the ball without momentum, making it easy for the defence to tackle them behind the gain line.
- Poor Passing Execution: The 'out the back' pass from the 10 to the 15 requires practice. An inaccurate or floating pass will slow down the play and give the defence time to adjust.
6. Variations & Progressions
Once the basic move is mastered, introduce these variations to keep the defence guessing:
- The Inside Pop: If the opposing 12 drifts out to cover the looping 15, the 10 can simply pop the ball short to the 12 running the hard cut line.
- The Switch: Instead of the 13 running an outside line, they can cut back inside on a switch line off the 15, targeting the space left by drifting defenders.
- Adding the Blindside Winger: Bring the 11 (left wing) across from the blindside to act as an extra option, either running an inside line off the 10 or joining the line outside the 13.
7. Age Adaptations
Tailor the complexity of the move based on the age and skill level of your players:
- Under 10s/12s: Focus purely on the fundamental skills: catching, passing, and running straight. Simplify the move by removing the loop; instead, practice a simple pass from 10 to 12, or 10 to 13, emphasizing depth and running onto the ball.
- Under 14s/16s: Introduce the decoy runner (12) and the concept of fixing defenders. Practice the 'out the back' pass in isolation before incorporating it into the full team move.
- Under 18s/Open: Execute the full move at game speed against a live, contested defence. Encourage the 10 and 15 to make read-and-react decisions based on the defensive alignment.