Back-Four Offside Trap: Defensive Line Coordination Drill
Master the back-four offside trap with this step-by-step drill that teaches defenders to hold a flat line, read the trigger moment, and step up in perfect synchronisation to nullify attacking threats.

Equipment Needed
Overview
The back-four offside trap is one of the most tactically rewarding defensive tools in football — and one of the most difficult to execute reliably under pressure. When it works, it compresses the pitch, frustrates attackers, and swings momentum firmly in your team's favour. When it breaks down, it creates one-on-one situations against your goalkeeper. This drill is designed to give your back four the communication habits, spatial awareness, and split-second decision-making they need to use the trap confidently in competitive matches.
This session is best used mid-week during a tactical block, or as part of a defensive shape unit in pre-season. It is most effective when your team already has a basic understanding of a flat defensive line and is ready to add a higher-risk, high-reward layer to their defensive game. Allocate 45–60 minutes for a full session, including warm-up, walkthrough, and live repetitions.
Setup

Pitch Area: Use the defensive half of a full-size pitch (approximately 52m x 68m). Mark a start zone for attackers at the halfway line and a midfield trigger zone 35–40m from goal using flat cones or disc markers.
Equipment Required:
- 16 flat cones or disc markers (to mark defensive line reference points and trigger zones)
- 8 bibs in two contrasting colours (defenders in red, attackers in blue)
- 1 goalkeeper
- 6–8 footballs (to maintain drill tempo)
- 1 coaching board or flip chart (for pre-drill walkthrough)
Player Positions:
| Number | Position | Role in Drill |
|---|---|---|
| GK | Goalkeeper | Sweeper-keeper; steps off line on trap trigger |
| 2 | Right Back (RB) | Holds right flank of defensive line |
| 5 | Right Centre-Back (RCB) | Anchors right side of central line |
| 6 | Left Centre-Back (LCB) | Anchors left side of central line |
| 3 | Left Back (LB) | Holds left flank of defensive line |
| 9 | Centre Forward (CF) | Primary attacker testing the trap |
| 7 | Right Winger (RW) | Wide attacker providing secondary run |
| 11 | Left Winger (LW) | Wide attacker providing secondary run |
A coach or designated midfielder stands at the halfway line to play balls into the attackers on command.

Diagram 1 — Phase 1: Defensive Line Set. The back four (2, 5, 6, 3) hold a flat line 30m from goal with the goalkeeper (GK) positioned at the edge of the penalty area. Attackers (9, 7, 11) are positioned just onside as the ball is played in from midfield.
Step-by-Step Instructions

Step 1 — Walk-Through (No Ball, No Pressure)
Begin with the back four standing in their flat line approximately 30m from goal. Walk them through the concept verbally: the line holds its shape, the goalkeeper acts as a sweeper, and the trigger to step up is the moment the ball is played forward by the midfield passer. Physically walk each defender to their starting position and use cones to mark the line.
Step 2 — Establish the Defensive Line
The four defenders set their line at 30m from goal. The goalkeeper positions at the edge of the penalty area (18-yard box), not on the goal line. Defenders must be able to see each other in their peripheral vision. The LCB (No. 6) or RCB (No. 5) is designated as the line-caller — the player who shouts the trigger command.
Step 3 — Introduce the Trigger Signal
The coach (acting as the midfield passer) holds the ball at the halfway line. The three attackers (9, 7, 11) stand 5m ahead of the defensive line — just onside. On the coach's raised hand (the pre-trigger warning), defenders prepare to step. The moment the coach's foot contacts the ball to play it forward, the line-caller shouts "STEP!" and all four defenders sprint forward 8–10m in unison.
Step 4 — Goalkeeper Coordination
As the defenders step, the goalkeeper simultaneously advances to the edge of the penalty area (or beyond, if the ball is played long). The goalkeeper must be vocal, calling "KEEPER!" if they are coming to claim the ball, or "HOLD!" if the defenders need to track back. This communication is non-negotiable.
Step 5 — Live Repetitions (Passive Attackers)
Run 10 repetitions with attackers walking into their runs — not sprinting. The focus is entirely on the defensive line's timing and communication. Rotate the line-caller role between the two centre-backs every five repetitions. After each rep, freeze the action and check: are all four defenders on the same horizontal line? Is the goalkeeper in position?
Step 6 — Live Repetitions (Active Attackers)
Now allow attackers to time their runs at full pace, attempting to stay onside. The coach varies the timing of the pass — sometimes early, sometimes delayed — to test the defenders' concentration. Attackers should also attempt dummy runs and directional changes to simulate match conditions.
Step 7 — Consequence Phase
If the trap is beaten (an attacker receives the ball onside), the drill continues as a live 4v3 attack vs defence situation. This teaches defenders the critical recovery shape and prevents them from switching off after a failed trap. The goalkeeper must now act as the last line of defence.
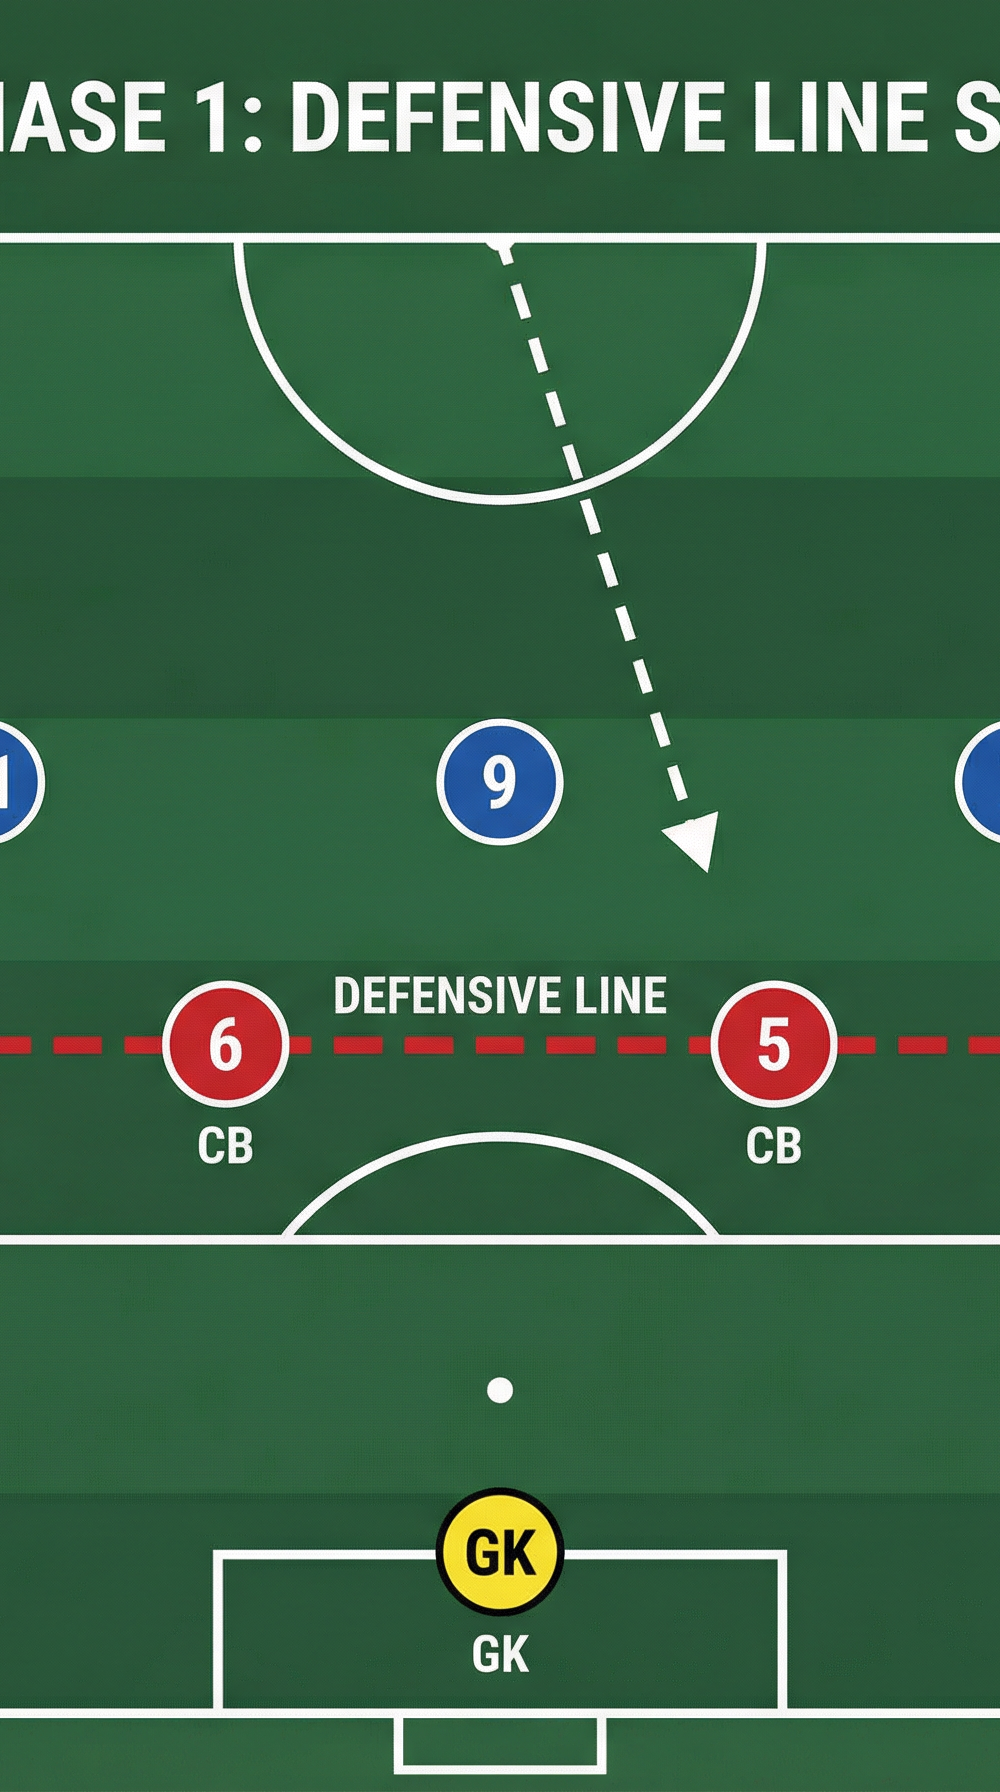
Diagram 2 — Phase 2: Step-Up Trigger. On the line-caller's command, all four defenders step forward 8–10m simultaneously. The attacking centre forward (9) is caught in an offside position. The goalkeeper advances to cover the space behind the line.

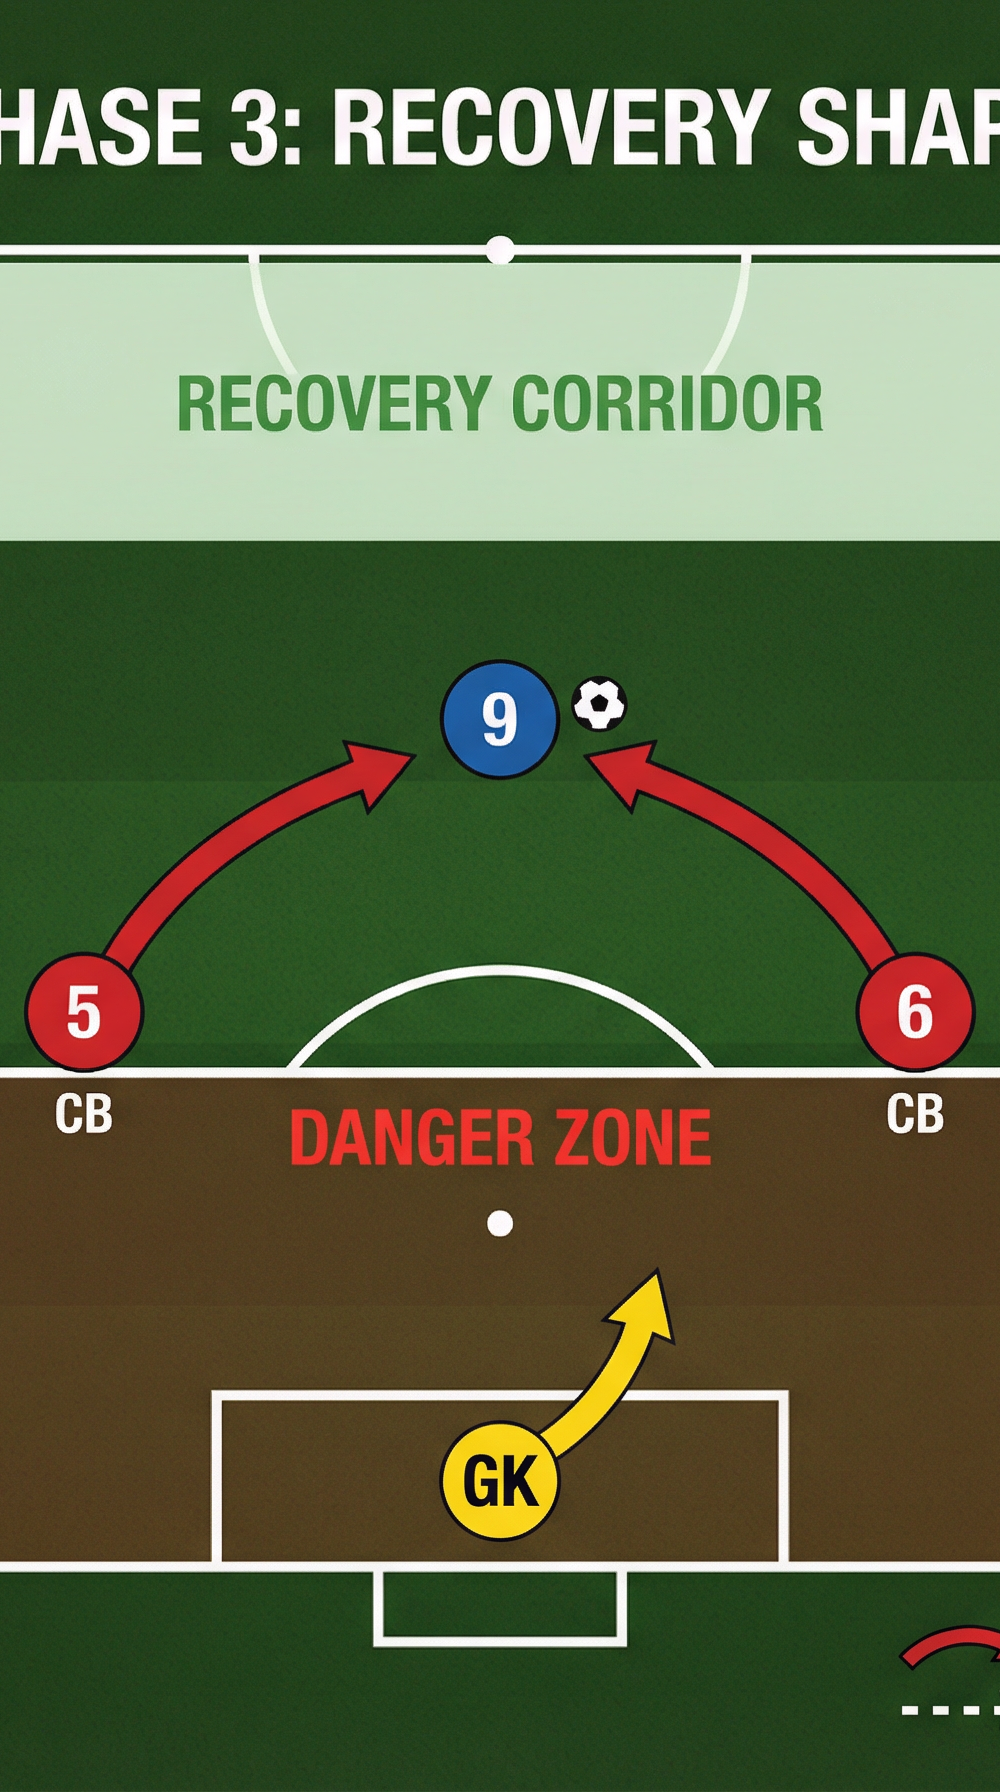
Diagram 3 — Phase 3: Recovery Shape. When the trap is beaten, the two centre-backs (5 and 6) converge on the ball-carrier (9), while the full-backs (2 and 3) track the wide attackers (7 and 11). The goalkeeper advances to narrow the angle.
Key Coaching Points

1. The Line Must Be Flat — Not Staggered
A single defender dropping even one metre behind the line invalidates the trap entirely. Constantly reinforce that all four players must move as one unit. Use the phrase: "You are not four individuals — you are one line." Defenders should be able to draw a straight horizontal line through all four of their chests.
2. The Trigger Is the Pass, Not the Run
The most common error is stepping on the attacker's movement rather than the moment of the pass. Drill this relentlessly: defenders must read the passer's body shape and step the instant the ball leaves the passer's foot. Stepping too early (on the attacker's run) is offside law ignorance; stepping too late means the attacker is onside and through on goal.
3. Communication Is Non-Negotiable
The line-caller must be loud, clear, and decisive. Hesitation in the call is as dangerous as no call at all. Rotate the calling responsibility so that both centre-backs are capable of leading. Full-backs must also echo the call to confirm they have heard it.
4. The Goalkeeper Is the Fifth Defender
The goalkeeper's positioning is the safety net of the entire system. They must be aggressive in their positioning — off the goal line and ready to sweep any ball played in behind. A goalkeeper who stays on their line during a high defensive line negates the entire tactical benefit of the trap.
5. Hold the Line Under Pressure
In the final third, with the crowd or opponents applying pressure, defenders will instinctively drop. Teach them to trust the system. Use the cue: "If you drop, you invite them in. If you hold, you own the space." Confidence in the system comes only from repetition.
6. Recovery Is Part of the Drill
The trap will not work every time in a match. Defenders must understand that when it fails, their immediate response — sprinting back into shape, tracking runners, and communicating with the goalkeeper — is just as important as the trap itself.
Common Mistakes
Mistake 1 — Stepping at Different Times
This is the most dangerous error. If the RB steps while the LCB holds, the line is broken and an attacker can exploit the gap. Correction: slow the drill down to walking pace and count aloud — "One, two, step" — until all four players move simultaneously. Only increase the pace once the timing is consistent.
Mistake 2 — Stepping Too Slowly or Too Tentatively
A half-hearted step leaves attackers onside. The step must be explosive — 8–10m at sprint pace. Defenders who jog forward rather than sprint are not moving the line far enough to catch attackers offside. Correction: place a cone 8m ahead of the starting line and insist defenders reach it on every step.
Mistake 3 — Goalkeeper Remaining on the Goal Line
A goalkeeper who does not advance during the trap creates a massive gap between the defensive line and the goal. Any ball played over the top will result in a one-on-one with no cover. Correction: physically position the goalkeeper at the penalty spot during walkthroughs and reinforce their role as a sweeper-keeper verbally throughout the session.
Mistake 4 — Stepping on the Attacker's Run Rather Than the Pass
Defenders who watch the attacker rather than the ball will step too early, leaving attackers onside when the ball is eventually played. Correction: instruct defenders to keep their eyes on the passer's hips and foot during the build-up phase. The trigger is the foot-to-ball contact, not the attacker's movement.
Mistake 5 — Failing to Recover Shape After a Failed Trap
When the trap is beaten, some defenders freeze or continue stepping forward in confusion. This leaves the goal completely exposed. Correction: make the consequence phase (Step 7) a mandatory part of every session. Defenders must learn that a failed trap triggers an immediate sprint back to defensive positions.
Variations & Progressions

Progression 1 — Add a Central Midfielder (Easier)
Introduce a defensive midfielder (No. 4 or No. 8) sitting 5–8m behind the line. Their role is to intercept any ball that drops short of the offside line. This gives the back four greater confidence to step, knowing there is cover behind them. Use this variation when first introducing the drill to less experienced groups.
Progression 2 — Multiple Passers (Harder)
Instead of one coach/passer at the halfway line, use two passers positioned at different angles — one central, one wide. The defenders must now read which passer has the ball and react to the correct trigger. This replicates match conditions where the ball can be switched quickly before the through-ball is played.
Progression 3 — Full 11v11 Transition Game (Match Intensity)
Integrate the offside trap into a full 11v11 possession-to-attack game. The defending team earns a bonus point for every successful offside trap. This rewards the behaviour in a competitive context and forces the back four to execute the trap under genuine match pressure, with midfielders and forwards also involved in the defensive shape.
Age Adaptations

Under-12 and Under-14: Do not introduce the offside trap as a tactical system at this age. Instead, use the drill purely to teach defensive line awareness and communication — stepping up as a unit to win the ball rather than to spring an offside trap. Remove the offside law element entirely and focus on the physical habit of moving together. Use a smaller pitch area (30m x 40m) and reduce the number of attackers to two.
Under-16: Introduce the full offside trap concept but use passive attackers for the majority of the session. Spend significant time on the verbal communication element — who calls, when they call, and how loud. At this age, the psychological confidence to hold a high line is the primary development goal. Limit live repetitions to the final 15 minutes of the session.
Open Age / Senior: Run the full drill as described, including the consequence phase and the multiple-passer progression. Senior players should be challenged to execute the trap from different starting positions on the pitch (not just 30m from goal) and in response to different attacking patterns — long balls, layoffs, and switch passes. Introduce video review of the session to reinforce correct and incorrect trigger moments.