Back-Four Offside Trap: Mastering Defensive Line Coordination
Teach your defensive unit to execute a disciplined, high-line offside trap through progressive drills that build communication, timing, and collective stepping — turning your back four into an organised, territory-controlling unit.

Equipment Needed
Overview
The offside trap is one of the most tactically rewarding — and demanding — tools available to a defensive unit. When executed correctly, it compresses the pitch, denies space in behind, disrupts the opposition's forward runs, and hands your team a powerful psychological edge. This drill teaches your back four (Right Back #2, Centre Back #4, Centre Back #5, Left Back #3) to operate as a single, flat, coordinated unit, stepping up in unison the moment the trigger moment arrives.
This session is best deployed mid-week when you have 45–60 minutes dedicated to defensive shape work. It is most effective when your team is preparing to face opponents who rely heavily on through-balls, diagonal runs in behind, or a high-pressing striker. It is equally valuable as a foundational session early in a pre-season block, establishing the defensive habits and communication patterns that will underpin your entire defensive structure for the season.
When to use this drill: Pre-season shape sessions, mid-week tactical preparation against a specific opponent, or whenever your back four has been repeatedly caught by balls played in behind.
Setup

Equipment Required
| Item | Quantity | Purpose |
|---|---|---|
| Full-size or 3/4-size pitch | 1 | Realistic defensive distances |
| Bibs (2 colours) | 10 | Distinguish defenders from attackers |
| Footballs | 6–8 | Continuous reps without delays |
| Flat cones (red) | 8 | Mark the offside trap trigger zones |
| Flat cones (yellow) | 4 | Mark the defensive starting line |
| Mannequins or poles | 2–3 | Optional: simulate midfield runners |
Pitch Setup
Use the defensive half of a full-size pitch (100–110m × 64–75m). Mark a starting defensive line with yellow cones at approximately 35 metres from goal — this represents the back four's default mid-block position. Place red cones at the halfway line to indicate the maximum step-up position. The goalkeeper (#1) starts on the edge of the penalty area (approximately 16.5m from goal line) and must communicate actively throughout.
Player Positions
- #1 — Goalkeeper: Edge of penalty area, sweeper-keeper role, calls "STEP" or "HOLD"
- #2 — Right Back: Right flank, aligned with the defensive line
- #4 — Centre Back (Right): Central, 2–3 metres right of centre
- #5 — Centre Back (Left): Central, 2–3 metres left of centre
- #6 — Defensive Midfielder (optional): 8–10 metres ahead of the back four, acts as a shield and trigger indicator
- #3 — Left Back: Left flank, aligned with the defensive line
- #9, #10, #11 — Attackers (Red bibs): Positioned 5–8 metres ahead of the defensive line, simulating opposition forwards
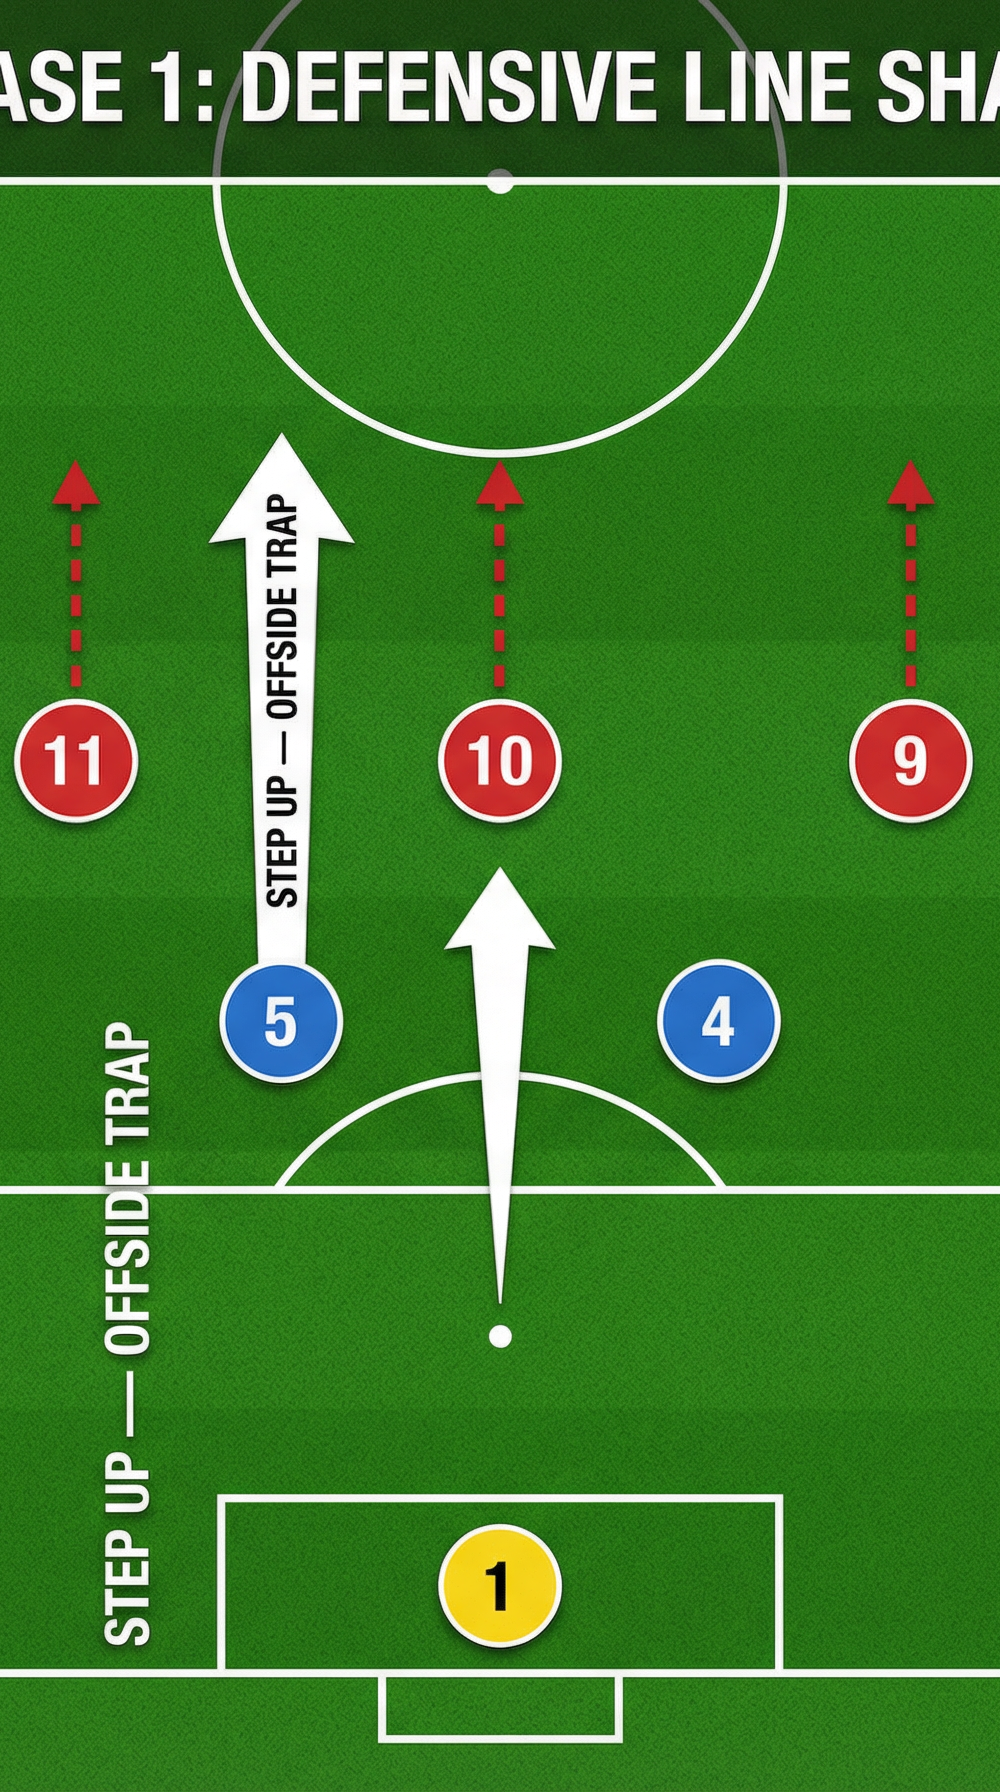
Diagram 1 — Phase 1: Defensive Line Shape. The back four holds a flat line 35m from goal. Attackers (#9, #10, #11) are positioned just ahead. The trigger has not yet been called.
Step-by-Step Instructions
Step 1 — Establish the Defensive Line (5 minutes)
Begin with a walk-through. Position your back four along the yellow cone line at 35m. Spend 3–4 minutes physically adjusting each player's position until the line is perfectly flat. Emphasise that the line is set by the second-to-last defender — not the last. Use this moment to establish the verbal cue: the goalkeeper shouts "STEP!" as the trigger.
Step 2 — Introduce the Trigger Cue (5 minutes)
The coach (or a designated feeder) stands 40–45 metres from goal with a ball. Attackers (#9, #10, #11) stand 5 metres ahead of the defensive line. On the coach's signal (a raised arm or verbal "GO"), the attackers make forward runs. The goalkeeper reads the movement and shouts "STEP!" The back four steps up 8–10 metres simultaneously, maintaining a flat line. Freeze and check alignment. Repeat 6–8 times at walking pace.
Step 3 — Add the Ball (10 minutes)
The coach now plays a forward pass toward the space behind the defensive line at the moment the attackers run. The back four must step up before the ball is played, catching the attackers offside. Defenders raise their arms to signal offside. The goalkeeper sweeps to collect any ball that beats the line. Run 10–12 repetitions, rotating attackers so all outfield players experience both roles.
Step 4 — Introduce Pressure and Decision-Making (10 minutes)
Add a midfield unit (#6, #8) 10–12 metres ahead of the back four. The coach now has two options: play a through-ball (triggering the trap) or play a short pass to a midfielder (requiring the back four to hold their line). The goalkeeper must now differentiate between "STEP!" and "HOLD!" calls. This is the critical decision-making phase — the back four must trust the goalkeeper's call, not react individually.
Step 5 — Live Scenario (15 minutes)
Run a 4v4 or 5v5 in the defensive half. Attacking team attempts to play in behind; defensive unit applies the offside trap in a live context. Award 1 point to defenders for every successful offside trap; award 1 point to attackers for every time they beat the trap and create a shooting opportunity. First to 5 points wins.

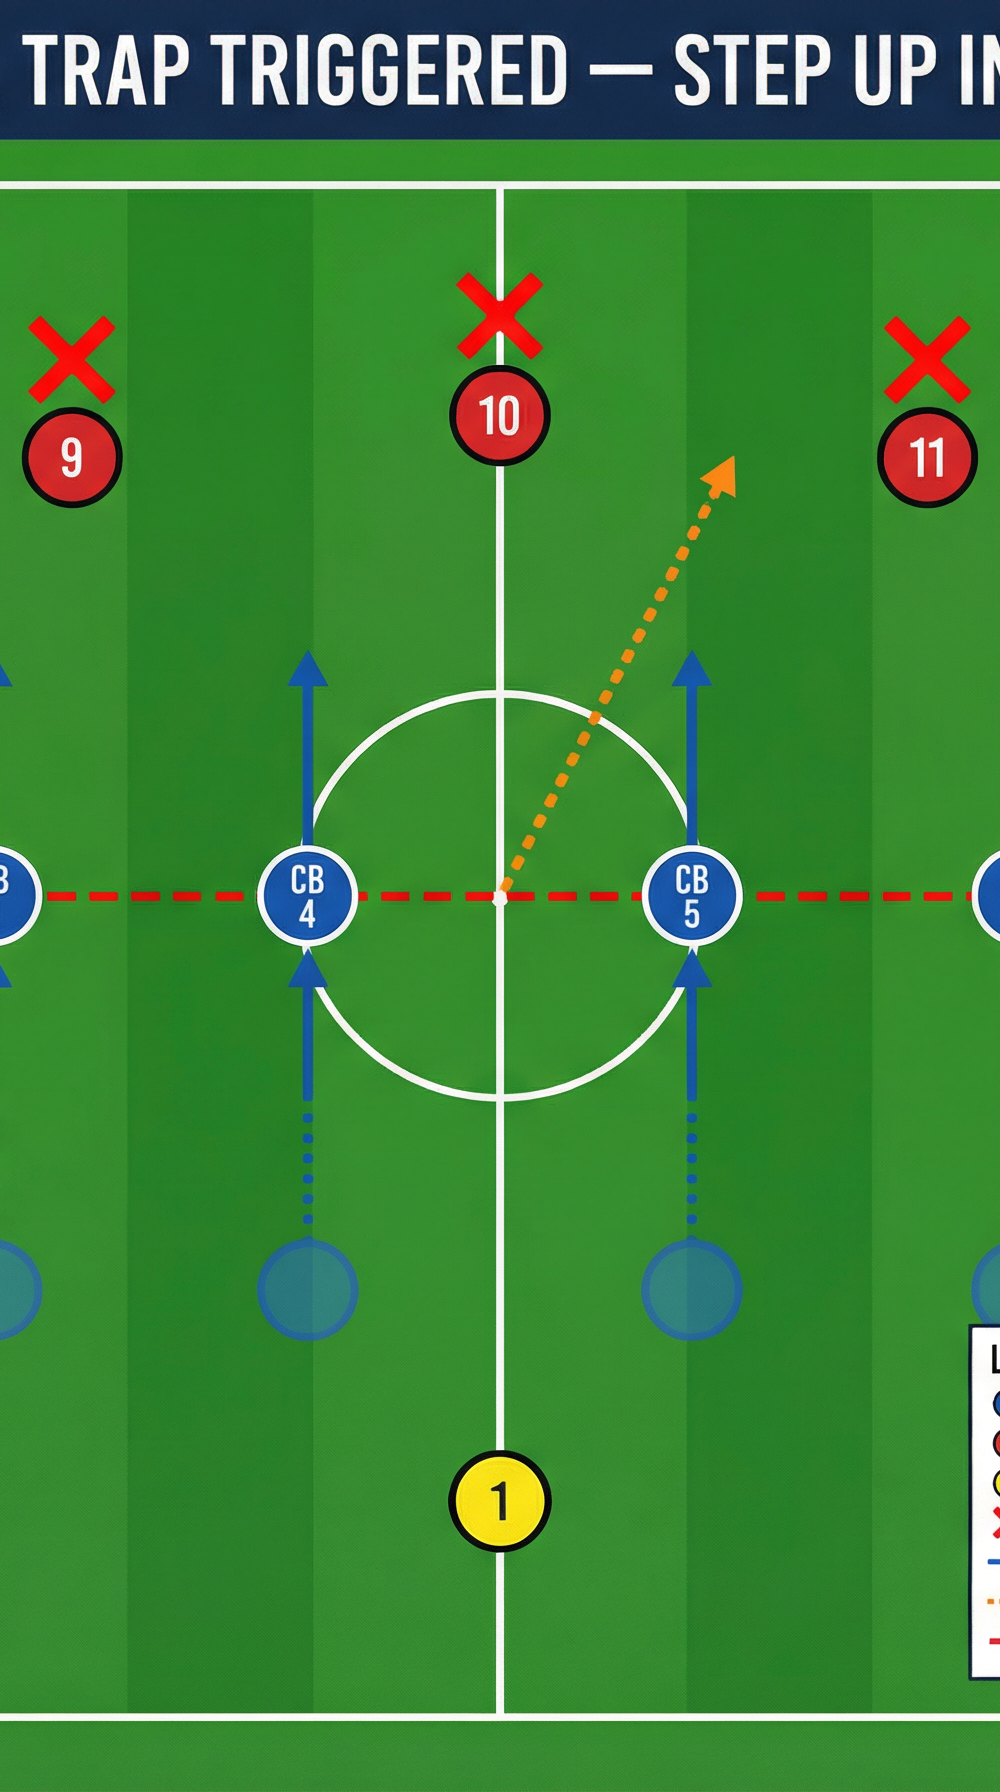
Diagram 2 — Phase 2: Trap Triggered. The back four steps up 10m in unison to the halfway line. Attackers (#9, #10, #11) are caught offside (marked with red X). The orange dashed arrow shows the ball played into the vacated space, collected by the goalkeeper (#1).
Key Coaching Points

1. The Line is Only as Strong as Its Weakest Link. One defender who hesitates or steps at a different time destroys the trap. Drill the concept that all four defenders move as one body. Use the phrase: "If one steps, all step."
2. The Goalkeeper is the Conductor. The back four should never self-initiate the trap based on individual reads. The goalkeeper has the widest view of the pitch and must own the "STEP" call. Train your goalkeeper to be loud, decisive, and early with the call — ideally 0.5–1 second before the ball is played.
3. Trigger Moments are Specific. Teach players to recognise the three primary trigger moments: (a) the opposition midfielder's head drops to play a through-ball, (b) a wide player cuts inside to deliver a diagonal pass, or (c) the ball is played back to a deep midfielder. Outside of these triggers, the line holds.
4. Step Up — Do Not Sprint. The step-up is a sharp, controlled 8–10 metre advance, not a sprint. Players who sprint lose their shape and create gaps. The movement should be quick but compact, with players checking their shoulders to maintain the flat line.
5. Communication Does Not Stop After the Step. After stepping, defenders must immediately call "OFFSIDE!" loudly and raise their arms. This helps the assistant referee and reinforces the collective action. Silence after the step is a coaching red flag.
6. Recover Quickly if the Trap Fails. If the ball beats the line, defenders must immediately sprint back into a recovery shape — no dwelling on the mistake. Train the recovery sprint as part of every repetition so it becomes automatic.
Common Mistakes

Mistake 1 — Staggered Stepping. One or two defenders step while others hold, creating a diagonal line rather than a flat one. Correction: Return to walk-through pace. Use a rope or pole held horizontally by two coaches to physically guide the line during early reps.
Mistake 2 — Stepping Too Late. Defenders wait until the ball is already played before stepping, meaning attackers are onside at the moment of the pass. Correction: Emphasise that the step must begin as the passer's foot makes contact — or even fractionally before. Slow-motion video review is highly effective here.
Mistake 3 — Individual Decision-Making. A centre back reads a through-ball and steps alone, while the full backs hold. Correction: Reinstate the rule that only the goalkeeper's call triggers the step. Penalise individual stepping in training with a reset and verbal reminder.
Mistake 4 — Goalkeeper Failing to Sweep. After the trap is sprung, the goalkeeper stays on the goal line instead of advancing to collect the through-ball. Correction: In every repetition, the goalkeeper must physically move forward to claim any ball played into the space behind the defensive line. Make sweeping a non-negotiable habit.
Mistake 5 — Losing Shape Under Pressure. In the live scenario phase, defenders abandon the flat line when attackers make diagonal or overlapping runs. Correction: Introduce a "shape check" freeze: blow a whistle mid-drill and ask defenders to hold their positions. Coach walks the line and provides immediate feedback on alignment.
Variations and Progressions
Progression 1 — Add a Second Ball (Harder). While the first trap is being executed, the coach immediately plays a second ball from a different angle. Defenders must reset their line within 3 seconds and be ready to trap again. This simulates high-tempo match conditions and builds rapid recovery habits.
Progression 2 — Introduce a Wide Overload (Harder). Add a wide attacker (#7 or #11) who makes a run down the channel simultaneously with the central forward run. The full back must decide whether to track the wide run (breaking the line) or hold and trust the trap. This creates a realistic dilemma that mirrors match scenarios against teams who use wide runners to exploit the trap.
Variation 1 — Passive Trap (Easier/Introductory). Remove the live ball entirely. Attackers simply walk forward on a signal, and the back four steps up in response to the goalkeeper's call. This is ideal for younger or less experienced groups who need to build the habit of collective movement before adding ball pressure.
Variation 2 — Midfield Integration. Add your full midfield unit and run the drill from a 9v9 or 11v11 perspective. The defensive midfielder (#6) acts as a press trigger — when #6 presses the ball, the back four steps up simultaneously. This integrates the offside trap into your team's full pressing structure rather than treating it as an isolated defensive action.
Age Adaptations

| Age Group | Adaptation |
|---|---|
| Under 12 | Use a smaller pitch (50–60m × 40m). Reduce to a back three. Focus only on Steps 1–3 (no live scenario). Use coloured bibs as visual cues instead of verbal calls. |
| Under 14 | Full back four, but limit attackers to two. Introduce the goalkeeper's call in Step 3. Skip the midfield integration variation. Focus on flat line shape and trigger recognition. |
| Under 16 | Full session as described. Introduce Progression 1 (second ball) in the final 10 minutes. Begin integrating the trap into a wider pressing structure. |
| Open / Senior | Full session including both progressions and the 11v11 integration. Add video review of the live scenario phase. Discuss opponent-specific trigger moments from match analysis. |
Session duration: 45–60 minutes. Recommended frequency: once per week during the competitive season; twice per week in pre-season. Always finish the session with a positive rep — end on a successful trap to reinforce confidence.