Defensive Heading and Clearing: Command the Box
A structured, progressive drill that teaches centre-backs and full-backs to win aerial duels decisively and clear the ball to safety under match-realistic pressure.

Equipment Needed
Overview
The ability to win aerial duels and clear the ball decisively is one of the most undercoached skills in youth and amateur football. When a cross or long ball arrives in the penalty area, defenders must not merely make contact with the ball — they must attack it with intent, direct it away from danger, and immediately re-establish defensive shape. This drill, Defensive Heading and Clearing: Command the Box, is designed to build exactly those habits.
This session is most effective when used as a dedicated technical block (20–30 minutes) at the start of a training session, or as a focused unit within a wider defensive shape session. It is equally valuable before a match against opponents who rely heavily on set pieces, long balls, or wide deliveries into the box.
Primary objectives:
- Develop correct heading technique: forehead contact, eyes open, neck locked
- Train defenders to attack the ball rather than wait for it
- Establish clear communication protocols between GK, CB, and fullbacks
- Build confidence and aggression in aerial duels
Setup

Pitch Area: The drill is conducted entirely within and around the penalty area (approximately 40m wide × 20m deep). No full-pitch space is required, making this drill ideal for split-session training.
Equipment Required:
- 8–12 footballs (size 5 for senior/U14+, size 4 for U12 and below)
- 4 marker cones (to define the server's arc)
- 2 tall poles or mannequins (optional, to simulate attacking runners)
- 1 full-size goal (or portable goal for training venues)
- Bibs in two colours (defenders vs. attackers)
- A ball bag positioned at the server's station
Player Positions and Numbers:
| Position | Number | Role in Drill |
|---|---|---|
| Goalkeeper (GK) | 1 | Commands the box, calls for or leaves the ball |
| Centre-Back (CB) | 5 | Primary header — near post / central zone |
| Centre-Back (CB) | 6 | Secondary header — far post / central zone |
| Right Back (RB) | 2 | Covers right channel, clears wide balls |
| Left Back (LB) | 3 | Covers left channel, clears wide balls |
| Defensive Midfielder (CDM) | 4 | Second-ball recovery, 5m outside the box |
| Server (Coach/Player) | — | Delivers varied balls from the top of the area |
| Attackers (optional) | 9, 10 | Passive then active pressure on defenders |
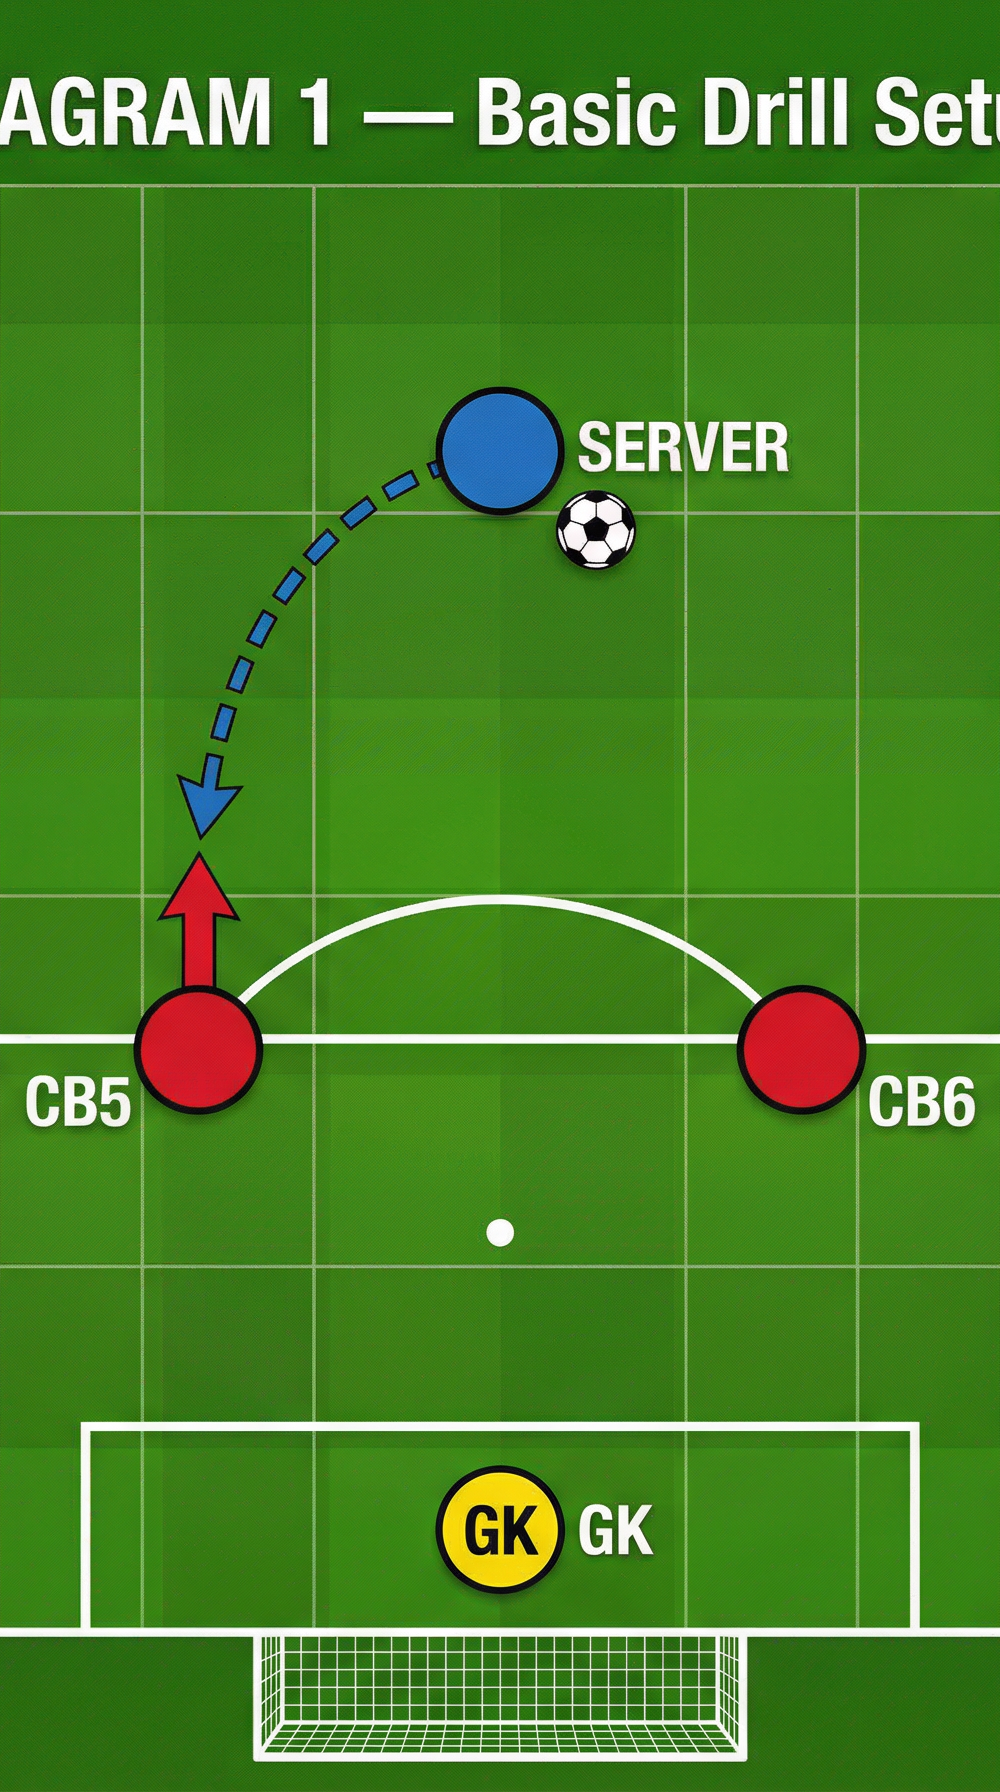
Diagram 1 — Basic Drill Setup: The server delivers from 20m out. CB5 attacks the ball, CB6 provides cover. The GK commands the 6-yard box.
Step-by-Step Instructions

Phase 1 — Unopposed Technical Work (10 minutes)
- Position CB5 and CB6 on the edge of the 6-yard box, one metre apart. The GK takes their position on the goal line, slightly off-centre toward the near post.
- The server stands 18–22 metres from goal at the centre of the penalty arc, holding a ball.
- The coach calls "Set!" — both centre-backs adopt a defensive heading stance: feet shoulder-width apart, weight on the balls of the feet, knees slightly bent, eyes forward.
- The server delivers a looping ball (hand-thrown or kicked) to arrive at head height above CB5's position.
- CB5 takes two explosive steps forward to attack the ball, jumps off one foot, and heads the ball upward and outward — aiming to clear beyond the 18-yard line. The clearing direction should be wide of the penalty area, never back across goal.
- CB6 holds their position until the ball is cleared, then both defenders reset to starting positions.
- Rotate deliveries: 5 balls to CB5, 5 balls to CB6, then 5 balls to the central zone where both must compete and communicate.
- After every 5 repetitions, rotate players so all outfield defenders take turns at CB5 and CB6.
Phase 2 — Positional Group Work (10 minutes)
- Bring in RB2 and LB3 to their positions on the edge of the penalty area. CDM4 positions themselves 5 metres outside the box at the centre.
- The server now varies delivery: central lofted balls, balls played toward the near post, and balls played toward the far post.
- Before each delivery, the coach calls a colour-coded instruction: "Near post!" (CB5 attacks), "Far post!" (CB6 attacks), or "Keeper's!" (GK claims, defenders hold).
- When the ball is cleared, CDM4 must control or win the second ball and play it back to the server. This reinforces the habit of second-ball recovery after every clearance.
- RB2 and LB3 are responsible for any ball that drops into the wide channels — they must head or volley clear if the ball reaches them.

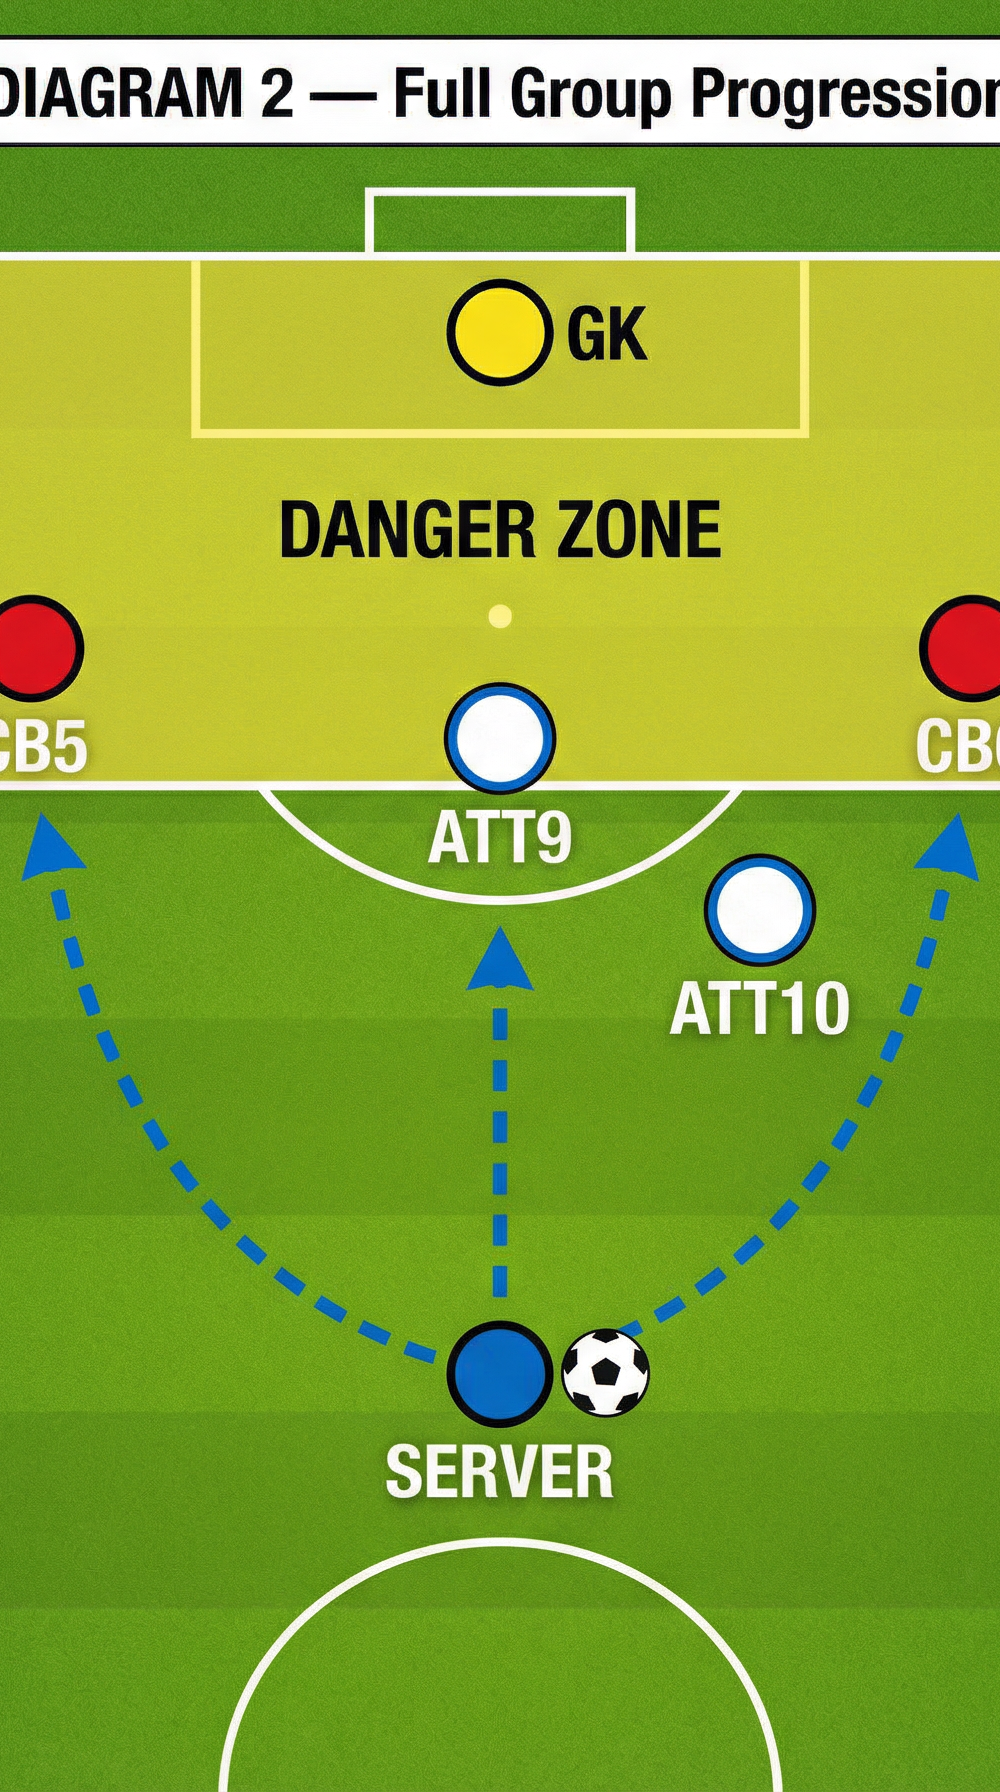
Diagram 2 — Full Group Progression: Multiple delivery options, attackers apply passive pressure, and CDM4 wins the second ball. Clearing directions are always wide and long.
Phase 3 — Live Ball with Pressure (10 minutes)
- Introduce ATT9 and ATT10 as passive attackers initially — they stand in position but do not jump or challenge. Their presence forces defenders to communicate and commit to the ball despite visual distraction.
- After 5 minutes, upgrade ATT9 and ATT10 to semi-active: they can move and attempt to win the ball but may not use their arms or body to obstruct.
- Introduce a wide server (WINGER11) on the right channel, 5 metres from the byline, who delivers driven crosses into the box. This replicates the most common match scenario for defensive headers.
- After each clearance, the drill continues live: if the attackers win the second ball, they attempt to score. Defenders must recover shape immediately.

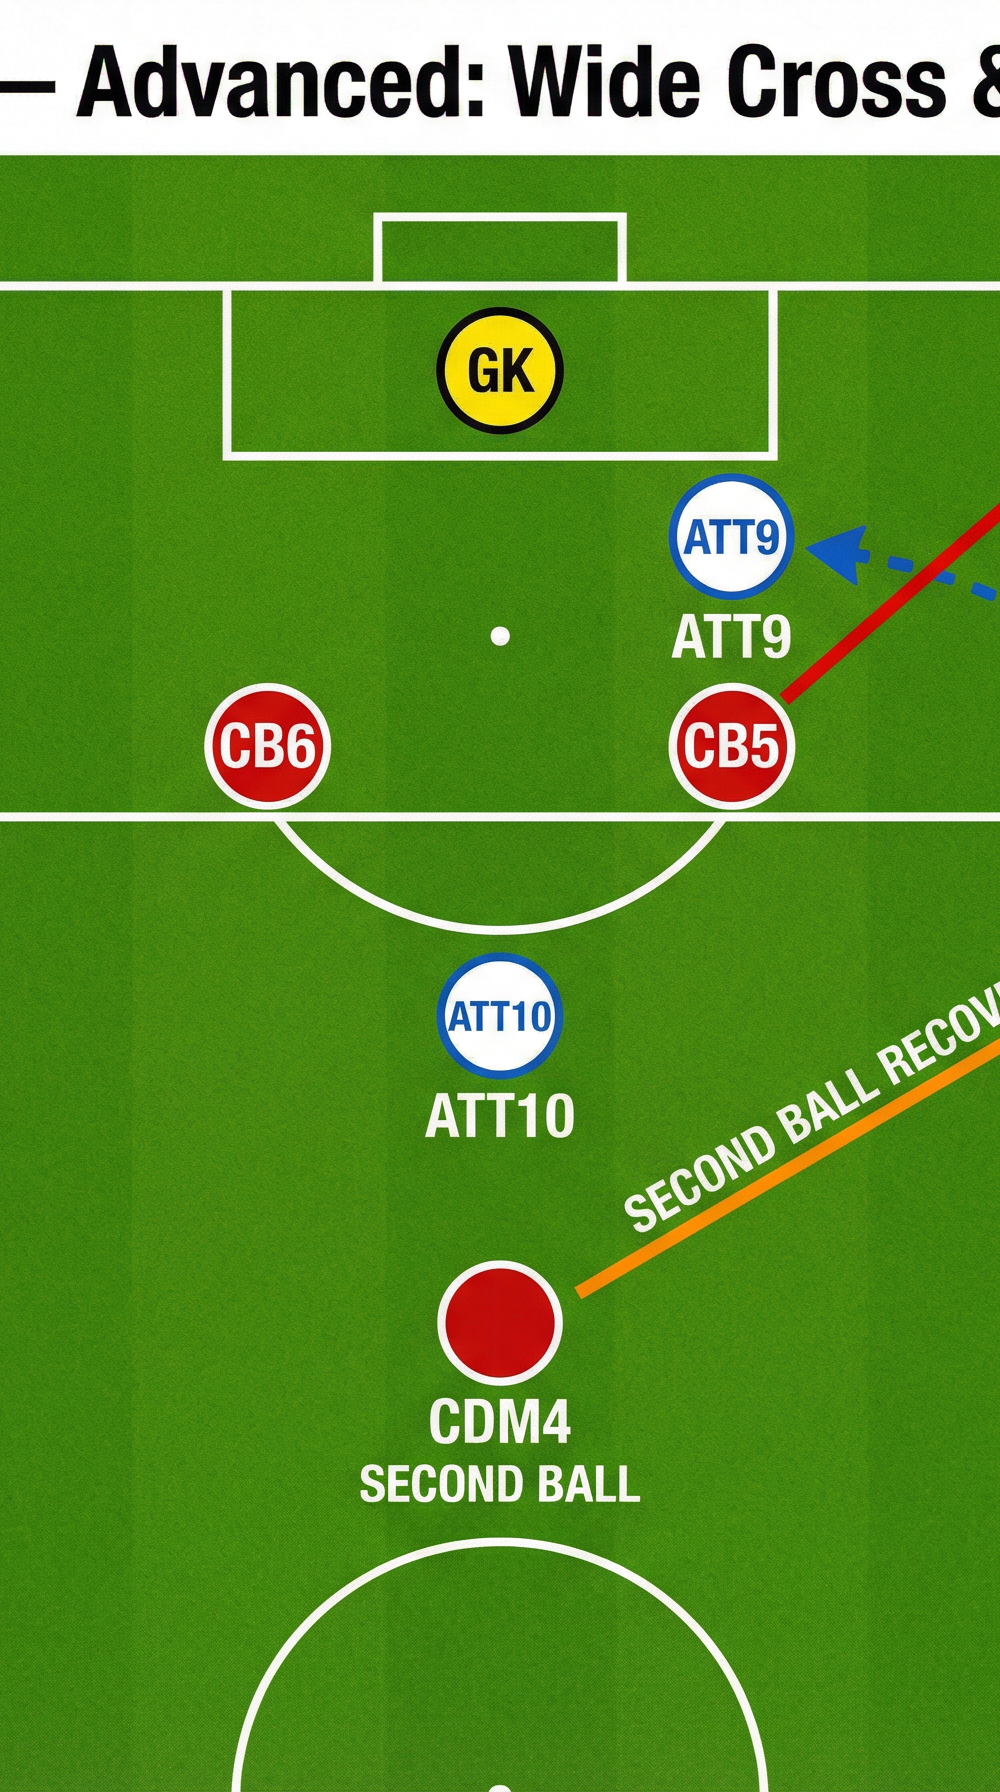
Diagram 3 — Advanced Scenario: A wide cross from WINGER11 is delivered into the box. CB5 clears to the wide channel. CDM4 anticipates the second ball and wins possession.
Key Coaching Points
1. Attack the Ball — Never Wait for It
The single most common error in defensive heading is passivity. Defenders who wait for the ball to arrive are beaten by attackers who move to meet it. Reinforce the cue: "Two steps forward, attack it early." A defender who attacks the ball controls the aerial duel; a defender who waits for it concedes it.
2. Forehead Contact, Eyes Open
Heading with the top of the skull or with eyes closed produces weak, uncontrolled clearances. Insist on contact with the flat of the forehead, just below the hairline. Eyes must remain open through contact. Use the cue: "See the ball, head the ball."
3. Clear Wide and Long — Never Across Goal
The golden rule of defensive heading: never clear the ball back across the face of your own goal. A mis-headed ball that travels across the 6-yard box is an invitation for a tap-in. Clearances must always travel toward the wide channels or beyond the 18-yard line.
4. Communicate Loudly and Early
The GK must command the box with early, loud calls: "Keeper's!" or "Away!" Defenders must echo the call so the whole unit responds. Silence in the box leads to hesitation and collision. Make communication a non-negotiable habit from the first repetition.
5. Win the Second Ball
A clearance is not the end of the defensive action — it is the beginning of a transition. CDM4's role in this drill is to reinforce the principle that every clearance must be followed by a recovery run to win the second ball. Attackers who win second balls in the penalty area are among the most dangerous threats in the game.
6. Body Shape on Landing
After heading the ball, defenders must land balanced and immediately re-engage: chin up, eyes forward, ready to sprint. A defender who lands off-balance or watches their own clearance is vulnerable to a second delivery. Use the cue: "Head it, land it, find your shape."
Common Mistakes

Mistake 1 — Heading with the Top of the Head
This produces a weak, looping ball that rarely clears the danger zone and risks injury. Correction: Have the player stand still and tap the ball gently against their forehead to identify the correct contact point before progressing to jumping headers.
Mistake 2 — Closing Eyes on Contact
Players who close their eyes lose control of direction and power. Correction: Use a slow-motion delivery (hand-toss at low speed) and ask the player to call out the panel of the ball they contact. This forces visual engagement.
Mistake 3 — Clearing Back Across Goal
Often caused by poor body orientation — the defender's hips are angled toward the centre of the pitch rather than toward the wide channel. Correction: Place a cone in the wide channel as a target. Reward clearances that travel toward the target zone.
Mistake 4 — Failure to Communicate
Two defenders converging on the same ball without calling leads to collision or neither player committing. Correction: Impose a rule: any delivery where neither player calls is replayed, and both players do a short sprint as a consequence. Make communication a habit through mild accountability.
Mistake 5 — Dropping Off After the Clearance
Defenders who relax after heading the ball are caught flat-footed when the second ball arrives. Correction: Immediately after every clearance, the coach plays a second ball into the box. This conditions defenders to stay alert and re-engage rather than admire their clearance.
Variations and Progressions
Progression 1 — Competitive Scoring
Introduce a points system: defenders earn 1 point for a clearance that travels beyond the 18-yard line, 2 points for a clearance that reaches the halfway line, and 0 points for any clearance that stays inside the box. Attackers earn 1 point for any ball that stays in the box after a defensive header. This adds competitive intensity and sharpens decision-making under pressure.
Progression 2 — Full Back Four + Midfield Screen
Expand the drill to include the full defensive unit (GK, RB2, CB5, CB6, LB3) plus CDM4 as a midfield screen. The server now delivers from multiple positions: central, wide right, and wide left. The back four must maintain their defensive line, communicate, and clear as a unit. After each clearance, the unit must immediately reset to their defensive line — no individual can switch off.
Variation — Reduced Pressure for Beginners
For players who are new to heading or who lack confidence in the air, replace the jumping header with a standing header from a hand-tossed ball at head height. Focus entirely on technique: forehead contact, eyes open, neck locked. Progress to a gentle lofted delivery only once the standing technique is consistent.
Age Adaptations

| Age Group | Key Modifications |
|---|---|
| U10 and below | Do not teach jumping headers. Focus on standing headers only, using a size 3 ball. Reduce delivery height. Prioritise fun and confidence over technique. |
| U12 | Introduce gentle jumping headers from hand-toss. Use size 4 ball. No active attackers. Emphasise communication between two defenders. |
| U14 | Full drill as described in Phase 1 and Phase 2. Introduce passive attackers in Phase 3. Begin coaching clearing direction. |
| U16 | Full drill including Phase 3 with semi-active attackers. Introduce wide cross deliveries. Begin coaching second-ball recovery with CDM4. |
| Open / Senior | Full drill at match intensity. Use full back four + CDM. Introduce live scenarios where attackers can score if the clearance fails. Add time pressure: server delivers the next ball within 5 seconds of each clearance. |
Coach's Note: The best defensive headers in the game are not necessarily the tallest players — they are the players who read the flight of the ball earliest, commit to the challenge most decisively, and land in the best shape to deal with what comes next. Build those habits here, in training, before they are tested in a match.