High Press Play from the Front Three: Winning the Ball in the Opponent's Half
Master the coordinated high press from your front three to suffocate opponents in their own half, force turnovers in dangerous areas, and launch devastating counter-attacks.

Equipment Needed
Overview
The high press from the front three is one of the most effective and tactically demanding weapons in modern football. Popularised at the elite level by managers such as Jürgen Klopp, Pep Guardiola, and Marcelo Bielsa, this coordinated pressing structure tasks your centre-forward (#9), left winger (#11), and right winger (#7) with aggressively hunting the ball in the opponent's defensive third — typically within 30–35 metres of their own goal.
The objective is not simply to chase the ball. It is to force the opponent into a pre-determined trap: the wide channel. By using the touchline as an extra defender, your front three can manufacture turnovers in areas where a dispossessed opponent has no easy escape route. When executed correctly, the press creates high-quality scoring chances within 6–8 seconds of winning possession.
This play is best deployed when the opposition goalkeeper or centre-backs receive the ball under low pressure and attempt to play out from the back. It is equally effective as a set trigger — activated by a specific cue such as the goalkeeper receiving a back-pass or a centre-back receiving the ball with their back to goal.
Setup
Equipment
- Full-size pitch or minimum 60m × 40m training area
- 1 ball per group (plus 4–6 spare balls around the perimeter for continuity)
- Bibs in two contrasting colours
- Cones to mark the press trigger line (approximately 35m from the opponent's goal line)
Pitch Setup
Work on a full pitch (100–110m × 64–75m) or a large-sided training area. Place a cone line across the width of the pitch at approximately 65–70% of the pitch length from your own goal — this is the press trigger line. When the ball crosses this line into the opponent's half, the front three shift into press mode.
Player Positions
| Position | Number | Role in the Press |
|---|---|---|
| Centre-Forward | #9 | Primary press trigger; closes the ball-playing CB |
| Left Winger | #11 | Cuts off the wide outlet on the left; traps LB |
| Right Winger | #7 | Cuts off the wide outlet on the right; traps RB |
| Attacking Midfielder | #10 | Second-wave press; blocks CDM passing lane |
| Central Midfielder | #8 | Shadows CDM; prevents easy recycling |
| Defensive Midfielder | #6 | Holds position; ready to intercept any long ball |
| Right Back | #2 | Holds a high line; ready to press if ball goes wide right |
| Left Back | #3 | Holds a high line; ready to press if ball goes wide left |
| Centre Backs | #4, #5 | Maintain a high defensive line (35–40m from goal) |
| Goalkeeper | #1 | Sweeper-keeper; ready to claim any balls in behind |

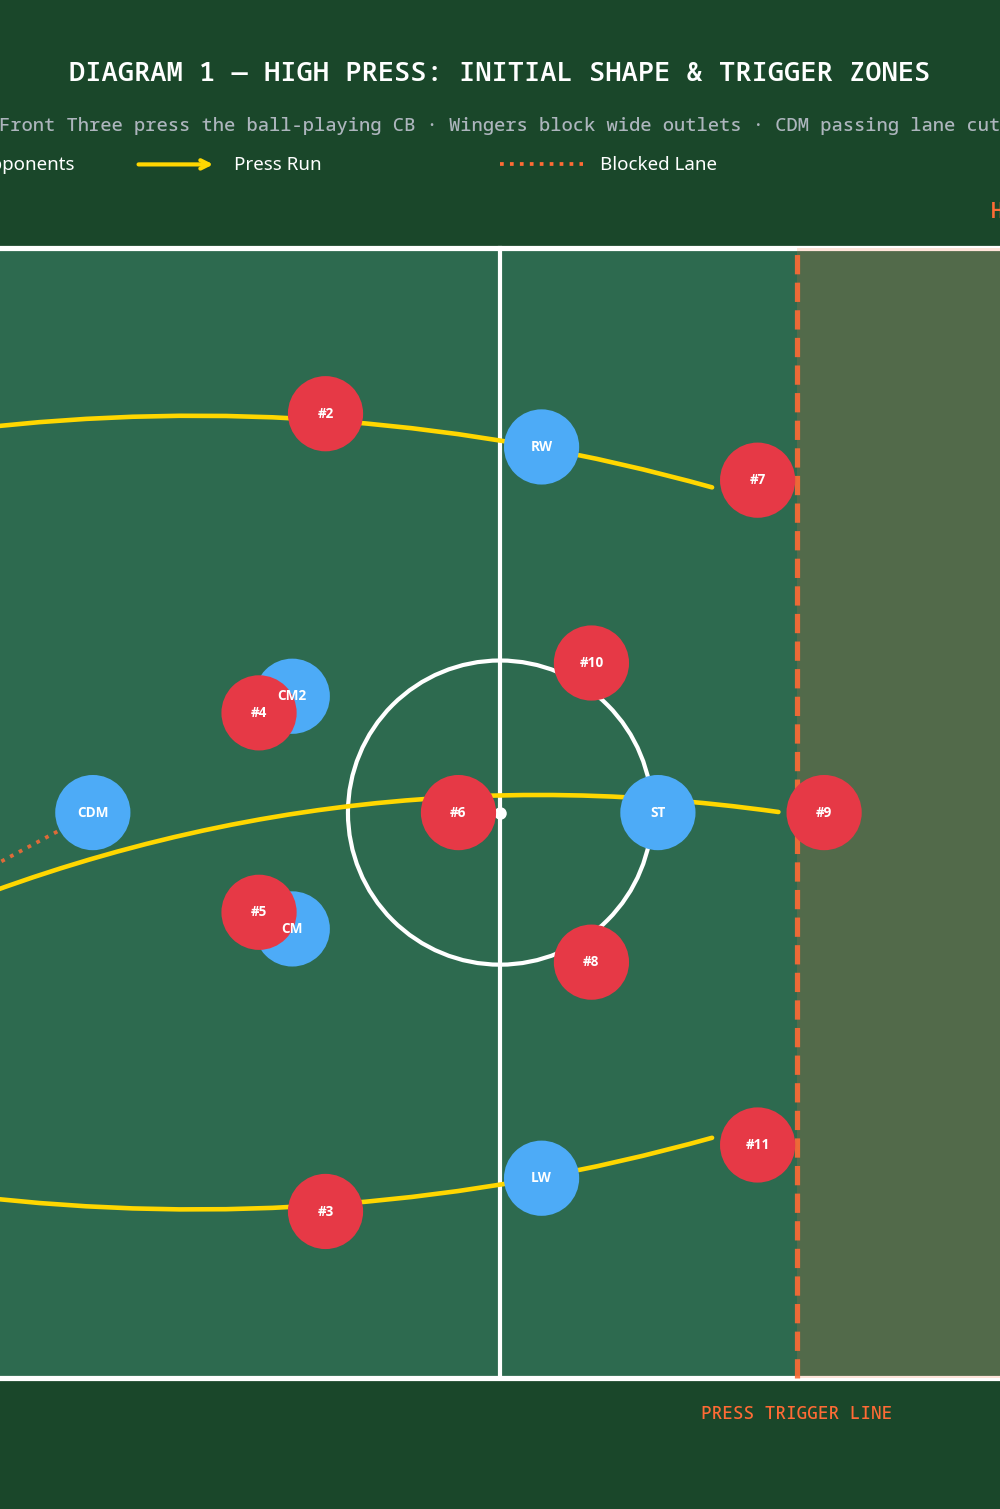
Diagram 1 shows the initial press shape. The front three are positioned beyond the press trigger line, with #9 preparing to close the ball-playing CB, while #11 and #7 angle their runs to cut off the wide outlets. The CDM passing lane is blocked by the positioning of #8.
Step-by-Step Instructions

Step 1 — Set the Press Trigger (0–2 seconds)
Identify your press trigger moment in the team shape meeting before the session. The most reliable trigger is the opponent's goalkeeper receiving a back-pass or a centre-back receiving the ball with their back to goal. As soon as the trigger occurs, #9 calls "PRESS!" (verbal cue) and immediately accelerates toward the ball-playing centre-back.
Step 2 — #9 Angles the Press to Force Wide (2–4 seconds)
The CF must not sprint directly at the CB. Instead, #9 takes an angled approach — body shape open toward the touchline — to show the CB only one option: the wide pass to the full-back. This is the critical tactical detail. The angle of the press determines where the ball goes next.
Step 3 — #11 and #7 Sprint to Cut Off Wide Outlets (2–4 seconds)
As #9 begins the press, both wingers sprint aggressively to cut off the full-backs. The winger on the ball-near side (e.g., #11 if the ball is with the left CB) sprints to arrive at the LB at the same time as the ball. The far-side winger (#7) tucks inside to block the switch pass to the right CB.
Step 4 — #10 and #8 Block the Midfield Escape Route (3–5 seconds)
The attacking midfielder (#10) and central midfielder (#8) step up aggressively to shadow the opponent's CDM and central midfielders. Their job is to make the "safe" pass into midfield feel dangerous. They must be within 3–4 metres of their respective opponents to create genuine pressure.
Step 5 — The Trap is Sprung — LB Receives Under Pressure (4–6 seconds)
The CB, forced wide by #9's angled press, plays to the LB. The LB receives the ball with #11 arriving at pace, the touchline behind them, and no easy pass forward. This is the ball-win moment. #11 must be aggressive, low, and balanced — aiming to win the ball or force the LB into a misplaced clearance.
Step 6 — Immediate Counter-Press or Counter-Attack (6–8 seconds)
If the ball is won cleanly, the team transitions immediately into a counter-attack. #9 makes a diagonal run in behind the now-exposed defensive line. #7 or #10 provides a quick lay-off option. The defensive block (#6, #4, #5) holds its shape to prevent a counter if possession is lost again. If the ball is not won cleanly, the team resets into its mid-block shape within 3 seconds.

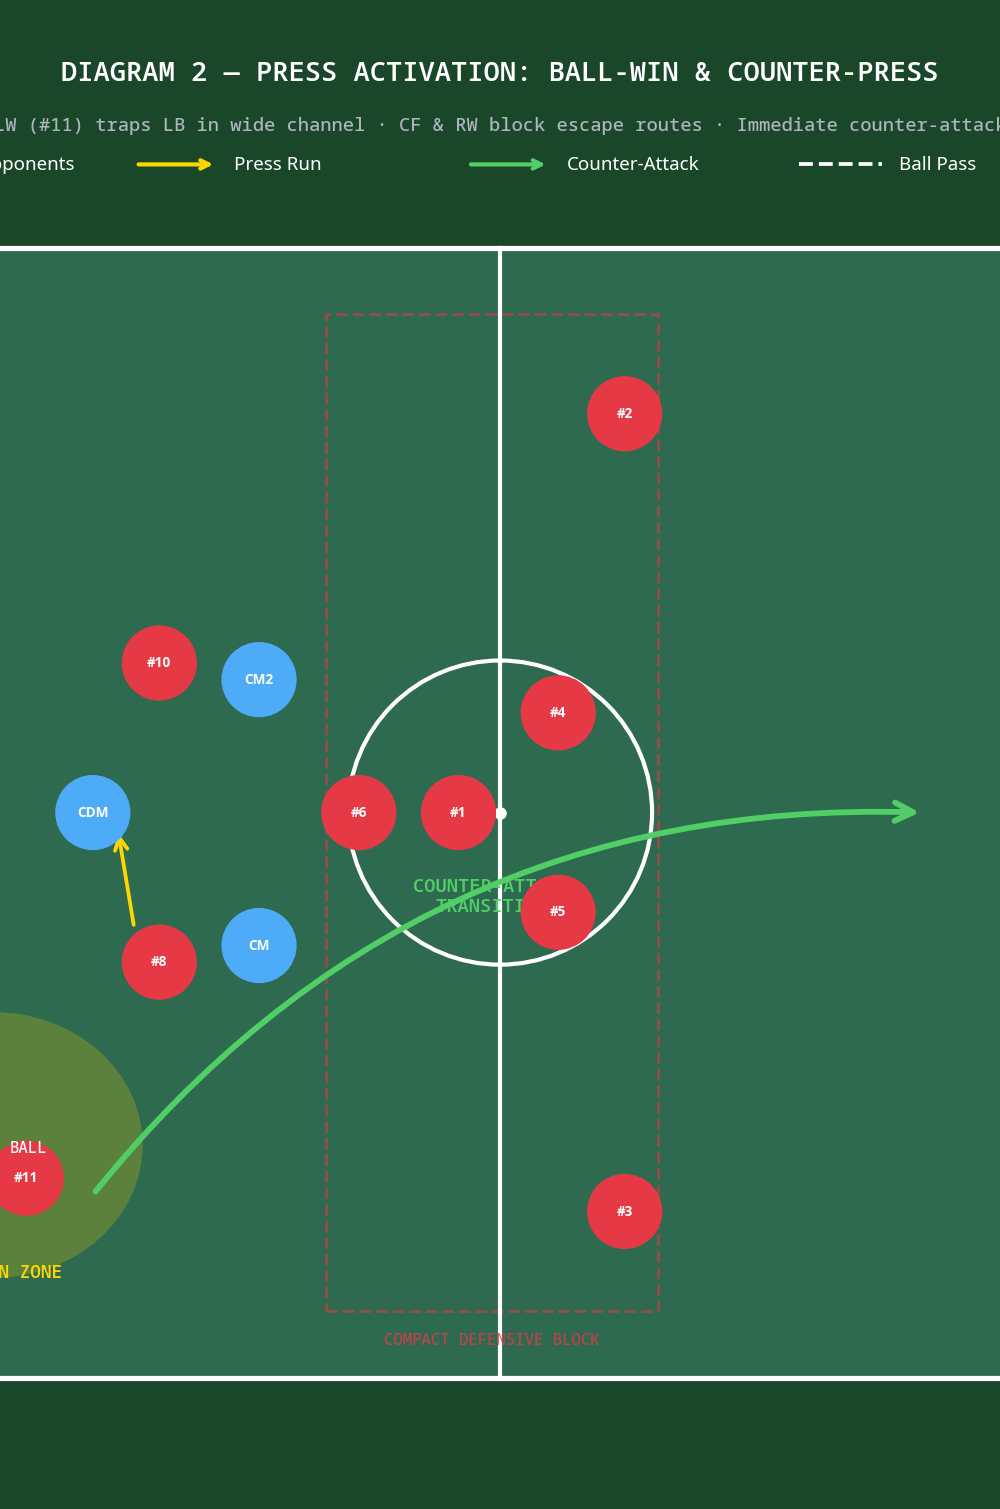
Diagram 2 illustrates the press activation moment. #11 traps the LB in the wide channel (highlighted in gold). #9 and #7 block the escape routes back to the CBs. The green arrow shows the immediate counter-attack direction once possession is won, with the compact defensive block maintaining shape in the centre.
Key Coaching Points

1. Press Angle is Everything. Repeatedly emphasise to #9 that a straight sprint at the CB gives the opponent two options (left or right). An angled press removes one option entirely. Drill this with shadow play before adding opposition.
2. Synchronised Timing — Press Together or Not at All. The press only works when all three forwards move simultaneously. A lone press from #9 while #11 and #7 are slow to react creates a 1v1 that the CB wins easily. Use the verbal trigger to ensure synchronisation.
3. Use the Touchline as Your Fourth Defender. Teach your wingers to position themselves so the LB or RB has the touchline directly behind them. The press should funnel the ball toward the line, not away from it.
4. Win the Ball or Force the Long Ball — Both Are Victories. If the press forces a long, aimless clearance, that is a successful press. Your team should be positioned to win the second ball. Coaches must celebrate forced clearances as much as clean turnovers.
5. Immediate Transition Mentality. The moment the ball is won, the team must switch from defensive to attacking mode within one second. Hold transition drills where players must shoot or create a chance within 6 seconds of winning the ball in the press.
6. Reset Without Complaint. When the press is beaten, players must sprint back into shape immediately. A beaten press that leads to a slow defensive transition is more dangerous than never pressing at all. Drill the reset as rigorously as the press itself.
Common Mistakes
Mistake 1 — #9 Pressing Too Early or Too Late. If #9 presses before the CB receives the ball, the CB simply plays it back to the GK and the press is reset. If #9 presses too late, the CB has time to turn and play forward. Timing is trained through repetition — use a rondo or positional game where the trigger is clearly defined.
Mistake 2 — Wingers Pressing in a Straight Line. Wingers who sprint directly at the full-back allow the full-back to simply play the ball back inside. Wingers must curve their run to cut off the back-pass option first, then close the full-back down. Use cones to mark the correct curved press path in training.
Mistake 3 — Midfield Fails to Step Up. When #8 and #10 do not step up to shadow the CDM and CMs, the opponent has a simple escape route: play back to the CDM and switch play. Midfielders must be coached to step up aggressively the moment the press is triggered, even if it means leaving their opponent momentarily.
Mistake 4 — Defensive Line Drops Instead of Holding High. When the press is activated, centre-backs (#4 and #5) sometimes drop deeper out of caution. This creates a large gap between the pressing front three and the defensive line, leaving the team stretched. The defensive line must hold at 35–40m from their own goal and trust the press.
Mistake 5 — Celebrating the Press, Forgetting the Transition. Players sometimes pause after winning the ball to celebrate or look around. Drill the counter-attack sequence so that the first pass after winning the ball is automatic and rehearsed.
Variations & Progressions

Variation 1 — The 4-2-3-1 Press Trap (Easier)
In a 4-2-3-1 shape, use the #10 as an additional press trigger alongside the front three, creating a four-player press. This provides more coverage and is easier for younger or less experienced teams to coordinate. The trade-off is reduced cover behind the press.
Variation 2 — Trigger-Specific Press (Intermediate)
Rather than pressing every time the ball enters the opponent's half, assign two specific triggers: (a) the GK receives a back-pass, or (b) a CB receives the ball with their back to goal. This conserves energy and makes the press harder for the opponent to predict. Teams must be drilled to recognise these triggers instantly.
Progression 1 — Press vs. Live Opposition with GK (Advanced)
Run the press against a full 11-player opposition team including a goalkeeper who can play long. This forces the pressing team to deal with the long ball option and trains the defensive line to win second balls. Add a condition: if the press is beaten and the opponent plays forward, the pressing team must win the ball back within 8 seconds or concede a point.
Progression 2 — Press with Numerical Disadvantage (Advanced)
Run the press with 10 outfield players against 11. This forces the pressing team to be more disciplined and coordinated, as any individual error is immediately punished. It also builds the mental resilience required to press effectively when fatigued.
Age Adaptations

| Age Group | Key Modifications |
|---|---|
| Under 10–12 | Use a smaller pitch (40m × 30m), reduce to a front two press, focus only on Steps 1–3, use coloured bibs to identify press triggers visually |
| Under 14 | Introduce the full front three press on a 60m × 40m area, add the midfield shadow step (Steps 4–5), use a passive then semi-active opposition |
| Under 16 | Full pitch, full press sequence, introduce trigger-specific pressing (Variation 2), begin counter-attack drills after ball-win |
| Open/Senior | Full tactical implementation including defensive line positioning, counter-press reset drills, and live 11v11 press scenarios with video review |
For all age groups, prioritise understanding over intensity. A player who understands why they are pressing will always outperform a player who is simply told to run. Use freeze coaching, shadow play, and video clips to build tactical literacy before demanding high-intensity execution.