Near Post Corner Kick: The Flick-On Set Play
Master the near post corner kick set play — a deceptively simple yet devastatingly effective routine that exploits defensive shape and creates high-percentage scoring opportunities through a coordinated near post flick-on.
Equipment Needed
Overview
The Near Post Corner Kick Flick-On is one of the most reliable and tactically intelligent set plays in the modern game. Rather than delivering the ball directly to a target man at the far post or penalty spot, this routine exploits the natural defensive instinct to track the ball's flight by redirecting it at the near post — creating chaos in the six-yard box and generating high-quality chances for runners arriving late from deeper positions.
This set play is most effective when your squad includes a player with good aerial ability and the timing instinct to attack the near post aggressively, combined with runners who can read the flick-on and arrive into the danger zone at pace. Use it when you have earned a corner from the right or left flank, particularly when the opposition goalkeeper is positioned centrally or slightly toward the far post — a common defensive default.
When to deploy: Use this play when the score is level or you are chasing the game, when the opposition defence is compact and difficult to break down in open play, or when you have identified that the defending team's near post zone is poorly guarded.
Setup

Equipment Required
- 1 standard football (match ball)
- Corner flag (in situ)
- Bibs to differentiate attacking and defending units during training
- Cones to mark reference positions during the learning phase
Pitch Reference Points
All positions are referenced to a standard pitch (100–110m × 64–75m) with a standard penalty area (16.5m deep × 40.3m wide) and goal area (5.5m deep × 18.3m wide).
Player Positions
| Player | Position | Starting Location |
|---|---|---|
| #2 (Corner Taker) | Right Back / Designated Taker | Corner arc (right flank) |
| #9 (Near Post Runner) | Centre Forward | Edge of six-yard box, near post side — starts 2m outside the box |
| #10 (Far Post Runner) | Attacking Midfielder | Far post, inside the six-yard box |
| #8 (Late Penalty Spot Runner) | Central Midfielder | 3m outside the penalty area, penalty spot line |
| #7 (Near Post Blocker/Decoy) | Right Winger | Near post, 1m inside the box — acts as a screen |
| #6 (Back Post Anchor) | Centre Back | Back post, 1m outside the six-yard box |
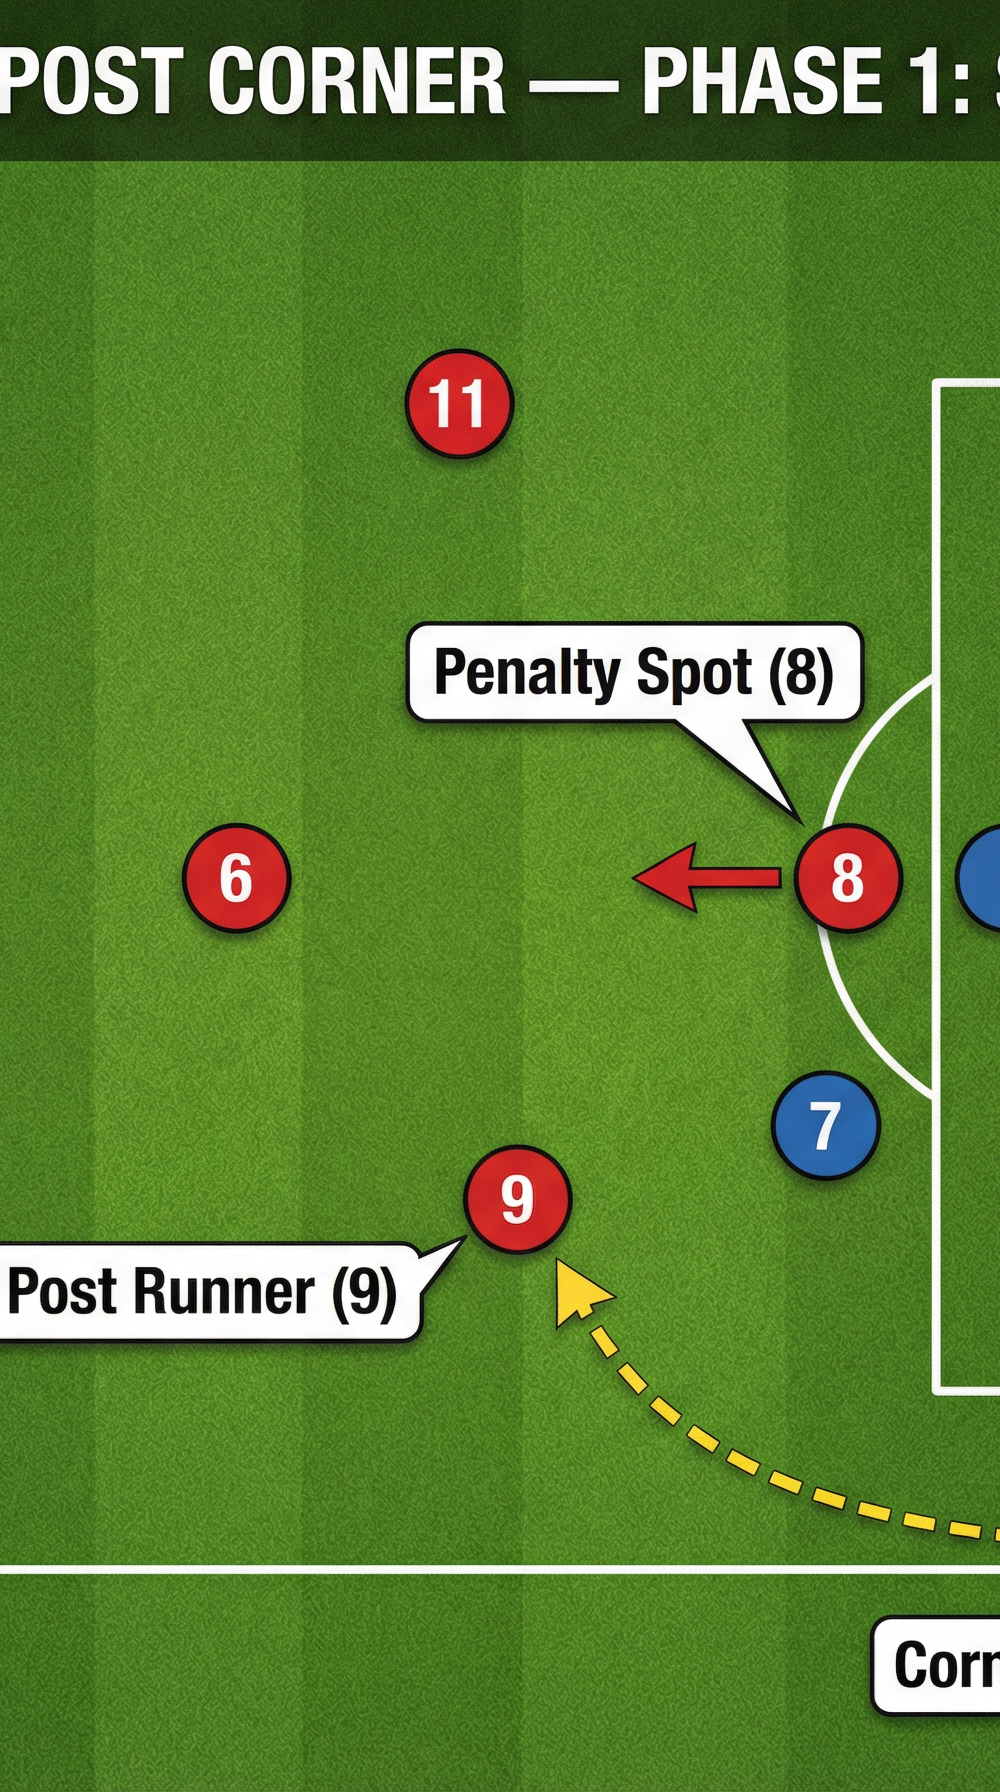
| #11 (Second Ball Holder) | Left Winger | Top of the penalty area, left channel — 20m from goal |
Diagram 1: Phase 1 — Initial Setup. Players take their starting positions before the corner is delivered. Note the spacing between #9 and #7 at the near post, and the depth of #8 outside the box.
Step-by-Step Instructions
Step 1 — Signal the Play
The corner taker (#2) raises their right hand as they approach the ball. This is the pre-agreed signal that the near post routine is on. All outfield players in the box should already be in their starting positions.
Step 2 — Initiate the Decoy Movement (2 seconds before delivery)
#10 makes a sharp dummy run toward the near post, pulling one or two defenders with them. Simultaneously, #7 takes two steps toward the penalty spot, dragging their marker away from the near post zone. This creates the space that #9 will exploit.
Step 3 — The Corner Delivery
#2 delivers a driven, in-swinging ball (for a right-sided corner, this means a left-footed delivery or a right-footed in-swinger) aimed at a point approximately 5–6 metres from goal at the near post, at head height (approximately 2–2.5m off the ground). The delivery must be firm — not a looping cross. Pace on the ball is essential for the flick-on to work.
Step 4 — The Near Post Flick-On (#9)
#9 times their run to arrive at the near post as the ball arrives, attacking the ball from a position slightly behind the near post line. Using the forehead or the side of the head, #9 glances the ball toward the far post or across the face of goal — not heading it powerfully, but redirecting its pace. The aim is to change the ball's direction by approximately 45–90 degrees, sending it across the six-yard box.
Step 5 — Runners Attack the Redirected Ball
- #10 has looped their run and is now arriving at the far post to meet the flick-on.
- #8 has timed a late run from outside the box and arrives at the penalty spot to attack any ball that drops short or is parried by the goalkeeper.
- #6 provides a back-post presence for any ball that travels beyond the far post.
Step 6 — Second Ball Positioning
#11 holds their position at the top of the penalty area to win any clearance, recycle possession, or shoot from distance if the ball breaks out of the box.

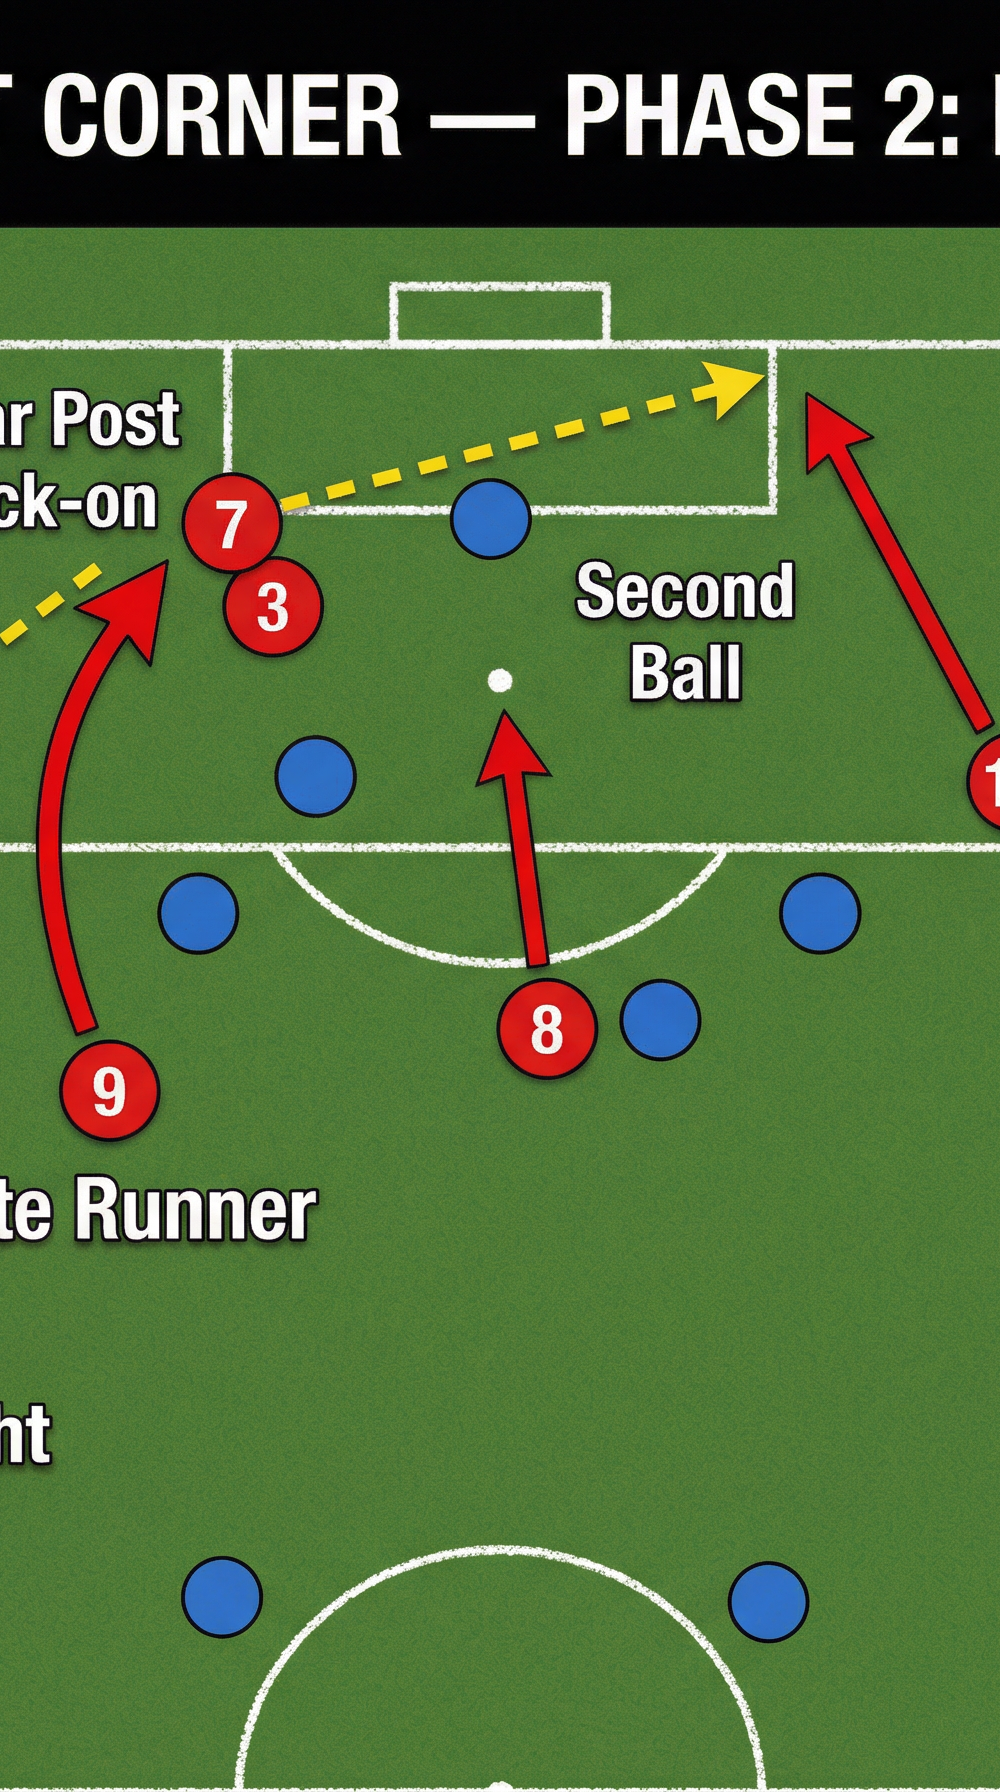
Diagram 2: Phase 2 — Execution. The ball is delivered to the near post, #9 flicks on across goal, and multiple runners converge on the redirected ball. Note the late arrival of #8 from the penalty spot line.
Key Coaching Points

1. Delivery Height and Pace Are Everything
A looping, high ball will give defenders time to adjust and will make the flick-on uncontrollable. Drill your corner taker to deliver a driven ball at 2–2.5m height. Use a target cone or hanging marker during training to reinforce the correct delivery zone.
2. #9 Must Attack the Ball — Not Wait for It
The most common failure point is the near post runner hesitating. Emphasise that #9 must commit to the run early and arrive at the ball with momentum. A stationary header at the near post is easily defended; a moving, attacking header is not.
3. Timing the Decoy Runs
The effectiveness of this play depends entirely on the decoy movements of #7 and #10 pulling defenders away from the near post zone. Coach these players to make their dummy runs with conviction — defenders must believe the ball is coming to them.
4. The Flick Must Redirect, Not Power
Coach #9 to use the side of the head or a glancing forehead contact to redirect the ball's existing pace. Attempting to head the ball powerfully at the near post will result in the ball going wide or over. The goal is a subtle redirection across the face of goal.
5. Late Runners Must Stay Outside the Box Until the Ball Is Delivered
Offside is a significant risk with this play. #8 and #10 must discipline themselves to begin their runs only as the ball leaves #2's foot. Use a verbal or visual cue in training to reinforce this timing.
6. Second Ball Mentality
Even if the primary flick-on does not result in a direct chance, the play creates second ball opportunities. Coach #11 and #8 to expect the ball to break out of the box and be ready to shoot or recycle immediately.
Common Mistakes

Mistake 1 — Delivery Too High or Too Slow
A lofted, looping delivery gives the goalkeeper time to claim the ball and allows defenders to reorganise. Correct this by having the corner taker practice driven deliveries repeatedly, using a target zone marked with cones or a hanging rope at the correct height.
Mistake 2 — Near Post Runner Arriving Too Early
If #9 arrives at the near post before the ball, they become static and easy to mark. Defenders will simply body them out. Work on the timing of the run in isolation — have #9 start from their position and practice arriving at the near post exactly as a ball is driven in.
Mistake 3 — Flick-On Going Straight to the Goalkeeper
This happens when #9 heads the ball directly rather than redirecting it across goal. Use video analysis or a target goal/cone on the far post side to help #9 understand the required angle of redirection.
Mistake 4 — Runners Failing to Commit to the Box
Some players will slow their run when they see the ball going to the near post, unsure whether to continue. Emphasise that all runners must commit fully — the flick-on can go in any direction and the runner who stops will be caught flat-footed.
Mistake 5 — Neglecting Second Ball Coverage
Teams often set up their near post corner with everyone in the box, leaving them exposed to a fast counter-attack if the ball is cleared. Always ensure #11 holds the top of the box and at least one midfielder (#8) is ready to recover.
Variations & Progressions
Variation 1 — The Dummy Near Post (Intermediate)
Instead of flicking on, #9 dummies the ball completely — letting it run through to #10 arriving at the far post. This variation works best when the opposition has identified and begun to anticipate the flick-on. Signal the dummy variation with a different pre-kick signal (e.g., corner taker places both hands on hips).
Variation 2 — Short Corner Trigger (Intermediate)
If the opposition sends only one player to press the corner taker, #2 plays a short pass to #7 who has dropped to receive. This draws a second defender out of the box, creating a 2v1 wide before a driven cross is delivered to the near post zone. This variation keeps the opposition guessing and prevents them from packing the near post.
Progression — Live Defensive Pressure (Advanced)
Once the play is rehearsed and understood, add a full defensive unit and run the play against 11 defenders. Introduce a goalkeeper. This live environment forces players to execute the timing, delivery, and runs under realistic pressure and reveals any breakdowns in the routine that are not apparent in walk-through practice.
Age Adaptations

Under-12 and Below
Simplify the play to three roles: corner taker, near post runner, and one far post runner. Remove the decoy movements and focus purely on delivery height and the concept of attacking the near post. Use a smaller pitch and goal, and allow the corner taker to use their stronger foot regardless of which side the corner is from. Praise effort and movement over technical execution.
Under-14 to Under-16
Introduce the full player positioning but allow the near post runner to choose between a flick-on and a direct shot/header based on what they see. Add the second ball runner (#8) and begin coaching the timing of runs in relation to the delivery. Use video review to help players understand their positional roles.
Open Age / Senior
Run the play as described in full, including all decoy movements, the dummy variation, and the short corner trigger. Introduce the play as part of a wider set piece menu so that opponents cannot predict which routine will be used. Analyse opponent defensive set-up from match footage to determine the optimal delivery side and target zone before each game.