Masterclass: High-Pressure Running Between the Wickets
Transform your team's running between the wickets with this comprehensive drill focused on clear calling, aggressive backing up, and elite decision-making under pressure.

Equipment Needed
1. Overview
Running between the wickets is the heartbeat of a successful batting partnership. It dictates the tempo of the innings, rotates the strike, and constantly applies pressure on the fielding side. This drill is designed to simulate match intensity, forcing batters to make split-second decisions while communicating effectively. By focusing on aggressive backing up, decisive calling, and efficient ground-making, coaches can instill a proactive mindset in their players. Use this drill during the pre-season to establish standards, or mid-season to sharpen match awareness.
2. Setup
To execute this drill effectively, you will need a standard 22-yard cricket pitch (synthetic or turf) and the following equipment:
- 1 cricket ball (or incrediball for juniors)
- 2 bats
- Full batting protective gear for both batters (pads, gloves, helmet, box)
- 6-8 marker cones to designate fielding zones
- 1 set of stumps at each end
Pitch/Field Setup:
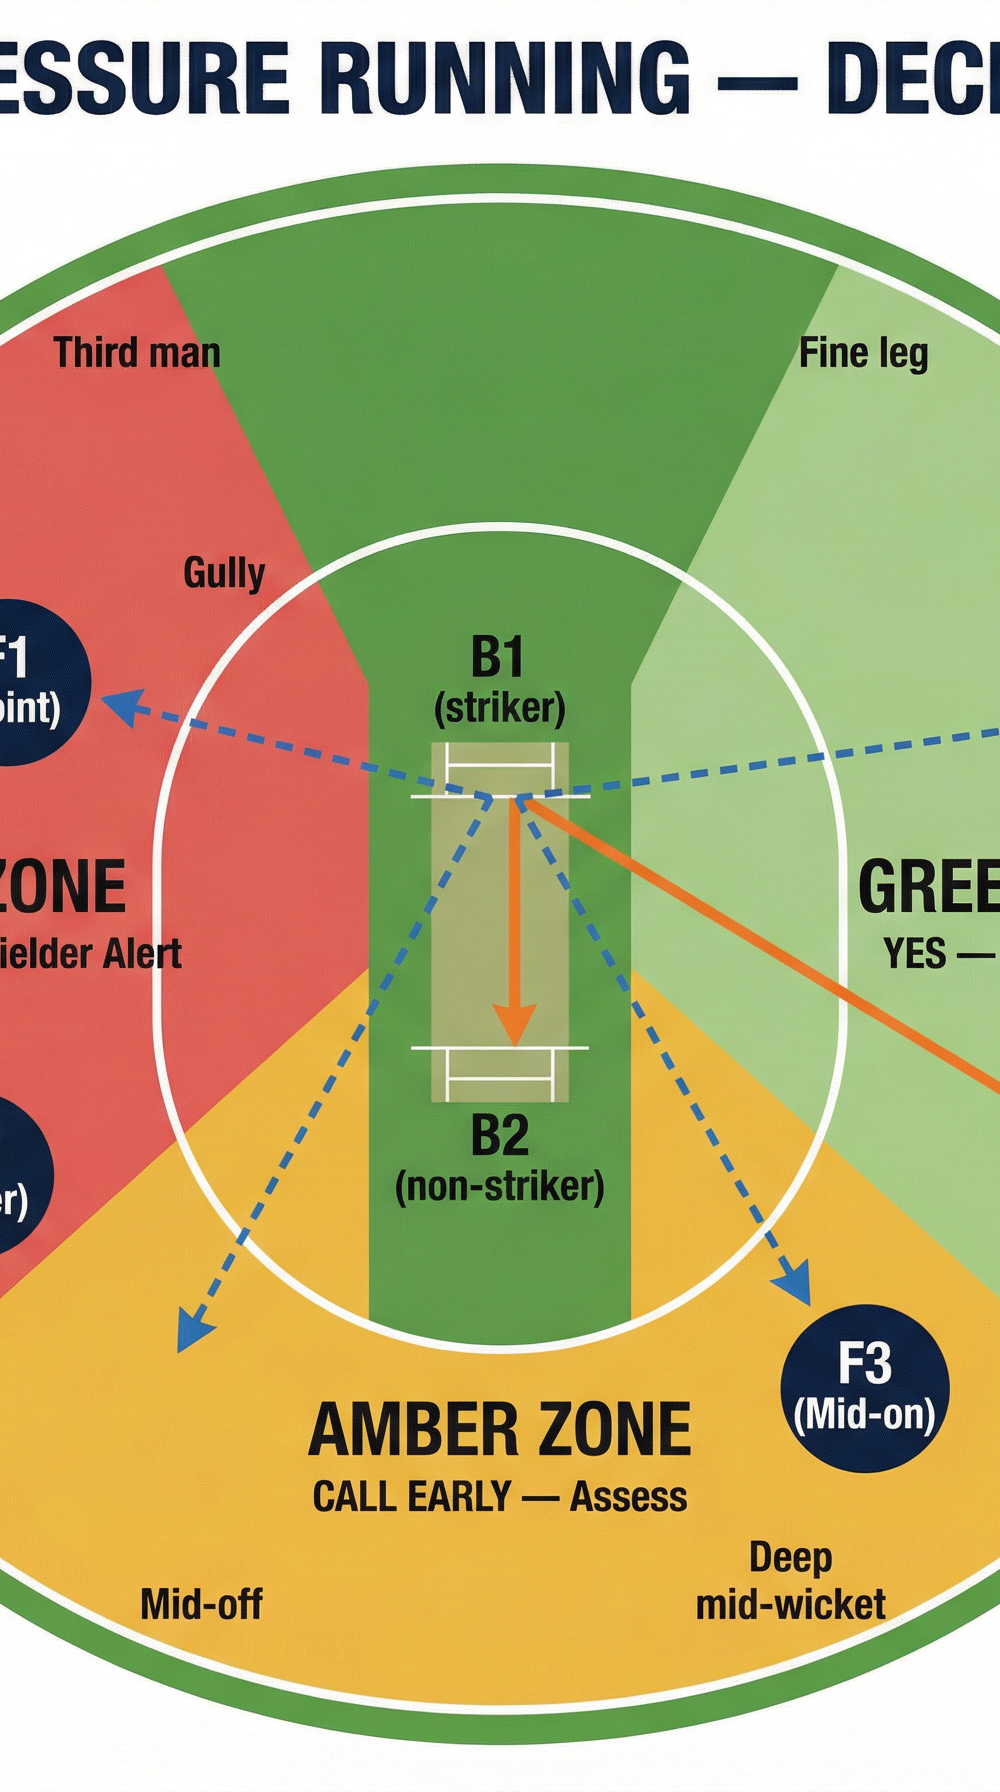
Place the stumps at the standard 22-yard distance. Use the marker cones to divide the field into three distinct zones as shown in the tactical diagrams: the Green Zone (easy singles), the Amber Zone (assess and call), and the Red Zone (high danger). Position three fielders or coaches at Point (F1), Cover (F2), and Mid-on (F3).
Player Positions:
- Striker (B1): Positioned at the batting crease, fully geared up.
- Non-Striker (B2): Positioned at the non-striker's end, ready to back up.
- Fielders (F1, F2, F3): Positioned in the designated zones to apply pressure and execute return throws.
3. Step-by-Step Instructions


Step 1: The Basic Run and Call
Begin with a foundational run to establish communication. The coach (or a bowler) delivers the ball. The striker (B1) plays a controlled shot into a predetermined safe area (Green Zone). The striker must immediately call "YES!" loudly and clearly. The non-striker (B2) must respond with "YES!" and both players sprint to the opposite end. Focus on running in straight lines and keeping the bat in the correct hand to avoid crossing paths.

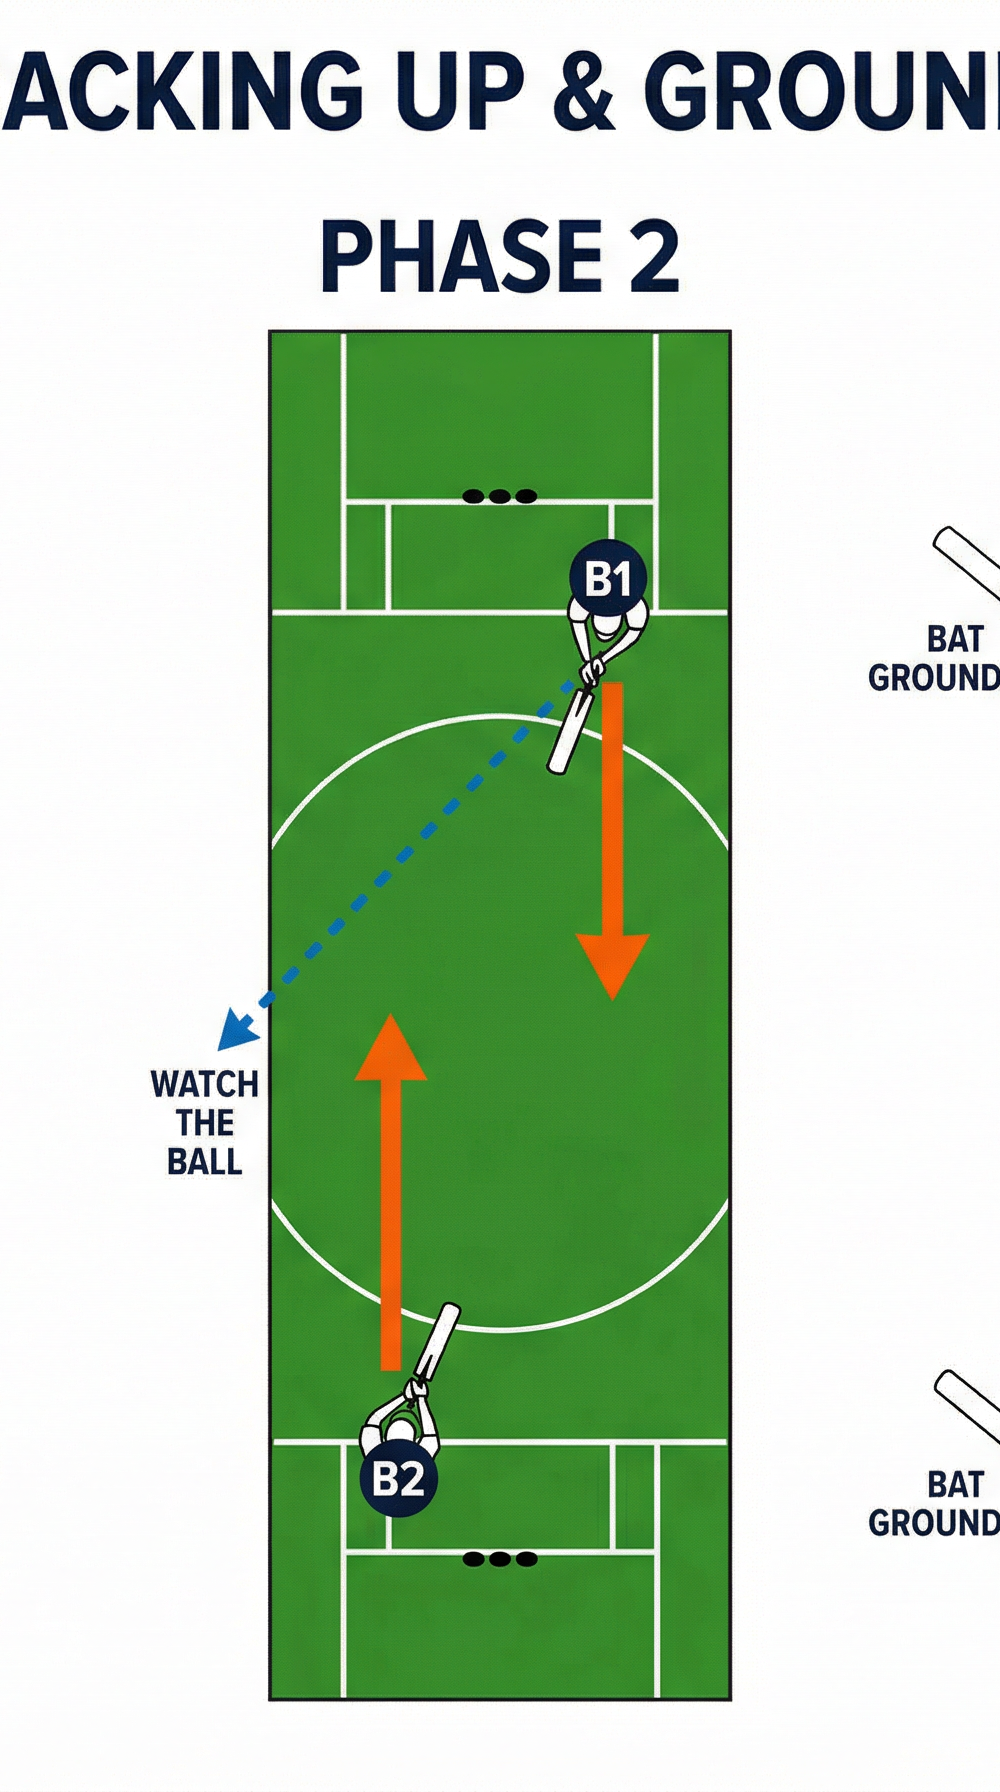
Step 2: Aggressive Backing Up and Ground Making
Introduce the backing up phase. As the bowler enters their delivery stride, the non-striker (B2) must walk in with the bowler, leaving the crease only when the ball is released. They should aim to be 2-3 yards down the pitch as the striker plays the ball. Once the call is made, both batters sprint. As they approach the opposite crease, they must execute a slide or stretch, grounding the bat behind the popping crease to secure the run safely.
Step 3: Decision Zones and Pressure Running
Now, integrate the fielders and decision zones. The striker plays the ball into either the Green, Amber, or Red zone.
- Green Zone: Immediate "YES!" from the striker.
- Amber Zone: Striker calls "WAIT!", assesses the fielder's movement, and then calls "YES!" or "NO!".
- Red Zone: Immediate loud "NO!" from the striker.
Fielders must attack the ball and attempt a run-out if the batters decide to run. This step forces batters to process visual cues rapidly and communicate under pressure.
4. Key Coaching Points
- Loud and Clear Communication: Calls must be definitive ("YES", "NO", "WAIT"). Avoid ambiguous calls like "maybe" or "run". The non-striker must always echo the call to confirm.

- Aggressive Backing Up: The non-striker must walk in with the bowler, watching the ball leave the hand. This reduces the running distance by 2-3 yards, turning tight singles into comfortable runs.
- Run the First Run Hard: Regardless of where the ball goes, the first run must be completed at maximum speed. This puts pressure on the fielders and opens up the possibility of a second run.
- Efficient Ground Making: Teach players to slide the bat into the crease rather than stepping over the line. The bat should be grounded well before the body crosses the crease.
- Turn Blind: When turning for a second run, the batter running to the danger end should turn blindly, trusting their partner's call, to save crucial fractions of a second.
5. Common Mistakes
- Ball Watching: The non-striker turns their head to watch the ball instead of watching their partner and listening for the call. This causes hesitation and delays the run.

- Running on the Pitch: Batters run down the center of the pitch, damaging the protected area and increasing the risk of colliding with each other or the bowler. Always run wide on the designated side.
- Poor Bat Grip During the Run: Holding the bat with two hands or carrying it high impedes sprinting speed. The bat should be held in one hand and pumped alongside the body like a sprinter's arm.
- Late Calling: Waiting until the ball has stopped to make a call allows the fielders to set up. Calls must be made as soon as the ball is struck.
6. Variations & Progressions
- The "Two-Run" Challenge: Force the batters to push for two runs on every ball played into the deep. This emphasizes turning technique and acceleration out of the crease.

- No-Call Drill: Run the drill in complete silence. Batters must rely entirely on eye contact and body language to make decisions. This heightens spatial awareness.
- Handicap Running: Start the non-striker a yard further back or place the fielders a few yards closer to increase the difficulty and pressure on the batters.
7. Age Adaptations
- Under 8s / Under 10s: Focus purely on calling "YES" and "NO" loudly, and running with the bat in one hand. Use softer balls and remove fielders to build confidence.

- Under 12s / Under 14s: Introduce backing up and sliding the bat. Start using basic decision zones without the pressure of direct hits.
- Under 16s / Open: Full match intensity. Implement all decision zones, direct hit run-outs, and complex scenarios like turning for a second run on a misfield.