Kick-Off Reception & Wide Channel Counter-Attack Play
A structured 3-phase counter-attack play designed to safely secure the kick-off, consolidate possession, and rapidly strike wide through a fullback loop.

Equipment Needed
1. Overview
Securing the kick-off is arguably the most critical set piece in modern rugby, setting the tone for possession and momentum. However, merely catching the ball and kicking it back often surrenders the initiative. This set play is designed to turn a defensive reception into a lethal attacking opportunity.
By utilizing a structured three-phase system, teams can safely secure the high ball, consolidate the ruck to draw in defenders, and then rapidly shift the point of attack to the wide channels. The key to this play is the delayed involvement of the fullback (#15), who enters the line late on a loop to create a numerical mismatch on the edge. This play is highly effective when the opposition chases the kick-off aggressively but fails to fold their defensive line quickly enough on the subsequent phases.
2. Setup
To execute this play effectively, coaches must ensure precise positioning and clear communication before the referee blows the whistle.
Pitch Area: Own half, specifically between the 22-metre line and the 10-metre line.
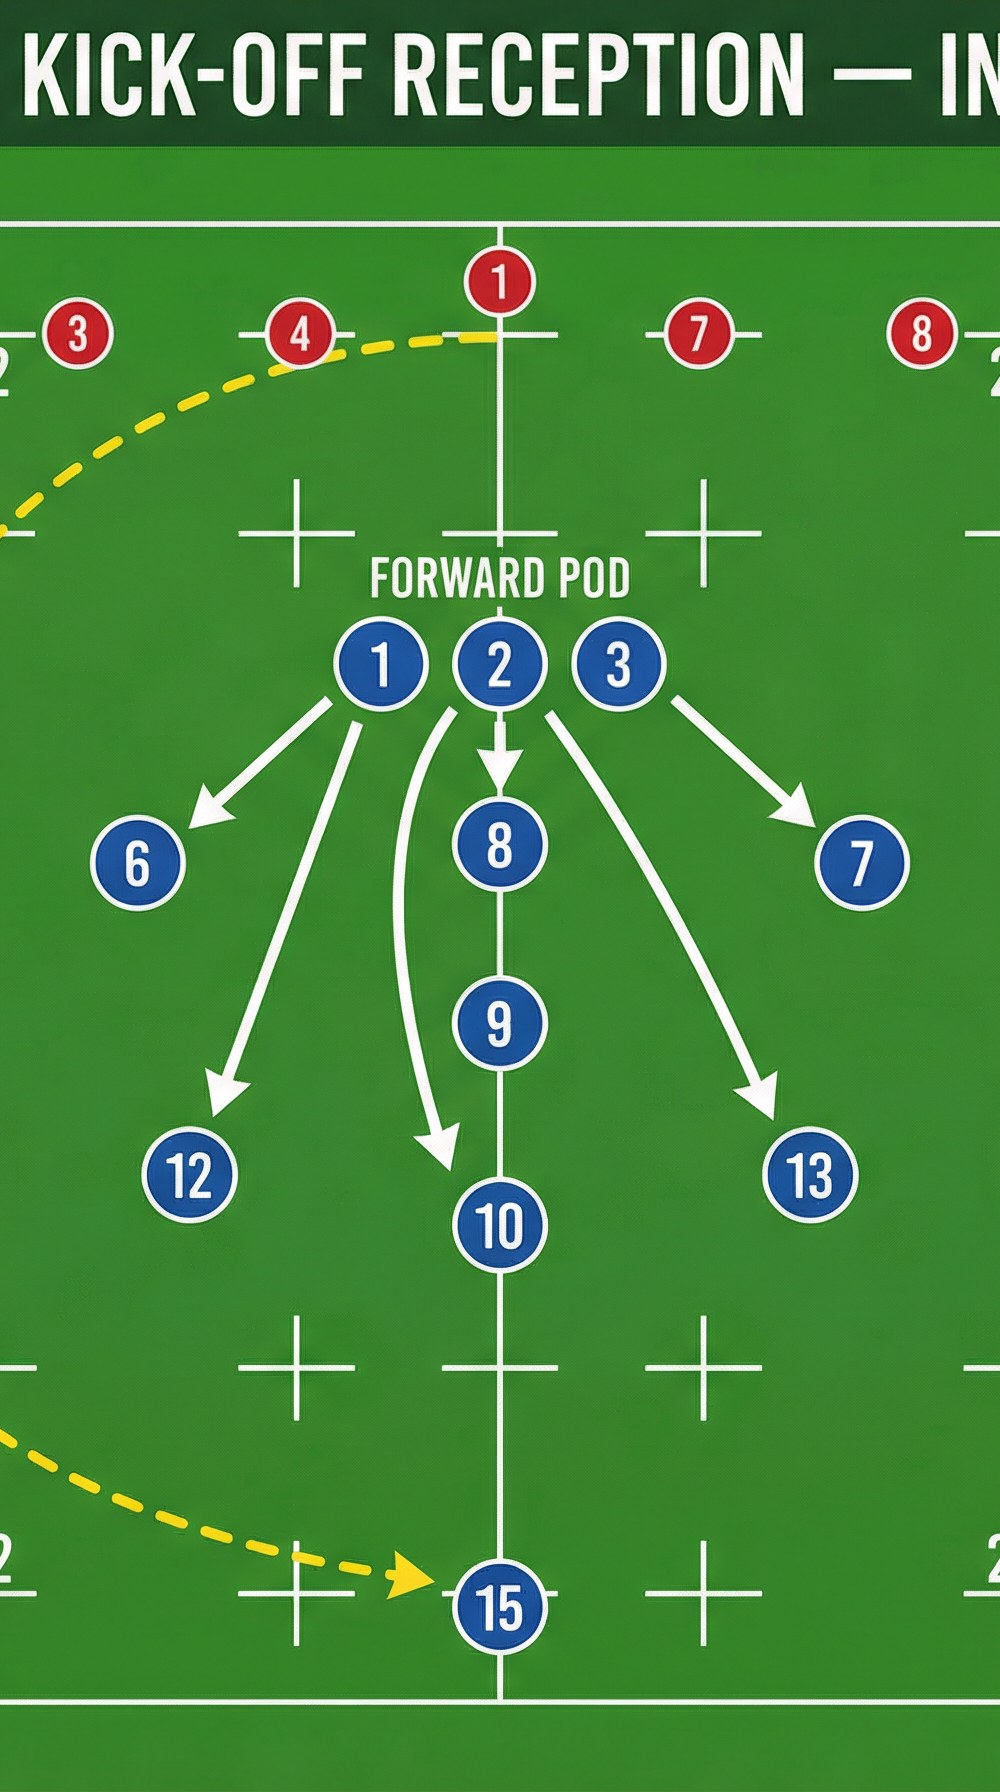
Player Positions (Initial Setup):
- Fullback (#15): Positioned deep, central, on or just behind the 22m line, ready to track the kick.
- Wings (#11, #14): Positioned wide, just inside the 15m tramlines, around the 22m line to cover angled kicks.
- Fly-half (#10) & Centers (#12, #13): Positioned in a flat line around the 30m mark, ready to organize the counter-attack or chase a return kick.
- Scrum-half (#9): Sweeping behind the forward pod, around the 35m mark, ready to clear the ball quickly.
- Forward Pod (#1, #2, #3, #8): Clustered centrally around the 45m mark, forming a protective screen and ready to lift the catcher or secure the immediate ruck.
- Flankers (#6, #7): Positioned wider on the 40m line to cover shorter kicks or support the initial carry.

3. Step-by-Step Instructions

This counter-attack relies on speed of thought and precise execution across three distinct phases.
Phase 1: The Catch and Consolidate
- As the ball is kicked, the Fullback (#15) calls early and loud to claim the catch.
- The Forward Pod (#1, #2, #3, #8) immediately retreats to form a protective wedge in front of the catcher, legally blocking the chasers' direct path.
- Upon catching the ball, #15 takes two strong steps forward to initiate contact on their terms, aiming to cross the 30m line.
- The Flankers (#6, #7) and Number 8 (#8) latch onto #15 to drive through contact and secure a lightning-fast ruck.
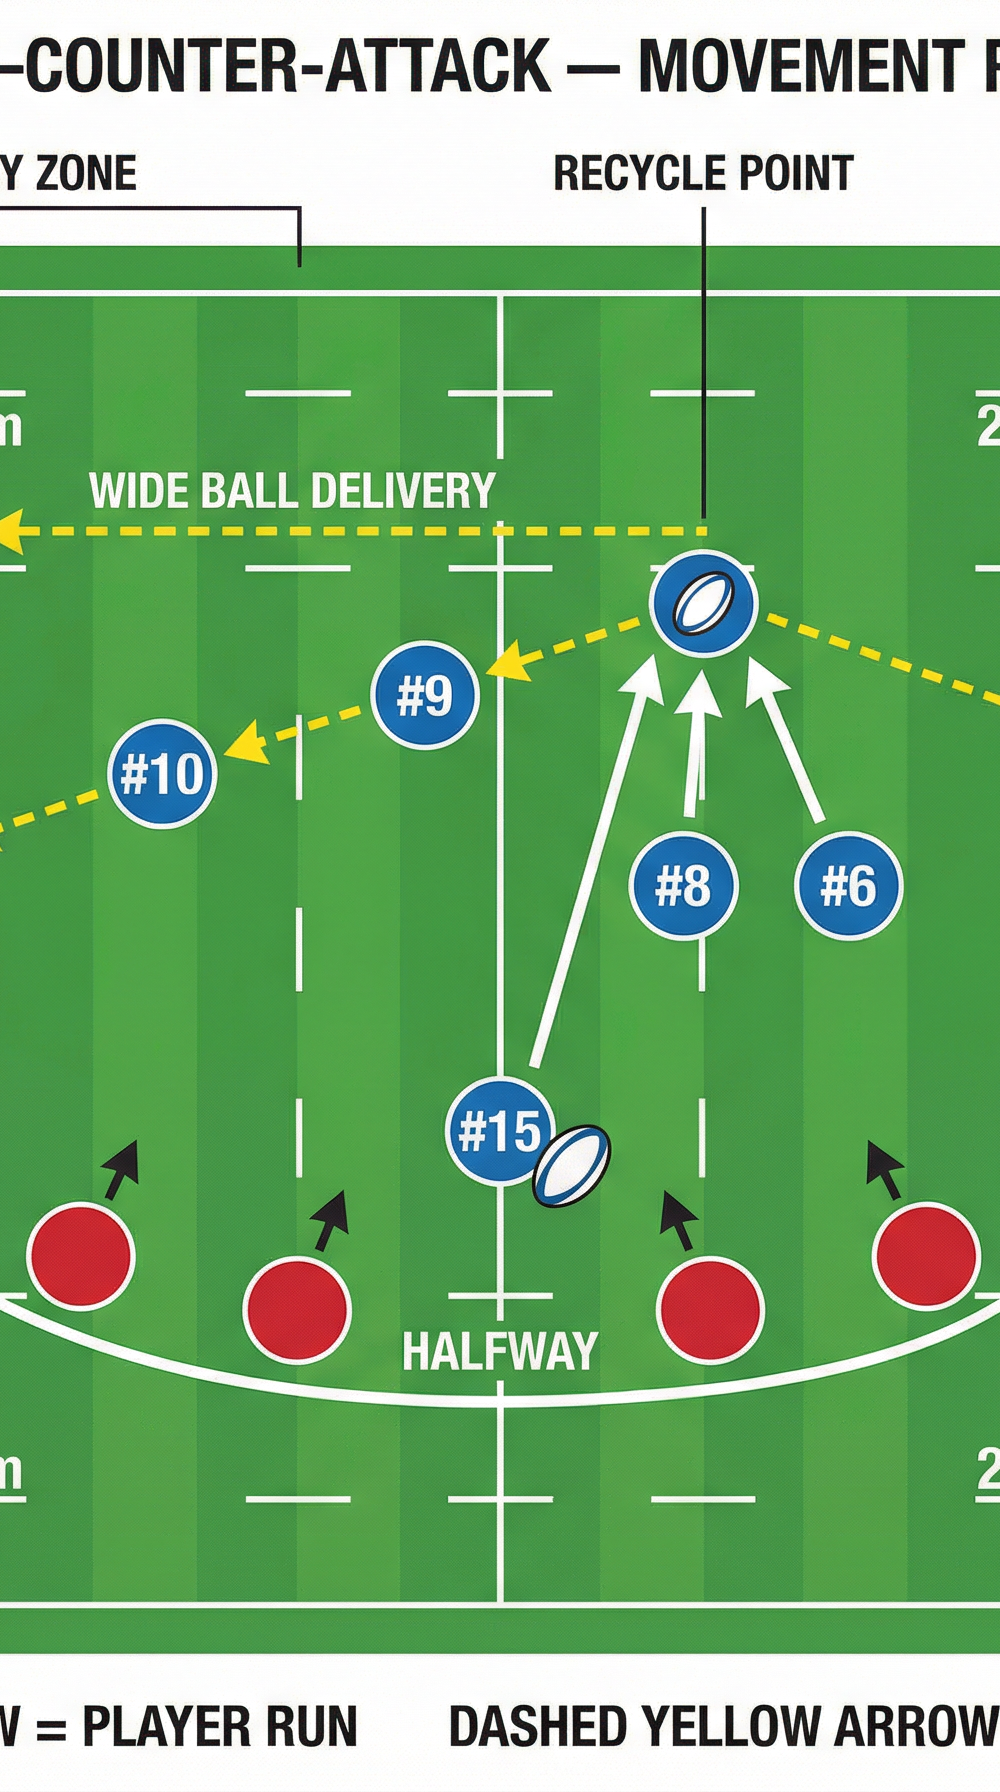
Phase 2: The Shift
- The Scrum-half (#9) arrives at the ruck instantly, ensuring the ball is available in under 3 seconds.
- #9 fires a flat, fast pass to the Fly-half (#10), who is positioned on the move at the 40m line.
- #10 takes the ball to the gain line to commit the first defender, then passes wide to the Inside Center (#12).
- #12 immediately ships the ball to the Left Wing (#11), who has held their width on the touchline.
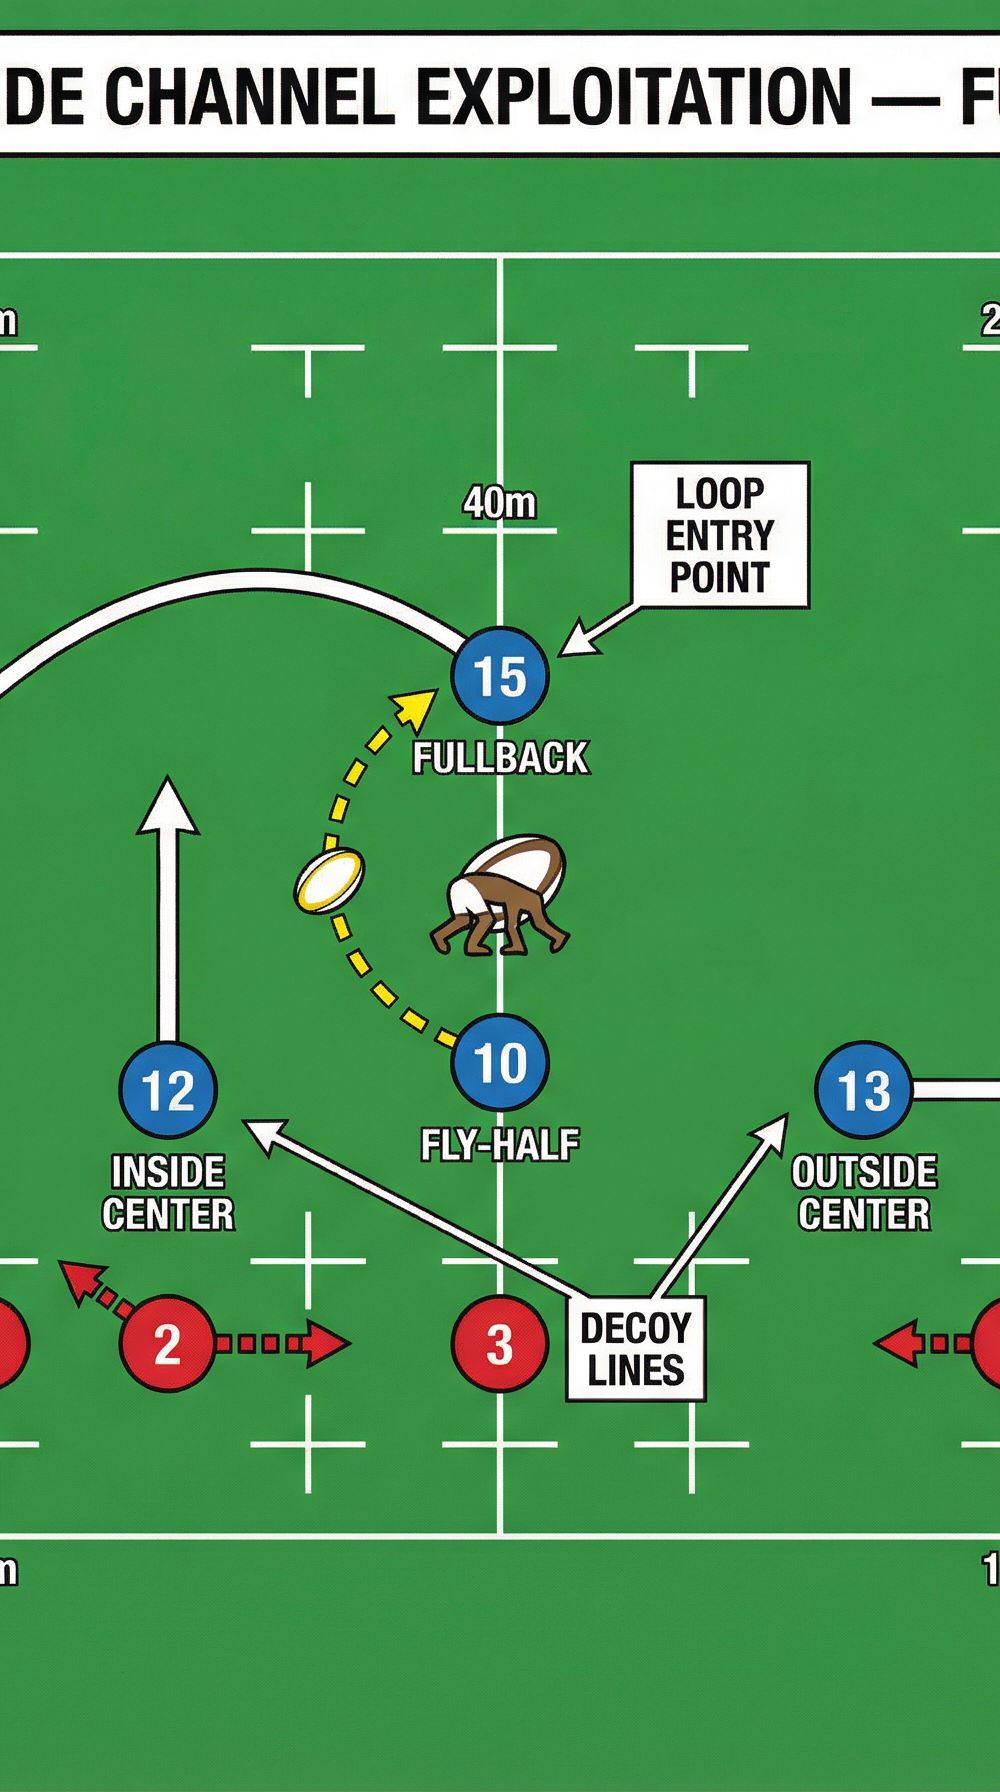
Phase 3: The Fullback Loop and Strike
- As the ball moves wide, the Fullback (#15) quickly gets back to their feet from the initial ruck and loops around behind the attacking line.
- The Left Wing (#11) receives the ball and steps hard off their left foot, cutting diagonally infield to draw the covering defenders.
- The Outside Center (#13) and Right Wing (#14) run hard decoy lines to fix the midfield defense and prevent them from drifting wide.
- #11 passes back inside to #10 (who has looped around) or directly to the looping #15, who hits the line at pace in the wide channel, creating a 2-on-1 overlap against the final defender.
4. Key Coaching Points

To ensure success, focus your coaching on these critical elements during practice:
- Early and Loud Communication: The catcher must claim the ball while it is still at the apex of its flight. Silence leads to collisions and dropped balls.
- Aggressive Forward Screen: The forwards must work incredibly hard to get back and set a legal screen. They cannot change their line to block, but they must hold their ground to protect the catcher.
- Ruck Speed is Non-Negotiable: The entire play hinges on producing lightning-fast ball (under 3 seconds) from the first ruck. If the ball is slow, the defense will fold, and the counter-attack is dead.
- The Fullback's Work Rate: The #15 must have the fitness and desire to make the initial tough carry, hit the deck, bounce back up instantly, and run a 30-metre loop to become the strike runner.
- Fixing Defenders: Players passing the ball (#10, #12, #11) must run squarely at the defensive line before passing. Drifting sideways pushes the defense across and kills the space for the loop.
5. Common Mistakes

Watch out for these frequent errors that can derail the play:
- Isolated Catcher: The support players (#6, #7, #8) react too slowly to the catch, leaving the Fullback isolated and resulting in a holding-on penalty or a turnover.
- Deep Alignment on the Shift: The backline stands too deep on Phase 2. This allows the defense to drift easily and tackles the ball carriers behind the gain line.
- Telegraphing the Loop: The Fullback starts the loop too early or runs it too shallow, allowing the defense to read the play and adjust their spacing.
- Ignoring the Decoys: The decoy runners (#13, #14) jog through their lines instead of sprinting. If they don't look like genuine threats, the defense won't commit to them.
6. Variations & Progressions

Keep the defense guessing by introducing these variations once the core play is mastered:
- The Inside Ball (Switch): If the defense drifts aggressively to cover the wide loop, #10 or #12 can play a short, pop pass back inside to a hard-running forward or the blindside wing.
- The Box Kick Option: If the initial ruck is messy or slow, #9 must have the autonomy to call off the counter-attack and execute a high, contestable box kick to relieve pressure.
- Right-Side Strike: Mirror the entire play to attack the right edge, utilizing the Right Wing (#14) and having the Fullback loop to the opposite side.
7. Age Adaptations

Tailor the complexity of the play to suit the developmental stage of your players:
- Under 10s/12s: Focus purely on the safe catch, the protective screen, and securing the first ruck. The counter-attack should be a simple pass to the fastest player in space, without complex loops.
- Under 14s: Introduce the concept of shifting the ball away from the ruck quickly (Phase 2), but keep the passing simple. Focus on drawing the man and passing.
- Under 16s & Open: Implement the full three-phase structure, including the Fullback loop and the intricate decoy lines. Demand high execution speed and precision under pressure.