The Box Zone: Defensive Third Press Set Play
Master the box zone defensive setup to force turnovers, disrupt attacking flow, and dominate the defensive third with coordinated team movement.
Equipment Needed
Overview
The 'Box Zone' is a highly effective defensive set play designed to create intense pressure in the defensive third, specifically targeting the opposition's feed into the shooting circle. Unlike traditional one-on-one (man-on-man) defence, a zone defence requires players to guard specific areas of the court rather than individual opponents. This set play aims to clog the middle channel, force the ball out wide to the pockets, and create interception opportunities by dictating where the attacking team can pass.
This setup is particularly devastating against teams that rely on quick, direct passes down the centre corridor or teams with a dominant holding Goal Shooter (GS) who requires early, high feeds. By implementing the Box Zone, coaches can force the opposition into making high-risk, looping passes that are easier to contest and intercept.
Setup
Court Area: Defensive Third and Centre Third
Players Involved: GK, GD, WD, C (Primary), WA (Secondary Support)
Equipment Needed:
- 1 Netball
- Set of training bibs (two contrasting colours)
- 4–6 flat marker cones (to initially outline the zone boundaries during training)
Initial Positions
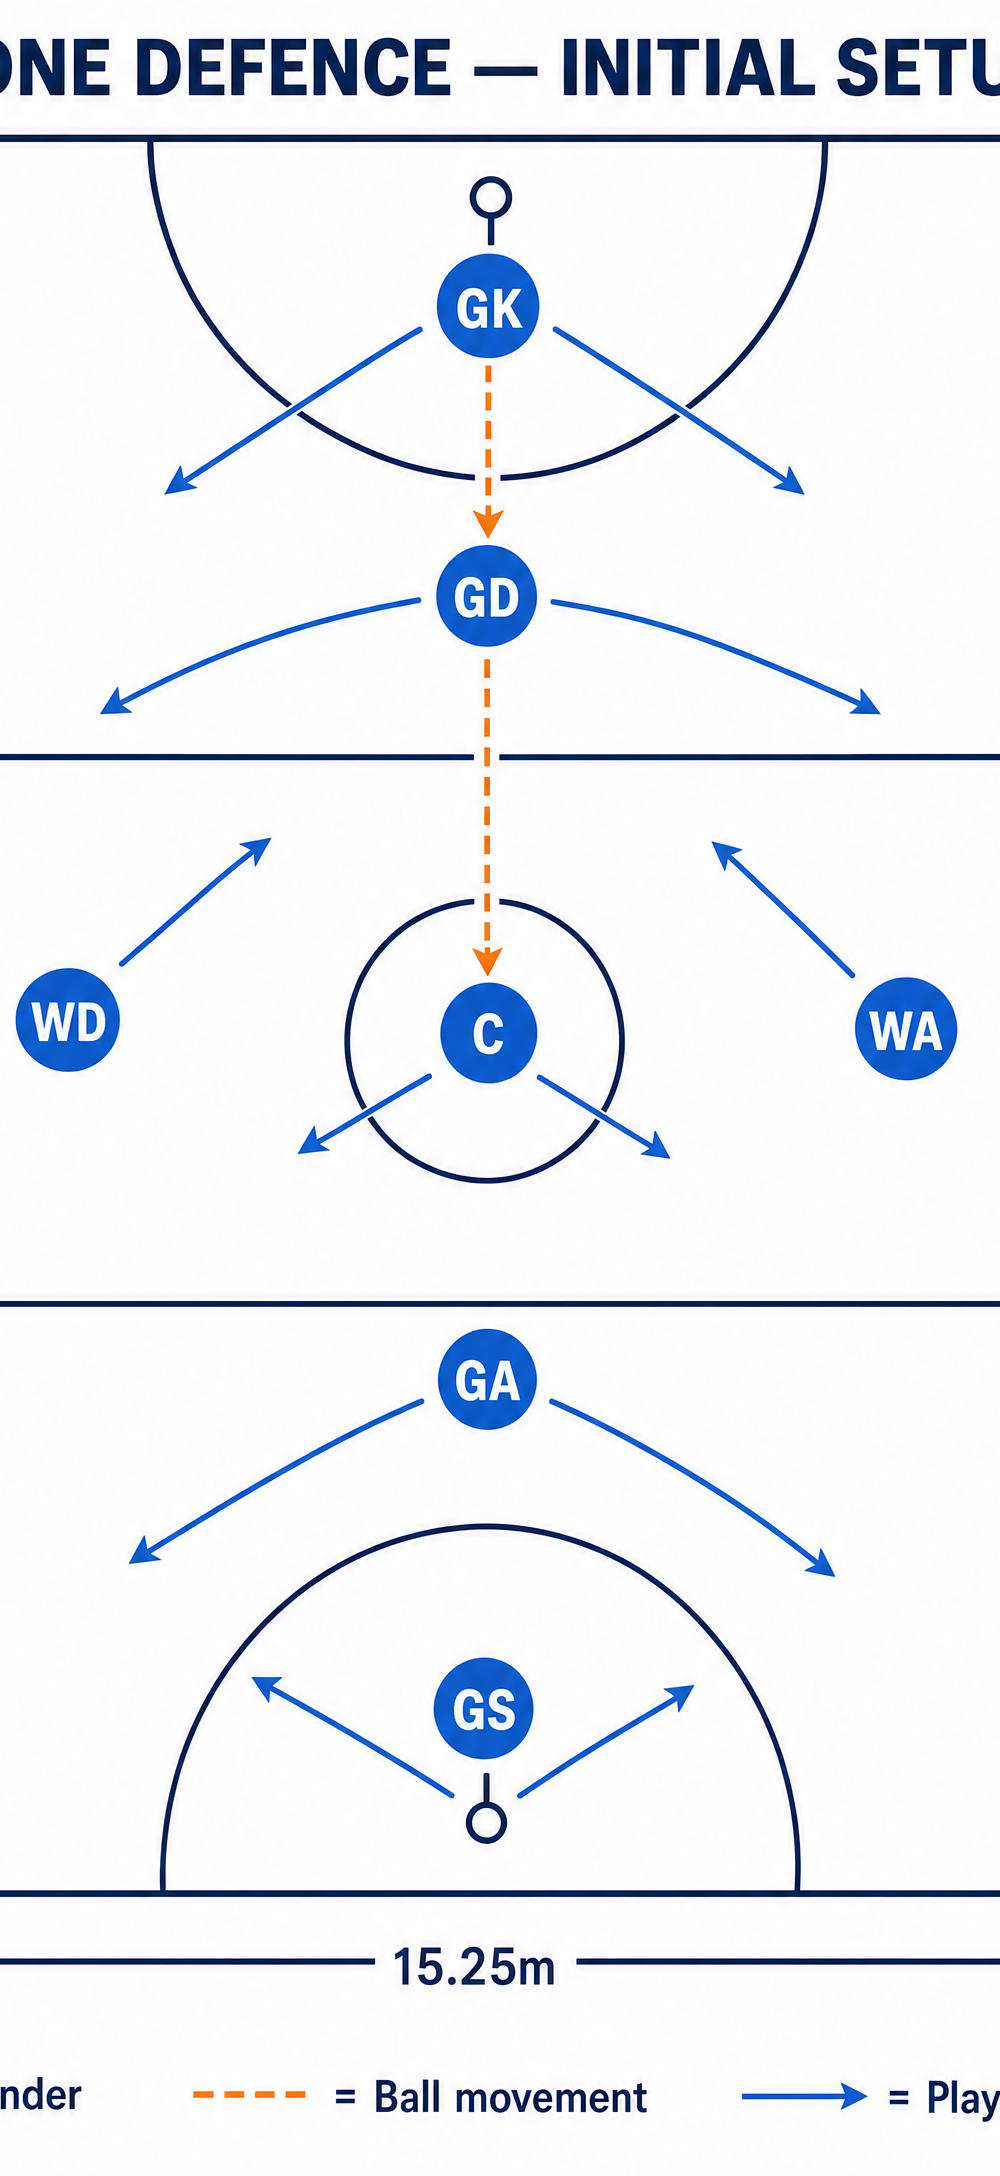
- Goal Keeper (GK): Positioned deep in the shooting circle, slightly in front of the goal post, ready to track the GS but primarily holding the back space.
- Goal Defence (GD): Sets up at the top of the shooting circle (the 'D'), anchoring the front of the zone.
- Wing Defence (WD): Positioned on the left side of the transverse line (defensive third), angled inwards.
- Centre (C): Positioned centrally, just below the centre circle, acting as the floating defender who triggers the press.
- Wing Attack (WA): (If involved in the full-court transition) Drops back slightly to cover the transverse line on the right side.
Step-by-Step Instructions
- The Setup Call: As the opposition brings the ball down the court and approaches the transverse line into your defensive third, the GD or C calls "Box!" to initiate the zone structure.
- Forming the Structure: The GD, WD, C, and (optionally) WA form a 'box' or 'cup' shape just outside the shooting circle. The goal is to create a physical barrier across the top of the circle, denying easy entry.
- Dictating the Pass: As the ball carrier looks for options, the zone defenders hold their space, keeping their eyes on both the ball and the attackers entering their designated areas. The defenders must angle their bodies to invite the pass out wide toward the sidelines (the pockets) while completely blocking the direct pass to the top of the circle.
- The Trigger: The moment the ball is passed out wide to the pocket, this is the 'trigger' for the press.
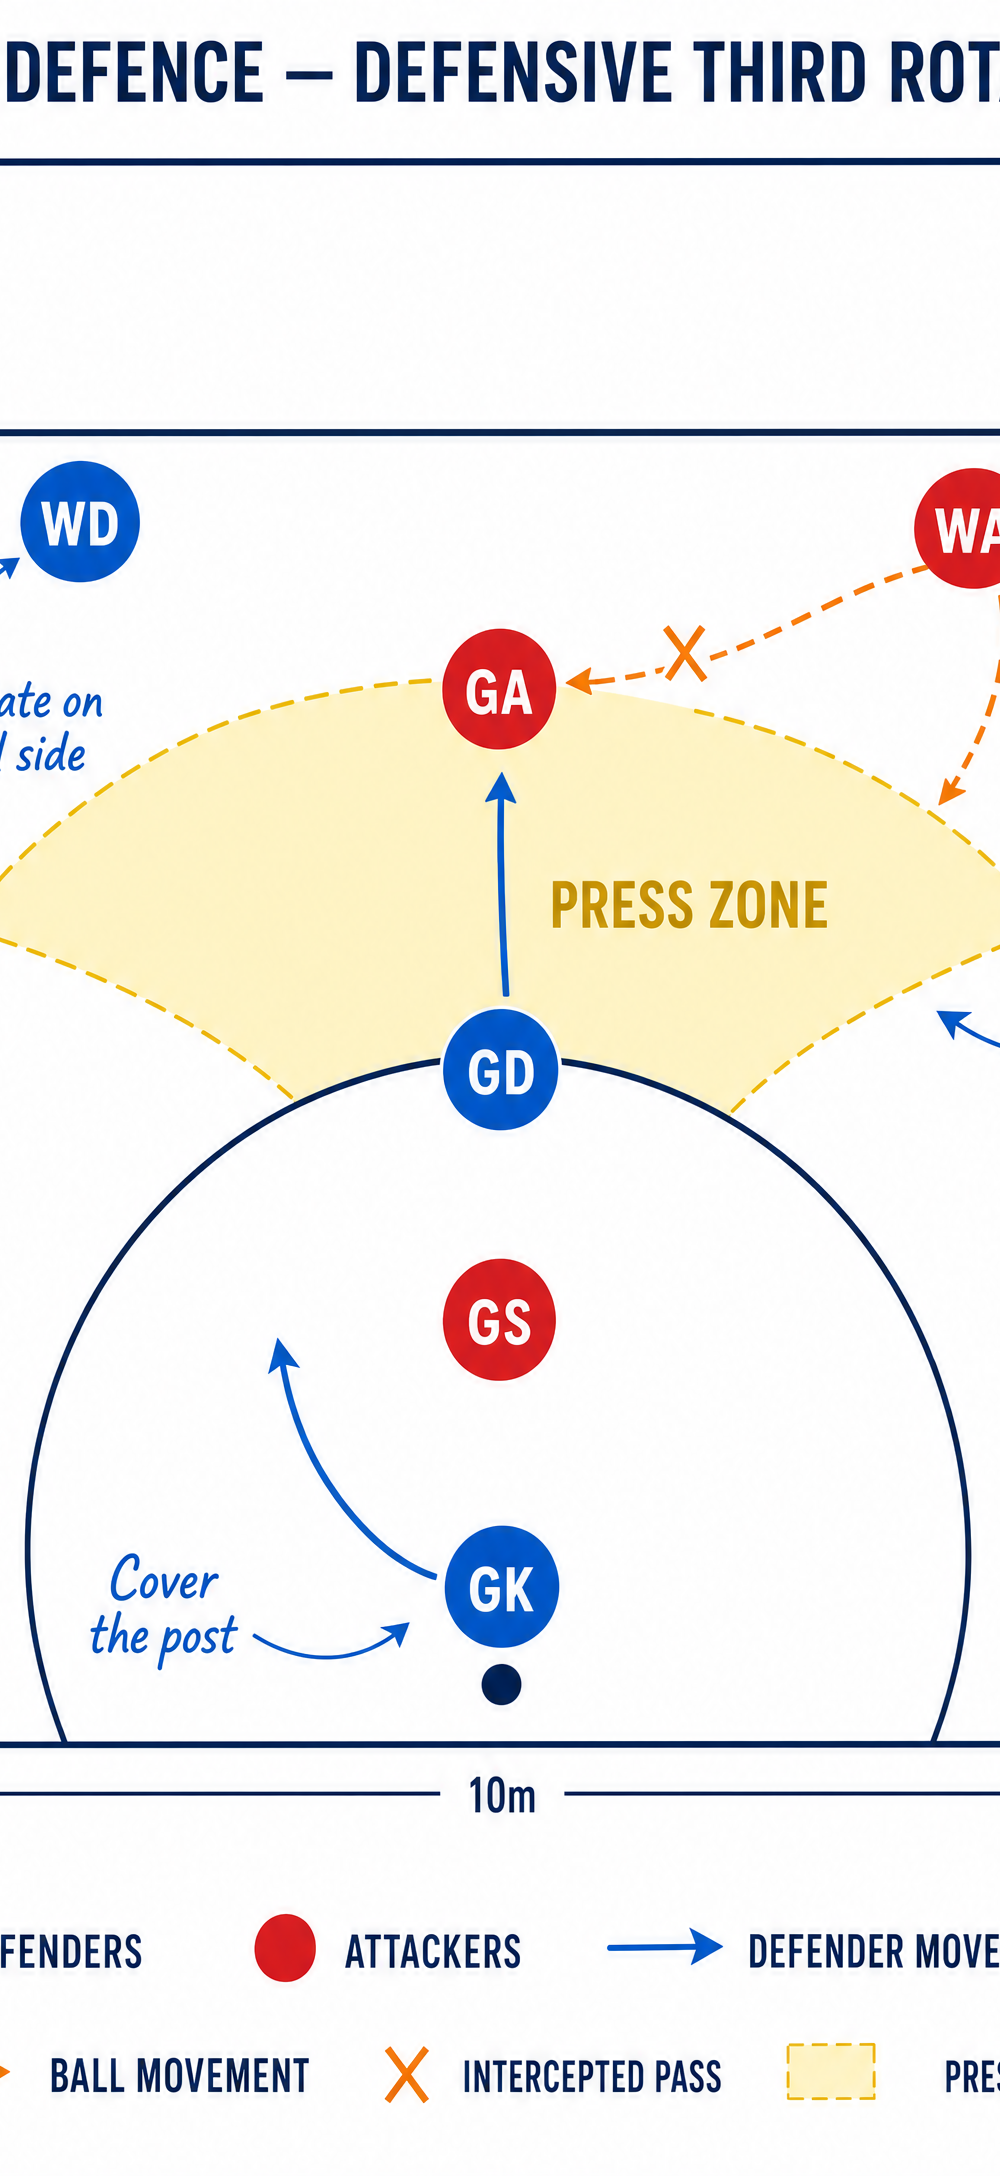
- The Trap and Intercept:
- The defender closest to the ball (e.g., WD) immediately applies intense three-foot pressure on the ball carrier in the pocket.
- The GD slides across to cover the front of the circle on the ball side, denying the drive from the GA.
- The GK adjusts position to front the GS, cutting off the baseline feed.
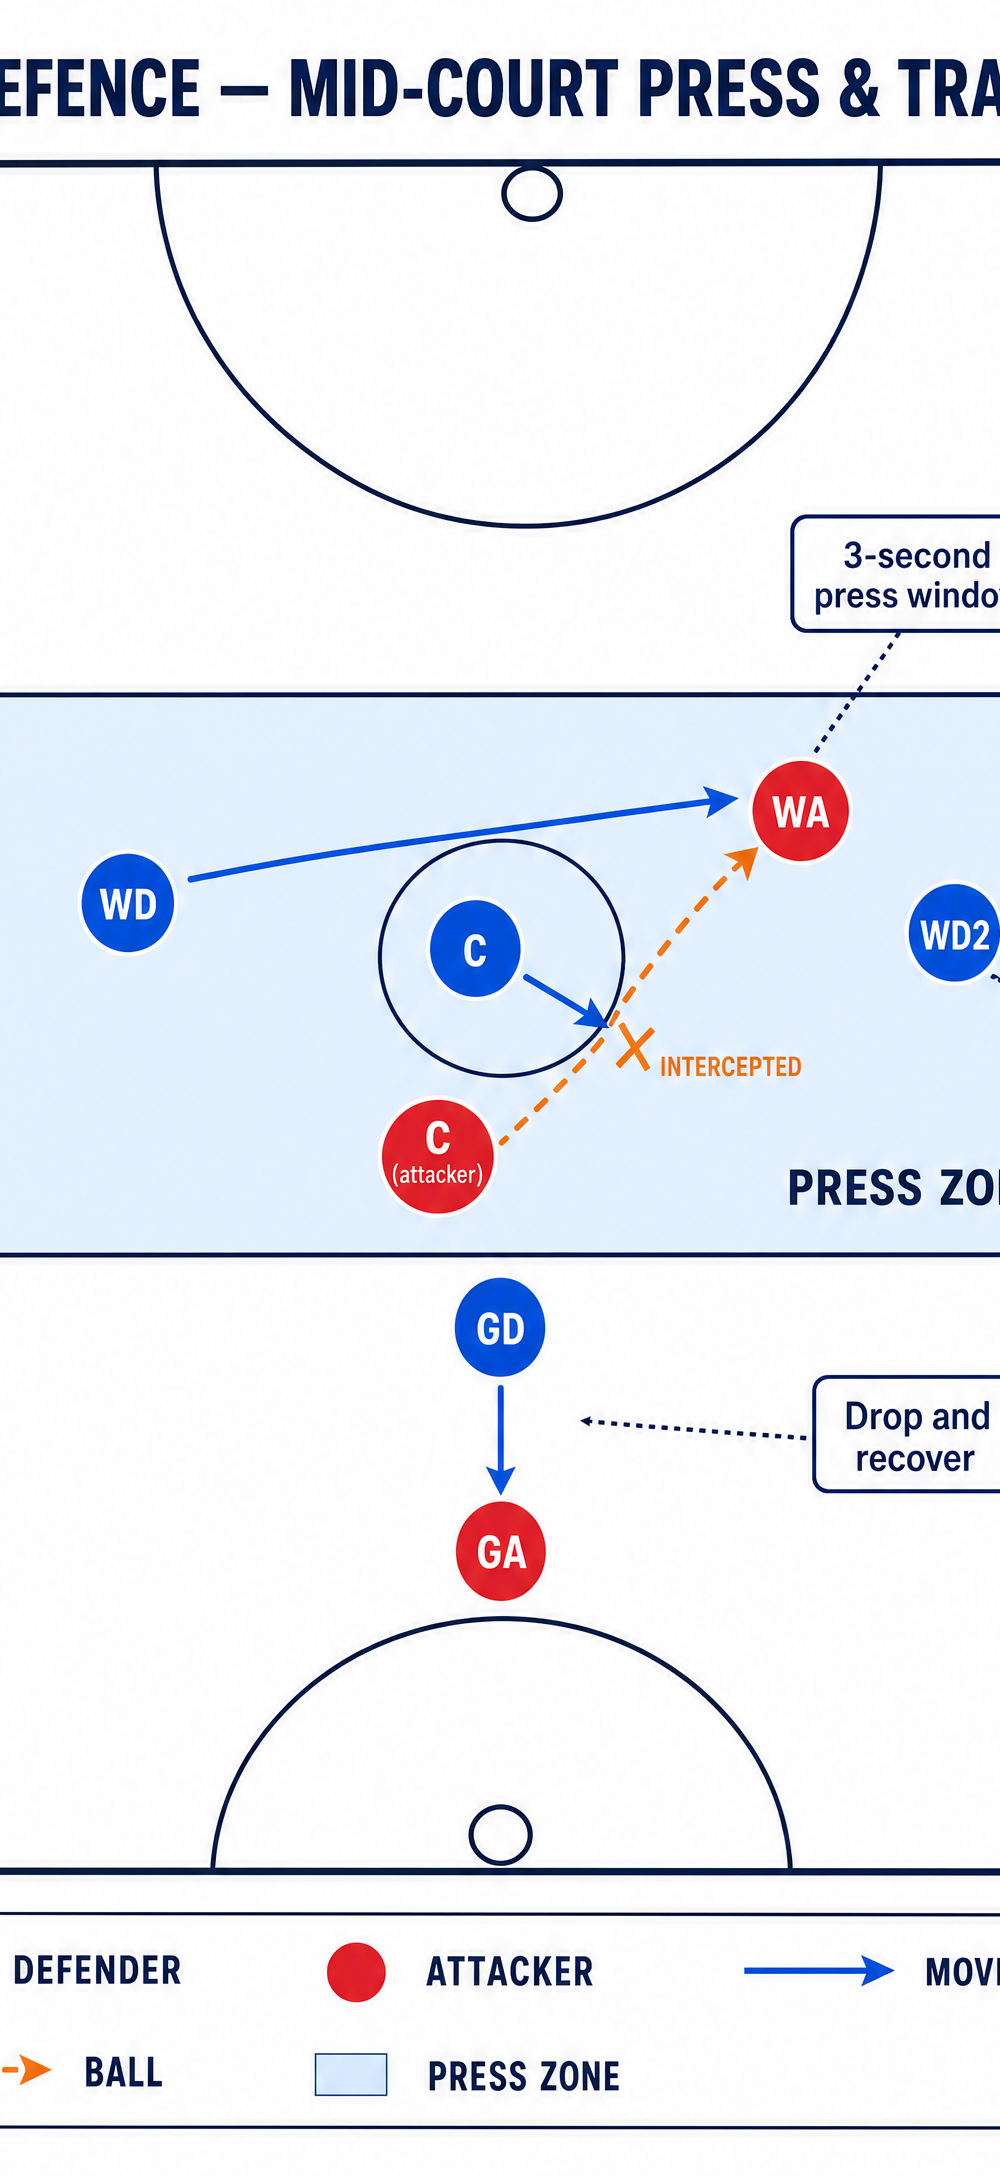
- The C drops into the space left by the GD, hunting for the interception on any forced cross-court or looping pass.
- Transition: Upon securing the interception or forcing a held ball/error, the team must immediately transition into attack, using the width of the court to clear the ball from the defensive third.
Key Coaching Points
- Communication is Critical: A zone defence falls apart without constant talk. Players must call out attackers entering and leaving their zones (e.g., "GA coming through!", "I've got ball!").
- Vision and Body Angle: Defenders must maintain 'open' body positioning, allowing them to see the ball carrier and the attackers in their zone simultaneously. Never turn your back on the ball.
- Hunting as a Pack: The zone relies on collective movement. If one player shifts to cover a space, the adjacent players must slide to cover the gap left behind. It's a connected unit, moving like a pendulum with the ball.
- Patience: Do not break the zone structure too early to chase a low-percentage interception. Force the attackers to make 4–5 passes around the perimeter until they make a mistake or attempt a risky feed.
Common Mistakes
- Ball Watching: Defenders focus entirely on the ball and lose track of attackers cutting through their blind spots behind them.
- Following the Player: A defender gets drawn out of their designated zone by following an attacker, creating a massive hole in the defensive structure for another attacker to exploit.
- Weak Three-Foot Pressure: When the trap is triggered in the pocket, the defender fails to put immediate, intimidating pressure over the ball, allowing the attacker to easily see over the zone and make a successful feed.
- Late Sliding: The adjacent defenders react too slowly when the ball is moved, failing to cover the gaps and allowing easy passes through the seams of the zone.
Variations & Progressions
- Progression 1 — The 'Diamond' Zone: Instead of a box, set up in a diamond formation with the C at the point, WD and GD on the wings, and GK at the back. This puts more pressure directly on the ball carrier coming down the centre corridor.
- Progression 2 — Adding Attackers: Start the drill with only 3 attackers against the 4 zone defenders to build confidence. Once the defensive movement is fluid, add a 4th attacker, and finally run it 7v7 in a full-court scrimmage.
- Variation — The 'Drop' Zone: If the opposition has incredibly fast mid-courters, have the C and WD drop back 2–3 metres off the transverse line, giving them more time to read the play and set the structure before the attackers arrive.
Age Adaptations
- Under 10s / Under 12s: Focus heavily on the concept of "guarding a space, not a face." Use flat marker cones to clearly define the zones for each player. Keep the setup simple (e.g., just GD and GK working a mini-zone in the circle) before involving the mid-court.
- Under 14s / Under 16s: Introduce the concept of the 'trigger' and the trap. Emphasize the importance of communication and sliding as a unit. Practice transitioning quickly from zone defence to attack.
- Open / Advanced: Implement complex variations like the Diamond zone or switching between man-on-man and zone defence mid-quarter to confuse the opposition. Focus on high-intensity, immediate pressure on the trap.

