Mastering the Zone Defence: A Comprehensive Set-Up Play
Learn how to effectively implement a full-court zone defence to disrupt opposition flow, force errors, and create turnover opportunities.

Equipment Needed
1. Overview
The zone defence is a highly effective tactical setup designed to disrupt the opposition's attacking rhythm and force turnovers. Unlike traditional one-on-one (man-to-man) marking, where players are responsible for a specific opponent, a zone defence requires players to guard specific areas of the court. By creating a "wall" of defenders, the team can dictate where the ball goes, often forcing the opposition into making risky, cross-court passes or rushed decisions under pressure. This set play is particularly useful against teams with dominant, fast-moving attackers or when your team needs to shift momentum and secure crucial interceptions.
2. Setup
Implementing a successful zone defence requires precise court positioning and excellent communication. The setup typically begins when the opposition has a centre pass or a sideline throw-in within their defensive third.
Court Dimensions: Standard Netball Court (30.5m x 15.25m)
Player Positions Involved: Goal Keeper (GK), Goal Defence (GD), Wing Defence (WD), Centre (C), Wing Attack (WA)
Equipment Needed: Standard netball, team bibs, and optional court markers (cones) for practice sessions to delineate zones.
Initial Positioning
- GK: Positioned near the top of the goal circle, ready to cover the deep space.
- GD: Positioned in the middle of the defensive third, acting as the central pivot of the zone.
- WD: Positioned wide in the defensive third, covering the sideline channel.
- C: Positioned at the transverse line, ready to drop back and support the defensive third.
- WA: Positioned wide in the centre third, creating the initial line of pressure.

3. Step-by-Step Instructions
Executing the zone defence requires coordinated movement. Here is how to run the play effectively:
- Establish the Initial Line: As the opposition takes the centre pass or throw-in, the C and WA establish a high line of pressure across the transverse line. Their goal is to force the first pass wide or backwards, preventing easy penetration down the middle corridor.
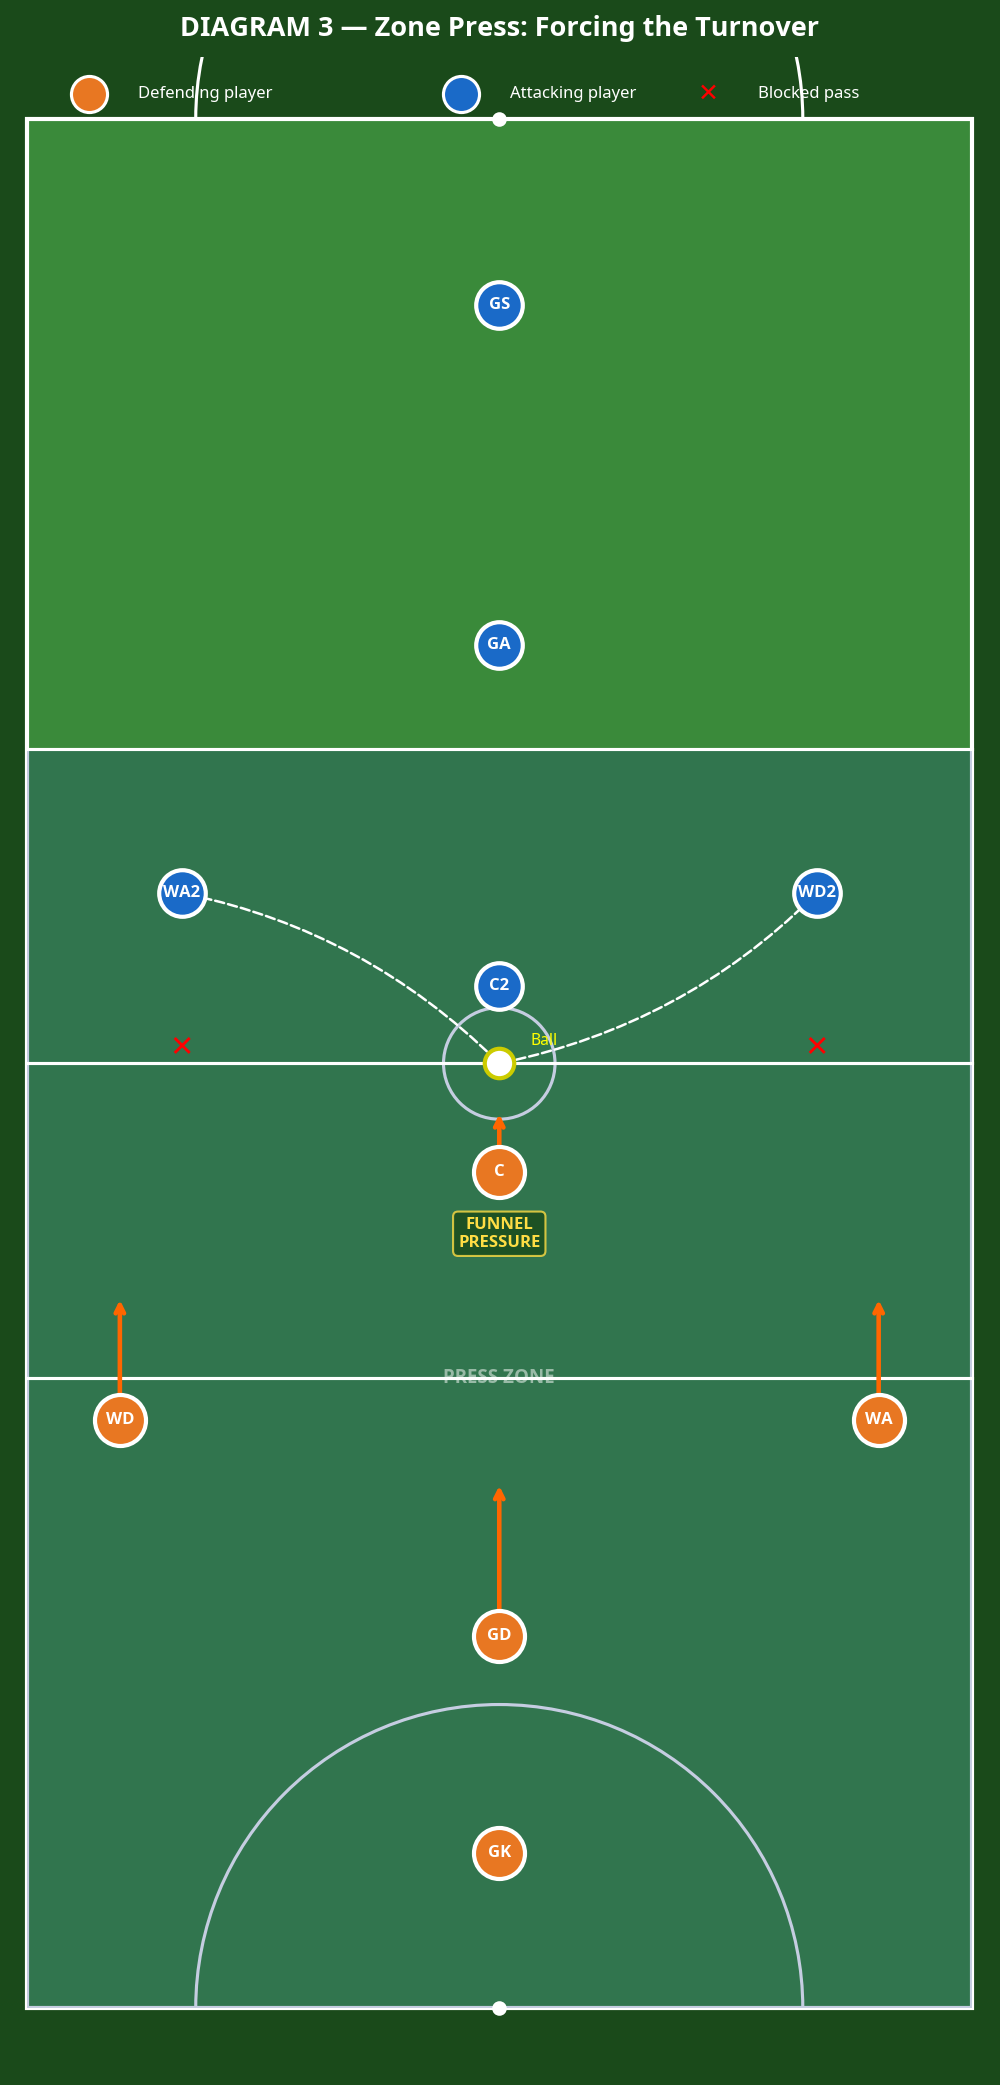
- The Defensive Drop: Once the ball is in play, the GD, WD, and C execute a coordinated drop into the defensive third. They form a triangular or flat wall formation, depending on the opposition's attacking structure. The key is to maintain equal spacing between defenders.
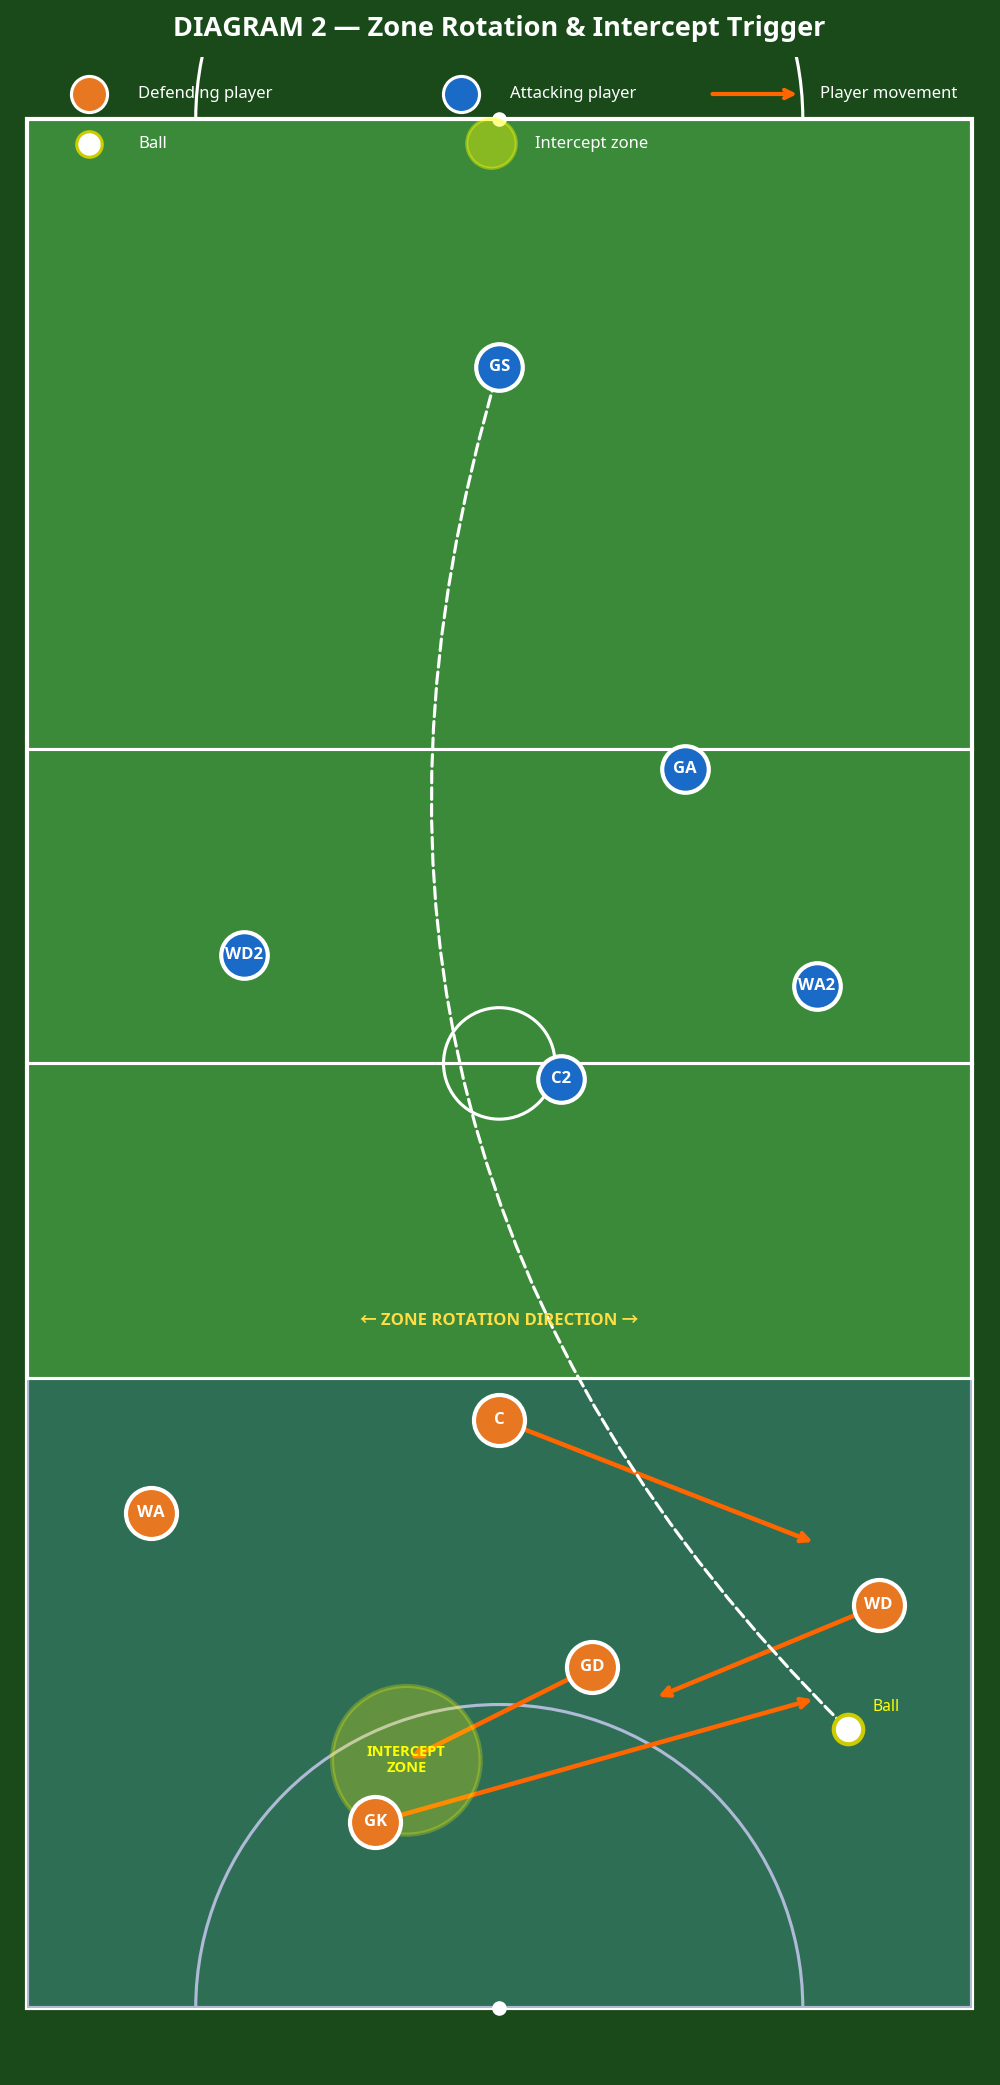
- Zone Rotation and Sliding: As the ball moves laterally across the court, the entire defensive unit must slide together. If the ball goes to the right sideline, the WD steps up to apply pressure, the GD slides across to cover the middle, and the GK shifts to cover the deep space behind the GD.
- Setting the Trap (The Intercept Trigger): The objective of the zone is to force a predictable pass. By leaving a specific area seemingly open (often a high, looping pass over the zone or a forced pass into the pocket), the defenders anticipate the throw. When the pass is released, the designated interceptor (usually the GD or GK) explodes into the space to take the interception.
- Transition to Attack: Immediately upon securing the turnover, the team must transition rapidly. The intercepting player looks for the C or WA breaking down the court, turning defence into a fast-break attack.

4. Key Coaching Points
To ensure your team executes the zone defence flawlessly, focus on these critical coaching points during practice:
- Eyes on the Ball and the Player: Defenders must maintain "split vision," seeing both the ball carrier and the attackers moving through their zone. Do not get caught ball-watching.
- Communication is Non-Negotiable: Players must constantly talk to each other, calling out attackers entering and leaving their zones. Use clear, concise calls like "Mine," "Yours," or "Slide Left."
- Maintain Spacing: The effectiveness of the zone relies on the structural integrity of the "wall." If players bunch up, large gaps appear for the opposition to exploit. Ensure defenders stay approximately 2-3 meters apart.
- Dictate the Play: The zone should not be passive. Defenders must actively use their body positioning and arm extensions to block passing lanes and force the attackers into uncomfortable areas of the court.
- Explosive Movement on the Intercept: The trap only works if the intercepting player commits fully. When the trigger pass is thrown, the defender must attack the ball at its highest point with explosive speed.
5. Common Mistakes
Watch out for these frequent errors when implementing a zone defence:
- Following the Player: The most common mistake is a defender reverting to man-to-man marking and following an attacker out of their designated zone, thereby creating a massive hole in the defensive structure.
- Passive Defending: Standing still and simply putting arms up is not a zone defence. Players must be active, adjusting their footwork and constantly repositioning to close down angles.
- Poor Communication: Silence on the court leads to confusion. If defenders do not hand off attackers as they cross zones, two players might end up guarding one attacker, leaving another completely free.
- Late Reactions: If the defensive unit is slow to slide as the ball moves, the opposition can easily pass around the outside of the zone before the trap can be set.
6. Variations & Progressions
Keep your training sessions dynamic by introducing these variations:
- The Half-Court Press: Instead of dropping into the defensive third, initiate the zone from the transverse line immediately after a centre pass, applying high pressure in the centre third to force an early error.
- The Box and One: A hybrid defence where four players form a box zone in the defensive third, while one player (often the WD or GD) plays a strict man-to-man marking role on the opposition's most dangerous attacker (e.g., a dominant WA or GA).
- Overload the Strong Side: Shift the entire zone heavily towards the side of the court where the ball is located, completely shutting down the strong-side options and forcing a difficult, long cross-court pass to the weak side.
7. Age Adaptations
Tailor the zone defence to suit the developmental stage of your players:
- Under 10s / Under 12s: Focus on the basic concept of "guarding space" rather than complex sliding mechanics. Use cones to visually mark out zones on the court. Emphasize communication and keeping eyes on the ball.
- Under 14s / Under 16s: Introduce the concept of the "intercept trigger" and setting traps. Practice sliding as a cohesive unit and maintaining equal spacing. Focus on explosive footwork for interceptions.
- Open / Advanced: Implement complex variations like the Box and One or full-court presses. Demand high-level communication, split vision, and rapid transition from defence to attack upon securing a turnover.