The Overload & Switch: Attacking Third Throw-In Routine
A dynamic throw-in routine designed to create numerical superiority on the touchline before quickly switching play to exploit the weak side.

Equipment Needed
1. Overview
Throw-ins in the attacking third are often treated merely as a way to restart play, but they present a fantastic opportunity to create high-quality scoring chances. "The Overload & Switch" is designed to draw the opposition towards the ball side, creating a dense, congested area, before rapidly shifting the point of attack to the under-defended far side. This play relies on sharp, coordinated movements and quick ball circulation to exploit the space left by a shifting defensive block.
This routine is particularly effective against teams that employ a heavy zonal marking system or those that tend to overcommit players to the ball side during throw-ins. By establishing a quick 3v2 or 4v3 advantage near the touchline, your team can either penetrate directly or use the overload as a decoy to isolate a winger or full-back on the opposite flank.
2. Setup
Pitch Area: Attacking third, specifically the final 25-30 metres from the goal line.
Players Involved: 6-7 primary players (Throw-in taker, near-side winger, central midfielder, attacking midfielder, striker, far-side winger).
Equipment Needed: Standard pitch (100-110m x 64-75m), minimum 4 balls for quick restarts during practice, training bibs for opposition.
Initial Positioning:
- Player 1 (TI): The designated throw-in taker, positioned on the touchline.
- Player 2 (RW): Positioned 5-8 metres away, slightly infield.
- Player 3 (ST): Positioned centrally, roughly 15-18 metres from the thrower, ready to make a run.
- Player 4 (CAM): Positioned in the half-space, ready to support the overload or switch.
- Player 5 (LW): Positioned wide on the opposite flank, maintaining maximum width.
- Player 6 (CM): Positioned deeper and centrally, acting as the pivot for the switch.
3. Step-by-Step Instructions

Phase 1: The Decoy and Overload
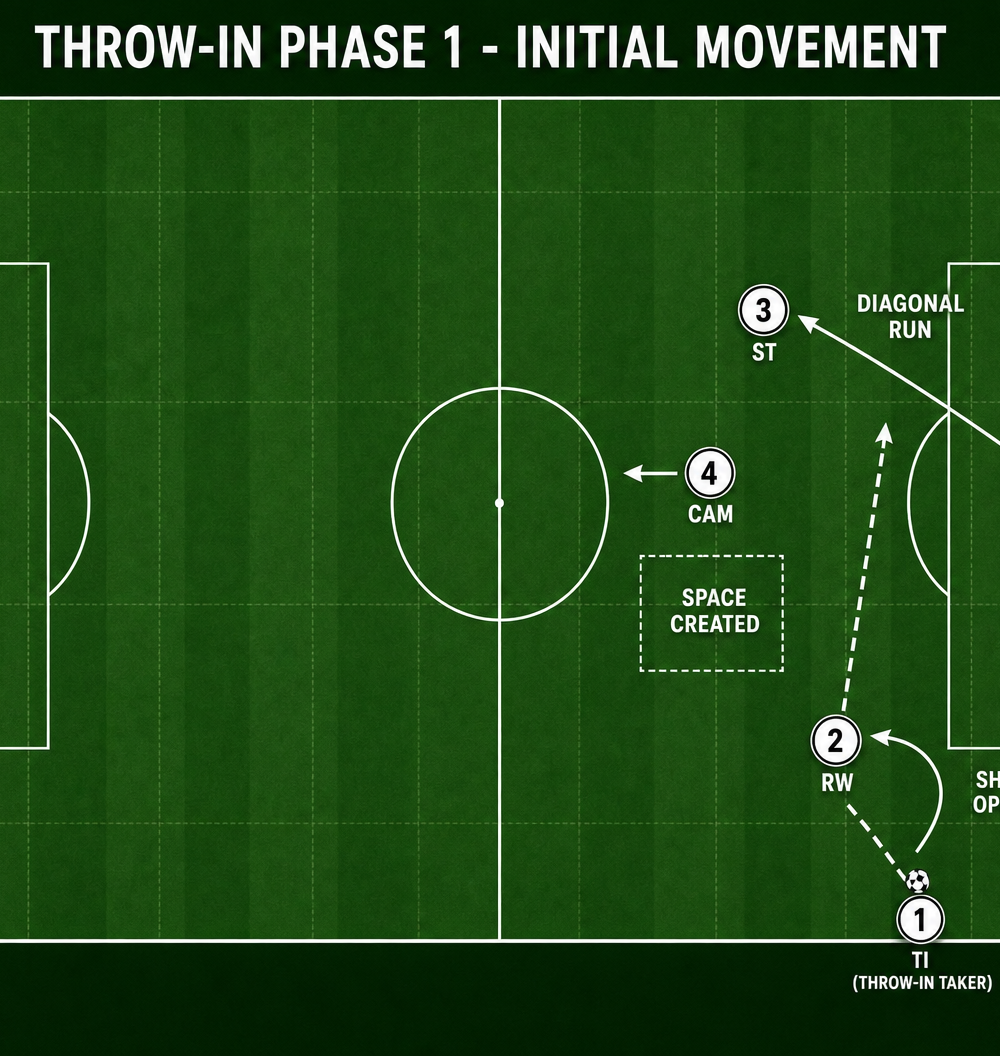
- The Trigger: The routine begins when the Throw-In taker (Player 1) raises the ball above their head and makes eye contact with the central midfielder (Player 6).
- The Decoy Run: The Striker (Player 3) makes a hard, diagonal run towards the near corner flag, drawing the central defender with them. This movement creates space in the central channel.
- The Check: Simultaneously, the near-side winger (Player 2) checks back sharply towards the thrower, creating a short passing option.
- The Delivery: Player 1 executes a firm, flat throw to the feet of Player 2. It is crucial that the throw is played to the foot furthest from the defender to protect the ball.
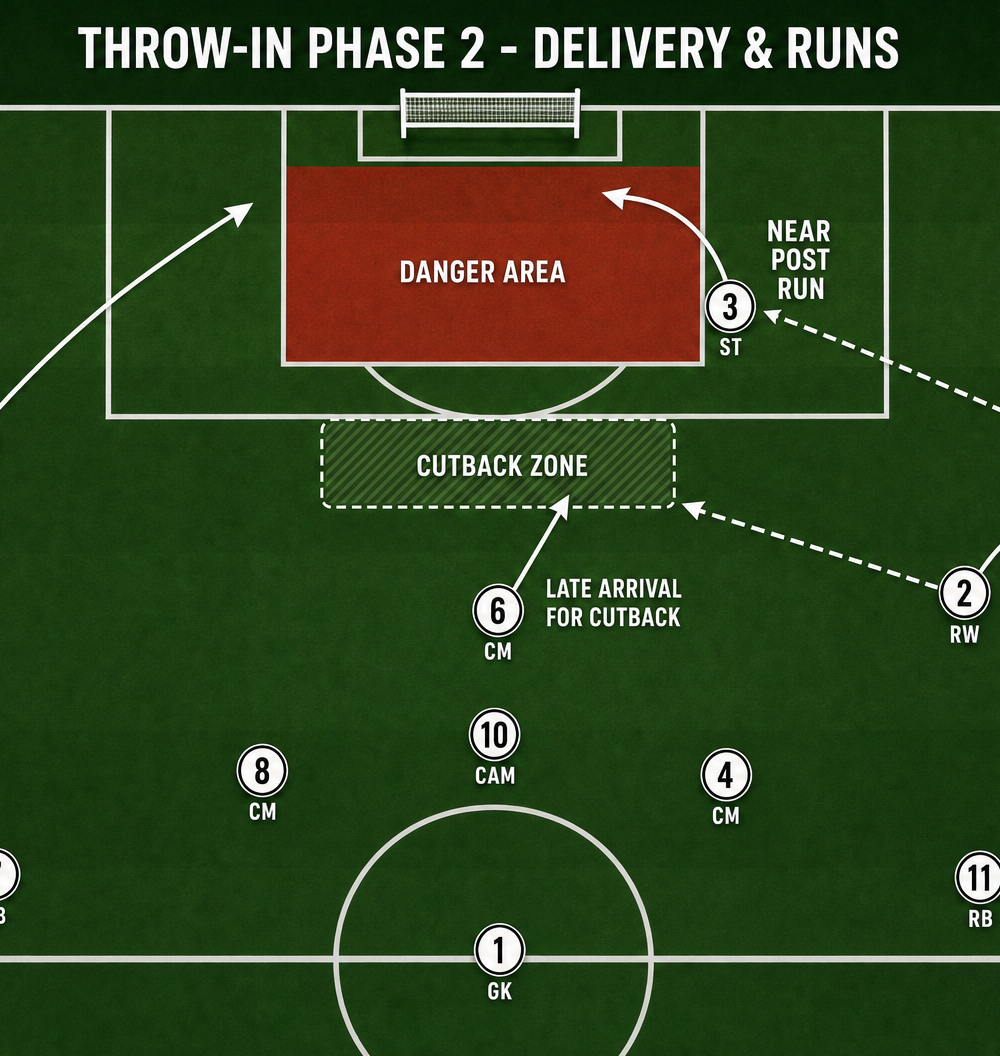
Phase 2: The Switch and Penetration
- The Lay-off: Player 2 immediately plays a one-touch pass backward or inside to the supporting Attacking Midfielder (Player 4) or Central Midfielder (Player 6), who has stepped up to receive.
- The Switch: The receiving midfielder (Player 4 or 6) opens their body and immediately plays a sweeping, driven pass to the far-side winger (Player 5), who is holding maximum width.
- The Attack: Player 5 receives the ball in isolation (often 1v1 against the opposing full-back) and drives towards the penalty area.
- The Box Arrival: As Player 5 prepares to cross or cut inside, Players 2, 3, and 4 make staggered, high-speed runs into the penalty area (near post, central, and far post/cutback zones) to finish the move.
4. Key Coaching Points
- Speed of Execution: The success of this play hinges on the speed of the lay-off and the subsequent switch. If the ball moves slowly, the opposition will have time to slide across and neutralize the threat.
- Quality of the Throw: The initial throw must be firm, flat, and directed to the receiver's safe foot. Loopy or inaccurate throws will invite pressure and disrupt the timing of the play.
- Body Shape: The midfielder receiving the lay-off must have an open body shape, allowing them to see the far side of the pitch and execute the switch with their first or second touch.
- Width and Patience: The far-side winger must maintain maximum width and resist the urge to drift infield prematurely. This ensures they are in the optimal position to receive the switch and isolate the defender.
- Synchronized Runs: The final runs into the box must be coordinated and staggered to attack multiple zones (near post, penalty spot, far post, and edge of the box).
5. Common Mistakes
- Telegraphing the Switch: If the receiving midfielder stares down the far-side winger before the ball arrives, the opposition will anticipate the switch and intercept the pass.
- Poor Spacing: Players crowding the throw-in taker without a clear purpose, making it easy for the opposition to defend the area with minimal effort.
- Hesitation on the Lay-off: Taking too many touches after receiving the throw-in allows the defense to close down the space and prevent the switch.
- Lack of Width: The far-side winger drifting centrally, compressing the space and making the switch less effective.
6. Variations & Progressions
- Variation 1: The Direct Penetration. If the opposition anticipates the switch and shifts early, the receiving midfielder (Player 4 or 6) can fake the long pass and instead play a penetrating through ball to the Striker (Player 3), who has continued their run into the space vacated by the shifting defense.
- Variation 2: The Underlap. Instead of the far-side winger receiving the switch, the far-side full-back makes a late, underlapping run into the half-space to receive the pass, catching the defense off guard.
- Progression: Add active defenders to the drill, starting with passive resistance and gradually increasing to full match intensity to test the players' decision-making under pressure.
7. Age Adaptations
- Under 10s: Focus primarily on the mechanics of a legal throw-in and the simple concept of finding a teammate in space. The complex switch may be too difficult; instead, focus on a simple throw and lay-off to retain possession.
- Under 12s - Under 14s: Introduce the concept of the overload and the switch, but allow for an extra touch or two before the long pass. Emphasize body shape and scanning.
- Under 16s and Open: Demand high-speed execution, one-touch lay-offs, and precise, driven switches. Introduce the variations and focus on the tactical decision-making required to read the defense's reaction.