Penalty Pass Advantage Play: Exploiting the 0.9m Rule
Master the penalty pass advantage play to quickly exploit defensive gaps and secure high-percentage scoring opportunities.
Equipment Needed
1. Overview
The Penalty Pass Advantage Play is a highly effective offensive set piece designed to exploit the defensive disadvantage created when an opposing player is penalized for contact or obstruction. By capitalizing on the mandated 0.9m distance the offending defender must maintain, the attacking team can execute a rapid, coordinated movement to secure a high-percentage scoring opportunity. This play is particularly useful in the attacking third, where quick ball movement and decisive drives can catch the defense off-guard before they have time to reset.
2. Setup

Equipment Needed:
- 1 Netball
- Bibs (Teal for Attackers, Orange for Defenders)
- Court markers (optional, for practice drills)
Court Setup:
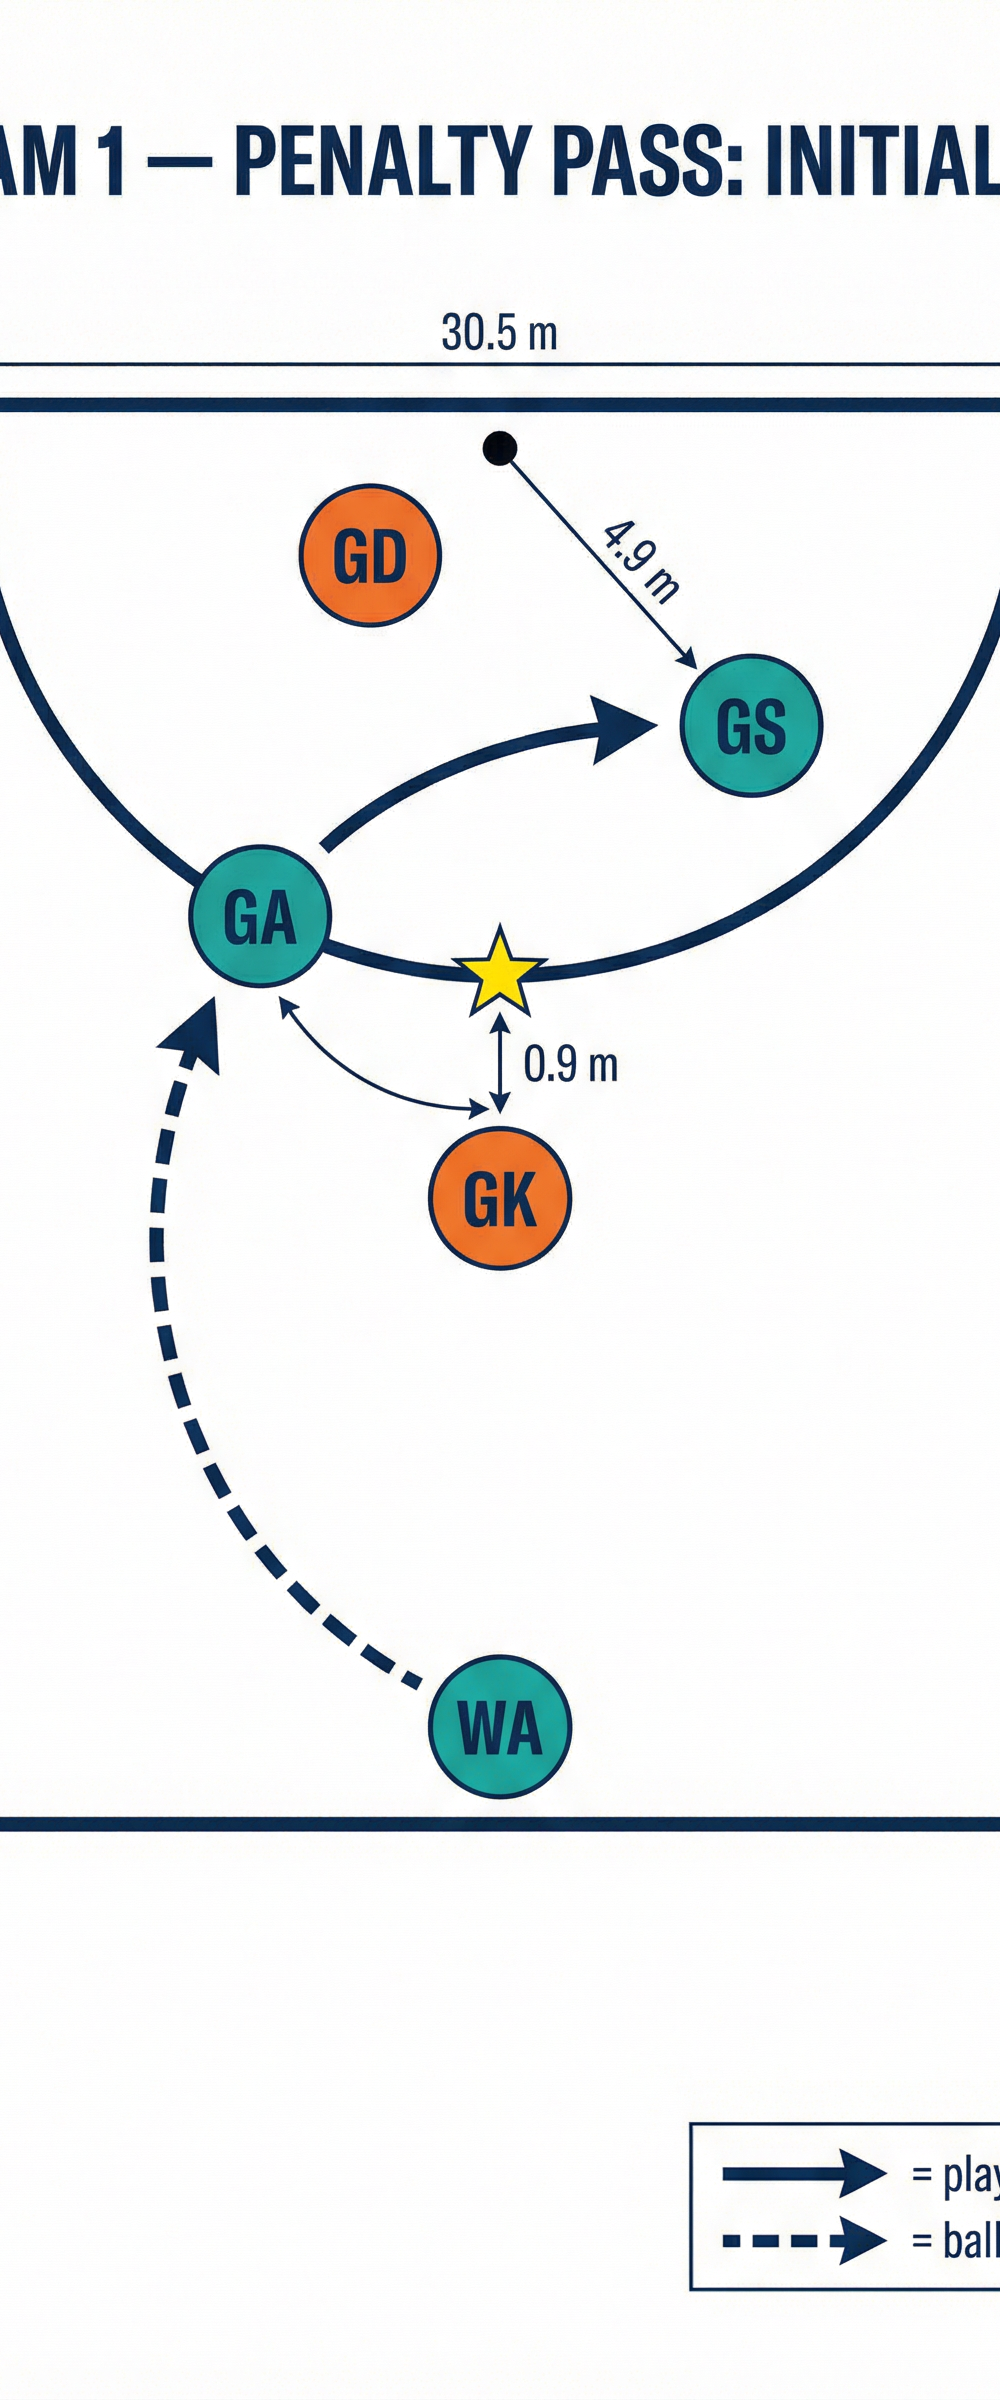
The play is executed in the attacking third, specifically around the shooting circle (4.9m radius). The setup requires precise positioning to maximize the space created by the penalty.
Player Positions:
- Goal Attack (GA): Takes the penalty pass at the designated spot.
- Goal Shooter (GS): Positioned near the goal post inside the shooting circle.
- Wing Attack (WA): Positioned near the transverse line, ready to drive into the space.
- Goal Keeper (GK) & Goal Defense (GD): The defenders, with the penalized player standing exactly 0.9m away from the GA.

3. Step-by-Step Instructions
- Establish the Penalty Spot: The umpire awards a penalty pass to the GA. The offending defender (e.g., GK) must stand 0.9m away and cannot interfere with the pass.
- Initial Positioning: The GS positions themselves near the goal post, drawing the attention of the GD. The WA sets up near the transverse line, ready to initiate movement.
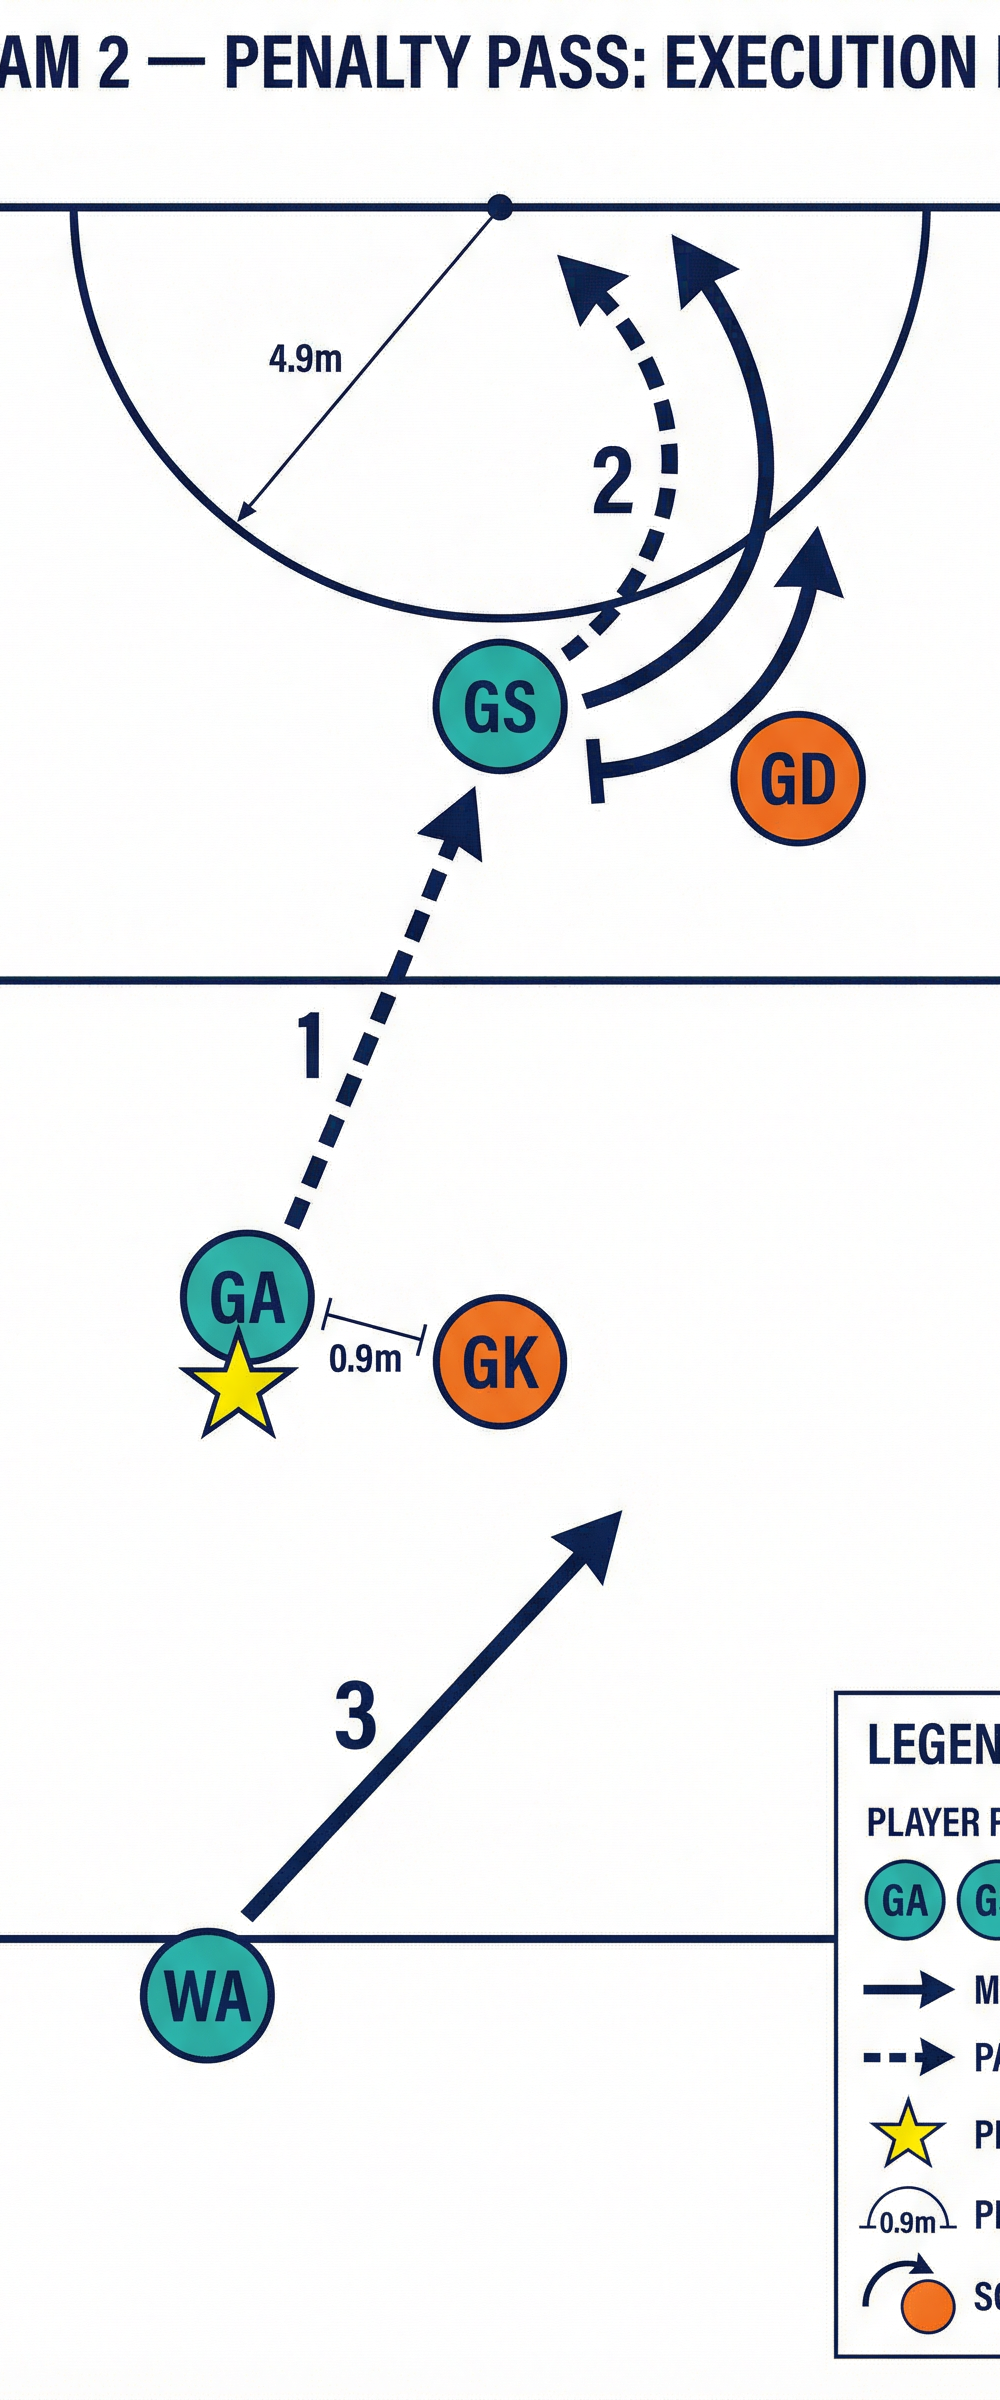
- The Decoy Run: As the GA prepares to pass, the GS makes a hard, decisive drive from the post toward the top edge of the shooting circle. This movement acts as a decoy, pulling the GD away from the post and creating space underneath.
- The Primary Drive: Simultaneously, the WA drives diagonally from the transverse line into the space created by the GS's movement. This dual-action confuses the defense and opens up passing lanes.
- The Pass: The GA, utilizing the unpressured 0.9m advantage, delivers a sharp, accurate pass to either the GS at the top of the circle or the WA driving into the pocket.
- The Finish: If the pass goes to the GS, they can immediately turn and shoot or pass to a re-positioning WA. If the pass goes to the WA, they can feed the ball into the circle for a high-percentage shot.

4. Key Coaching Points

- Speed is Essential: The play relies on quick execution before the defense can fully reset. The GA must be ready to pass as soon as the umpire signals.
- Decisive Movements: The GS and WA must commit fully to their drives. Hesitation will allow the defense to recover.
- Eye Contact: The GA must maintain strong eye contact with the intended receiver to ensure a successful connection.
- Exploit the 0.9m Rule: The GA should use the unpressured space to survey the court and deliver a precise pass.
- Spacing: Attackers must maintain proper spacing to avoid crowding the passing lanes and to force the defenders to cover more ground.
5. Common Mistakes
- Holding the Ball Too Long: The GA hesitates, allowing the defense to adjust and the 0.9m advantage to be lost.
- Weak Decoy Runs: The GS jogs instead of driving hard, failing to draw the GD away from the post.
- Poor Timing: The WA drives too early or too late, resulting in a disconnected play and a potential turnover.
- Telegraphing the Pass: The GA stares down the intended receiver, allowing the defense to anticipate and intercept the pass.
6. Variations & Progressions

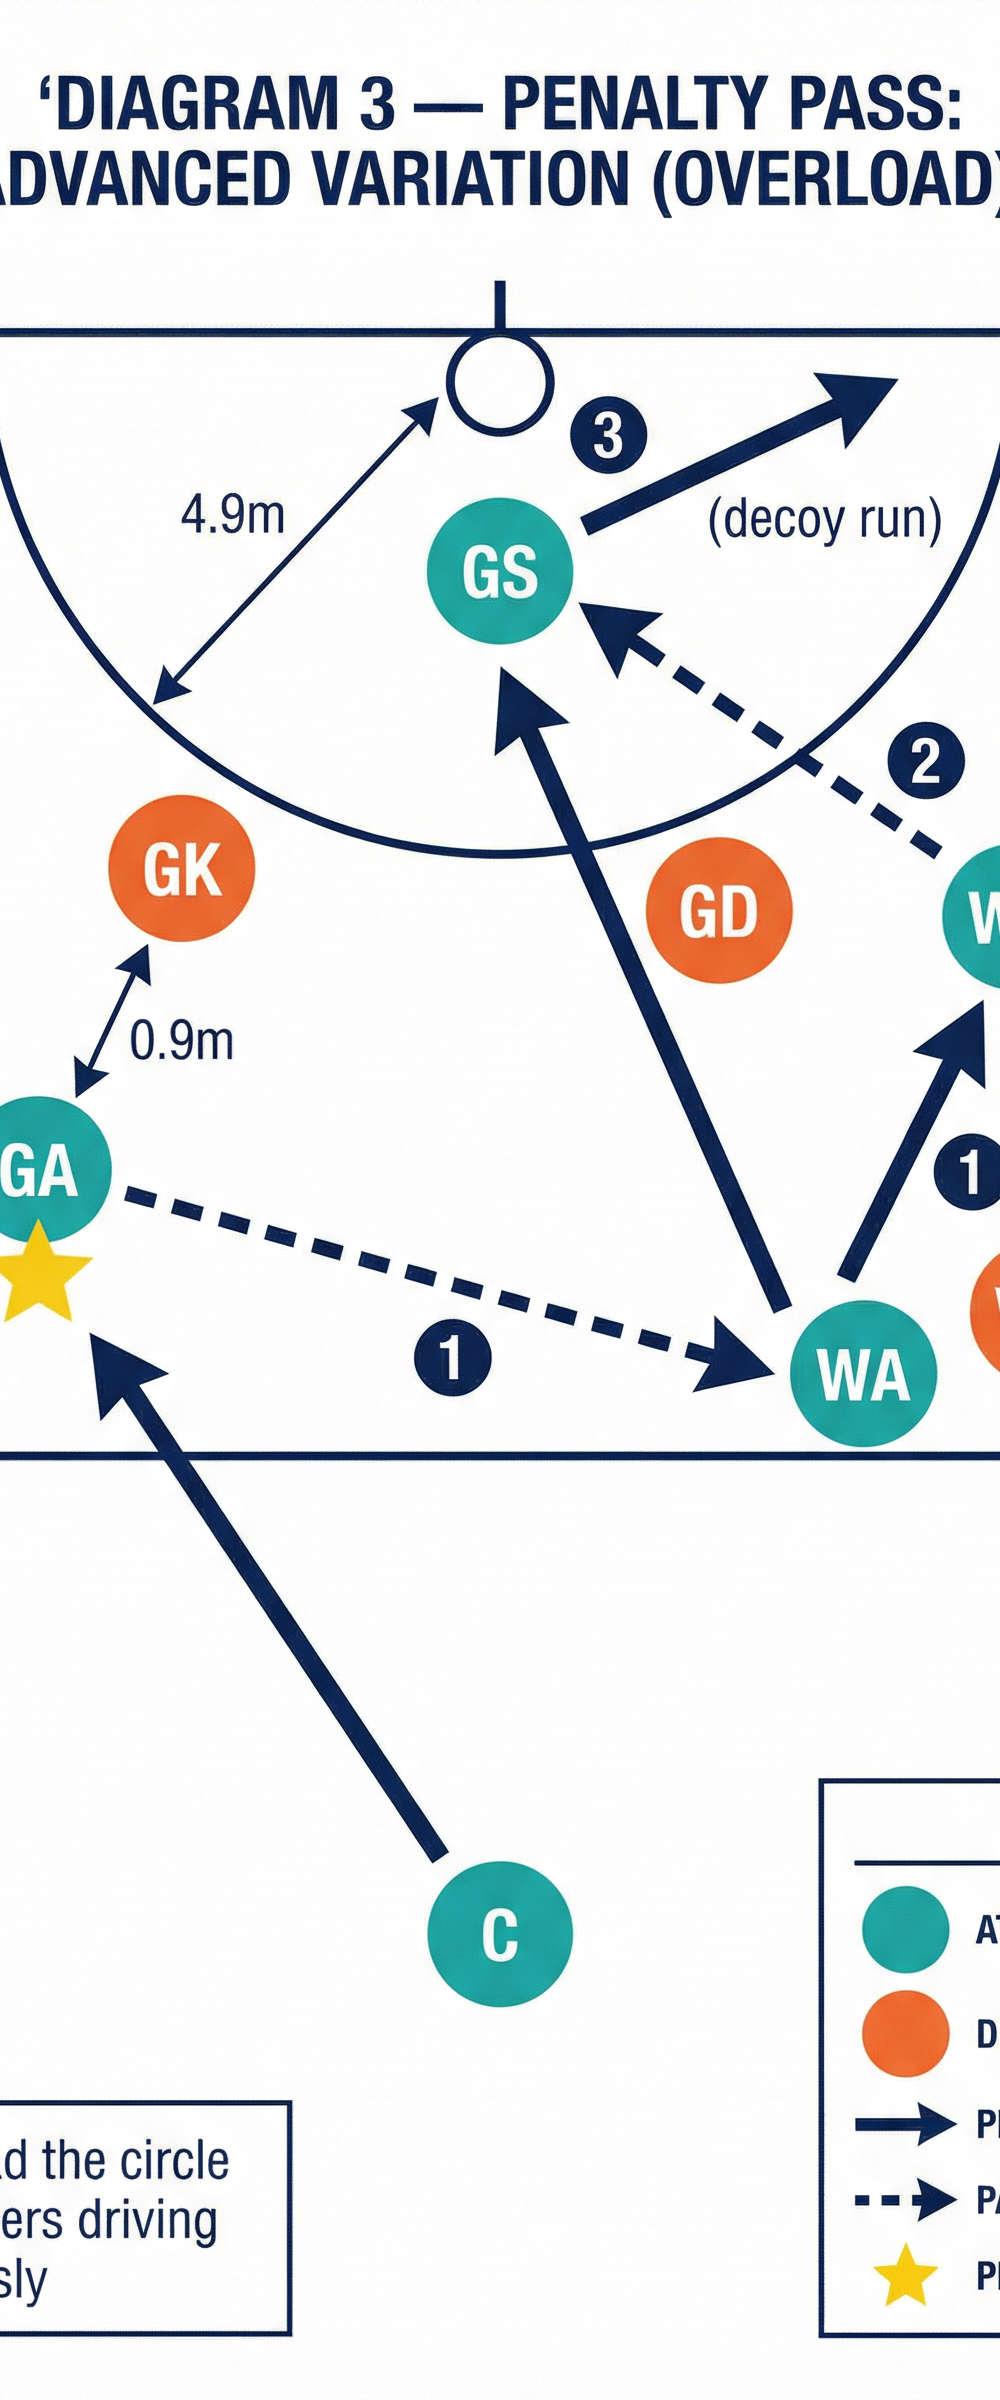
Variation 1: The Overload
To increase the complexity, introduce the Centre (C) into the play. As the GA prepares to pass, both the WA and C drive into the attacking third, overloading the defense and creating multiple passing options.

Variation 2: The Fake and Drive
The GA fakes a pass to the GS, drawing the defense, and then drives into the circle themselves to receive a return pass from the WA.
Progression:
Practice the play against a passive defense first, then gradually increase the defensive pressure until it simulates a real-game scenario.
7. Age Adaptations
- Under 10s: Focus on the basic mechanics of the penalty pass and simple, single-player drives. Emphasize the importance of the 0.9m rule.
- Under 12s: Introduce the decoy run and the concept of creating space for a teammate.
- Under 14s & Up: Implement the full set play, including variations and progressions, with a focus on speed, timing, and reading the defense.