Defensive Drift Pattern Drill: Building a Cohesive Backline Defence
Teach your backline to drift as a connected unit, eliminate outside breaks, and force attacking teams into the narrow channels where your forwards dominate.
Equipment Needed
Overview
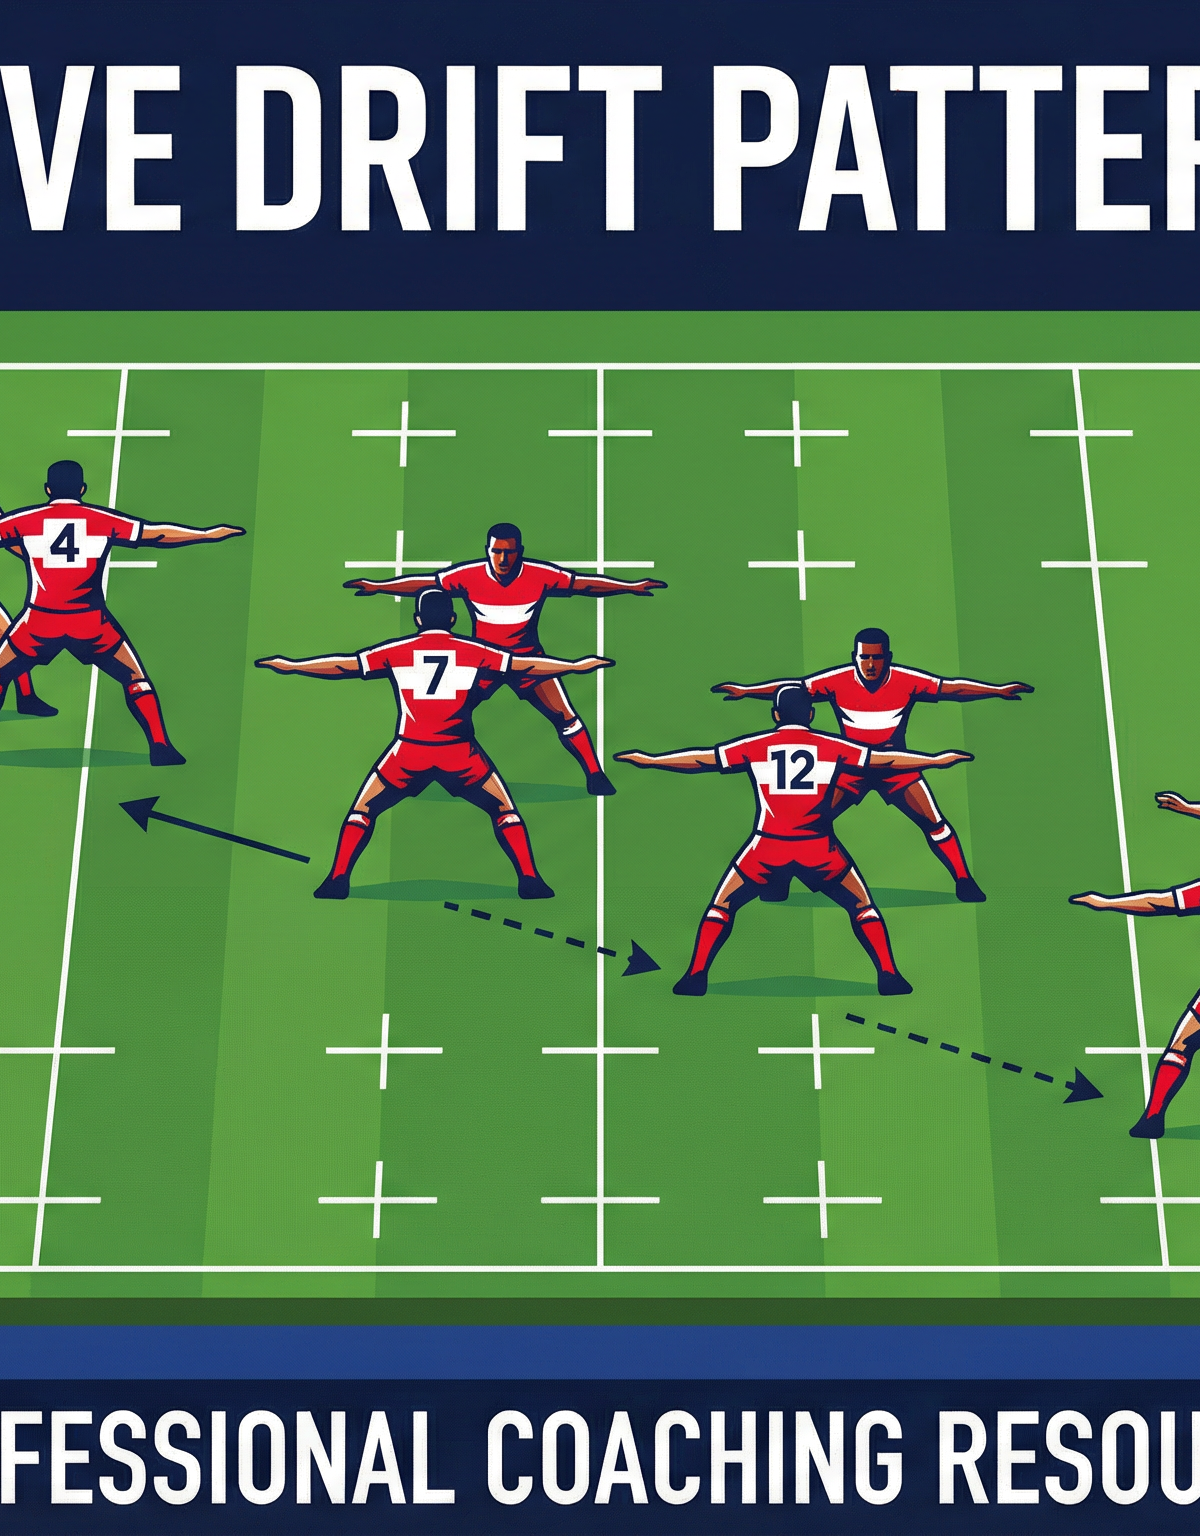
The Defensive Drift Pattern Drill is one of the most important defensive systems a rugby coach can install at any level of the game. The drift defence is a coordinated lateral movement by the defensive backline — typically the fly-half (10), inside centre (12), outside centre (13), and wings (11 & 14), supported by the flankers (6 & 7) — in which each defender takes responsibility for the attacker outside their direct opposite number. Rather than each defender marking their mirror attacker, the line drifts outward as the ball moves wide, creating a wall that forces the attacking team toward the touchline and eliminates the space for overlap plays.
This drill is most effective when introduced after players have a solid grasp of individual tackling technique and basic defensive line positioning. It is an essential session for any squad preparing to face teams that rely on wide-ball offloading games, skip passes, or structured backline plays. Use it early in the pre-season to establish defensive habits, and revisit it mid-season when your drift communication starts to break down under match pressure.
Setup

Equipment Required
| Item | Quantity | Purpose |
|---|---|---|
| Rugby balls | 4–6 | Ball movement and rotation |
| Cones (different colours) | 20 | Channel markers and zone boundaries |
| Tackle shields | 4 | Passive resistance in early progressions |
| Bibs (two colours) | 14 | Distinguish defenders from attackers |
| Whistle | 1 | Drill start/stop signals |
Pitch Setup
Use a 40m wide × 30m long channel marked with cones on a full-size pitch (100m × 70m). Position the channel between the 22-metre line and the halfway line, using the full width of the pitch from one touchline to the 40-metre cone marker. This replicates the most common area of the pitch where drift defence is called upon during match play.
Place a ruck simulation cone or tackle bag 5 metres from the left touchline to represent the breakdown point from which the scrum-half (9) will distribute. Mark a defensive line with cones 5 metres back from the ruck, running across the full 40-metre width.
Player Positions
Set up 7 defenders in a flat line across the 40-metre channel:
- 10 (Fly-half): First defender off the ruck, positioned 5m from the breakdown
- 12 (Inside Centre): 3–4m outside the 10, flat with the defensive line
- 13 (Outside Centre): 3–4m outside the 12
- 14 (Right Wing): Wide right, covering the touchline channel
- 11 (Left Wing): Wide left, acting as the last line of drift cover
- 7 (Openside Flanker): Beside the 10, providing ruck-side cover
- 6 (Blindside Flanker): Narrow-side cover, 2m from the ruck
Set up 5 attackers in a standard backline:
- 9 (Scrum-half): At the ruck cone, distributing the ball
- 10, 12, 13, 14: In a wide attacking line, 1–2m deeper than the defensive line

Diagram 1 shows the initial defensive alignment before the drift is triggered. Note the flat defensive line and the spacing between each defender.
Step-by-Step Instructions

Step 1 — Set the Defensive Line (0:00–1:00)
Bring all 7 defenders to their starting positions across the 40-metre channel. Instruct them to stand with feet shoulder-width apart, knees slightly bent, and arms out to their sides. Each defender should be able to see the ball and the attacker inside them simultaneously. The line should be flat — no one should be more than 1 metre ahead or behind their teammates.
Step 2 — Trigger the Drift Call (Coach Signal)
The coach or the defending 10 calls "Drift! Drift! Drift!" as the scrum-half picks up the ball at the ruck cone. This is the trigger for the entire defensive line to begin moving laterally toward the open side (right, in this drill setup). Every defender takes their cue from this call — not from the ball movement itself.
Step 3 — Execute the Lateral Drift (Ball Moves 10 → 12)
As the attacking 9 passes to 10, the defending 10 does not rush up to tackle the attacking 10. Instead, they drift outward at a 45-degree angle toward the touchline, taking the attacking 12 as their primary target. The defending 12 simultaneously drifts to cover the attacking 13, and so on down the line. Each defender moves one attacker wider than their starting position.
Step 4 — Maintain Line Integrity (Ball Moves 12 → 13)
As the ball moves from attacking 10 to 12, the defensive drift accelerates. Defenders must maintain a connected line — no gaps wider than 2 metres between any two defenders. The defending 10 should now be in a position to tackle the attacking 12 if they carry, while the defending 12 is aligned on the attacking 13's outside shoulder.
Step 5 — Force to the Touchline (Ball Moves 13 → 14)
As the ball reaches the attacking 13, the defending 13 and 14 should have drifted to a position where the attacking 14 (wing) has no space to run. The defending 14 should be ahead of the attacking 14 in terms of lateral position, forcing the ball carrier into touch or into a tackle situation with no support.
Step 6 — Tackle and Reset
Once a tackle is made or the ball goes into touch, the coach blows the whistle. All defenders jog back to the reset line (10 metres behind the ruck cone) and re-set in their starting positions. Rotate attackers and defenders every 4–6 repetitions.
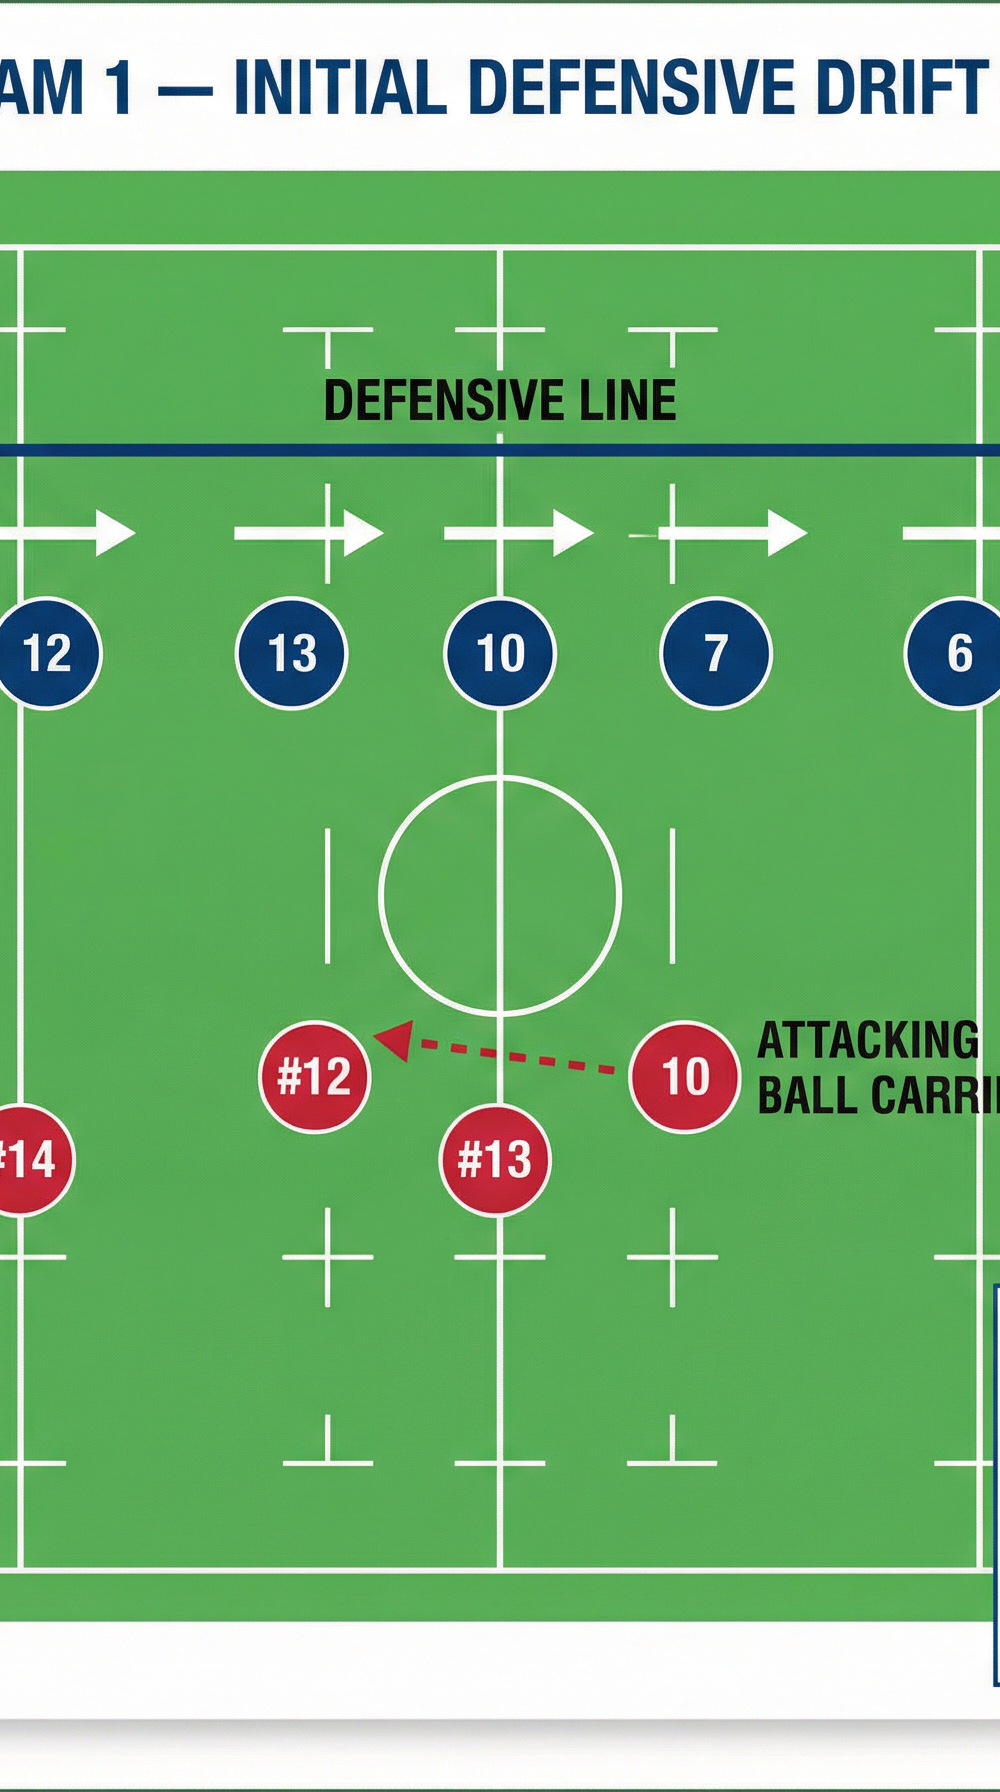
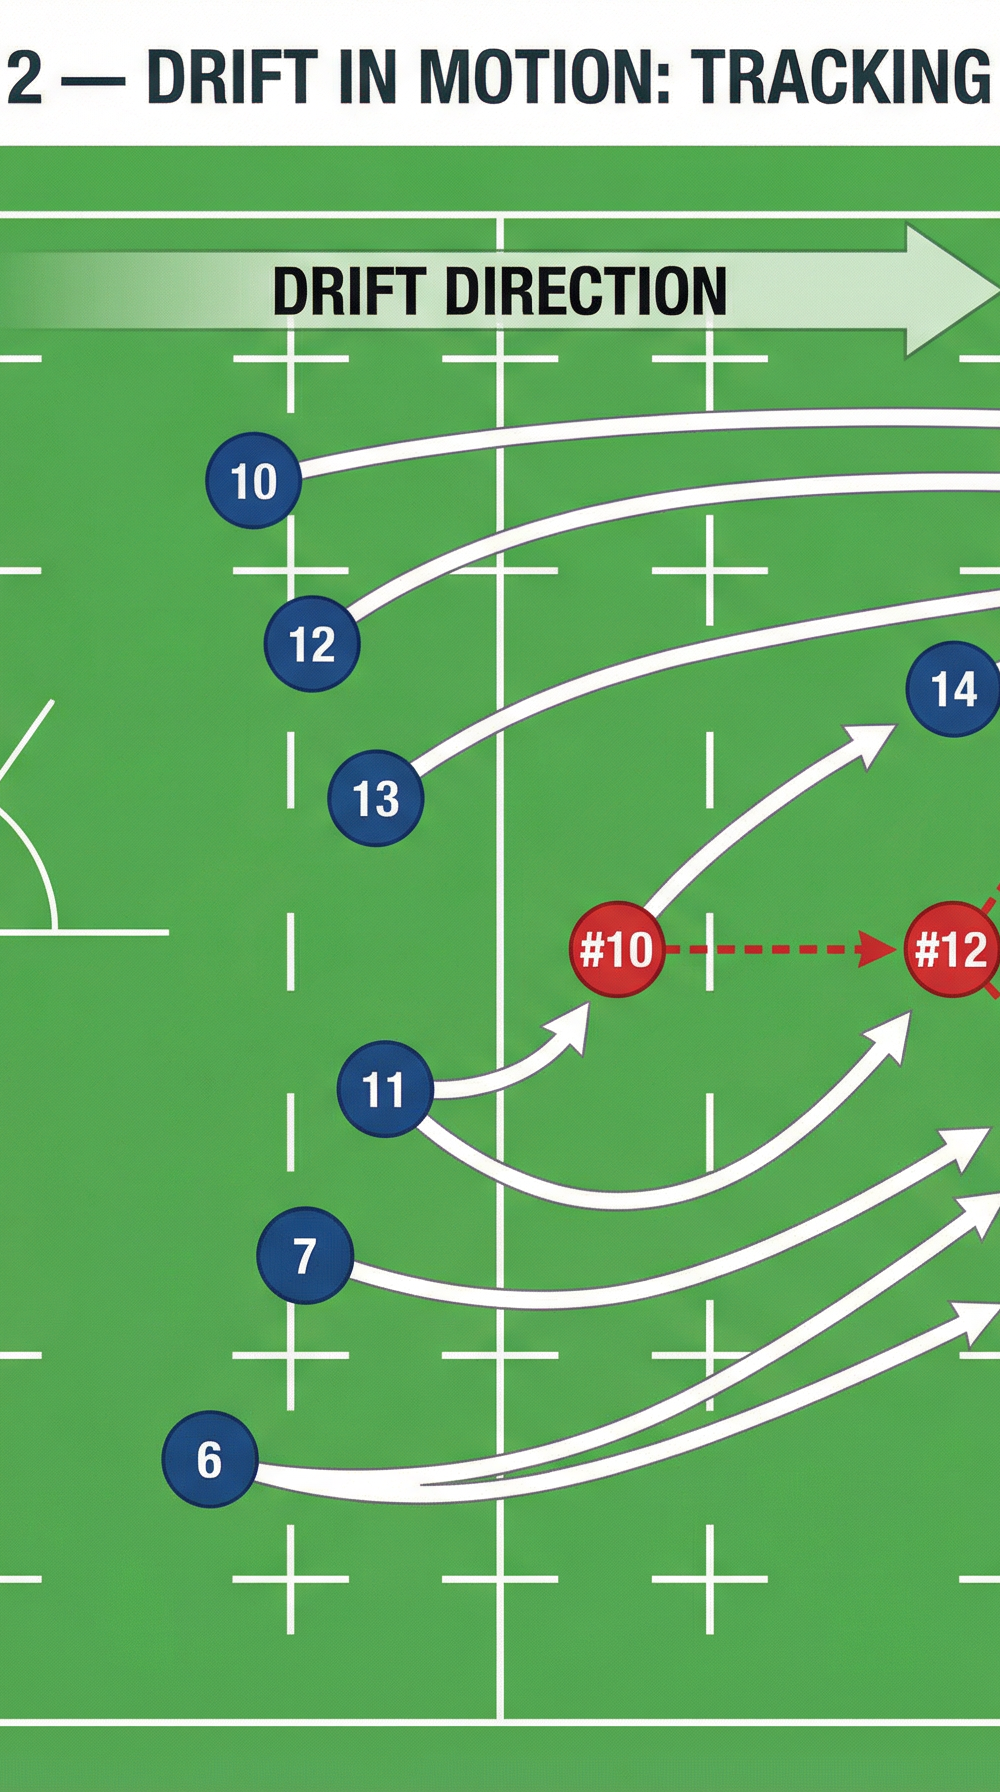
Diagram 2 illustrates the drift in full motion. Observe how each defender has shifted one position wider, and how the danger zone near the touchline is being closed down by the drifting wing.
Key Coaching Points
1. The Drift is Triggered by the Call, Not the Ball
The single most important concept to drill into your players is that the drift begins the moment the scrum-half touches the ball — not when the pass is made. If defenders wait to see the ball move before drifting, they will always be a half-second behind the attacking line. Emphasise: "Move on the call, not the catch."
2. Outside Shoulder Alignment
Every defender must position themselves on the outside shoulder of their target attacker. This body position channels the ball carrier toward the touchline and prevents the inside cut, which is the most dangerous counter to a drift defence. Coaches should watch for defenders who are square-on or inside their target — this is the most common error at all levels.
3. Flat Line — No Sagging
The defensive line must remain flat throughout the drift. If the defending 12 drifts faster than the defending 10, a gap opens between them that an alert attacking 10 will exploit with a kick or a run. Use the phrase "Stay connected — drift as one" to reinforce this concept.
4. Communication is Non-Negotiable
The defending 10 is the quarterback of the drift. They must call the drift trigger, communicate who has the ball carrier, and alert the wing when the ball is coming wide. Encourage constant verbal communication: "Ball on 12! Drift! Drift! 13 coming!" Silence in a defensive line is a warning sign.
5. Drift Angle and Speed
The drift angle should be approximately 45 degrees — moving both forward (toward the gain line) and laterally (toward the touchline). A drift that is purely lateral gives the attacker time to straighten and beat the defender on the inside. A drift that is too aggressive (too much forward angle) creates a rush defence rather than a drift, which can be exploited by a skip pass.
6. Last Defender Responsibility
The wing (14) must never be beaten on the outside. Their job is to be the final wall. If the ball reaches the attacking wing with space, the drift has failed. Coach the wing to track the ball from the moment it leaves the ruck and to communicate their position to the outside centre at all times.
Common Mistakes
Mistake 1 — Defenders Rushing Up Instead of Drifting
The most frequent error, particularly with younger players, is that defenders instinctively rush forward to tackle the ball carrier rather than drifting laterally. This leaves a gap outside them that a simple pass will exploit. Correction: Run the drill at walking pace first, with the coach calling out each ball movement. Physically walk defenders through the lateral movement before adding any speed or live ball.
Mistake 2 — The Drift Line Breaking into Individual Contests
When defenders see an attacker running hard at them, they often abandon the drift and engage in a one-on-one tackle attempt. This breaks the line and creates overlap opportunities for the attackers. Correction: Reward defenders who maintain the drift and force the ball into touch over those who make individual tackles. Change the scoring system in the drill: defenders earn a point for forcing touch, attackers earn a point for crossing the try line.
Mistake 3 — Poor Communication Between 10 and 12
The communication gap between the fly-half and inside centre is where drift defences most commonly collapse. If these two players are not talking constantly, the line loses cohesion. Correction: Require the defending 10 to call out the position of every attacker by number as the ball moves. Make this a non-negotiable habit — if the 10 is silent, stop the drill and restart.
Mistake 4 — Wing Drifting Too Early and Leaving Space Behind
An eager wing who drifts too quickly can leave a gap between themselves and the outside centre, which a well-timed skip pass will exploit. Correction: The wing's drift should be triggered by the ball reaching the attacking 12, not the attacking 10. Use a cone marker to show the wing their starting position and the position they should be in at each stage of the ball movement.
Mistake 5 — Defenders Not Tracking Back After a Kick
In match conditions, attackers will often chip kick over a drifting defensive line. Defenders who are fully committed to the lateral drift are vulnerable to this. Correction: In the advanced progression, introduce a kicking option for the attacking 10. Defenders must be coached to read the kicker's body shape and peel off the drift line to chase the kick.
Variations & Progressions

Progression 1 — Walk-Through to Full Speed (Beginner to Intermediate)
Begin the drill at walking pace with the coach narrating each movement. Progress to jogging pace once the shape is correct, then to full speed with live ball movement. This three-stage approach builds muscle memory before adding the pressure of match-speed decision-making. Allow 8–10 repetitions at each speed before progressing.
Progression 2 — Introduce the Skip Pass (Intermediate to Advanced)
Once the basic drift is established, instruct the attacking 10 to occasionally throw a skip pass directly to the attacking 13 or 14, bypassing the 12. This forces the defending 12 and 13 to recognise the skip pass early and accelerate their drift. This is the most game-realistic challenge for a drift defence and should be introduced only when the basic drift is consistently correct.
Progression 3 — Full 7v5 Live Drill with Kicking Option (Advanced)
Expand to a full 7-defender vs 5-attacker live drill across the full 40-metre channel. Allow the attacking 10 to kick over the defensive line as an option. Defenders must now manage both the drift and the kick-chase simultaneously. Award points: attackers score by crossing the try line or landing a kick in the in-goal area; defenders score by forcing touch, making a turnover, or catching the kick. Run for 3-minute periods with a 90-second reset.

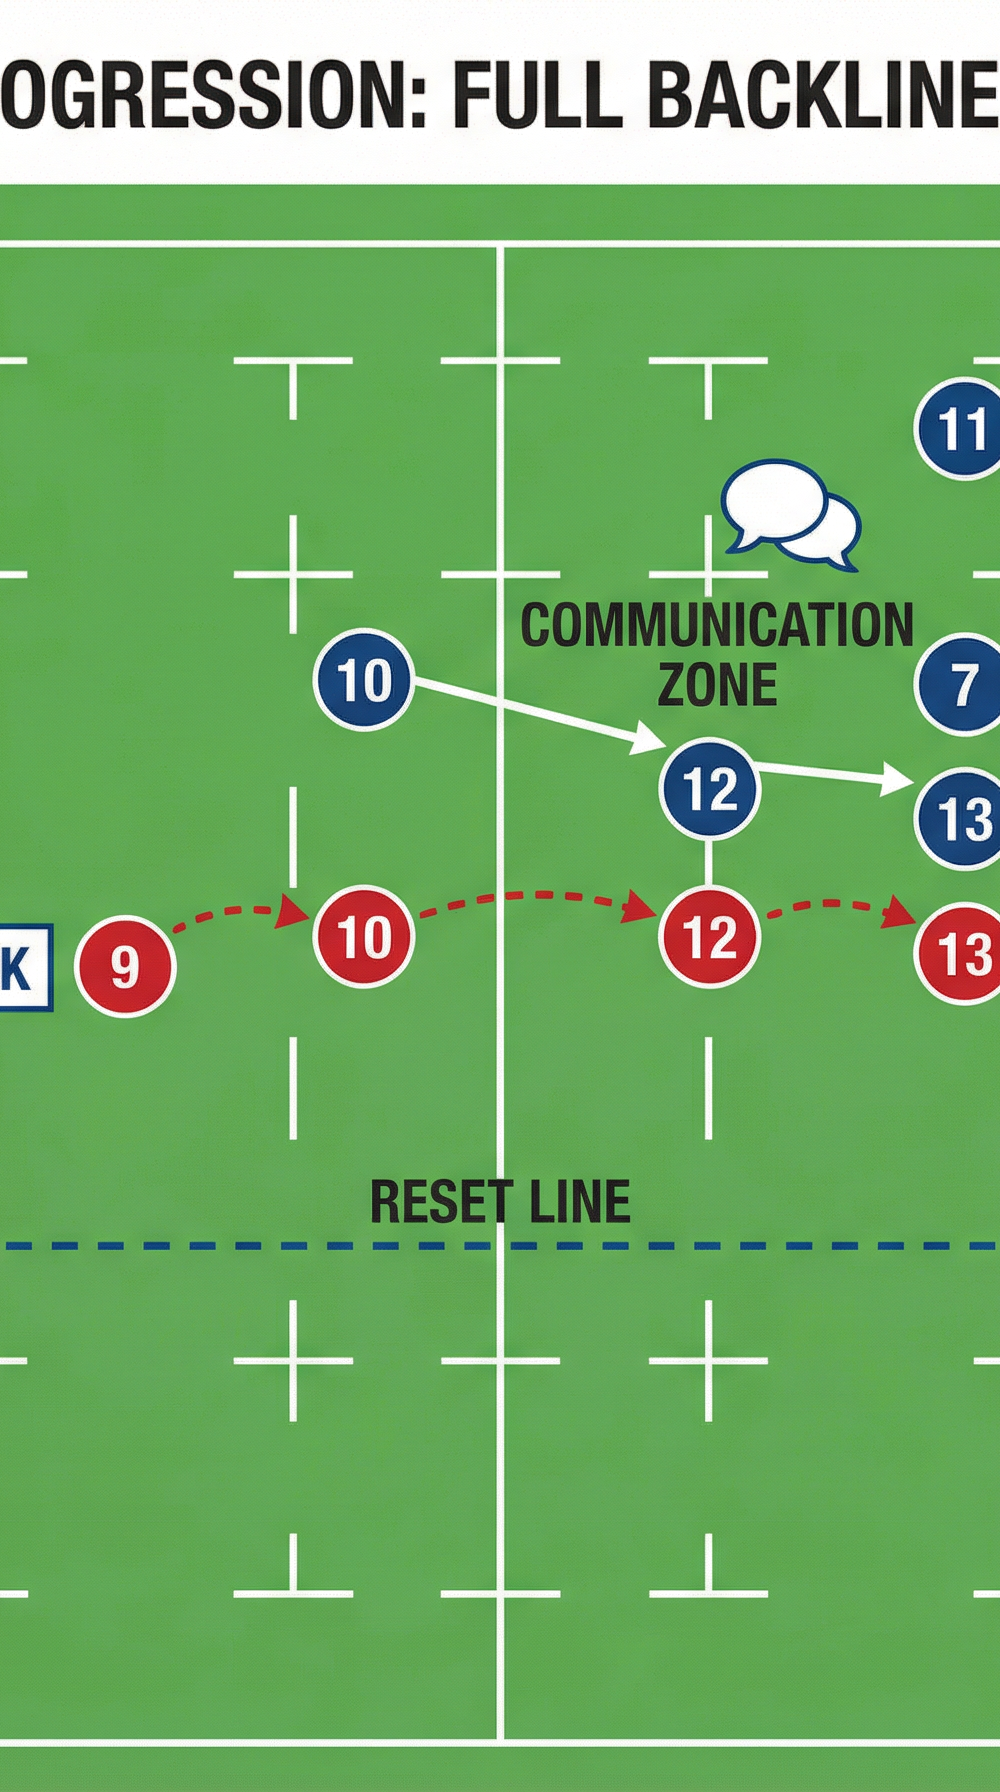
Diagram 3 shows the full progression drill with a live ruck, five attackers, and seven defenders executing the drift. The communication zone between the 10 and 12 is highlighted, along with the reset line used between repetitions.
Age Adaptations

| Age Group | Key Modifications |
|---|---|
| Under 12 | Reduce channel width to 25m. Use 4 defenders (10, 12, 13, 14) and 3 attackers. No tackling — use touch or tag. Focus only on the drift call and lateral movement. |
| Under 14 | Use a 30m channel. Introduce 5 defenders and 4 attackers. Allow controlled shoulder contact (no full tackles). Introduce the skip pass variation after 3 sessions. |
| Under 16 | Use full 40m channel. Introduce the kicking option. Begin using video review to show players their drift angles and line integrity. |
| Open / Senior | Full drill as described. Add defensive lineout and scrum scenarios as entry points. Integrate with full team defensive shape sessions. Introduce opposition-specific attacking plays for the attackers to run. |
Coach's Note: At all age groups, prioritise communication and shape over physicality. A well-organised drift defence that speaks constantly will always outperform a physically dominant but disorganised line. The habits built in this drill — calling the trigger, drifting on the call, maintaining outside shoulder alignment — are the same habits that win test matches.