Exit Strategy Play from Own 22: The 'Box & Diagonal' Two-Phase Kick Exit
A structured two-phase kicking exit from your own 22 that uses a scrum-base box kick followed by a fly-half diagonal to relieve pressure, pin opponents deep, and launch your back-three into a counter-attacking position.

Equipment Needed
Overview
The 'Box & Diagonal' Exit Play is a two-phase structured exit strategy designed to move your team safely and purposefully out of their own 22-metre zone. It is most effectively deployed when your team has won a scrum or lineout inside their own 22, the opposition is applying a high defensive rush, or your team needs to reset field position after a sustained period of defending.
The play works by exploiting two distinct kicking options in sequence. In Phase 1, the scrum-half (No. 9) executes a box kick from the base of the scrum, targeting the right-channel touchline corridor between the opposition's 10-metre and halfway lines. In Phase 2, should the ball be recycled at the ruck, the fly-half (No. 10) delivers a diagonal kick into the right back-field, with the back-three providing width, chase, and sweeping cover. The dual-kick structure creates uncertainty for the opposition's kick-chase defence and gives your team two legitimate exit routes from a single set piece.
This play is appropriate for intermediate to advanced squads who have basic kicking mechanics in place and understand positional discipline. It is particularly effective against teams that rush up aggressively in defence, as both kicks exploit the space behind the defensive line.
Setup

Equipment Required: 1 rugby ball, 8 marker cones (to mark the 22m line, kick target zones, and ruck positions), 1 full-sized pitch or a marked training grid of at least 50m x 70m.
Pitch Reference: Standard Rugby Union pitch — 100m x 70m. This play operates within the own 22 (0–22m) and targets the space between the opposition 10m line and halfway (50–60m from the defending try line).
Player Positions Required (15 players):
| Position | Number | Role in This Play |
|---|---|---|
| Loosehead Prop | 1 | Scrum anchor, holds bind post-kick |
| Hooker | 2 | Scrum anchor, first to ruck if ball recycled |
| Tighthead Prop | 3 | Scrum anchor, holds bind post-kick |
| Lock | 4 | Second row, clears to ruck Phase 2 |
| Lock | 5 | Second row, clears to ruck Phase 2 |
| Blindside Flanker | 6 | Jackals at ruck, provides Phase 2 ball |
| Openside Flanker | 7 | Chase support, right channel |
| Number 8 | 8 | Controls ball at scrum base, drives to ruck |
| Scrum-half | 9 | Box kick executor (Phase 1) |
| Fly-half | 10 | Diagonal kick executor (Phase 2) |
| Left Wing | 11 | Holds left touchline width, safety valve |
| Inside Centre | 12 | Flat decoy runner, draws defender |
| Outside Centre | 13 | Flat decoy runner, draws defender |
| Right Wing | 14 | Primary kick chaser, right channel |
| Fullback | 15 | Sweep support, covers kick landing zone |

Diagram 1 shows the initial scrum setup on the left side of the own 22, the No. 9 box kick trajectory to the right-channel kick target zone, and the chase lines of No. 14 and No. 15.
Step-by-Step Instructions

Phase 1 — Scrum Setup and Box Kick
Step 1 — Set the Scrum. The scrum is set on the left side of the pitch, approximately 15–20m in from the left touchline, on or just inside the own 22m line. The Number 8 (No. 8) controls the ball at the base. All forwards engage with full intensity — this is not a passive scrum.
Step 2 — Back-Line Positioning. Before the scrum engages, the fly-half (No. 10) takes a position approximately 25m from the scrum, aligned on the right side of the pitch at the 22m line. The inside centre (No. 12) and outside centre (No. 13) align flat and wide to the right of No. 10, creating the illusion of a running back line. The right wing (No. 14) positions deep in the right channel, approximately 10m from the try line. The fullback (No. 15) sits centrally, 8–10m behind the try line. The left wing (No. 11) holds width on the left touchline, 10–12m from the try line.
Step 3 — Call the Play. The scrum-half (No. 9) calls the play signal — a pre-agreed word or number — as the scrum engages. This alerts No. 14 and No. 15 to begin their pre-kick drift toward the right channel.
Step 4 — Execute the Box Kick. Once the scrum has won clean ball, No. 8 presents the ball at the base. No. 9 picks cleanly, takes two steps right, and executes a box kick — a high, spiralling kick aimed at the right-channel corridor between the 40m and 50m lines (approximately 20–28m from the right touchline). The kick should have sufficient height (minimum 4 seconds hang time) to allow No. 14 and No. 15 to arrive under the ball simultaneously with the opposition catcher.
Step 5 — Forwards Hold Bind. Immediately after the kick, the front five (Nos. 1–5) hold their bind for two seconds before releasing. This prevents an offside infringement and ensures the forwards are legally onside before chasing.
Step 6 — Chase and Contest. No. 14 sprints the right channel to contest the catch or force an error. No. 15 sweeps at pace behind No. 14 to collect any spilled ball or provide an immediate counter-attack option. No. 7 supports the right channel chase as the first forward to arrive.
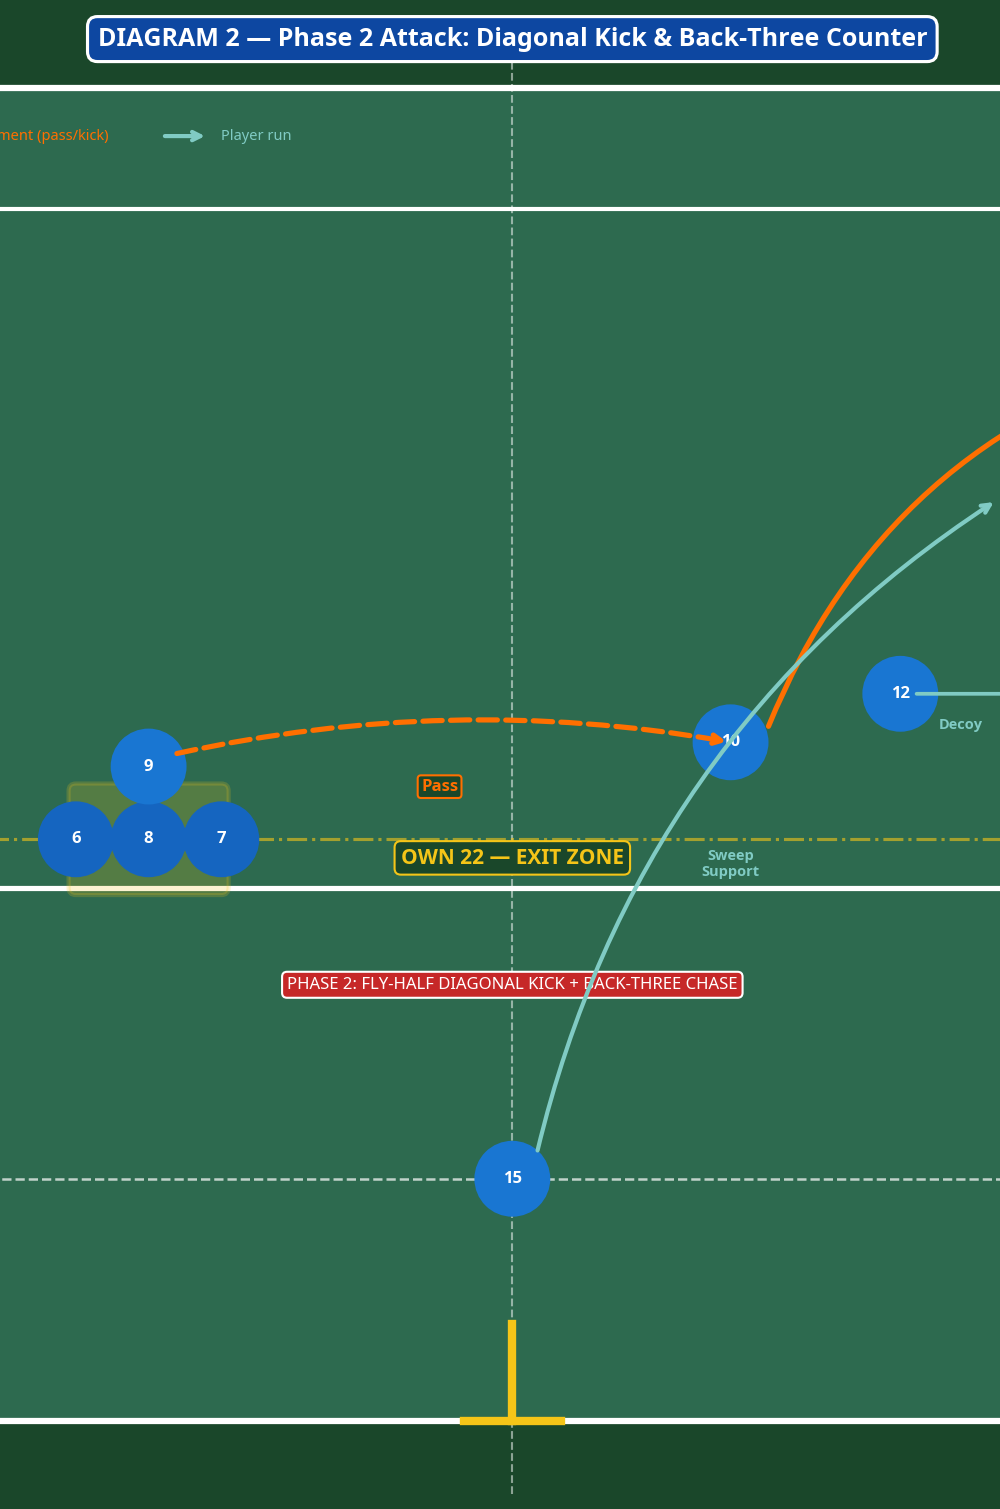
Phase 2 — Recycled Ball and Diagonal Kick
Step 7 — Ruck Formation. If the ball is not kicked out on the full or the opposition secures possession, the forwards contest the ruck aggressively. No. 6, No. 8, and No. 7 form the ruck spine. The target is to win clean Phase 2 ball within 3 seconds.
Step 8 — No. 9 Pass to No. 10. No. 9 fires a quick, flat pass to No. 10, who has shifted to approximately 22–25m from the ruck on the open side. No. 12 and No. 13 run flat decoy lines to hold the defensive line in place and prevent a rush blitz.
Step 9 — Fly-Half Diagonal Kick. No. 10 receives the pass at pace and executes a diagonal kick — a right-footed grubber or low chip — targeting the right back-field between the 40m line and the right touchline. The kick should travel 20–25m in the air, landing 5–8m from the right touchline.
Step 10 — Back-Three Counter. No. 14 chases the right channel. No. 15 sweeps diagonally from the centre to support. No. 11 holds the left touchline as a width option should the ball be recycled again. The objective is to either force the opposition into touch, win the ball at a ruck in the opposition half, or create a counter-attack opportunity.

Diagram 2 illustrates the Phase 2 sequence: the No. 9 pass to No. 10 at the ruck, the fly-half diagonal kick trajectory, decoy runs by No. 12 and No. 13, and the back-three chase and sweep lines.
Key Coaching Points
1. Kick Quality is the Foundation. Both kicks must be technically sound. The box kick requires height and accuracy — a flat or short box kick gives the opposition easy ball. Spend dedicated time in warm-up on kick mechanics before running this play at full pace.
2. Pre-Kick Drift Timing. No. 14 and No. 15 must begin their drift toward the right channel before the ball leaves No. 9's boot. If they wait until the kick is executed, they will arrive late and the contest is lost. The pre-agreed call is what triggers this movement — reinforce this constantly.
3. Decoy Runners Must Commit. No. 12 and No. 13 must run their flat lines with full conviction in Phase 2. A half-hearted decoy run does not hold defenders. Demand that they run as if they are receiving the ball every time.
4. Fullback as the Safety Valve. No. 15 must never chase the kick at the expense of leaving the backfield exposed. Their primary job is to sweep behind No. 14 and cover any counter-attack by the opposition. Only when No. 15 is confident the kick is contestable should they commit to the chase.
5. Forwards Must Communicate the Ruck. In Phase 2, the ruck must be won quickly and cleanly. No. 8 must communicate the ball's availability to No. 9 clearly. A slow or messy ruck destroys the timing of the diagonal kick and allows the defensive line to reset.
6. Width is Non-Negotiable. No. 11 must hold the left touchline throughout both phases. This width stretches the opposition's defensive alignment and prevents them from flooding the right channel to shut down the kick chase.
Common Mistakes

Mistake 1 — Box Kick Too Flat or Too Short. Coaches frequently observe No. 9 kicking a flat trajectory that travels directly to the opposition fullback at chest height, giving them an easy catch and counter. Correction: Use a cone to mark the minimum height point of the kick arc during training. No. 9 should aim to kick up first, not out. A good cue is: "Kick to the clouds, not to the posts."
Mistake 2 — Forwards Chasing Offside. Front-row forwards instinctively want to chase the kick immediately, but if they release before the ball is kicked they will be penalised for offside. Correction: Introduce a two-second hold rule in training. Use a coach's whistle to signal the legal release point. Reinforce the rule that the forwards are not chasers — they are ruck builders.
Mistake 3 — No. 15 Over-Committing to the Chase. When No. 15 chases aggressively and the kick is not contested, the backfield is left exposed for a quick tap or counter. Correction: In training, place a coach or defender in the backfield to punish any gap left by an over-eager No. 15. The fullback's decision to chase must be earned by the quality of the kick.
Mistake 4 — No. 10 Telegraphing the Kick. If No. 10 sets their body for the diagonal kick too early, the defensive line will read the kick and rush up to close the space. Correction: Drill No. 10 to carry the ball in a running posture until the last possible moment. The kick should be disguised as a running threat for as long as possible.
Mistake 5 — Left Wing Drifting Infield. No. 11 often drifts toward the ball, leaving the left touchline unguarded. This removes the width that stretches the defence. Correction: Place a cone on the left touchline at the 30m line. No. 11's job is to stay within 3m of that cone throughout both phases.
Variations & Progressions

Variation 1 — Switch to Left-Channel Box Kick. Run the identical play but mirror it: No. 9 box kicks to the left channel, No. 11 becomes the primary chaser, and No. 15 sweeps left. This variation is used when the opposition has identified the right-channel kick and has overloaded that side defensively. Use a different call word to signal the mirror.
Variation 2 — 'Dummy Kick' Running Option. In Phase 2, No. 10 shapes to kick the diagonal but instead passes to No. 13 who has looped behind No. 12 on a delayed run. This is used when the opposition's back-three has been conditioned to drift back in anticipation of the kick, leaving a gap in the defensive line at the 30–40m mark. Introduce this variation only after the base kick option has been drilled to automaticity.
Progression 1 — Add a Live Defensive Line. Once the play is running cleanly in unopposed conditions, introduce a defensive line of 4–6 players who apply realistic pressure. Begin with a passive defence (defenders walk) and progress to a full-speed rush defence over 3–4 sessions.
Progression 2 — Conditioned Game (Exit Zone). Set up a conditioned game where the attacking team always starts with a scrum or lineout inside their own 22. Award bonus points for any kick that lands in the designated target zone and is contested. This creates game-realistic pressure and rewards accurate kicking under fatigue.
Age Adaptations

Under 12 and Under 14. At these age groups, the two-phase structure may be too complex to introduce simultaneously. Begin with Phase 1 only: the box kick and chase. Focus on kick mechanics, the pre-kick drift call, and the two-second hold for forwards. Remove the diagonal kick entirely until Phase 1 is automatic. Use a larger target zone (half the pitch width) to build confidence.
Under 16. Introduce both phases but simplify the back-line roles. No. 12 and No. 13 run straight support lines rather than decoy lines. The diagonal kick can be replaced with a simple cross-kick to No. 14 if the fly-half's kicking technique is still developing. Emphasise communication and call discipline.
Open Age / Senior. Run the full play as described, including the 'Dummy Kick' variation and the conditioned game progression. Add a third phase option: if the diagonal kick is charged down, the forwards must immediately contest the ruck and No. 9 can kick again from Phase 3. Senior players should also be coached on reading the opposition's kick-chase alignment to select between the box kick and diagonal kick in real time.