Forward Pod Play with Offload Option
Master the 3-man forward pod to generate quick ball, punch through the defensive line, and create line breaks with a perfectly timed offload.

Equipment Needed
1. Overview
The forward pod with an offload option is a staple of modern attacking rugby. By organizing your forwards into tight, cohesive units of three, you can dictate the point of contact, generate momentum, and create high-quality front-foot ball.
This specific set play focuses on using the pod not just to crash the ball up, but to actively break the defensive line. The primary ball carrier attacks a seam between defenders, while the two support players offer dynamic options: one securing the ruck if a tackle is completed, and the other running a hard, late line to receive an offload in the tackle.
When to use it:
- In the middle third of the pitch to generate momentum.
- When the defense is spreading wide, leaving gaps around the fringes.
- To re-organize the attack after a chaotic phase or turnover.
2. Setup
Equipment Needed:
- 1 Rugby ball
- 8-10 Cones (to mark defensive lines and starting positions)
- Tackle shields or hit shields (optional for opposed practice)
Pitch Setup:
Set up a 20m x 20m grid representing the central channel of the pitch. Place three defenders (D1, D2, D3) on a flat line.
Player Positions:
- Number 9 (Scrum-half): Initiates the play from the base of the ruck or set piece.
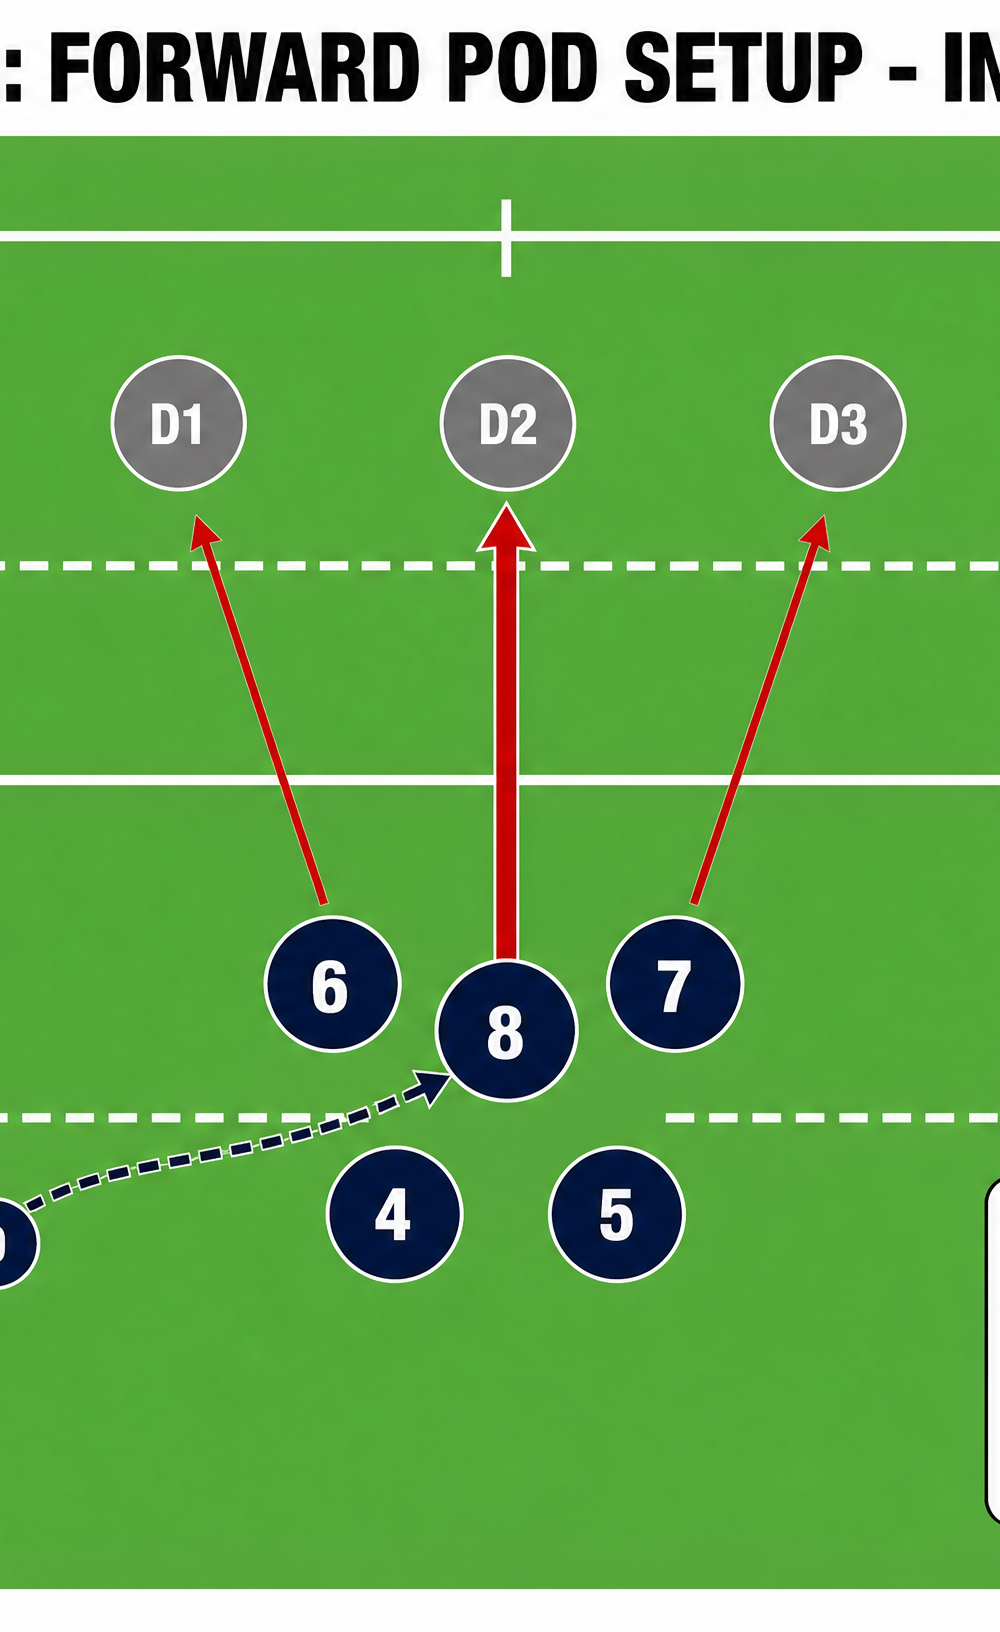
- Number 8 (Ball Carrier): The apex of the pod.
- Number 6 (Blindside Flanker) & Number 7 (Openside Flanker): The supporting players flanking the Number 8.
- Number 4 & 5 (Locks): Positioned deeper for the next phase.

3. Step-by-Step Instructions
Step 1: The Setup and Call
The Number 9 identifies the defensive alignment and calls the pod into position. The Number 8 sets up as the primary receiver, roughly 2-3 metres deep and 5 metres wide of the breakdown. The 6 and 7 bind or position themselves tightly on either shoulder of the 8.
Step 2: The Approach
Upon receiving the pass, the Number 8 accelerates aggressively toward the defensive line, specifically targeting the inside shoulder of a defender (D2) to force them to commit. The 6 and 7 track slightly behind, reading the ball carrier's body language.
Step 3: The Contact and Offload Trigger
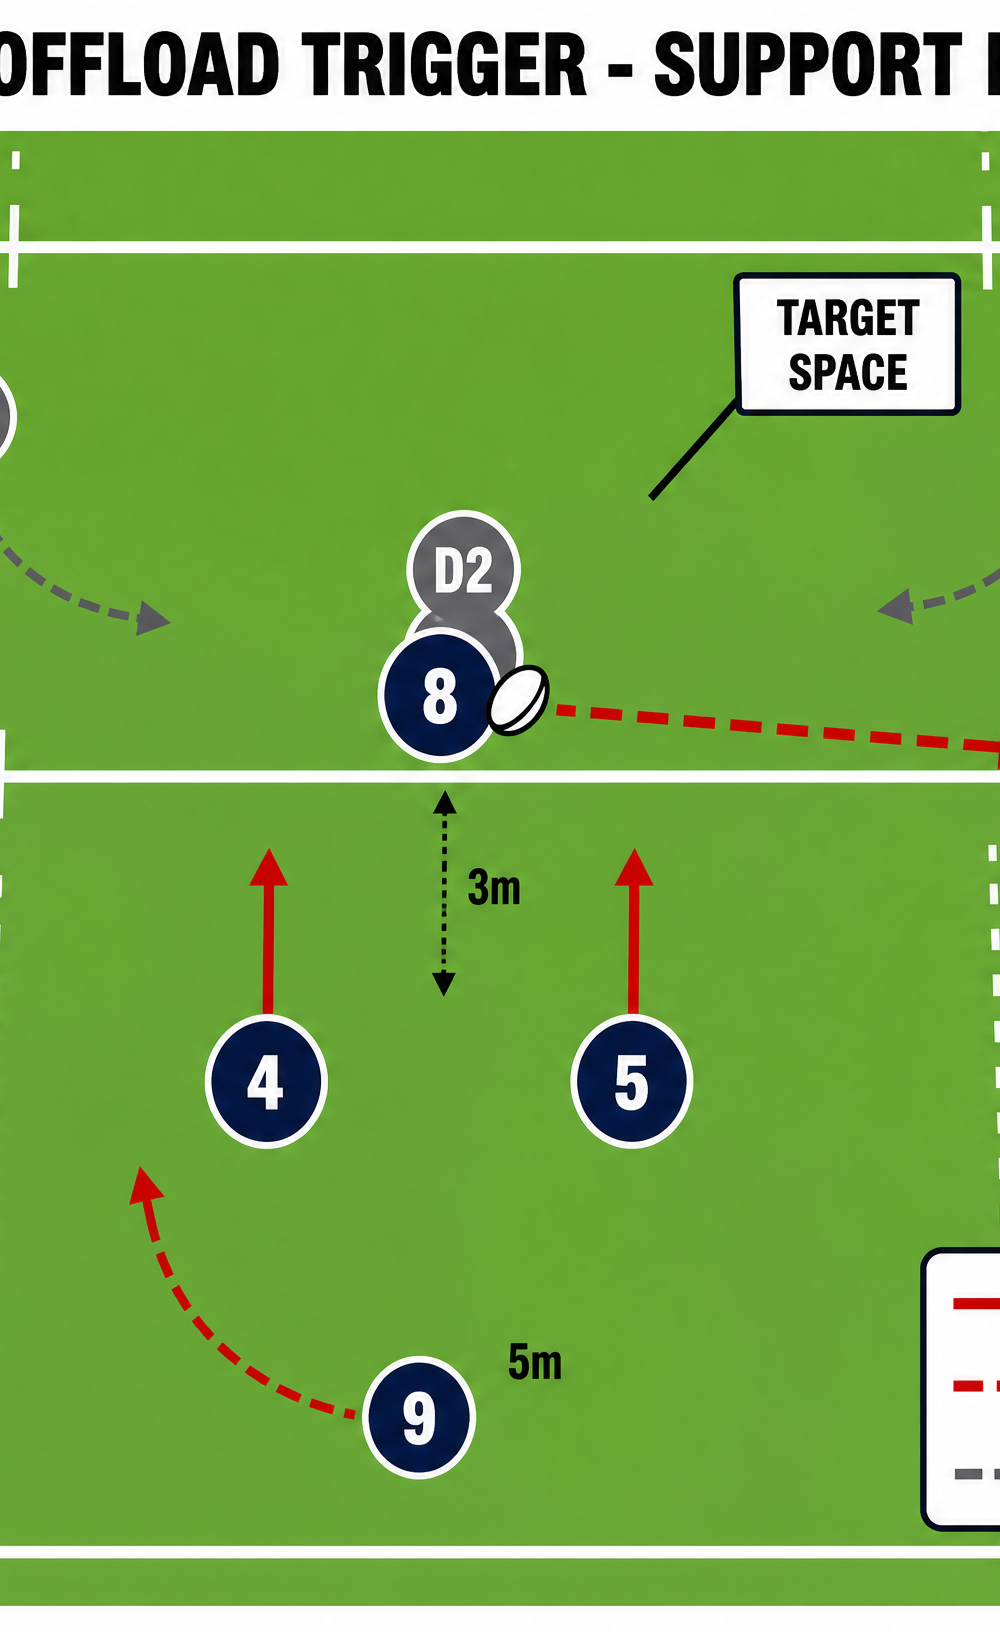
As the Number 8 makes contact, they must stay square and fight to keep their arms free. This is the critical moment. If the defender tackles low, the 8 looks to pop the ball up. If the defender tackles high, the 8 looks for an underhand offload.
Step 4: The Support Lines
The Number 7 (or whichever player is on the side of the offload) must run a hard, late line into the space behind the tackler. They should call for the ball only when they are in the 'Offload Zone' (3-5m from contact). The Number 6 acts as a decoy or prepares to secure the ruck if the offload isn't possible.
Step 5: The Next Phase
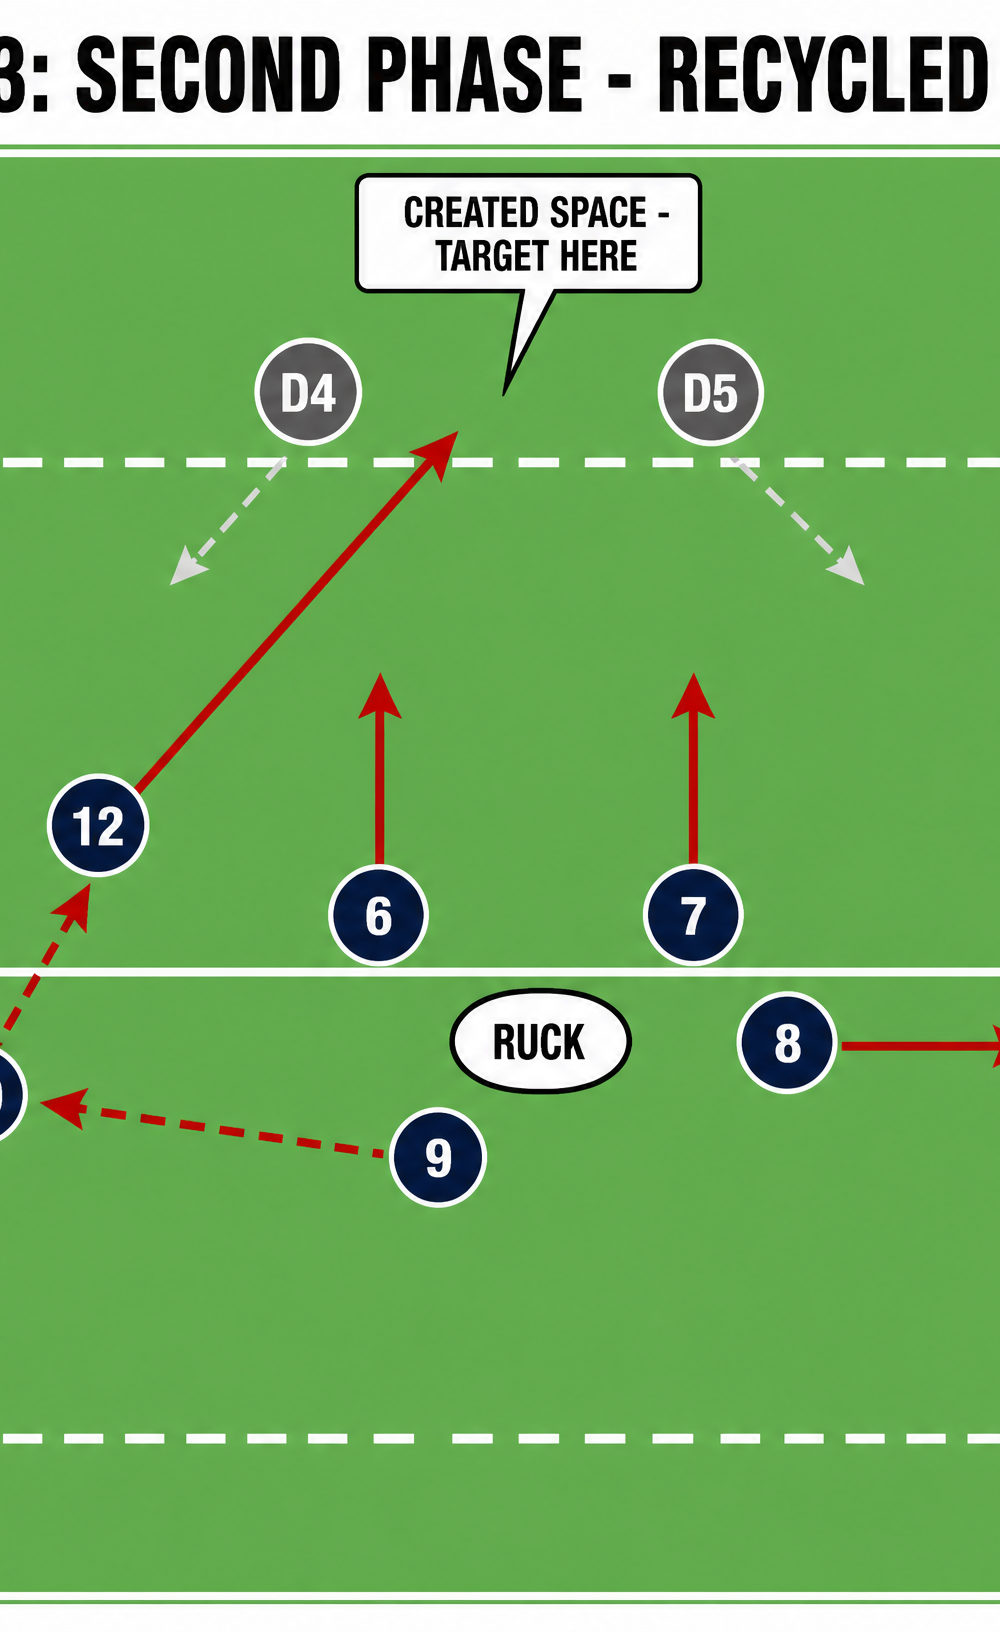
If the offload is successful, the Number 7 breaks the line. If the offload is not on, the 8 goes to ground on their terms, placing the ball cleanly. The 6 and 7 immediately clear the threat, presenting lightning-fast ball for the Number 9 to shift wide to the backs.
4. Key Coaching Points
- Square Shoulders: The ball carrier must attack the line squarely. Drifting sideways allows the defense to slide and shuts down the offload space.
- Late and Loud Support: The support runner receiving the offload must arrive late and fast. Running too early clogs the space and allows defenders to adjust.
- Fight Through Contact: The ball carrier must not surrender in the tackle. Leg drive and fighting to stay upright are essential to create the offload opportunity.
- Decision Making: The offload must not be forced. If the tackle is dominant and the arms are wrapped, the primary job is to secure the ball and set the ruck.
5. Common Mistakes
- Flat Pods: If the support players start too flat (level with the ball carrier), they will overrun the offload and be useless at the ruck.
- Passing Before Contact: The offload is a pass in or through contact, not before it. Passing too early is just a standard tip-on pass and doesn't commit the defender.
- Looking at the Ball, Not the Space: Support runners often stare at the ball carrier. They need to look at the space behind the defender to run the correct line.
6. Variations & Progressions
- The Tip-On Pass: Instead of taking contact, the Number 8 tips the ball early to the 6 or 7 hitting a hard line outside them.
- The Pull-Back: The Number 8 shapes to carry but pulls the ball back behind the pod to a play-maker (Number 10) in a deeper position.
- Adding Line Speed: Progress the drill by having the defenders rush up quickly, reducing the decision-making time for the pod.
7. Age Adaptations
- Under 10s/12s: Focus purely on the shape of the pod and going to ground safely to present the ball. Introduce the offload only when tackle technique is secure.
- Under 14s/16s: Emphasize the timing of the support runs and the decision-making of whether to offload or set the ruck.
- Open/Seniors: Run the play at full match intensity against a live, unscripted defense. Incorporate the pull-back and tip-on variations seamlessly.

