Forward Pod Play with Offload Option: Punching Through the Defensive Line
Learn how to deploy a three-man forward pod to generate front-foot ball, suck in defenders, and execute a perfectly timed offload to a supporting runner in space.

Equipment Needed
1. Overview
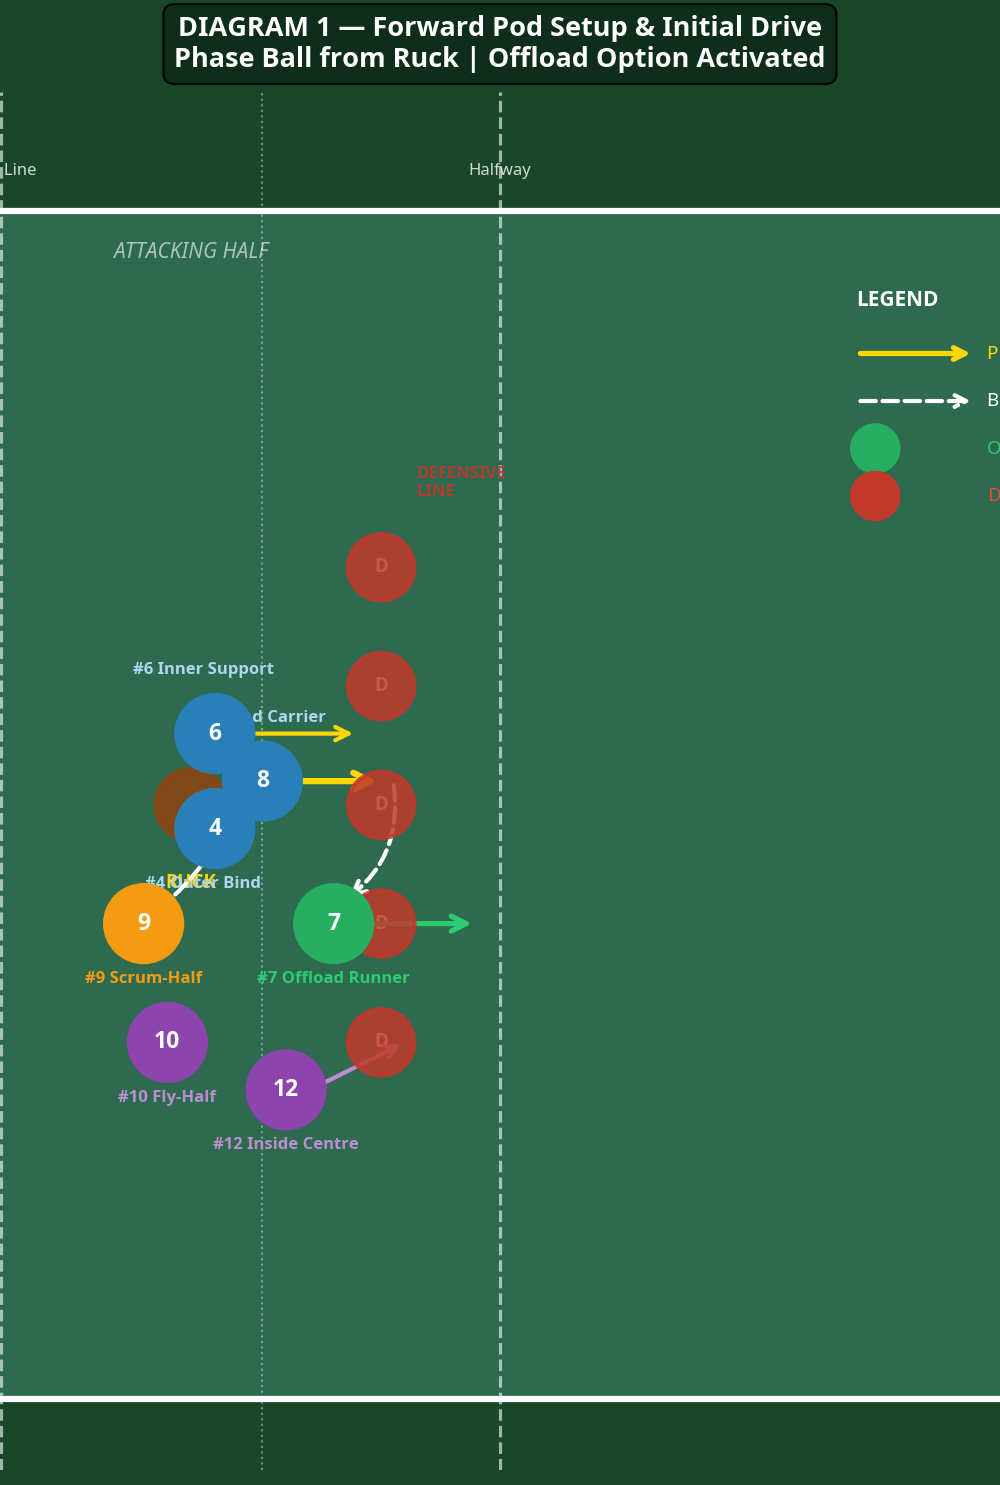
The forward pod with an offload option is a fundamental attacking structure designed to generate momentum, commit multiple defenders, and exploit the resulting space. By grouping three forwards (typically numbers 8, 6, and 4) into a tight "pod," the attacking team creates a physical mismatch against isolated defenders. The primary goal is to carry the ball aggressively over the gain line, forcing the defensive line to compress.
Once the defence commits to stopping the pod's drive, space naturally opens up on the fringes. This is where the offload option becomes devastating. A supporting runner—often the openside flanker (#7) or an inside back—tracks the pod's movement, staying just out of contact. As the lead carrier (#8) takes the tackle and fights through the contact zone, they execute a late offload to the supporting runner, who accelerates into the newly created gap. This play is highly effective in the middle third of the pitch or when attacking inside the opposition's 22-metre area, as it disrupts the defensive structure and prevents them from resetting.
2. Setup
Pitch Area: Middle of the pitch, between the 15-metre lines, ideally attacking from a phase ball situation (e.g., a ruck).
Player Positions:
- #9 (Scrum-Half): Positioned at the base of the ruck, ready to deliver a fast, accurate pass.
- #8 (Lead Carrier): Positioned 3-5 metres deep and slightly wide of the ruck, running a hard, direct line.
- #6 & #4 (Support/Binders): Positioned on the inside and outside shoulders of the lead carrier, ready to latch on immediately before or during contact.
- #7 (Offload Runner): Positioned slightly wider and deeper than the pod, tracking the ball carrier's inside or outside shoulder, anticipating the offload.
- #10, #12, #13 (Backline): Positioned wide to maintain width and hold the outside defenders in place.
3. Step-by-Step Instructions
Step 1: The Setup and Call
The scrum-half (#9) identifies the defensive alignment and calls the pod play. The three forwards (#8, #6, #4) align in a tight arrowhead formation, ensuring they are flat enough to take the ball at pace but deep enough to generate momentum.
Step 2: The Delivery and Run
The scrum-half delivers a crisp, flat pass to the lead carrier (#8). The carrier accelerates into the defensive line, targeting the space between two defenders (the "seam"). The support players (#6 and #4) accelerate simultaneously, binding onto the carrier's hips or shoulders just before contact to drive them forward.
Step 3: The Contact and Drive
Upon contact, the lead carrier drops their body height, driving their legs through the tackle. The support players provide immediate physical impetus, preventing the carrier from being driven backward and ensuring the pod punches through the initial defensive line. This action forces additional defenders to commit to the tackle area.

Step 4: The Offload Execution
As the pod drives forward and the defence collapses inward, the lead carrier keeps the ball free from the initial wrap. The supporting runner (#7) times their run to arrive at the carrier's shoulder just as the carrier bursts through the tackle or is brought to ground. The carrier executes a short, sympathetic pop pass or a one-handed offload to the runner.
Step 5: The Break and Support
The offload receiver (#7) accelerates through the gap created by the pod. The backline (#10, #12, #13) must immediately react, pushing up to support the break and offer options for the next phase, while a secondary pod (e.g., #1, #2, #3) organizes for the subsequent breakdown if the runner is tackled.
4. Key Coaching Points
- Depth and Pace: The pod must start deep enough to hit the ball at full pace. A static pod is easily defended. The carrier must be accelerating when they receive the pass.
- Tight Binding: The support players (#6 and #4) must bind tightly and simultaneously with the carrier. A loose pod will splinter upon contact, losing its driving force.
- Ball Presentation: The lead carrier must protect the ball going into contact, keeping it away from the initial tackler, and only look for the offload once they have secured the gain line and the support runner is in position.
- Timing of the Support Run: The offload receiver (#7) must not overrun the carrier. They need to read the tackle, hold their depth slightly, and accelerate onto the ball as the offload is made.
- Communication: Clear, concise communication between the scrum-half, the pod leader, and the offload receiver is crucial for timing and execution.
5. Common Mistakes
- Taking the Ball Standing Still: If the pod receives the ball without forward momentum, the defence will dominate the collision, leading to slow ball or a turnover.
- Forcing the Offload: Carriers often try to force an offload when the tackle is dominant or the support runner is not in position. This results in dropped balls or interceptions. Coaches must emphasize "earn the right to offload."
- Support Players Arriving Late: If the binders (#6 and #4) arrive after the carrier has taken contact, the carrier will be isolated and easily turned over.
- Backline Drifting Inward: If the backline drifts inward toward the pod, they bring their defenders with them, clogging the space meant for the offload receiver.
6. Variations & Progressions
Variation 1: The "Tip" Pass (Short Pass)
Instead of taking contact, the lead carrier (#8) catches the ball and immediately throws a short "tip" pass to either the inside (#6) or outside (#4) support player who is running a hard, unders line. This changes the point of attack at the last second.
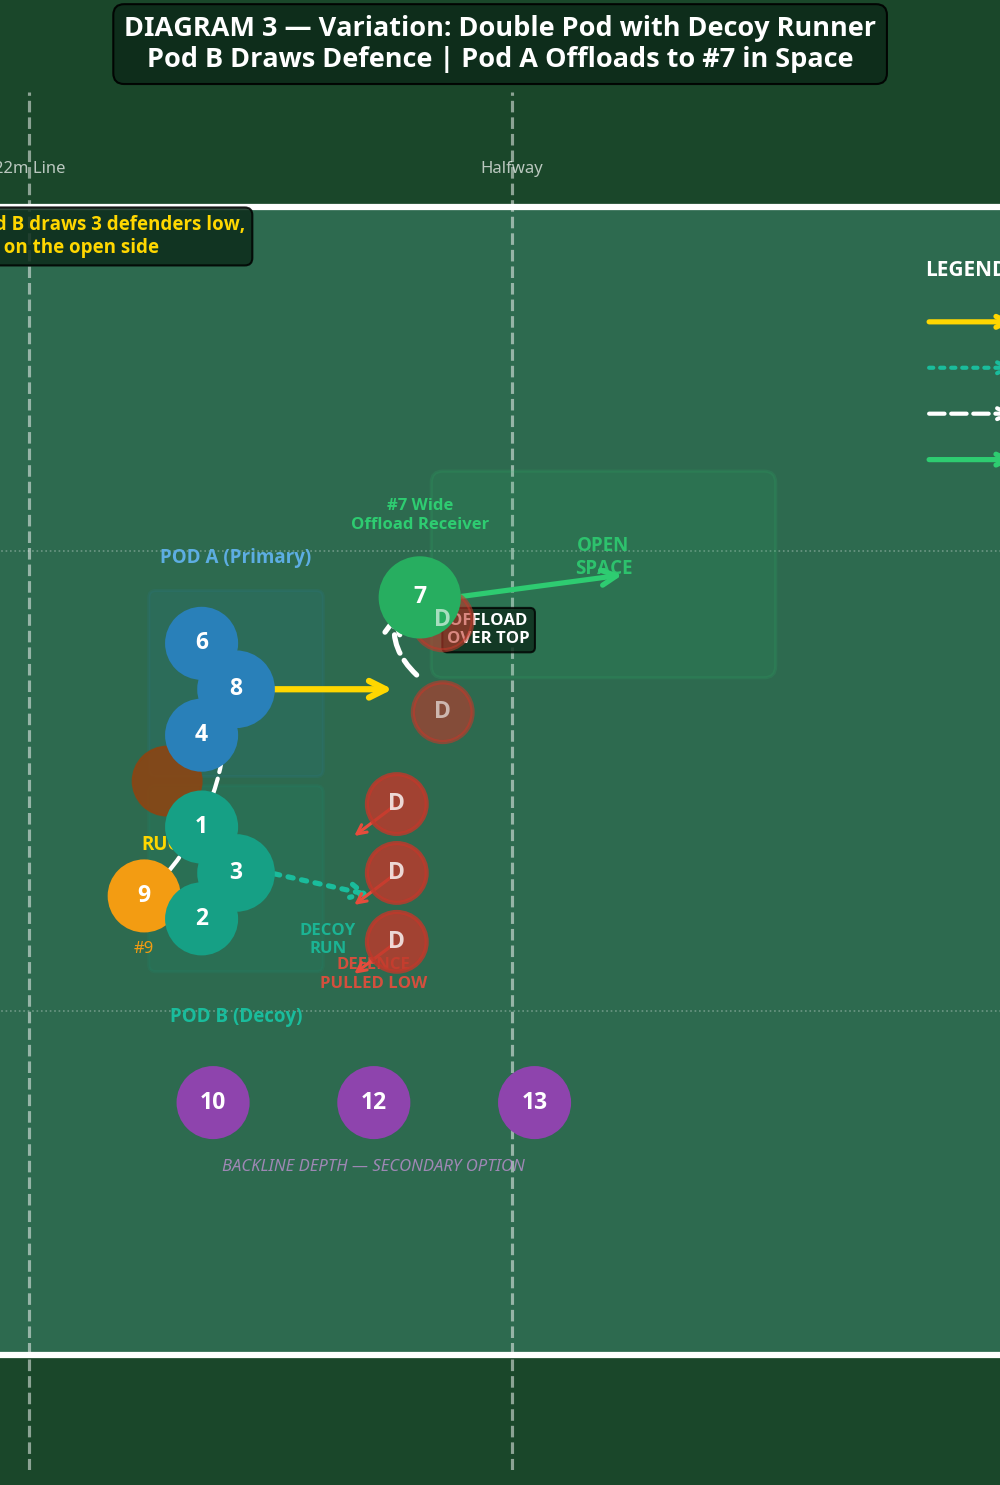
Variation 2: Double Pod (Decoy)
Set up two pods. Pod B (e.g., #1, #2, #3) runs a hard decoy line to the blindside or flat on the openside, drawing defenders. The scrum-half passes behind Pod B to Pod A (#8, #6, #4), who execute the standard drive and offload, exploiting the space created by the decoy.
Progression: Live Defence
Progress the drill from unopposed (bags/shields) to semi-opposed (touch/grab), and finally to fully opposed live scenarios. Start with a 3v2 advantage in the contact zone and build up to equal numbers to test the pod's decision-making and physicality.
7. Age Adaptations
- Under 10s / Under 12s: Focus purely on the concept of support and going forward. Simplify the pod to two players (carrier and one support). Emphasize safe tackling and ball presentation over complex offloads. Use soft pop passes instead of contact offloads.
- Under 14s: Introduce the three-man pod structure. Focus on the timing of the run and the binding technique. Begin practicing the offload in contact using tackle bags before moving to live scenarios.
- Under 16s / Open: Implement the full play with variations. Focus on decision-making (when to offload vs. when to go to ground) and the speed of the secondary support (the backline and the second pod).