Maul Formation and Drive Drill: Building a Dominant Driving Maul from Lineout
Master the art of building, driving, and extracting from a structured maul — giving your forward pack a lethal set-piece weapon in the opposition's 22.
Equipment Needed
Overview
The maul is one of rugby's most physically imposing and tactically decisive weapons. When executed correctly, a well-structured driving maul from a lineout near the opposition's 22-metre line is extraordinarily difficult to defend legally — it ties in multiple defenders, creates penalty opportunities, and can yield tries directly or generate quick ball for the backs. This drill teaches your forwards to form a maul immediately off the lineout catch, establish a connected pod structure, drive with coordinated power, and then either score directly or release the ball cleanly to the scrum-half at the point of maximum defensive pressure.
Use this drill during the forward-focused block of your training week, typically in the second or third session before a match. It is most effective when run after a warm-up that has already activated the hips and back, as the binding and driving positions demand full muscular engagement. Allow 35–40 minutes to run the full progression from unopposed to fully contested.
Setup

Equipment Required
- 8 tackle bags or blocking pads (for the defender simulation phase)
- 4 cones to mark the drill grid
- 2 lineout poles or 4 tall cones to simulate the lineout corridor
- 1 Gilbert match ball per group
- Scrimmage vests (2 colours) for attacker/defender distinction
- Whiteboard or coaching clipboard for pre-drill briefing
Pitch Setup
Set up in the attacking 22-metre zone, working off a touchline. Mark a grid 20 metres wide by 15 metres deep, with the lineout on the touchline. The try line should be approximately 15 metres from the lineout starting point. This replicates the most common game scenario where a maul is used — a lineout won inside the opposition's 22.
Player Positions Required
| Position | Number | Role in Drill |
|---|---|---|
| Hooker | 2 | Lineout thrower; joins maul from touchline |
| Loosehead Prop | 1 | Front wedge of the driving maul |
| Tighthead Prop | 3 | Front wedge of the driving maul |
| Lock | 4 | Jumper / primary engine of the drive |
| Lock | 5 | Jumper / primary engine of the drive |
| Blindside Flanker | 6 | Left-side binder and protector |
| Openside Flanker | 7 | Right-side binder / peel option |
| Number 8 | 8 | Ball carrier at the back of the maul |
| Scrum-Half | 9 | Extraction receiver and decision-maker |
| Fly-Half | 10 | Secondary attack option post-extraction |
Minimum players required: 10 (forwards + scrum-half). Recommended: 12–15 to include defenders and rotation.
Diagram 1 shows the initial lineout setup and the moment of maul formation, with the scrum-half (9) positioned 5 metres from the lineout and the fly-half (10) holding depth as the secondary option.
Step-by-Step Instructions

Phase 1 — Lineout Call and Catch (Unopposed)
Set the lineout. Position the hooker (2) on the touchline. Numbers 4 and 5 take their jumping positions in the lineout (typically positions 2 and 4 in the lineout). Numbers 6, 7, and 8 act as lifters and support. Number 9 stands 5 metres back from the lineout, parallel to the touchline.
Call the lineout. The lineout captain (usually 4 or 8) calls the ball to the front or middle of the lineout — for this drill, always call to the middle (No. 4 or 5 jumping). This is the most common maul trigger position.
Execute the throw and catch. Hooker (2) throws a flat, accurate ball to the jumper. Lifters elevate the jumper cleanly. The jumper catches the ball at full extension and does not pass — this is the critical trigger for the maul. The jumper lands with the ball secured two-handed against the chest.
Immediate maul formation. The moment the jumper's feet hit the ground, the two lifters bind tightly onto the ball carrier — one on each hip, hands gripping the shorts or jersey at the back. The ball carrier turns their back to the opposition (facing their own try line) and lowers their centre of gravity. This is the maul gate.
Phase 2 — Maul Structure and Drive
Props arrive first. Numbers 1 and 3 arrive within 2 seconds of the maul forming, binding onto the outside of the locks (4 and 5). They form the front wedge, with heads up and hips low. Their job is to create a solid platform, not to carry the ball.
Number 8 takes the ball. The ball carrier (initially the jumper) transfers the ball to Number 8, who positions themselves at the back of the maul with the ball held in both hands against the lower chest. Number 8 must communicate loudly: "Ball! Ball! Ball!" to signal readiness to drive.
Drive on the call. Number 8 calls "Drive!" — all players in the maul simultaneously lower their hips, drive their feet in short, rapid steps (no more than 30cm per step), and push forward as a single unit. The maul must move as one body. Emphasise that all players drive at the same angle — slightly downward into the ground, then forward.
Maintain the structure for 5 metres. Drive the maul forward a minimum of 5 metres before any extraction decision is made. Coach the players to stay connected — no gaps, no players standing upright.

Diagram 2 illustrates the full driving maul structure, showing the ball position with Number 8, the drive angle of each forward, and the extraction point where the scrum-half (9) receives the ball.
Phase 3 — Extraction and Attack Decision
Scrum-half reads the maul. Number 9 tracks the maul from 2 metres behind, staying on the open (non-touchline) side. They must not enter the maul. Their eyes are on Number 8 and the defensive line ahead.
Extraction trigger. When the maul stalls or Number 8 calls "Out!", Number 8 peels the ball to the side and presents it cleanly to Number 9 at knee height. Number 9 must receive the ball in a low, athletic position — weight forward, ready to pass or carry.
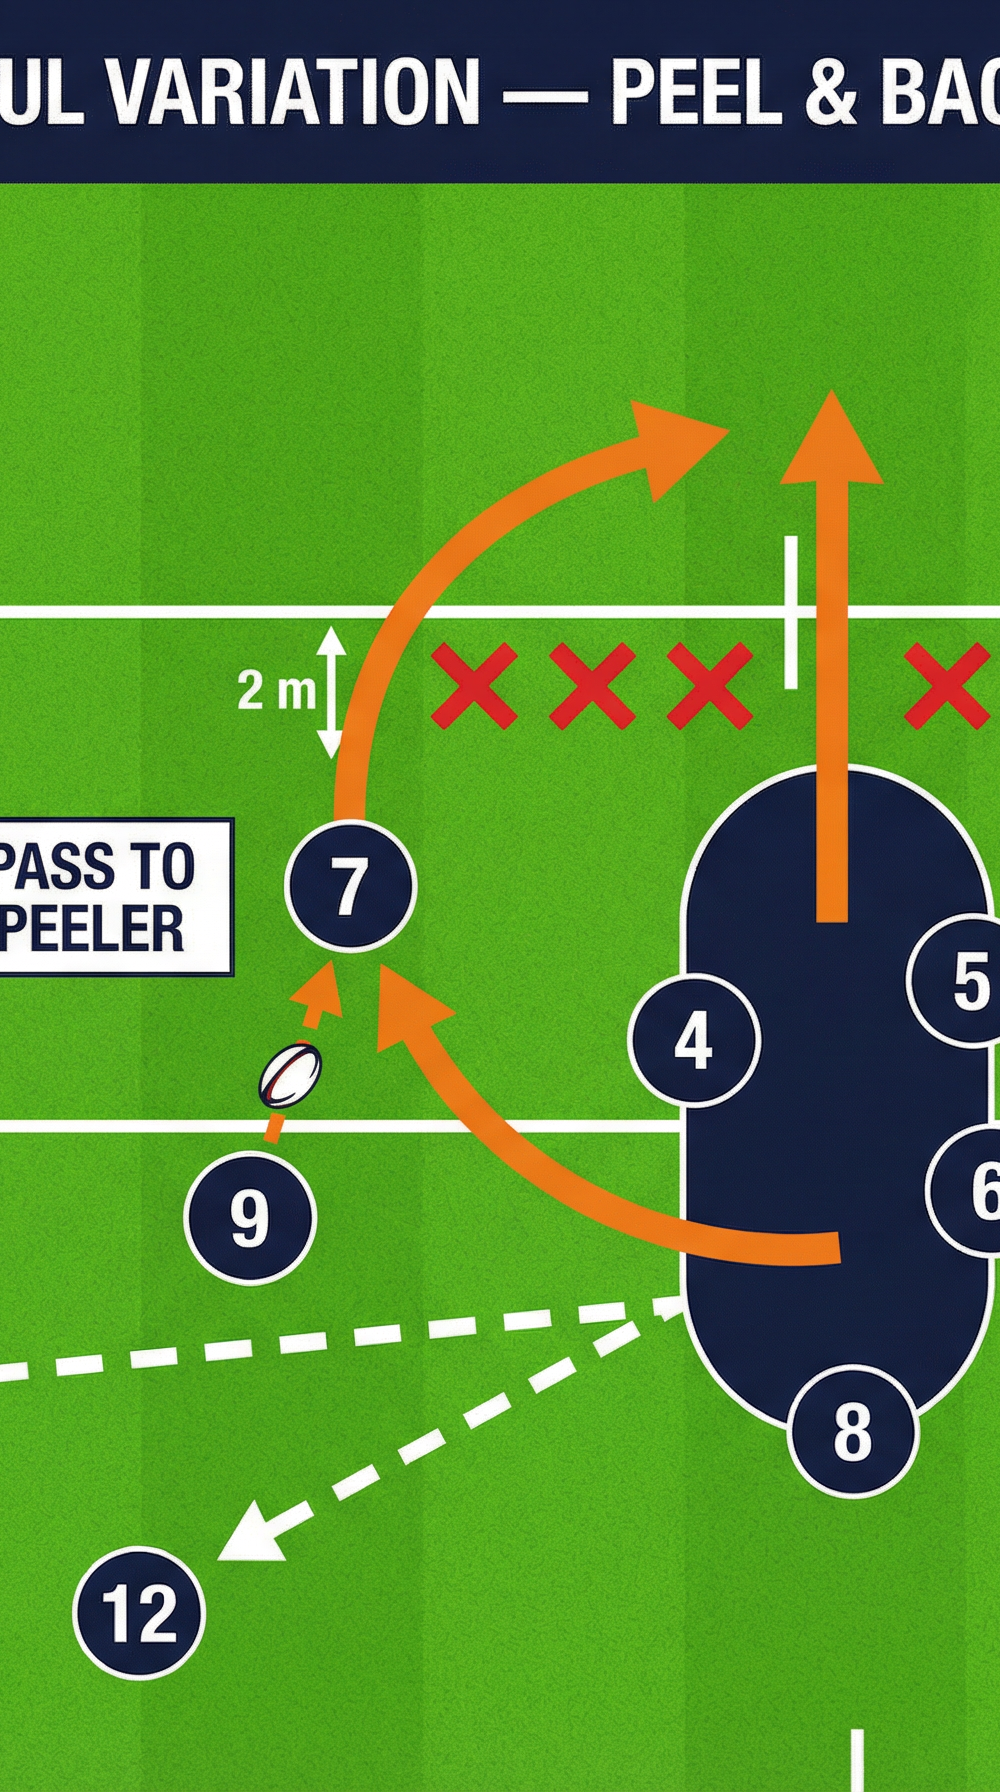
Attack decision. Number 9 now makes the play: (a) pass wide to Number 10 and the backs if the defensive line has been dragged in, (b) carry themselves into the gap at the edge of the maul, or (c) trigger the peel option with Number 7 (see Diagram 3 and Variations section).
Reset and repeat. After each rep, walk the group back to the lineout starting position. Run 4–6 reps unopposed, then introduce passive defenders (holding pads), then active defenders.
Key Coaching Points

1. The Maul Gate is Sacred. Every player who joins the maul must enter from behind the ball — never from the side. Reinforce this relentlessly. A player joining from the side gives the referee a clear reason to award a penalty against you. Call out "Gate! Gate!" during the drill whenever a player approaches incorrectly.
2. Hips Lower Than the Defender's Hips. The single most important technical principle of the driving maul is leverage. A player whose hips are higher than their opponent's will be pushed backwards. Demand that every player's hips are at or below the level of their own knees when driving. Use the cue: "Sit into it — like you're sitting on a low chair."
3. Short, Fast Feet — Never Lunge. Players instinctively want to take long strides when driving. This is wrong. Long strides reduce ground contact and allow defenders to disrupt balance. Insist on rapid, short steps (30–40cm) with both feet always in contact with the ground. Cue: "Sewing machine feet — fast and low."
4. Ball Security Above Everything. The ball carrier (Number 8) must never expose the ball to the outside. The ball stays tucked against the lower chest, with both forearms wrapped around it. If the ball is visible from the side, it can be stripped. Cue: "Hide the ball — if I can see it, they can steal it."
5. Communication is a Technical Skill. The maul only works if players communicate. Number 8 must call "Drive!" and "Out!" loudly and clearly. Arriving players must call "Bind!" before they make contact. Silence in a maul is a technical error — treat it as such.
6. Number 9 Must Be Patient. The most common scrum-half error is entering the maul or reaching in for the ball before it is presented. Number 9 must stay disciplined — 2 metres behind, tracking the maul, waiting for the clean presentation. Rushing the extraction causes knock-ons and turnovers.
Common Mistakes
Mistake 1 — Players Joining the Maul from the Side (Offside)
This is the most penalised error in maul play. Players arriving late from wide positions cut across and join from the flank rather than from behind the ball. Correction: Set a physical cone gate 1 metre behind the ball carrier's position. Any player who joins outside the cone is called back and must rejoin correctly. Repeat until the gate discipline is automatic.
Mistake 2 — The Maul Splitting in the Middle
When the two locks (4 and 5) fail to bind tightly to each other and to the ball carrier, the maul splits into two separate pods that defenders can target individually. Correction: Before the drive begins, physically check the bind — grip the jersey of the player in front with a full fist, not fingertips. Run a static binding drill: have players hold the bind for 10 seconds under pressure from a pad-holding coach before the drive begins.
Mistake 3 — Driving Upright (Standing Too Tall)
Forwards who stand upright in the maul look powerful but are easily stopped and turned. The body angle should be approximately 45 degrees — back flat, hips low, head up. Correction: Place a tackle pad flat on the ground in front of the maul. Players must drive forward over the pad without stepping on it — this forces them to stay low and lean forward.
Mistake 4 — Number 8 Holding the Ball Too Long
Number 8 sometimes waits too long to extract, trying to gain one more metre. When the maul stalls completely, the referee's clock is ticking — use it or lose it. Correction: Introduce a 5-second extraction rule in training. If the ball is not out within 5 seconds of the maul stalling, the drill is reset as a turnover. This builds urgency and decision-making speed.
Mistake 5 — Scrum-Half Receiving in a Standing Position
Number 9 receiving the ball upright is slow and telegraphs the next play to defenders. Correction: Require Number 9 to receive every extraction in a squat position, weight on the balls of the feet. Reward clean, low receptions with verbal praise during the drill.
Variations and Progressions
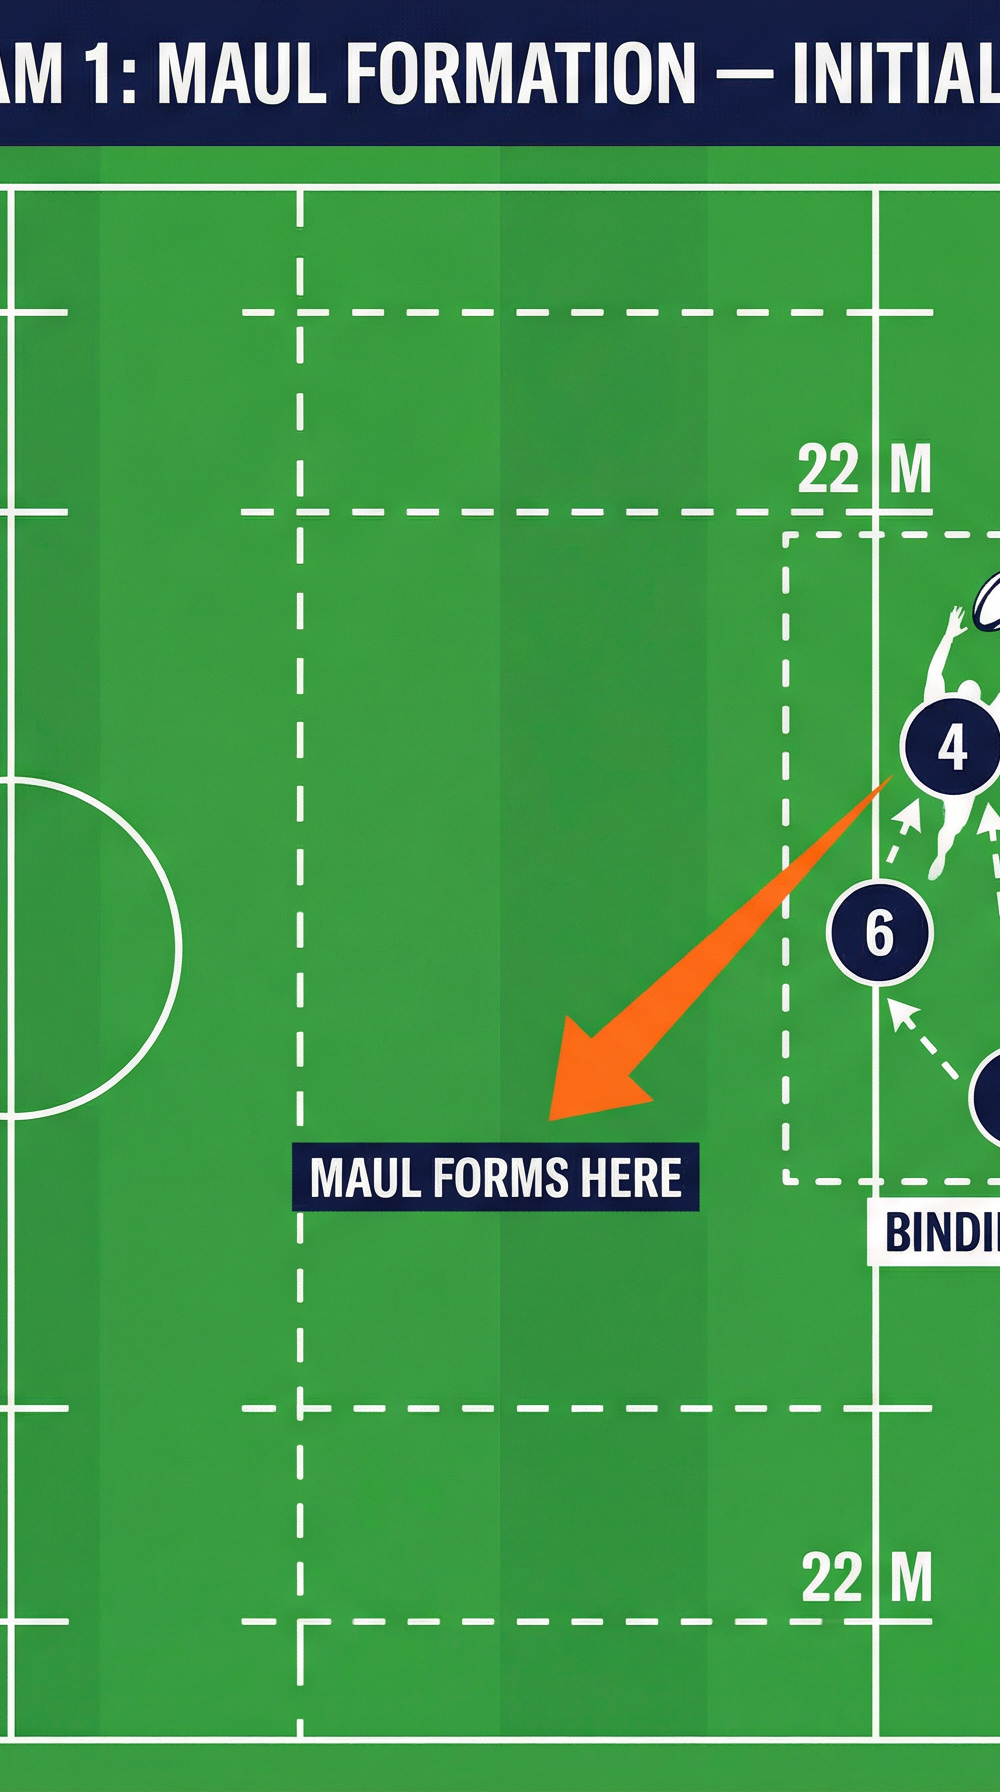
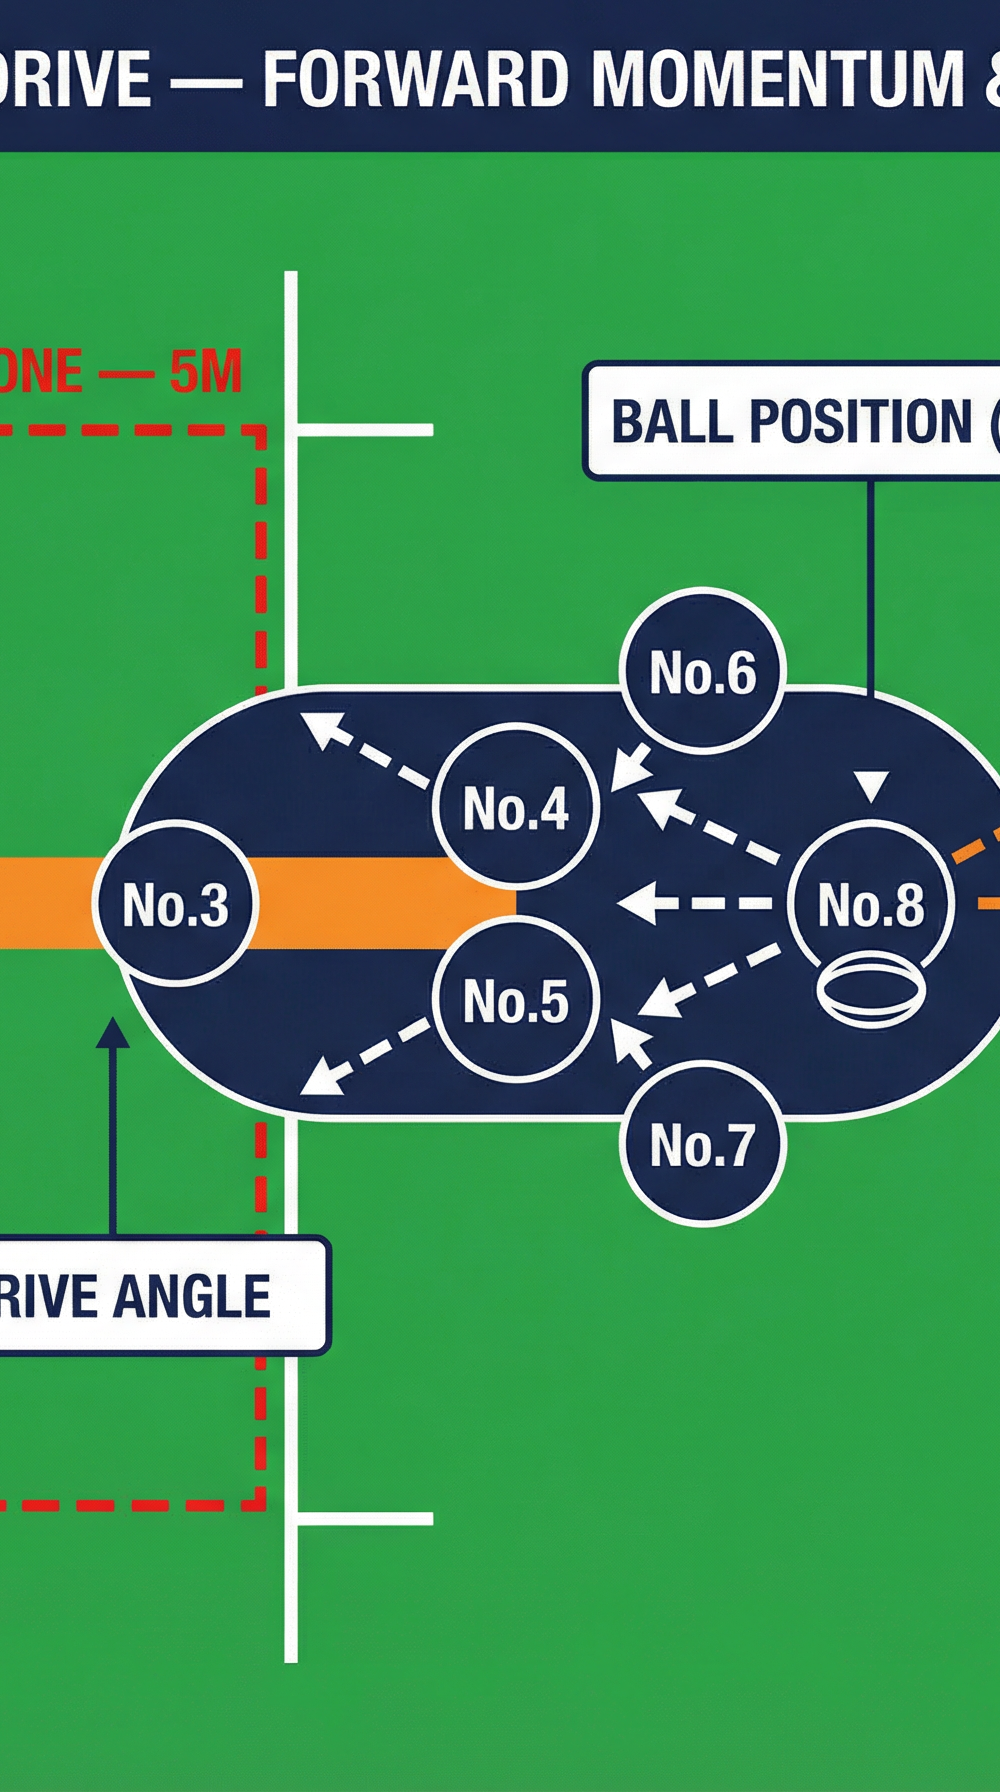
Diagram 3 shows the Peel Variation — Number 7 peels off the back of the maul to receive a pass from Number 9, attacking the space outside the defensive line that has been drawn in by the driving maul.
Variation 1 — The Peel (Intermediate)
Instead of extracting the ball to Number 9 for a wide pass, Number 7 (openside flanker) peels off the back of the maul and runs a curved arc around the outside. Number 8 passes directly to Number 7 as they clear the maul. This is most effective when the defensive line has drifted inward to stop the drive. Run this variation after players are comfortable with the base drill. Cue for Number 7: "Peel tight — stay within 2 metres of the maul until you're clear."
Variation 2 — Maul-to-Pick-and-Go (Easier)
Instead of a structured extraction, Number 8 simply picks the ball from the base of the maul and drives individually into contact, setting up a ruck. This is a simpler option that builds confidence in younger or less experienced groups before they attempt the full extraction. It also serves as a useful game-day option when the maul is being legally killed.
Progression — Contested Maul with Live Defenders (Advanced)
Introduce a full defensive unit of 6 forwards who are permitted to legally contest the maul. Defenders must bind and drive — no pulling, no collapsing. This is the closest replication of match conditions. Rotate attackers and defenders every 4 reps. Score the drill: 1 point for a try from the maul, 1 point for a clean extraction and score within 3 phases, 1 point for a defensive turnover. This competitive element raises intensity and decision-making quality significantly.
Age Adaptations

Under 12 and Under 14 — Simplified Binding and Drive
At these age groups, the priority is safety and correct technique, not power. Remove the lineout element entirely — start with a static ball carrier standing still, with two supporting players binding on. Focus exclusively on body position (hips low, back flat) and the concept of driving as a unit. Use only 3–4 players in the maul. Limit driving distance to 3 metres. Introduce the verbal calls ("Drive!" and "Out!") from the start to build good habits early.
Under 16 — Full Structure, Limited Contestation
At Under 16, players can handle the full lineout-to-maul sequence. Introduce passive defenders (holding pads but not actively contesting) to simulate defensive pressure without the collision risk of full contestation. Focus heavily on the gate discipline and binding technique. The peel variation can be introduced at this level.
Open Age (Senior and Elite) — Full Contestation and Tactical Decision-Making
At senior level, run the full contested progression described above. Add a back-line unit (10, 12, 13) to practice the decision chain after extraction — the scrum-half must now read the defensive line and choose between the peel, the wide pass, and the carry. Time the drill: a maul that takes longer than 8 seconds from formation to extraction is too slow for senior competition. Video the drill from above (using a phone on a tripod or drone) and review with players post-session.