Ruck Clear-Out & Clean-Out Drill: Winning the Breakdown
Master the art of securing quick ball at the breakdown with this comprehensive ruck clear-out drill that teaches forwards the body position, timing, and technique to dominate the contact area.

Equipment Needed
Overview
The ability to win the breakdown is the single most decisive factor in modern rugby. Teams that consistently secure quick, clean ball from the ruck control tempo, stretch defences, and generate the attacking platform from which tries are scored. This drill isolates and develops the ruck clear-out and clean-out technique — the process by which arriving forwards legally remove defenders from the ruck gate to expose the ball for the scrum-half.
Use this drill at the start of a contact-skills block, or as a warm-up to any session where phase play and ball-in-hand attack are the primary focus. It is equally effective as a standalone unit session for your loose forwards (6, 7, 8) and as a whole-squad contact warm-up for players aged 14 and above.
What this drill achieves: Players develop the correct approach angle, body position, and leg-drive mechanics to legally and effectively remove defenders from the ruck, while the scrum-half (9) learns to read the clear-out and time their arrival at the ruck base.
Setup


Pitch Area: Mark out a 20m x 15m grid using cones on any flat section of the training pitch. This represents a realistic phase-play channel on a standard 100m x 70m rugby pitch.
Equipment Required:
- 8 cones (to mark the grid boundaries and ruck zone)
- 1 tackle bag or scrum pad (to simulate a defending player over the ball)
- 1 rugby ball
- Coloured bibs (2 colours — attackers and defenders)
- Optional: a second tackle bag for the two-clearer variation
Player Positions and Numbers:
| Position | Jersey No. | Role in Drill |
|---|---|---|
| Number 8 / Ball Carrier | 8 | Goes to ground, presents ball back |
| Blindside Flanker | 6 | First clearer — arrives from left channel |
| Openside Flanker | 7 | Second clearer — arrives from right channel |
| Scrum-Half | 9 | Ruck base, receives and distributes |
| Defending Jackal | D1 | Holds tackle bag over ball |
| Defending Support | D2 | Secondary defender at ruck gate |
Minimum players required: 6 (4 attackers + 2 defenders). Recommended group size is 10–12 to allow rotation and continuous repetitions.
Drill duration: 25 minutes total — 5 minutes explanation and walk-through, 15 minutes live repetitions (3 sets of 5 reps per group), 5 minutes debrief and coaching feedback.
Step-by-Step Instructions

Phase 1 — The Carry and Presentation (Steps 1–3)
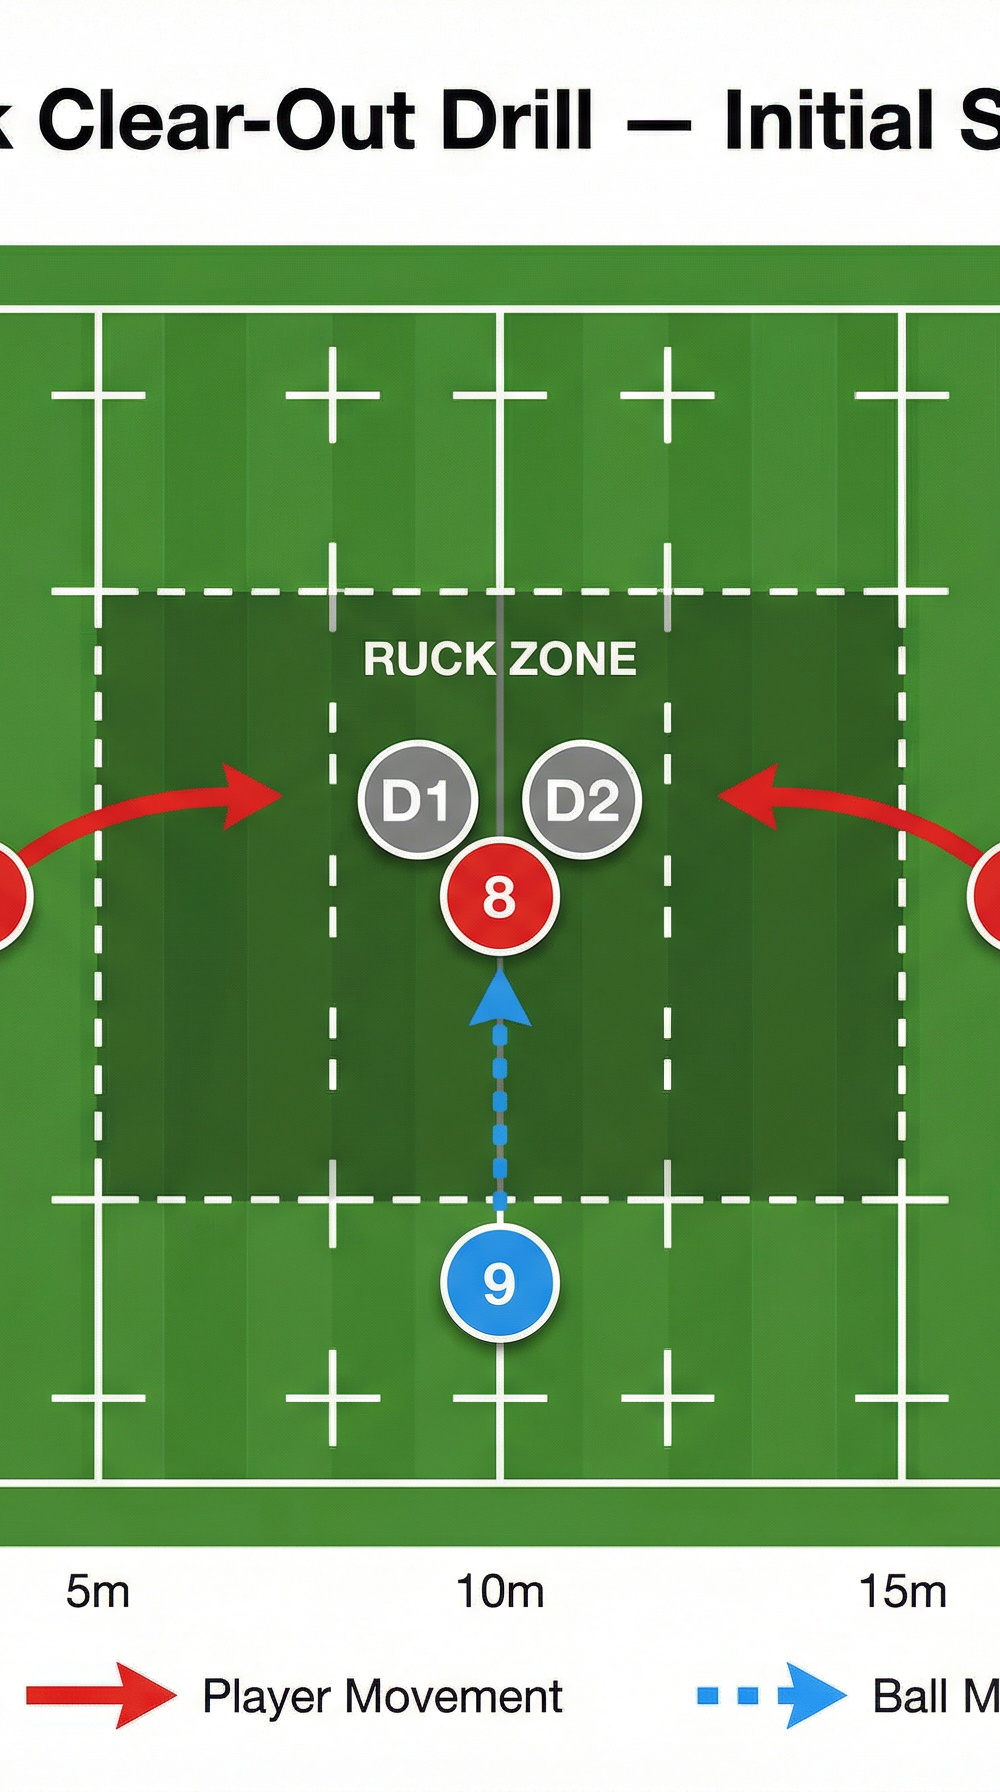
Ball carrier (8) starts 5m from the ruck zone. On the coach's whistle, the Number 8 runs forward at 75% pace, simulating a carry into contact. The ball is held in two hands, close to the chest.
Contact and go-to-ground. The Number 8 makes contact with the first tackle bag holder (D1), drives forward 1m, then goes to ground in a controlled manner — landing on the side of the body, never the back. The ball is immediately placed on the ground pointing back toward the attacking team's side, at least 1m beyond the tackle point. Both hands release the ball cleanly.
The ball carrier rolls away. The Number 8 immediately rolls to the side and clears the ruck area. This is a critical safety and legal requirement — a player on the ground must not interfere with the ball.
Phase 2 — The Clear-Out (Steps 4–6)
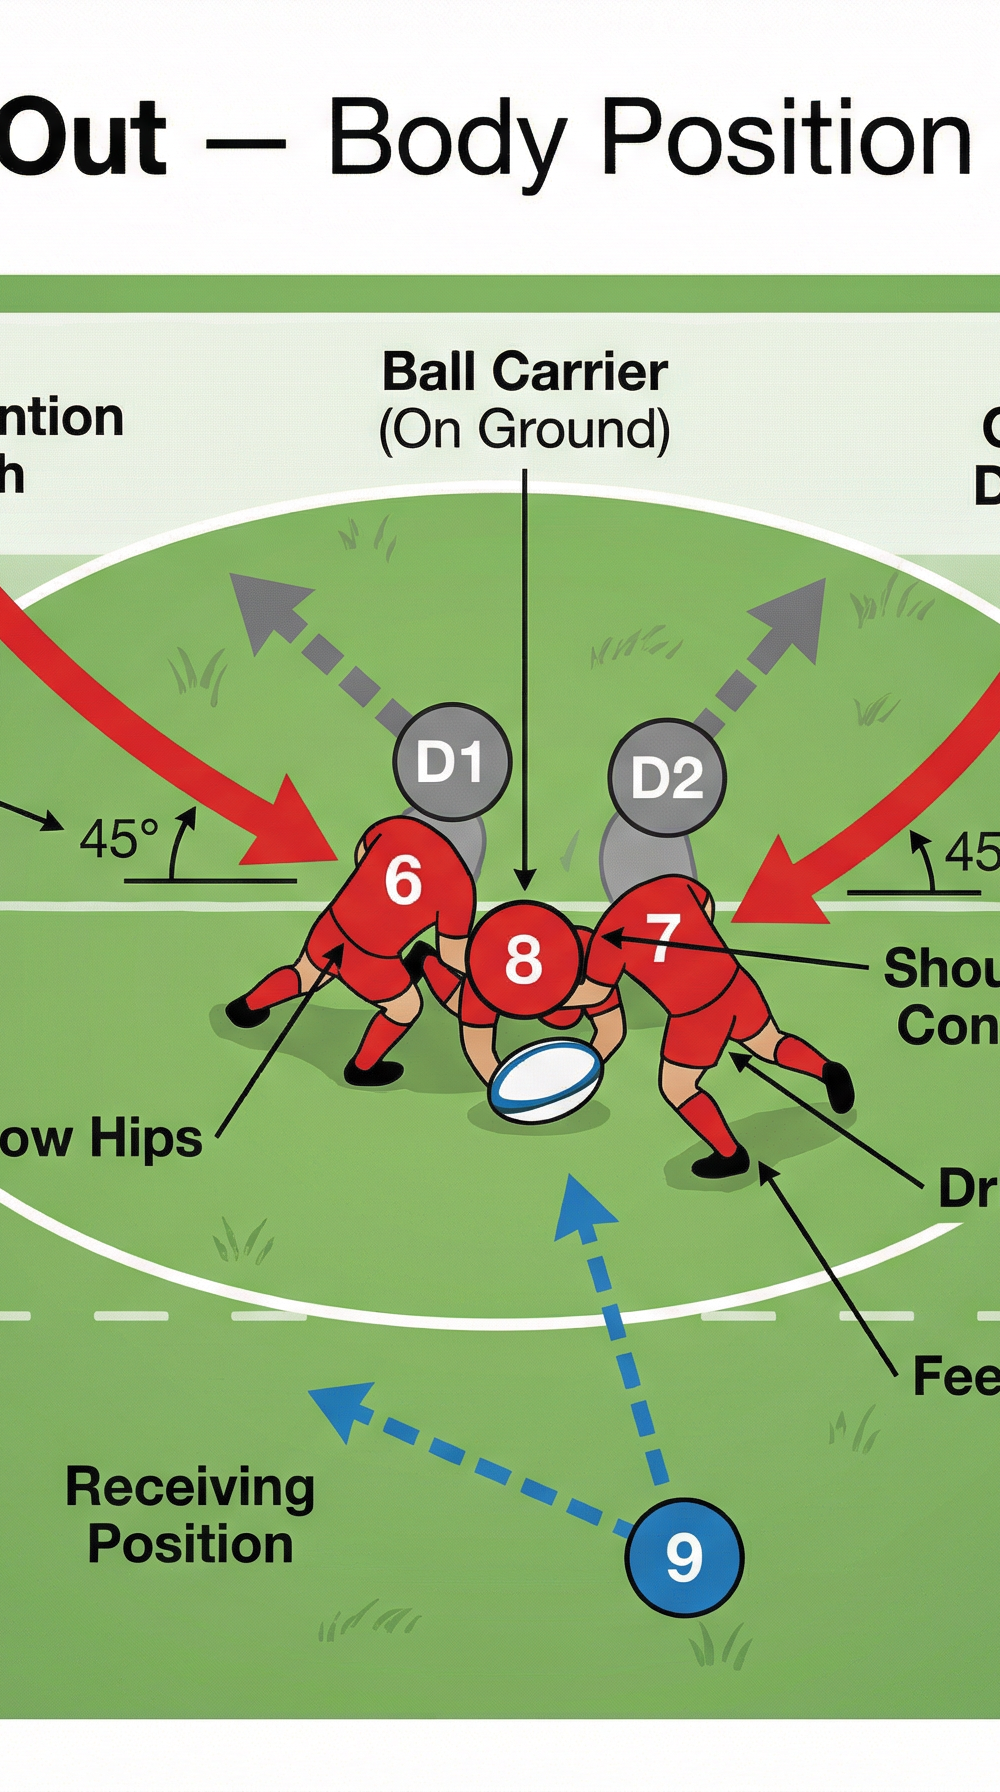
Clearers (6 and 7) read the contact. Both flankers begin their approach from 3–4m away the moment the Number 8 commits to contact. They must not be stationary — they should be moving and reading the play as it develops. The approach angle is crucial: 6 arrives from the left at roughly 45 degrees to the ruck, and 7 mirrors from the right.
Body position on arrival. As each clearer arrives at the ruck, they adopt the "jackhammer" position: hips lower than shoulders, feet shoulder-width apart and behind the hips, back flat, head up and eyes open. The shoulder makes contact with the hip or thigh of the defending bag holder — never the head or neck. This is the most technically demanding part of the drill and requires the most coaching attention.
Drive through and beyond. The clearer does not stop at contact — they drive their legs continuously, pushing the defender (bag) back and through the ruck gate. The goal is to create a clear channel over the ball. Both clearers work in tandem: 6 clears D1 (the jackal threat), and 7 clears D2 (the gate defender). Neither clearer should dive — they must stay on their feet throughout the drive.
Phase 3 — Ball Recycling (Steps 7–8)

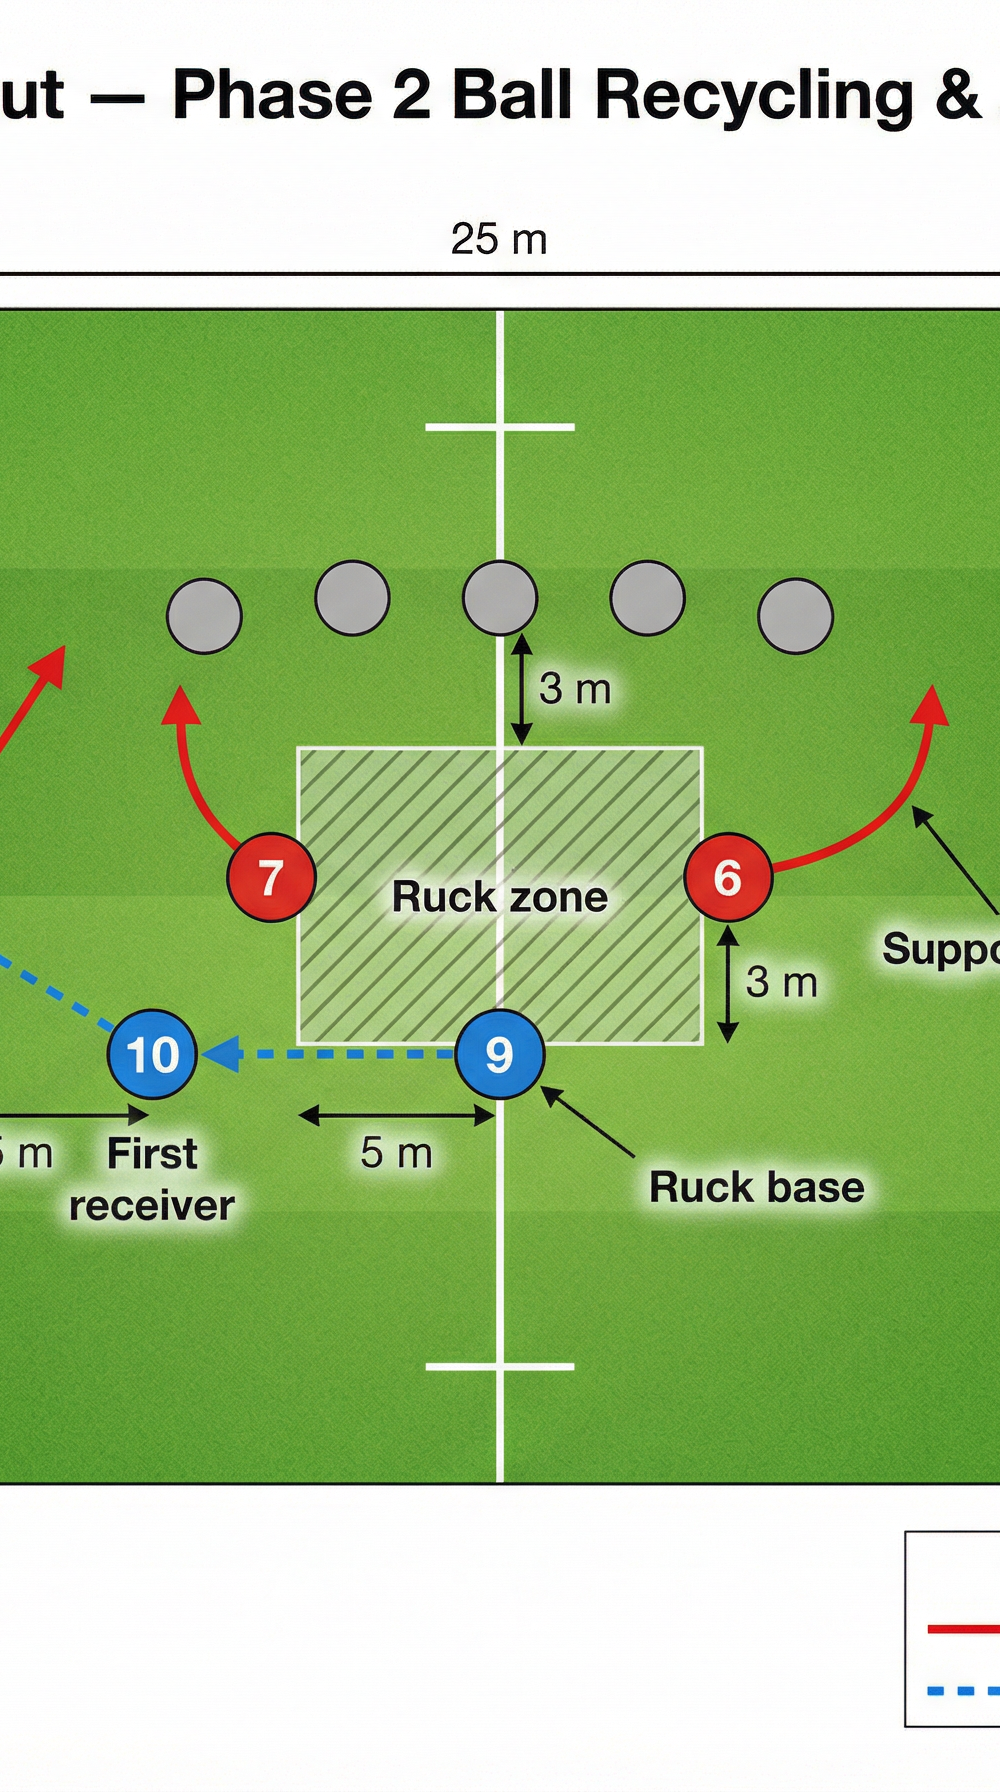
Scrum-half (9) arrives at the ruck base. The Number 9 times their run so they arrive at the ruck base as the clear-out is completed, not before. They must communicate loudly — calling "clear!" or "mine!" — to signal they are ready to receive. The 9 positions themselves 1m behind the hindmost foot of the ruck, staying on their feet at all times.
Ball out and attack shape forms. The Number 9 picks up the ball cleanly from the base and delivers a sharp, accurate pass to the first receiver (10), who has taken up position 5m to the left or right. The clearers (6 and 7) immediately peel off the ruck to provide support lines for the next phase of attack.

Key Coaching Points
1. Arrive with momentum, not from a standing start. The single biggest mistake at the breakdown is players arriving flat-footed. Clearers must be moving when they make contact. A player who jogs into the ruck with momentum will always outwork a stationary defender. Cue: "Be a freight train, not a parked car."
2. Hips lower than the defender's hips — always. The player with the lower body position wins the physical contest. If a clearer arrives upright, they will be driven back or penalised for not supporting their own body weight. Cue: "Sit into it — bend your knees before you make contact."
3. Feet must be active throughout the drive. Short, powerful chopping steps maintain leg drive and keep the clearer legal (on their feet). Players who lunge and stop moving their feet will stall and potentially fall, giving away a penalty. Cue: "Feet never stop — chop, chop, chop."
4. Clear through the gate, not across it. Clearers must drive in the direction of play — forward and through — not sideways across the ruck. Lateral clearing is both illegal and ineffective. The defender should end up behind the ruck, not beside it. Cue: "Drive them back the way they came."
5. The scrum-half is the conductor. The 9 must communicate constantly — calling the clear, directing where the ball is, and signalling when they are ready. A quiet 9 leads to hesitation and slow ball. Cue: "If you're not talking, you're not working."
6. Ball presentation is the foundation. Everything the clearers do is wasted if the ball carrier presents the ball poorly. The ball must be placed back, beyond the tackle point, and released immediately. Cue: "Place it like you're putting it on a tee — back, beyond, and let go."
Common Mistakes
Mistake 1 — The High Clear. Players arrive upright and make contact with the defender's chest or shoulders rather than the hips. This is both ineffective and dangerous. Correction: Use a cone placed at knee height beside the ruck zone as a visual cue for body height. If the player's shoulder is above the cone on arrival, they are too high. Walk the movement slowly before building to full pace.
Mistake 2 — Diving Over the Ball. Clearers dive onto the ball or the ball carrier rather than driving through the defender. This is a penalty offence (not supporting body weight) and removes the clearer from the play. Correction: Insist that clearers keep at least one foot in contact with the ground at all times during the drive. Use the verbal cue: "Feet on the floor, always."
Mistake 3 — Wrong Approach Angle. Clearers arrive head-on (straight into the ruck) rather than at 45 degrees from their respective channels. A straight-on approach creates a collision rather than a drive, and risks a penalty for not entering through the gate. Correction: Place two cones 3m from the ruck at 45-degree angles to mark the correct entry channels. Players must pass through their designated cone gate on every repetition.
Mistake 4 — Scrum-Half Too Early. The 9 arrives at the ruck base before the clear-out is complete, gets in the way of the clearers, and either slows the ball or gets penalised for being in an offside position. Correction: Use a verbal trigger system — clearers shout "clear!" only when the defender is fully removed. The 9 is not permitted to move until they hear the call.
Mistake 5 — Ball Carrier Interfering. The Number 8 remains on the ground and uses their body to shield the ball, which is a penalty for "sealing off." Correction: After placing the ball, the Number 8 must roll away immediately and be seen to be making every effort to move. Reinforce this with the cue: "Place and roll — you're done."
Variations & Progressions
Progression 1 — Add a Live Defender (Intermediate). Replace one or both tackle bags with a live defending player wearing a contact vest. The defender is instructed to contest the ball legally (jackal attempt). This adds a reactive element and forces clearers to read and respond to a genuine threat rather than a static target. Increase the intensity gradually — begin with the defender at 50% resistance before building to full contest.
Progression 2 — Continuous Phase Play (Advanced). After the ball is recycled by the 9 and passed to the 10, the 10 immediately carries into a second simulated contact, goes to ground, and the drill repeats for 3–5 consecutive phases. This develops the conditioning and decision-making required to sustain clear-out quality over multiple phases of a match. Rotate clearers every two phases to simulate the fatigue management required in a game.
Variation — One-Man Clear-Out (Simplification). For early-stage learning or younger players, reduce to a single clearer (6 or 7) against a single static bag. This isolates the individual technique without the coordination challenge of a two-man clear. Once both players are technically sound individually, reintroduce the two-man version.
Age Adaptations

Under 12 and Under 14. At these age groups, the priority is safe technique and legal play rather than physicality. Remove the tackle bags entirely and use passive defenders (players who hold a body position but offer no resistance). Focus entirely on body position, approach angle, and ball presentation. Reduce the grid to 15m x 10m and keep repetitions short (3 reps per group) with extensive rest and feedback between sets. Full contact clear-outs should not be introduced until players have demonstrated consistent technical competency.
Under 16. Introduce the tackle bag at low resistance. Players at this age are developing the physical strength to generate meaningful leg drive, but technique must still lead. Introduce the scrum-half role and begin working on the timing of ball recycling. Two-man clear-outs can be introduced once individual technique is sound.
Open Age (Senior and Academy). Run the drill at full intensity with live defenders. Introduce the continuous phase play progression and add decision-making elements — for example, the coach calls "jackal" or "gate" to indicate the type of defensive threat, and clearers must adapt their approach accordingly. Time the ball speed from tackle to 9's hands and set a target of under 3 seconds for clean ball.
Coach's Note: The breakdown is a contest of technique, not just physicality. A technically sound 85kg flanker will consistently out-clear a 100kg player who arrives upright and flat-footed. Invest the time in getting the fundamentals right at slow speed before adding resistance and intensity. The habits formed in training become the instincts that win matches.